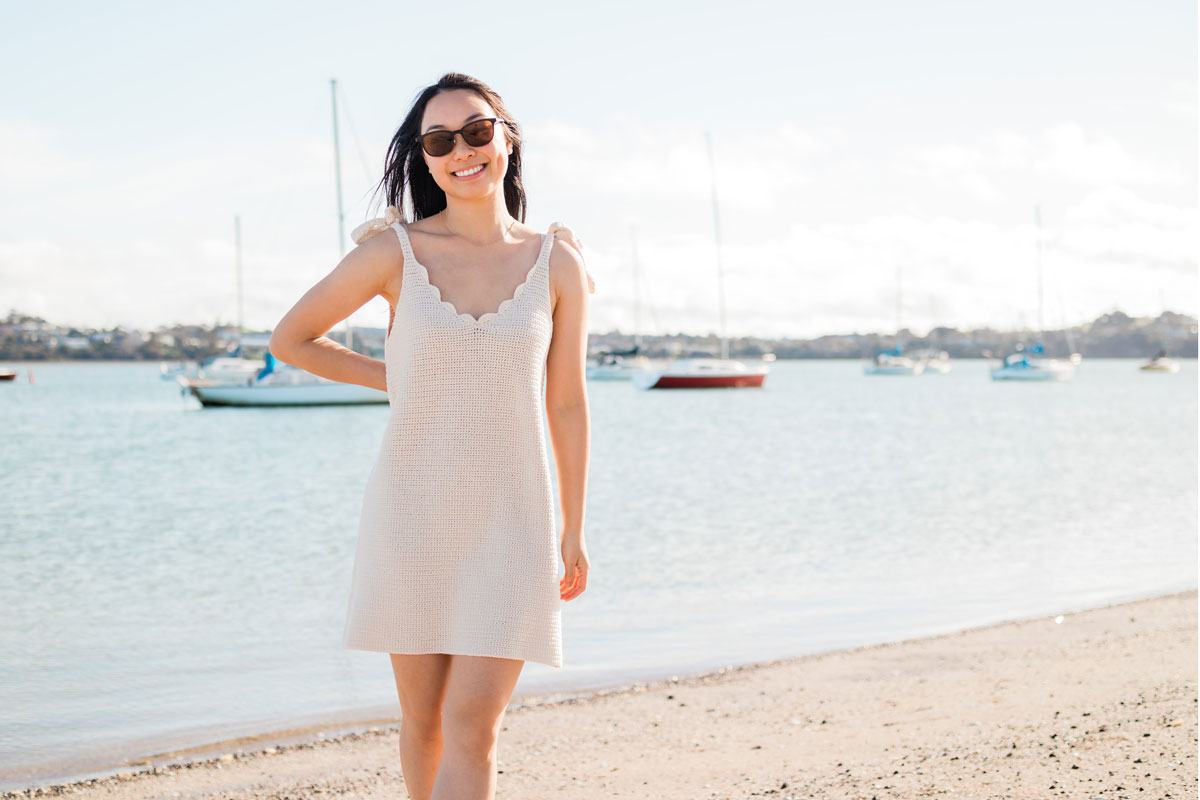
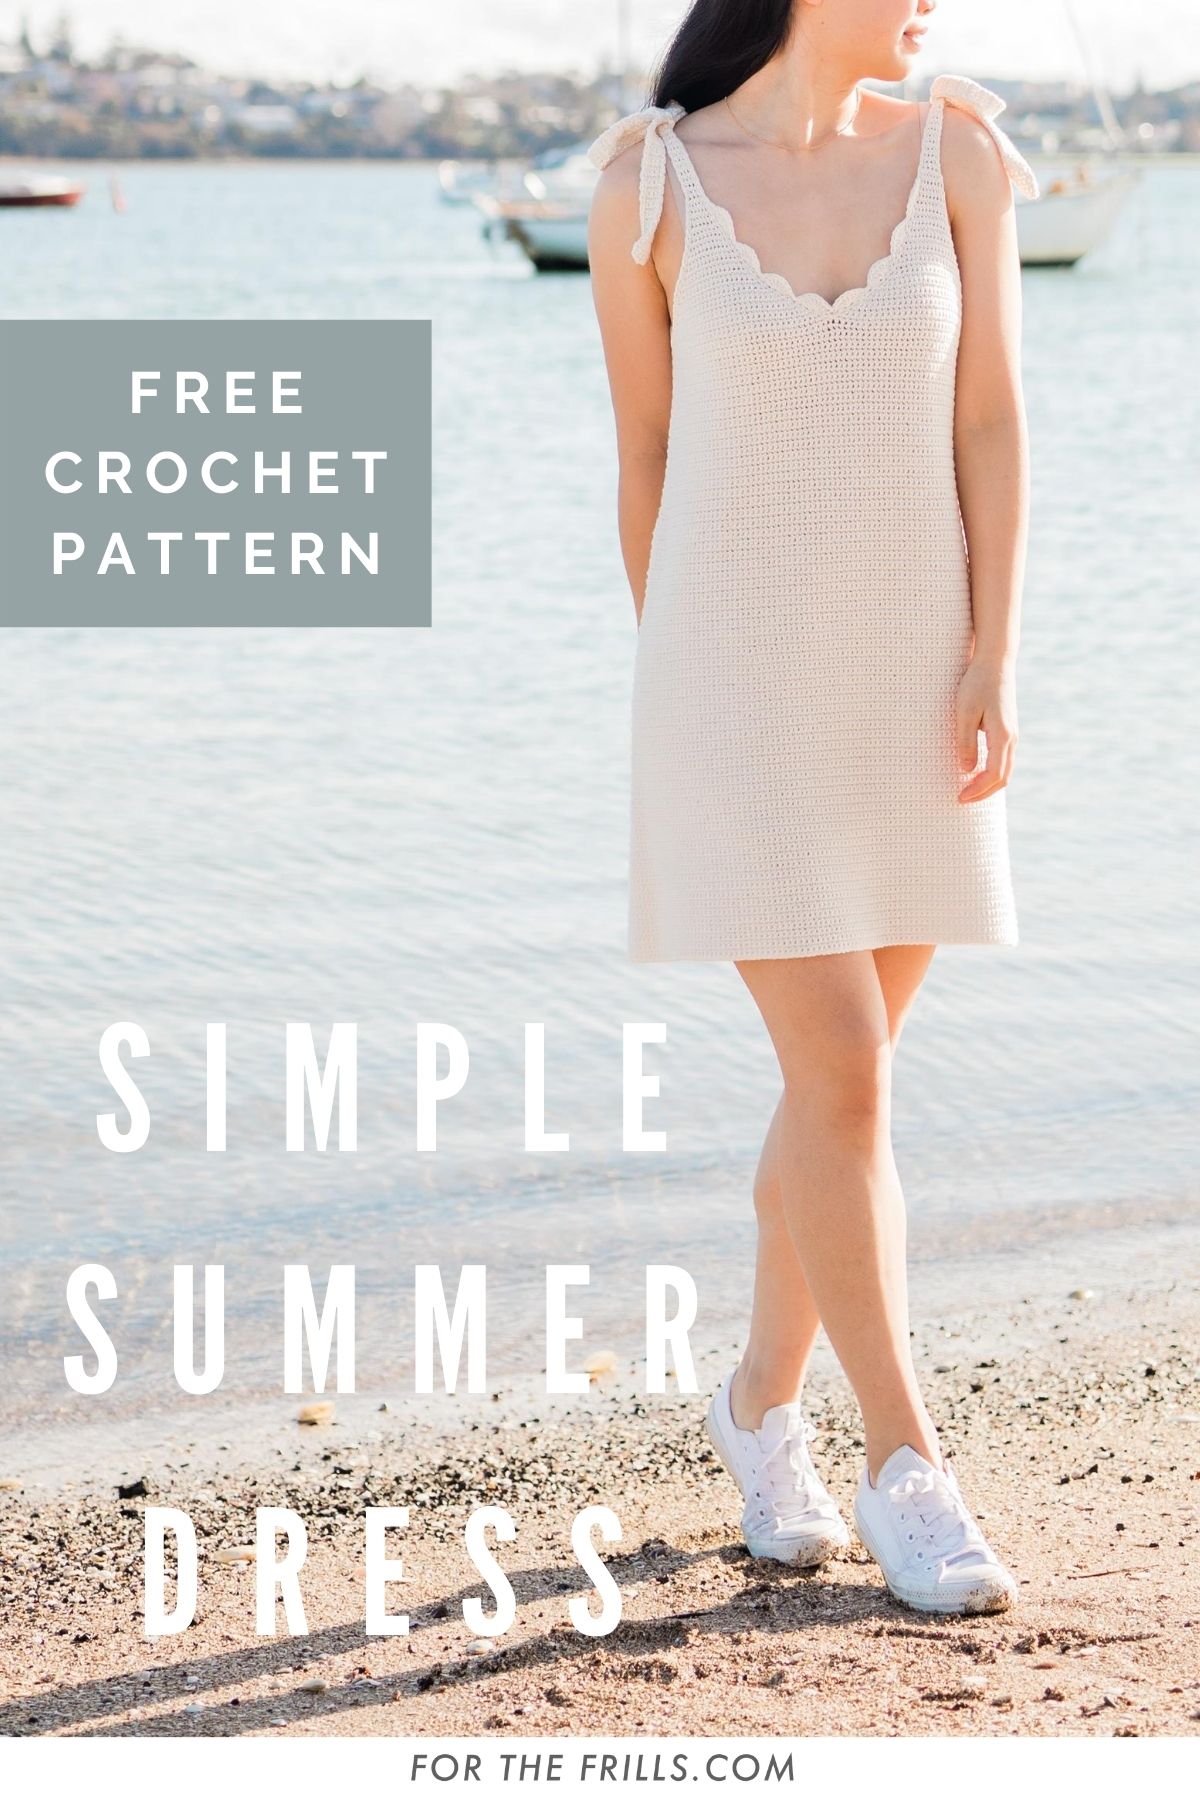
Looking for a summer crochet dress pattern? The Seascape Dress is an easy top-down crochet pattern with a step-by-step video tutorial. Featuring a lightly flared body and scallop edging, this simple crochet dress is effortlessly summer chic!
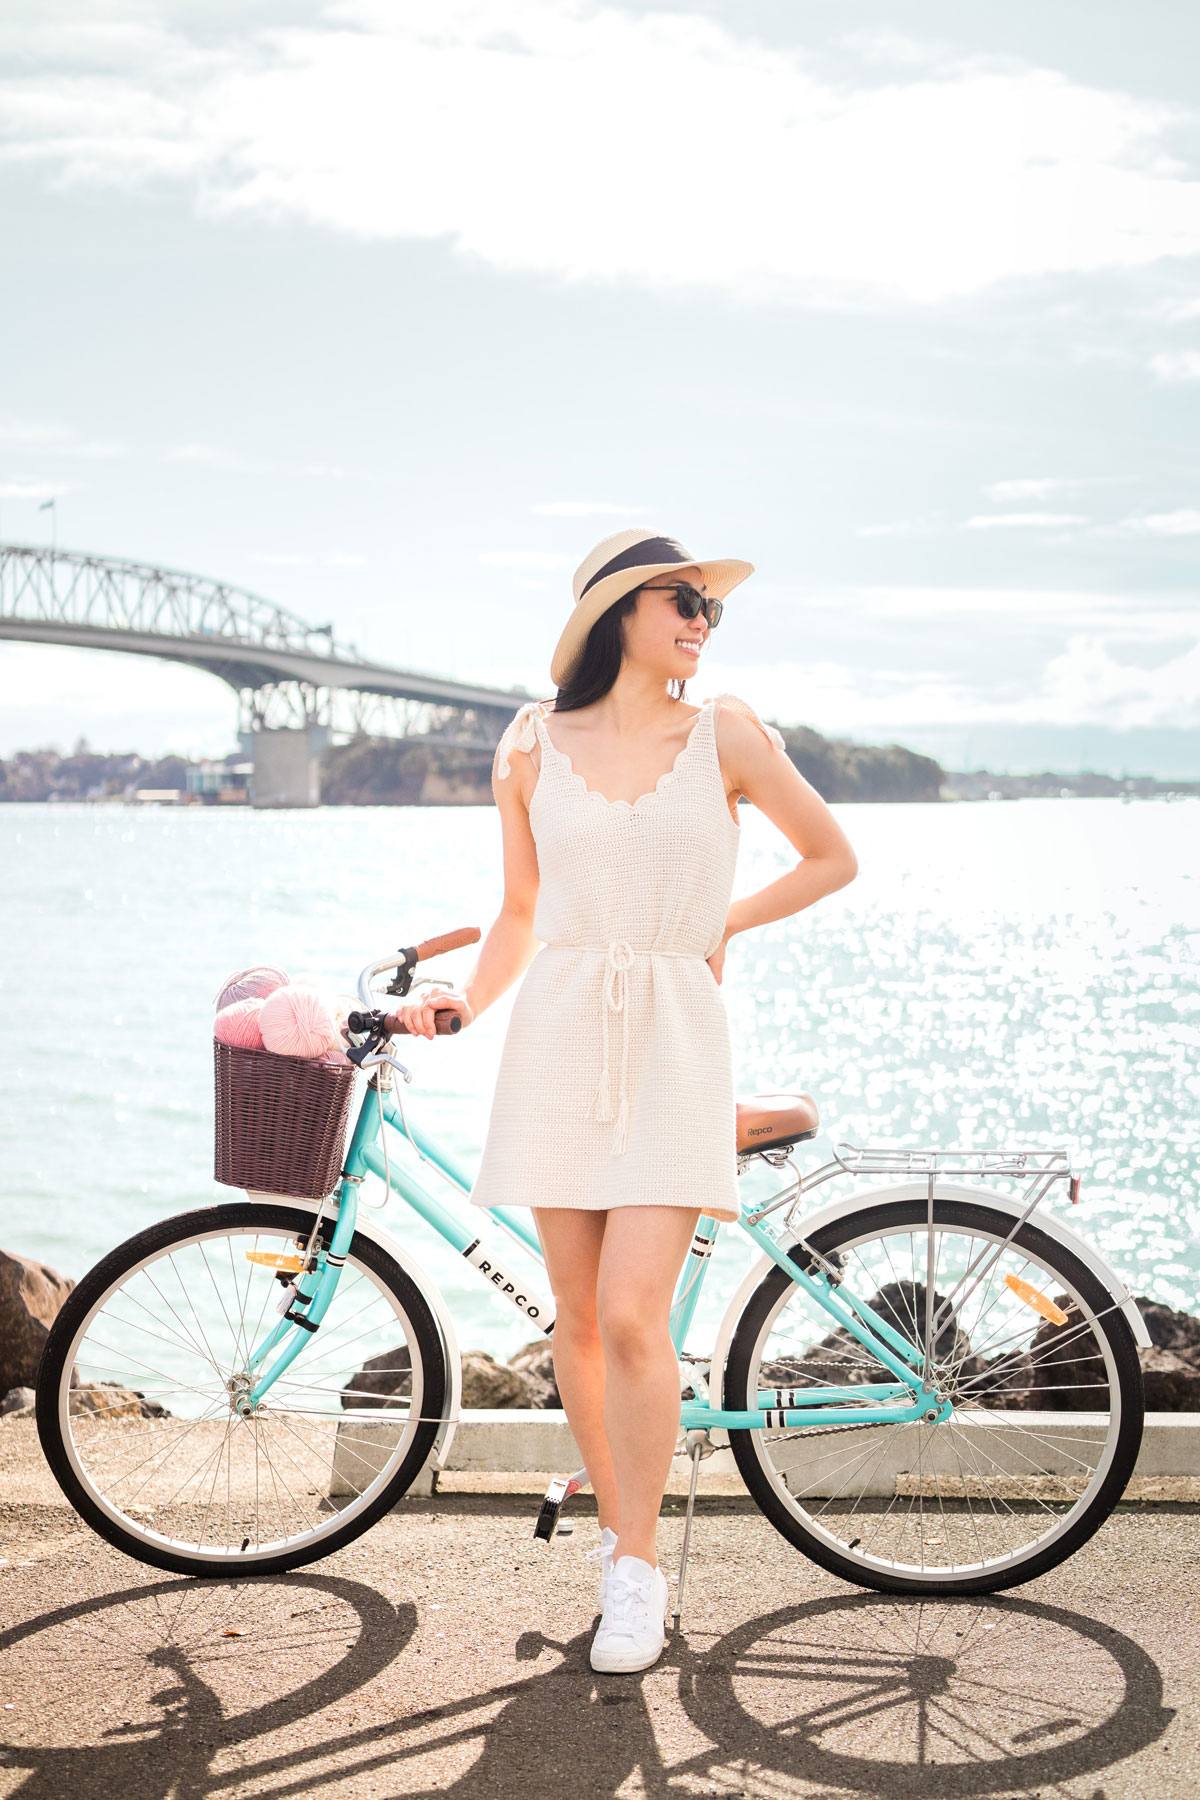
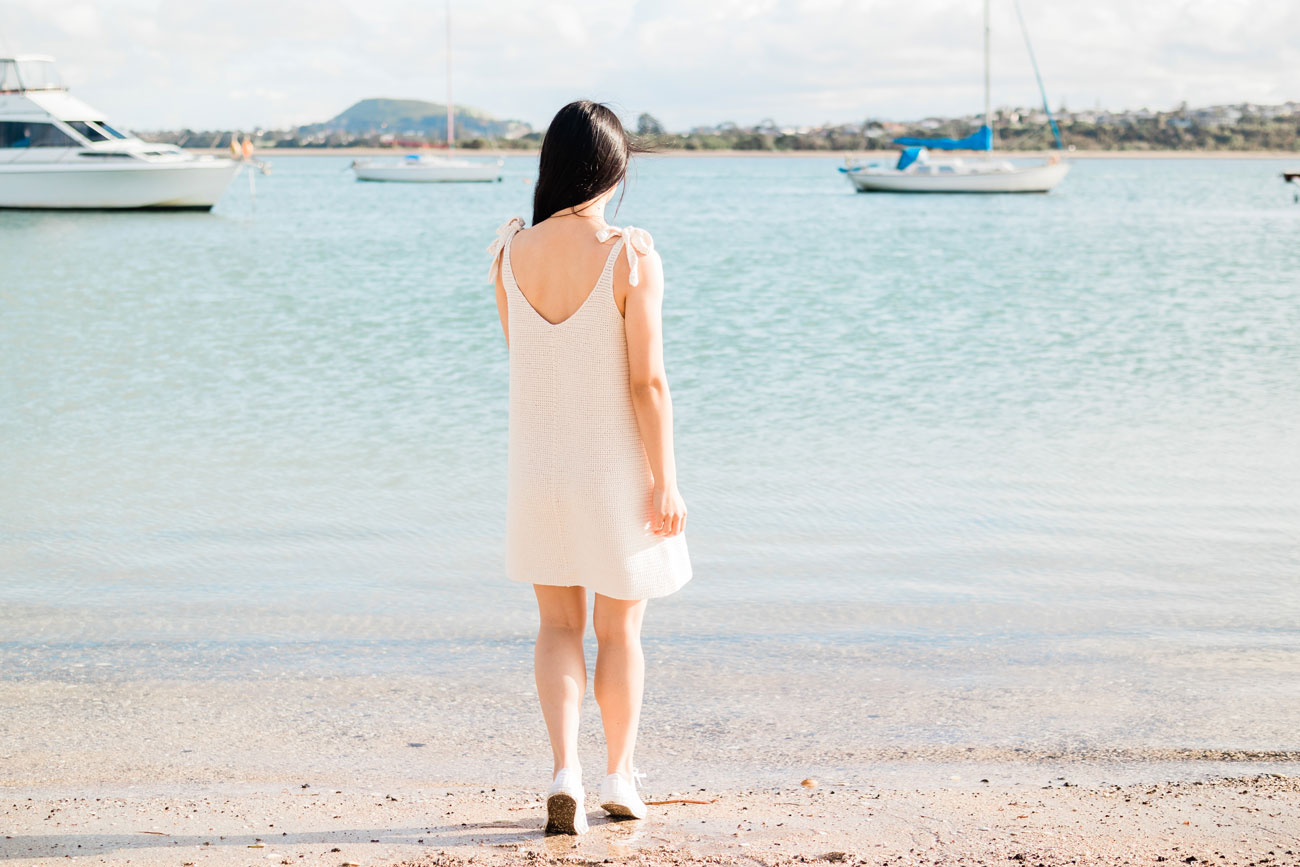
The dress version of the Seascape Scallop Tank is here! Made with WeCrochet’s Simply Organic Cotton Sport, the Seascape Dress has options galore. You can crochet tie straps (as pictured), straight straps, have a plain v-neck, crochet scallop edging or add a rope belt! You can truly customise this dress to perfectly suit your style 🙂
This post may contain affiliate links, view our disclosure policy for details.
Thank you to WeCrochet for sponsoring this free crochet dress pattern! As always all thoughts and opinions are 100% my own 🙂
This singlet style dress is great for warm weather, but you can easily throw on a denim jacket or light cardigan for chilly summer nights or pair it with tights and ankle boots for fall!
As with the tank version, we’ll start by crocheting the straps and then extending them into triangles. Once we have 4 triangles, we’ll crochet them altogether and start to work in the round. The dress will start to grow (lengthways and widthways) as it’s extended to around your waist for a loose and casual fit. We’ll then change the increases slightly to create a figure flattering dress that lightly skims past your hips with a relaxed drape.
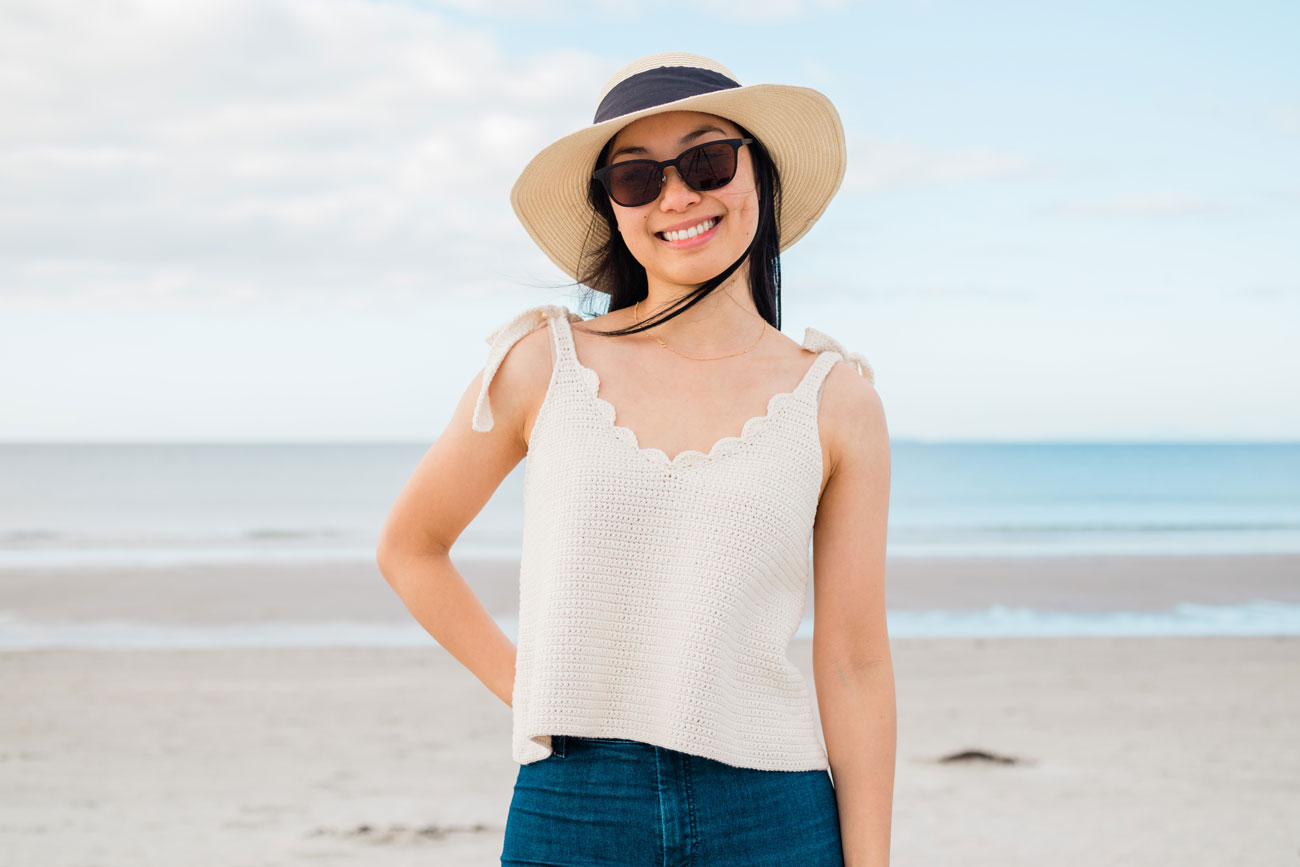
(If you just want a singlet top version, check out the Seascape Tank Top!)
The only part of this dress that ‘clings’ should be around your bust so if you want a bit of waist definition I’ve also included instructions for creating a braided rope belt. The look of the dress does change quite a bit with the belt, but since the belt is removable this outfit transitions so well from day to night! If you’re after more of a relaxed, holiday vibe simply leave off the belt during the day and then add wedges or heeled sandals with the belt for more of a dressy look at night!
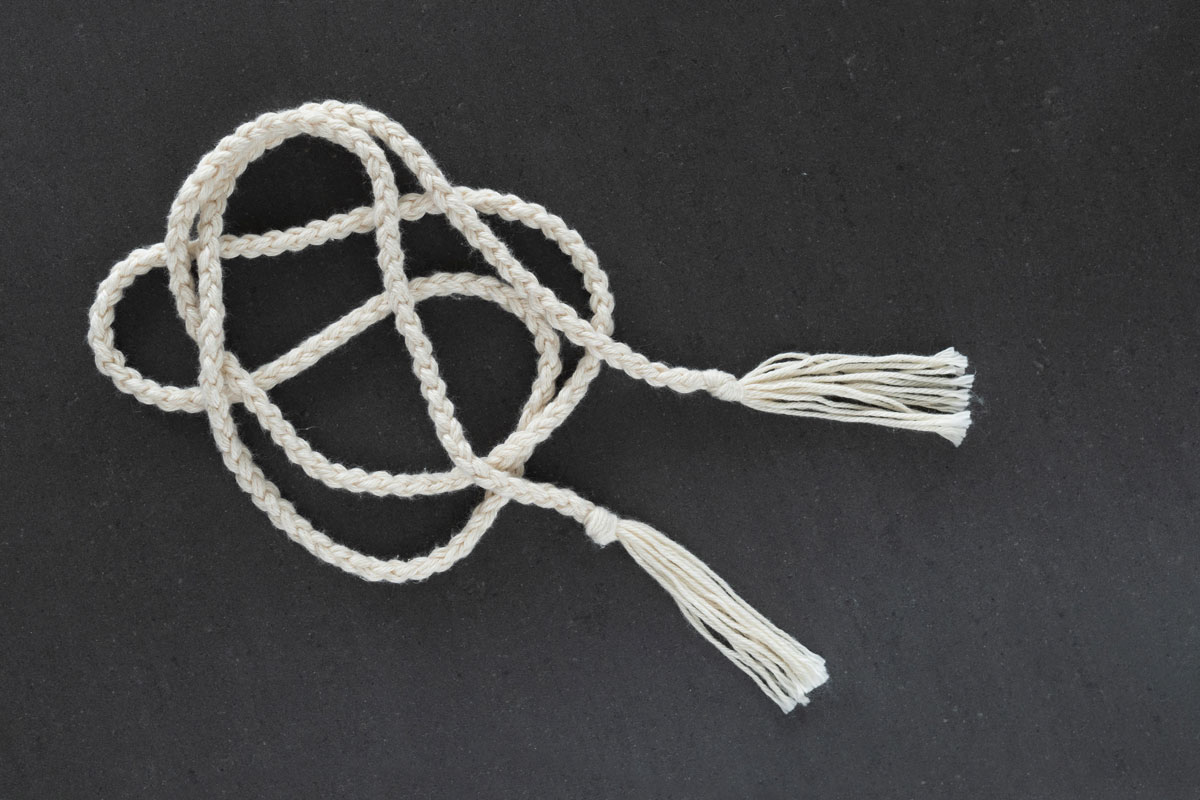
The braided rope belt is so easy (it’s only a 4 step repeat!) that once you’ve learnt the steps you’ll want to add a braided cord to all your summer outfits! The style of cord has more of a nautical rope vibe to it than a plaited look so you can also use it as a bag strap or drawstring cord.
Check out the 4 Strand Braid instructions for a step-by-step video and photo tutorial 🙂
Design Inspiration
The inspiration behind the Seascape Dress was simple – to create a relaxed summer dress that was versatile, wearable with an extra ‘je ne sais quoi’ ! I love how the tie straps and scallop edging details add all of the summery beach vibes to this dress but at the same aren’t too overpowering.
In everyday life I’m actually a dress wearer 90% of the time so I’ve been dreaming about a summer crochet dress for ages! However, I had so many ideas and designs in my head I couldn’t settle on any. Did I want a lacy mesh style dress or one with sleeves? Did I want the dress to be fitted or a maxi dress? Sometimes having too many ideas isn’t a good thing haha.
Finally, I decided on a design that I knew was perfect for everyday wear but was also had a few extra details – pretty much my typical ‘designing style’ :). The lightly flared silhouette looks great on every body type while the braided belt gives you to option to add more shape to the dress.
Since this crochet pattern is worked top down the length is completely customisable you can get the perfect length for your height! The thick straps mean that you can wear any bra with straps underneath so everyone can have as much support as they need 🙂
Many of you ask me what you should wear under all of the crochet tees, tank tops and crop tops and I’m always just wearing a skin coloured bra. (After being a competitive dancer for so many years I refuse to be sewn into or taped into anything haha).
If the top has very thin straps (like the beginner-friendly Skylar Crop Top), I’ll wear a strapless skin coloured bra but if it has thick straps (check out the Sea Breeze V-neck Tank Top or the Sagebrush Ribbed Tank Top) or is a t-shirt style (see the Forest Breeze Top and Riviera Stripe Tee) I’ll just wear a normal skin coloured t-shirt bra.
For dresses you can also wear a pair of boy shorts or spandex shorts underneath if you want extra coverage but the single crochet stitches used in this dress are quite dense so feel free to wear whatever feels comfortable for you!
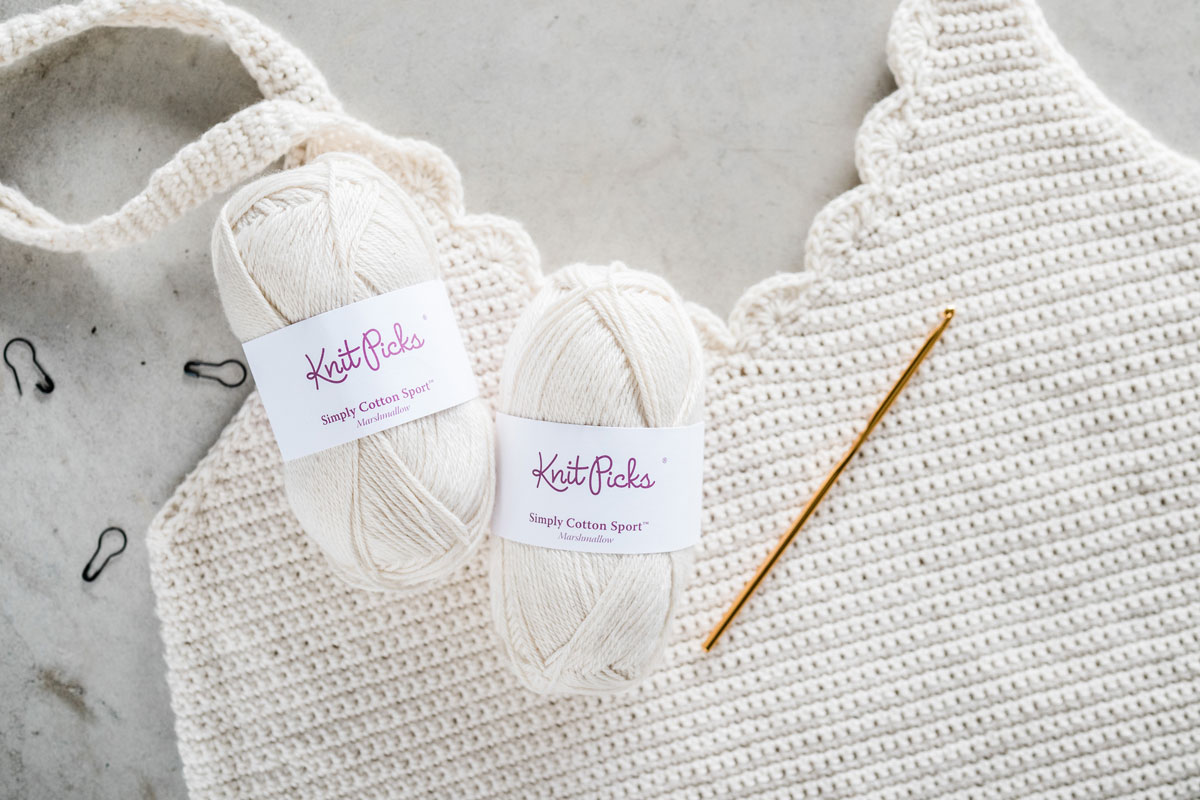
Yarn
The Seascape Scallop Dress uses WeCrochet’s Simply Organic Cotton Sport in the shade ‘Marshmallow’. This organic cotton is incredible value and quality – one 50g skein is only $2.99 and it is so soft and plushy with incredible drape and movement. And did I mention it’s machine washable? Pretty much everything you want from a dress yarn!
Since Simply Organic Cotton Sport is undyed and untreated yarn, it only comes in the natural cream colour but if you’re looking for a wide range of shades check out WeCrochet’s Shine Sport. Shine Sport is a gorgeous pima cotton blend that comes in 30 different shades with brights, pastels and neutrals!
You could also easily make this dress in a different fibre if you’d like to wear it in fall or spring. Just one thing to note is that WeCrochet’s Simply Organic Cotton Sport is really quite thick for a cotton sport weight yarn, very very close to a light DK (but just not quite a DK in my opinion!).
So, when substituting this yarn make your you pick a heavy sport weight yarn or a thin DK. I think it would be quite difficult to meet gauge with a normal sport weight yarn, but as always make sure to crochet a gauge swatch so you know that your dress will fit!
Check out more free crochet patterns!
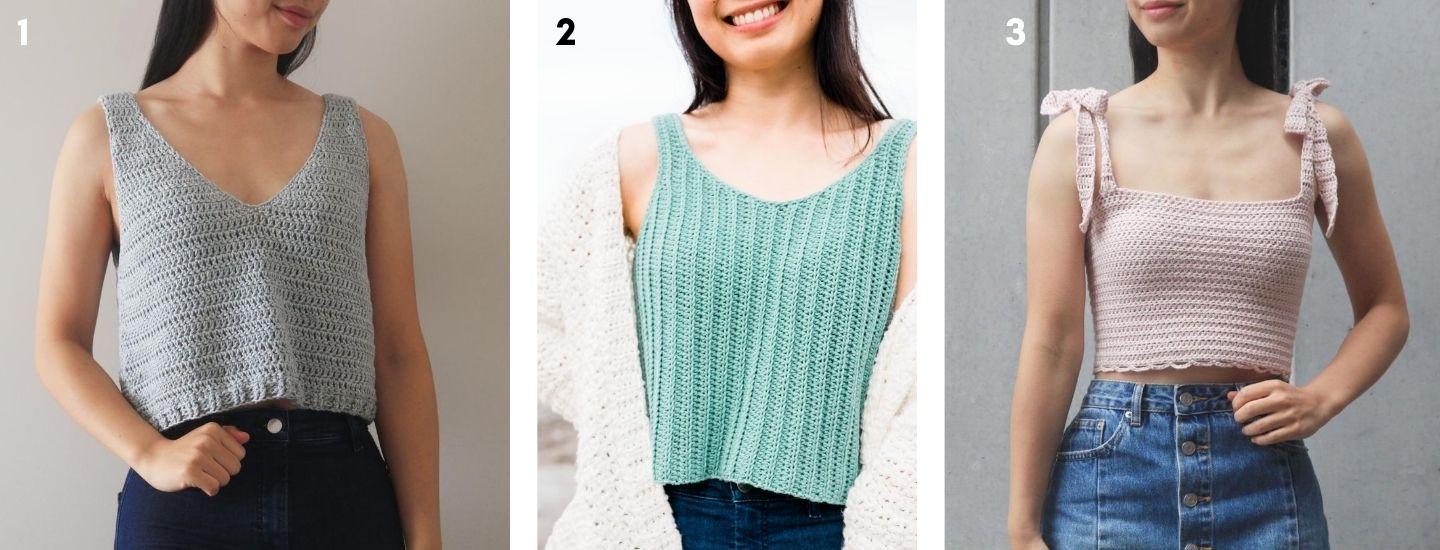
1. Sea Breeze Tank Top / 2. Sagebrush Tank Top / 3. Leila Tie Strap Crop Top
Pin me for later!
Video Tutorial
Add to the Seascape Scallop Dress to your Ravelry queue!
Seascape Dress - Ad-free, printable version here!
*Sample is a size small shown on a 5’3” model with a 32” bust.
(If you are in between sizes, size down - size small is a bit large on me)
*The sizing guide follows size XS(S, M, L, XL, 2XL, 3XL). E.g. “Ch 71(79, 87, 95, 103, 111, 119) means Ch 71 for XS, Ch 79 for Small, Ch 87 for Medium, Ch 95 for Large, Ch 103 for XL, Ch 111 for 2XL and Ch 119 for 3XL.”
If there is only one number, it applies to all sizes.
*"SC 10" means SC into the next 10 stitches.
*"2 SC" means place 2 SC into the same stitch.
*The turning chain ch 1 does NOT count as a stitch, unless otherwise noted.
*Total stitches are indicated between < >.
*This pattern uses US crochet terms.
*The dress version of this pattern will cause the straps and the length of the dress to stretch out – depending on the stretchiness of your yarn.
(You can find the Seascape Tank Top here)
*WeCrochet Simply Cotton Organic Sport is a thick sport weight yarn, just a touch thinner than a cotton DK.
LEVEL: Easy
Materials
Yarn – WeCrochet Simply Cotton Organic Sport – Sport/Fine (2), 150m/50g, 164yds/1.75 oz, 100% Organic Cotton
DRESS: 9(9, 10, 11, 12, 13, 14) skeins
approx. 415(450, 490, 525, 585, 625, 700)g
BRAIDED ROPE BELT: approx. 10(12, 13, 14, 15, 16, 18)g
Stitches & Abbreviations
Ch = Chain
Sl st = Slip Stitch
SC = Single Crochet
DC = Double Crochet
St(s) = Stitch(es)
Rep = Repeat
SM = Stitch Marker
RS = Right Side
Measurements cm:
Bust: 78(84, 94, 102, 111, 120, 135)
Dress Length: 73(75, 76, 77, 78, 79, 81)
Measurements inches:
Bust: 30.5(34, 37, 40, 44, 47.5, 53)”
Dress Length: 29(29.5, 30, 30.5, 31, 31.5, 32)"
GAUGE: 10cm/4” square = 19.5 stitches wide x 23 rows tall in single crochet
SEASCAPE SCALLOP DRESS CROCHET PATTERN
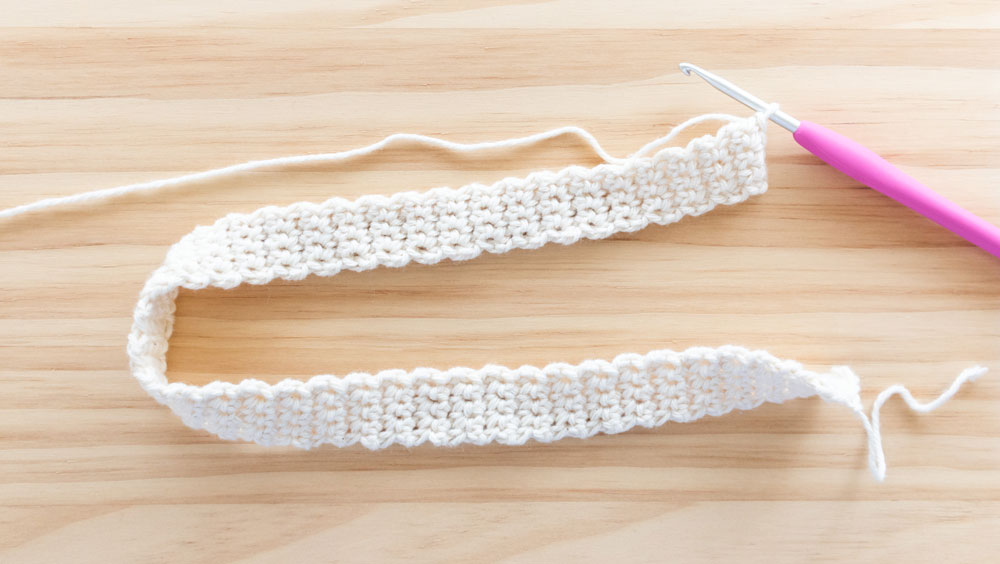
STRAP + RIGHT TRIANGLE
(make 2)
STRAP
FOUNDATION CHAIN: Ch 5(5, 5, 5, 9, 9, 9).
ROW 1: SC into 2nd ch from hook, SC in each st until end, turn.
<4(4, 4, 4, 8, 8, 8)>
ROW 2: Ch 1, SC across, turn.
<4(4, 4, 4, 8, 8, 8)>
STRAIGHT STRAPS: Repeat ROW 2 until ROW 12(12, 14, 14, 16, 16, 18).
TIE STRAPS: Repeat ROW 2 until ROW 84(84, 86, 86, 88, 88, 90).
Do not fasten off! Proceed directly to ‘Right Triangle’ instructions.
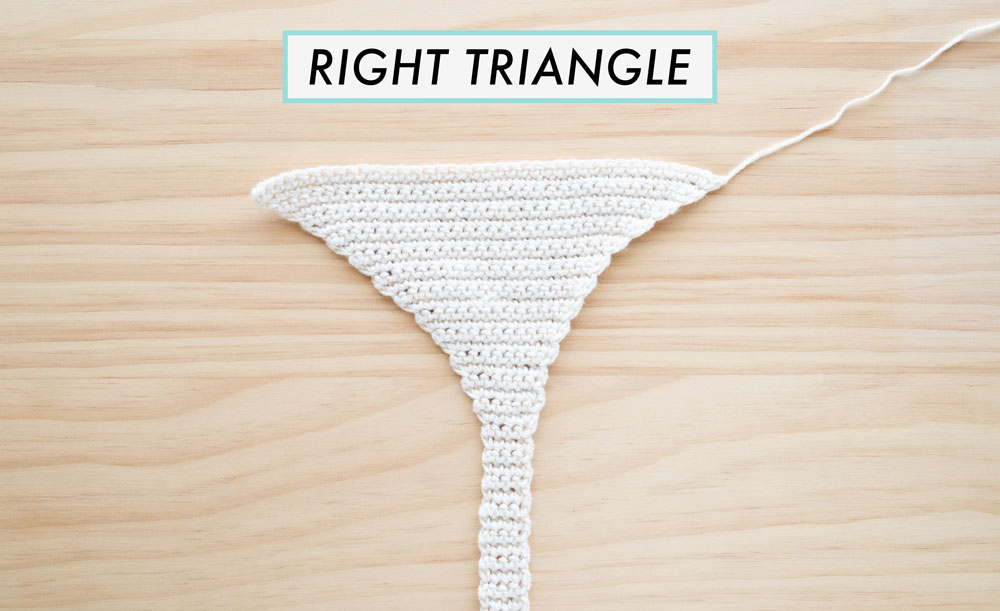
RIGHT TRIANGLE
ROW 1(RS): Ch 1, 2SC, SC in each st until last st, 2SC in last st, turn.
<6(6, 6, 6, 10, 10, 10)>
*You can place a SM in first row to make it easier to count the triangle rows and to indicate the RS.
ROW 2: Ch 1, SC across turn.
<6(6, 6, 6, 10, 10, 10)>
ROW 3: Ch 1, SC in each st until last st, 2SC, turn.
<7(7, 7, 7, 11, 11, 11)>
ROW 4: Ch 1, SC across, turn.
<7(7, 7, 7, 11, 11, 11)>
ROW 5: Ch 1, SC in each st until last st, 2SC, turn.
<8(8, 8, 8, 12, 12, 12)>
ROW 6: Ch 1, SC in each st until last st, 2SC, turn.
<9(9, 9, 9, 13, 13, 13)>
ROW 7: Ch 1, SC in each st until last st, 2SC, turn.
<10(10, 10, 10, 14, 14, 14)>
ROW 8: Ch 1, 2SC, SC in each st until last st, 2SC in last st, turn.
<12(12, 12, 12, 16, 16, 16)>
Repeat ROWS 5 – 8 until ROW 16.
ROW 9: Ch 1, SC in each st until last st, 2SC, turn.
<13(13, 13, 13, 17, 17, 17)>
ROW 10: Ch 1, SC in each st until last st, 2SC, turn.
<14(14, 14, 14, 18, 18, 18)>
ROW 11: Ch 1, SC in each st until last st, 2SC, turn.
<15(15, 15, 15, 19, 19, 19)>
ROW 12: Ch 1, 2SC, SC in each st until last st, 2SC in last st, turn.
<17(17, 17, 17, 21, 21, 21)>
ROW 13: Ch 1, SC in each st until last st, 2SC, turn.
<18(18, 18, 18, 22, 22, 22)>
ROW 14: Ch 1, SC in each st until last st, 2SC, turn.
<19(19, 19, 19, 23, 23, 23)>
ROW 15: Ch 1, SC in each st until last st, 2SC, turn.
<20(20, 20, 20, 24, 24, 24)>
ROW 16: Ch 1, 2SC, SC in each st until last st, 2SC in last st, turn.
<22(22, 22, 22, 26, 26, 26)>
ROW 17: Ch 1, 2SC, 2SC, SC in each st until last st, 2SC in last st, turn.
<25(25, 25, 25, 29, 29, 29)>
ROW 18: Ch 1, 2SC, SC in each st until last st, 2SC in last st, turn.
<27(27, 27, 27, 31, 31, 31)>
Repeat ROW 18 until ROW 22(24, 26, 28, 28, 30, 34).
<35(39, 43, 47, 51, 55, 63)>
Fasten off.
Repeat STRAPS + RIGHT TRIANGLE instructions.
Row-by-Row Stitch Count:
ROW 19: Ch 1, 2SC, SC in each st until last st, 2SC in last st, turn.
<29(29, 29, 29, 33, 33, 33)>
ROW 20: Ch 1, 2SC, SC in each st until last st, 2SC in last st, turn.
<31(31, 31, 31, 35, 35, 35)>
ROW 21: Ch 1, 2SC, SC in each st until last st, 2SC in last st, turn.
<33(33, 33, 33, 37, 37, 37)>
ROW 22: Ch 1, 2SC, SC in each st until last st, 2SC in last st, turn.
<35(35, 35, 35, 39, 39, 39)>
Size XS – final row
ROW 23: Ch 1, 2SC, SC in each st until last st, 2SC in last st, turn.
<(37, 37, 37, 41, 41, 41)>
ROW 24: Ch 1, 2SC, SC in each st until last st, 2SC in last st, turn.
<(39, 39, 39, 43, 43, 43)>
Size S – final row
ROW 25: Ch 1, 2SC, SC in each st until last st, 2SC in last st, turn.
<(41, 41, 45, 45, 45, 45)>
ROW 26: Ch 1, 2SC, SC in each st until last st, 2SC in last st, turn.
<(43, 43, 47, 47, 47)>
Size M – final row
ROW 27: Ch 1, 2SC, SC in each st until last st, 2SC in last st, turn.
<(45, 49, 49, 49)>
ROW 28: Ch 1, 2SC, SC in each st until last st, 2SC in last st, turn.
<(47, 51, 51, 51)>
Size L + XL – final row
ROW 29: Ch 1, 2SC, SC in each st until last st, 2SC in last st, turn.
<(53, 53)>
ROW 30: Ch 1, 2SC, SC in each st until last st, 2SC in last st, turn.
<(55, 55)>
Size 2XL – final row
ROW 31: Ch 1, 2SC, SC in each st until last st, 2SC in last st, turn.
<(57)>
ROW 32: Ch 1, 2SC, SC in each st until last st, 2SC in last st, turn.
<(59)>
ROW 33: Ch 1, 2SC, SC in each st until last st, 2SC in last st, turn.
<(61)>
ROW 34: Ch 1, 2SC, SC in each st until last st, 2SC in last st, turn.
<(63)>
Size 3XL – final row
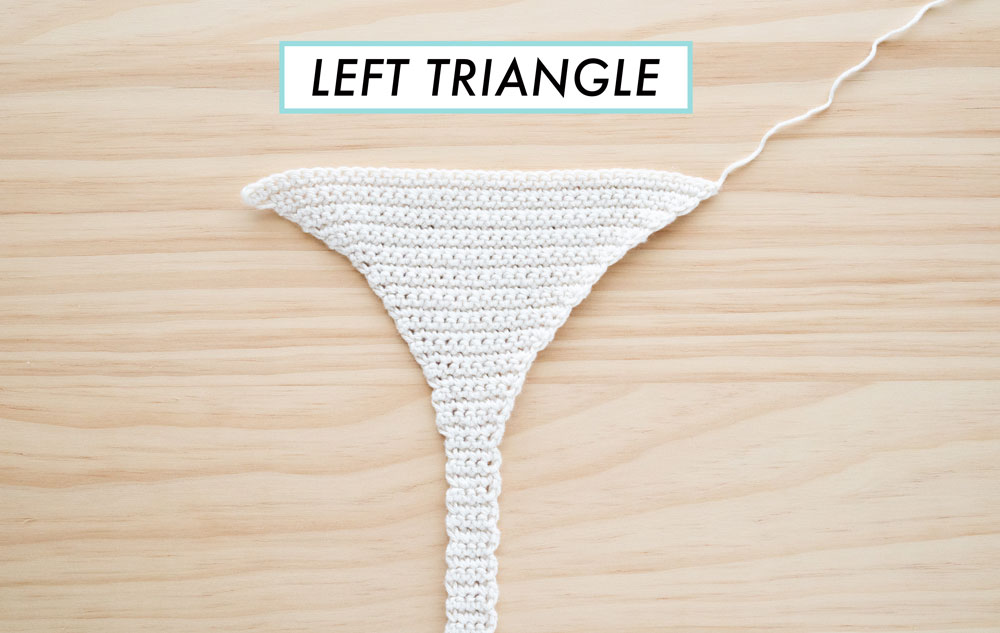
STRAP + LEFT TRIANGLE
(make 2)
STRAP
FOUNDATION CHAIN: Ch 5(5, 5, 5, 9, 9, 9).
ROW 1: SC into 2nd ch from hook, SC in each st until end, turn.
<4(4, 4, 4, 8, 8, 8)>
ROW 2: Ch 1, SC across, turn.
<4(4, 4, 4, 8, 8, 8)>
STRAIGHT STRAPS: Repeat ROW 2 until ROW 12(12, 14, 14, 16, 16, 18).
TIE STRAPS: Repeat ROW 2 until ROW 84(84, 86, 86, 88, 88, 90).
Do not fasten off! Proceed directly to ‘Left Triangle’ instructions.
LEFT TRIANGLE
ROW 1 (RS): Ch 1, 2SC, SC in each st until last st, 2SC in last st, turn.
<6(6, 6, 6, 10, 10, 10)>
*You can place a SM in first row to make it easier to count the triangle rows and to indicate the RS.
ROW 2: Ch 1, SC across, turn.
<6(6, 6, 6, 10, 10, 10)>
ROW 3: Ch 1, 2SC, SC across, turn.
<7(7, 7, 7, 11, 11, 11)>
ROW 4: Ch 1, SC across, turn.
<7(7, 7, 7, 11, 11, 11)>
ROW 5: Ch 1, 2SC, SC across, turn.
<8(8, 8, 8, 12, 12, 12)>
ROW 6: Ch 1, 2SC, SC across, turn.
<9(9, 9, 9, 13, 13, 13)>
ROW 7: Ch 1, 2SC, SC across, turn.
<10(10, 10, 10, 14, 14, 14)>
ROW 8: Ch 1, 2SC, SC in each st until last st, 2SC in last st, turn.
<12(12, 12, 12, 16, 16, 16)>
Repeat ROWS 5 – 8 until ROW 16.
ROW 9: Ch 1, 2SC, SC across, turn.
<13(13, 13, 13, 17, 17, 17)>
ROW 10: Ch 1, 2SC, SC across, turn.
<14(14, 14, 14, 18, 18, 18)>
ROW 11: Ch 1, 2SC, SC across, turn.
<15(15, 15, 15, 19, 19, 19)>
ROW 12: Ch 1, 2SC, SC in each st until last st, 2SC in last st, turn.
<17(17, 17, 17, 21, 21, 21)>
ROW 13: Ch 1, 2SC, SC across, turn.
<18(18, 18, 18, 22, 22, 22)>
ROW 14: Ch 1, 2SC, SC across, turn.
<19(19, 19, 19, 23, 23, 23)>
ROW 15: Ch 1, 2SC, SC across, turn.
<20(20, 20, 20, 24, 24, 24)>
ROW 16: Ch 1, 2SC, SC in each st until last st, 2SC in last st, turn.
<22(22, 22, 22, 26, 26, 26)>
ROW 17: Ch 1, 2SC, SC in each st until last 2 sts, 2SC, 2SC in last st, turn.
<25(25, 25, 25, 29, 29, 29)>
ROW 18: Ch 1, 2SC, SC in each st until last st, 2SC in last st, turn.
<27(27, 27, 27, 31, 31, 31)>
Repeat ROW 18 until ROW 22(24, 26, 28, 28, 30, 34).<35(39, 43, 47, 51, 55, 63)>
(*Please refer to Right Triangle ROWS 19 – 34 instructions for the row-by-row stitch count)
Fasten off.
Repeat STRAPS + LEFT TRIANGLE instructions but for the 2nd Left Triangle do not fasten off! Proceed directly to ‘JOINING ROW’ instructions.
JOINING ROW
JOINING ROW: Ch 1, 2SC, SC in each st until last 2 sts, 2SC, 2SC in last st.
<38(42, 46, 50, 54, 58, 66)>
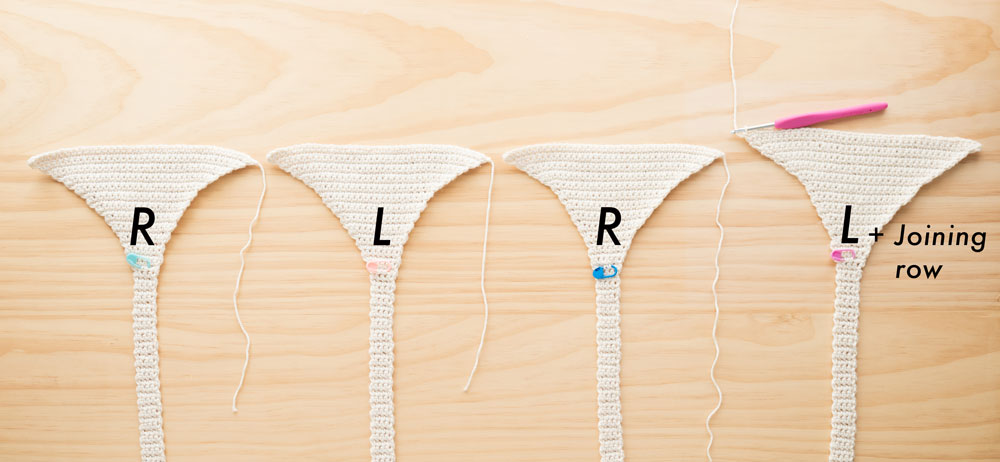
With the RS facing, place a Right Triangle the left of the Left Triangle.
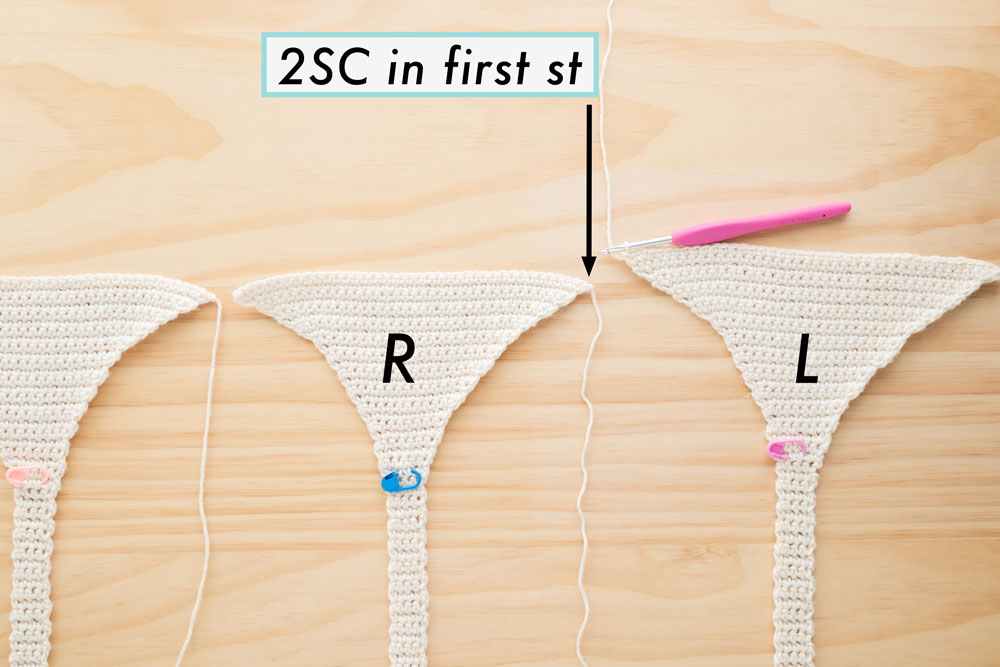
2SC into the first st of the Right Triangle, 2SC, SC in each st until last st, 2SC in last st.
<76(84, 92, 100, 108, 116, 132)>
With the RS facing, place the 2nd Left Triangle the left of the Right Triangle.
2SC into the first st of the 2nd Left Triangle, SC in each st until last 2 sts, 2SC, 2SC in last st.
<114(126, 138, 150, 162, 174, 198)>
With the RS facing, place the 2nd Right Triangle the left of the 2nd Left Triangle.
2SC into the first st of the 2nd Right Triangle, 2SC, SC in each st until last st, 2SC in last st.
<152(168, 184, 200, 216, 232, 264)>

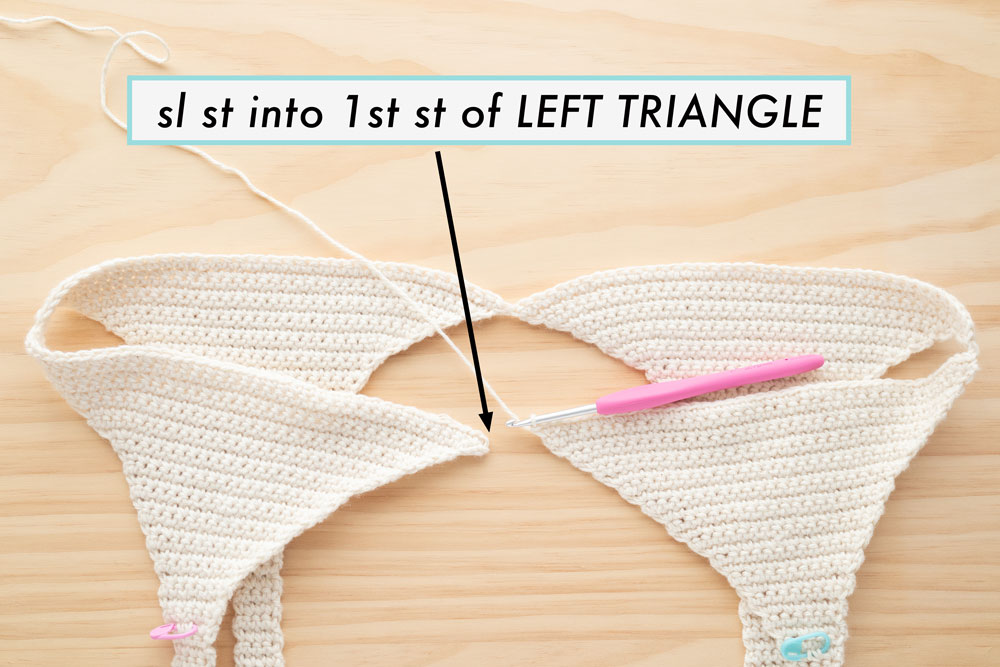
Sl st into the 1st st of the Left Triangle to join, turn. Make sure that your 4 triangles aren’t twisted!
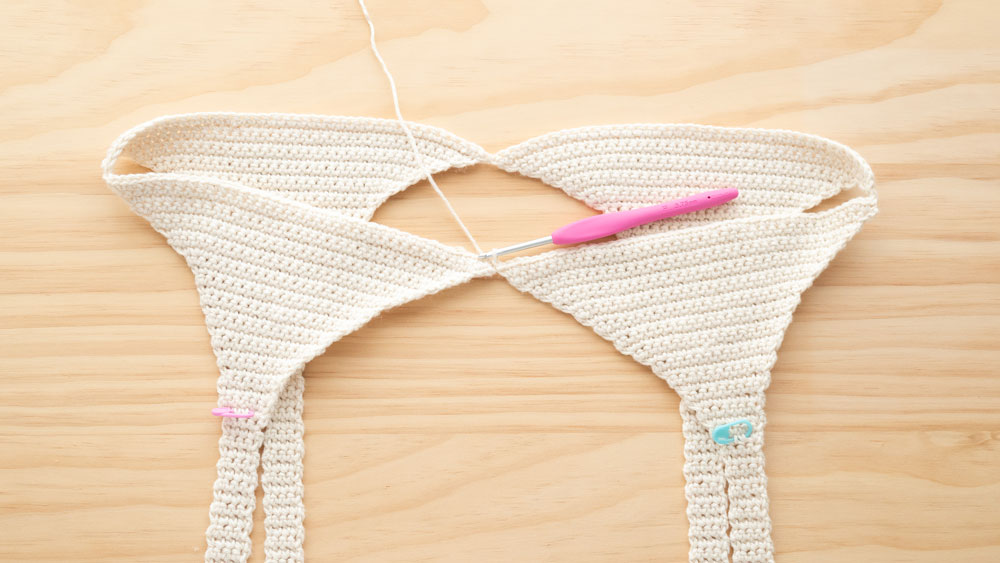
BODY
BODY ROUNDS 1 - 3: Ch 1, SC around, sl st to join, turn.
<152(168, 184, 200, 216, 232, 264)>
*The sl sts form a ‘seam’ that runs down the centre back of the dress.
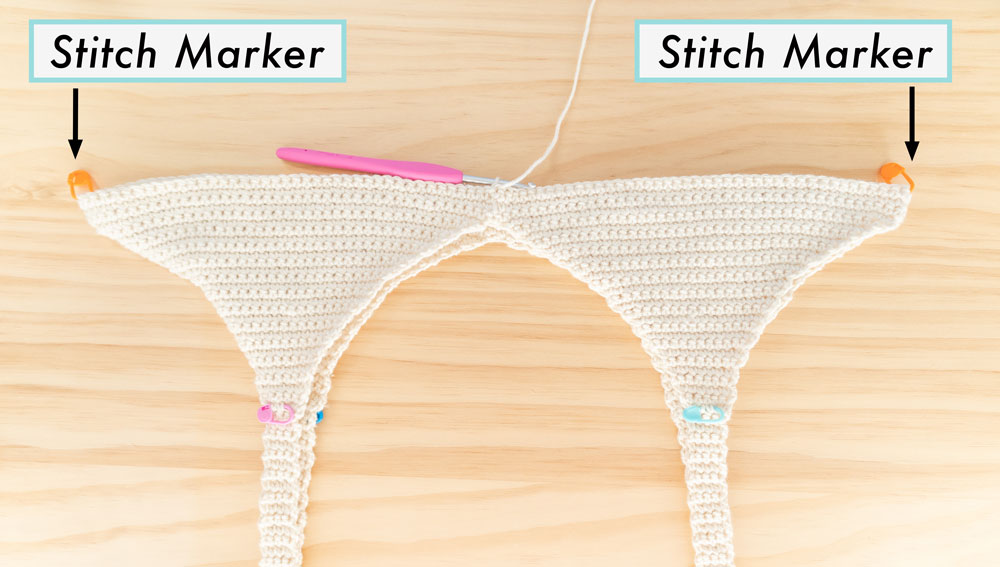
Place a SM underneath each armhole.
BODY ROUND 4: Ch 1, SC in each st until around 1st SM, 2SC – place SM, SC in each st until around 2nd SM, 2SC – place SM, SC in each st around, sl st to join, turn.
<154(170, 186, 202, 218, 234, 266)>
*You do not need to place the 2SC increases perfectly ‘on top’ of each other or in the same st with a SM.
*Place the 2SC increases in the general area underneath the armhole (varying the st placement results in a smoother hemline) - the SM just serves as a reminder of roughly where and which round to increase.
Repeat BODY ROUNDS 1 – 4 until BODY ROUND 60.
<182(198, 214, 230, 246, 262, 294)>
SKIRT
SKIRT ROUND 1 – 5: Ch 1, SC around, sl st to join, turn.
SKIRT ROUND 6: Ch 1, SC in each st until around 1st SM, 2SC – place SM, SC in each st until around 2nd SM, 2SC – place SM, SC in each st around, sl st to join, turn.
<184(200, 216, 232, 248, 264, 296)>
Repeat SKIRT ROUNDS 1 – 6 until SKIRT ROUND 72 or until you reach your desired length.
<206(222, 238, 254, 270, 286, 318)>
Keep in mind that the dress will lengthen after wear.
Fasten off.
STRAIGHT STRAPS ASSEMBLY + FINISHING
Sew the tops of the straps together.
ARMHOLE FINISHING
With the RS facing, insert hook at the top of the strap, secure yarn and pull up a loop, ch 1 – place SM.
Sl st evenly along edge of strap, SC evenly along edge of armhole, sl st evenly along edge of strap until SM, sl st into 1st st to join.
Fasten off.
Repeat for 2nd armhole.
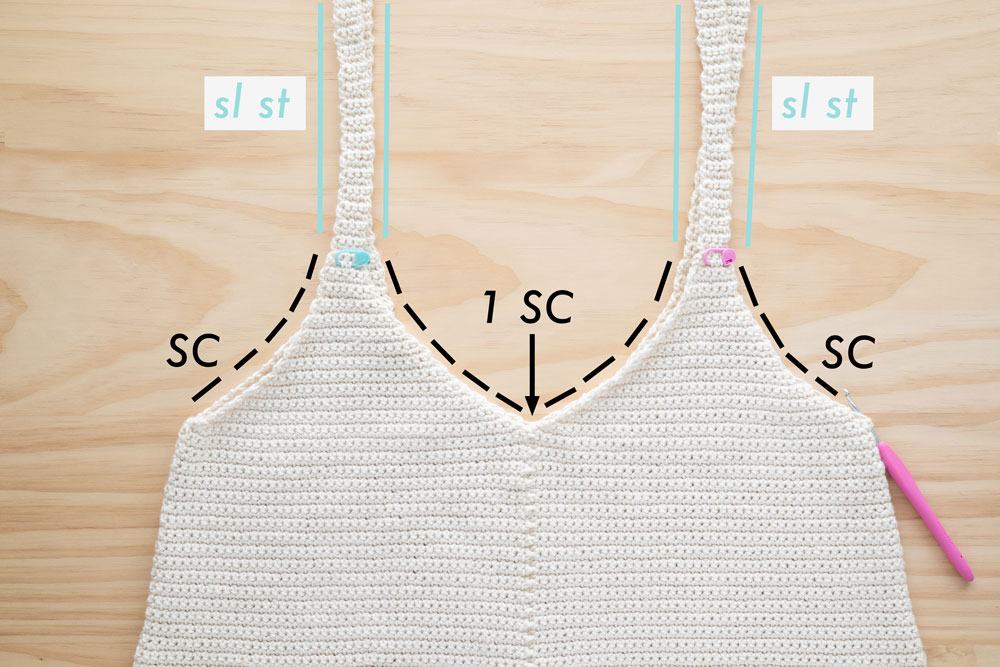
NECKLINE FINISHING
*SMs only necessary for scallop edge.
With the RS facing, insert hook at the top of the strap, secure yarn and pull up a loop, ch 1 – place SM.
Sl st evenly along edge of strap, when you reach the V-neckline SC evenly along 1st side of V-neck approx. SC 24(24, 30, 30, 30, 30, 36) – place SM in first SC,
*Depending on your tension you might need to add or remove SCs.
*If you want a plain v-neck the number of stitches doesn’t matter.
*If you want to add the scallop edging just make sure that the number of SCs is a multiple of 6 and crochet the same number of stitches on each side of the v-neck.
SC in the point of the V – place SM,
SC evenly along the 2nd side of the V-neck approx. 24(24, 30, 30, 30, 30, 36) sts,
Sl st evenly along edge of strap.
When you reach the back neckline, SC evenly along the 1st side of the V-neck approx. 24(24, 30, 30, 30, 30, 36) sts - place SM in first SC,
SC in the point of the V – place SM,
SC evenly along the 2nd side of the V-neck approx. 24(24, 30, 30, 30, 30, 36) sts,
Sl st evenly along edge of strap until 1st SM, sl st in 1st st to join.
Fasten off.
TIE STRAPS FINISHING
With the RS facing, insert hook at bottom of armhole, secure yarn and pull up a loop, ch 1 – place SM.
SC evenly along edge of armhole, Sl st evenly along edge of strap, place 2 sl sts in the corner st of strap, sl st across top of strap, place 2 sl sts in the corner st of strap, sl st evenly along edge of strap,
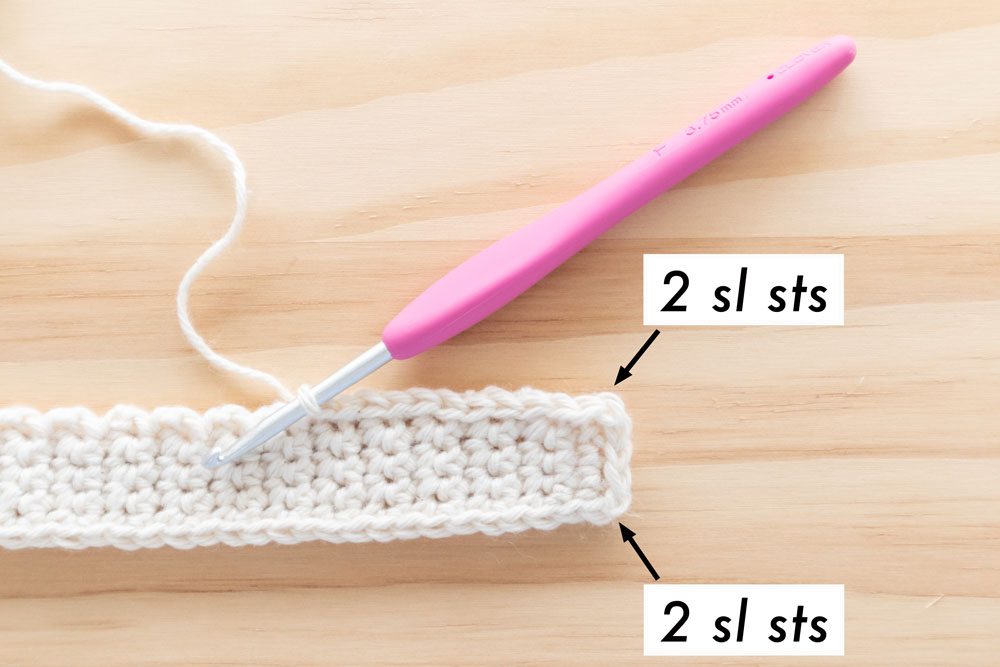
When you reach the V-neckline SC evenly along 1st side of V-neck approx. SC 24(24, 30, 30, 30, 30, 36) – place SM in first SC,
*Depending on your tension you might need to add or remove SCs.
*If you want a plain v-neck the number of stitches doesn’t matter.
*If you want to add the scallop edging just make sure that the number of SCs is a multiple of 6 and crochet the same number of stitches on each side of the v-neck.SC in the point of the V – place SM,
SC evenly along the 2nd side of the V-neck approx. 24(24, 30, 30, 30, 30, 36) sts,
Sl st evenly along edge of strap, place 2 sl sts in the corner st of strap, sl st across top of strap, place 2 sl sts in the corner st of strap, sl st evenly along edge of strap,
SC evenly along edge of armhole, sl st evenly along edge of strap, place 2 sl sts in the corner st of strap, sl st across top of strap, place 2 sl sts in the corner st of strap, sl st evenly along edge of strap,
When you reach the back neckline, SC evenly along the 1st side of the V-neck approx. 24(24, 30, 30, 30, 30, 36) sts - place SM in first SC,SC in the point of the V – place SM,
SC evenly along the 2nd side of the V-neck approx. 24(24, 30, 30, 30, 30, 36) sts,
Sl st evenly along edge of strap, place 2 sl sts in the corner st of strap, sl st across top of strap, place 2 sl sts in the corner st of strap, sl st evenly along edge of strap,
SC evenly along edge of armhole until 1st SM, sl st in 1st st to join.
Fasten off.
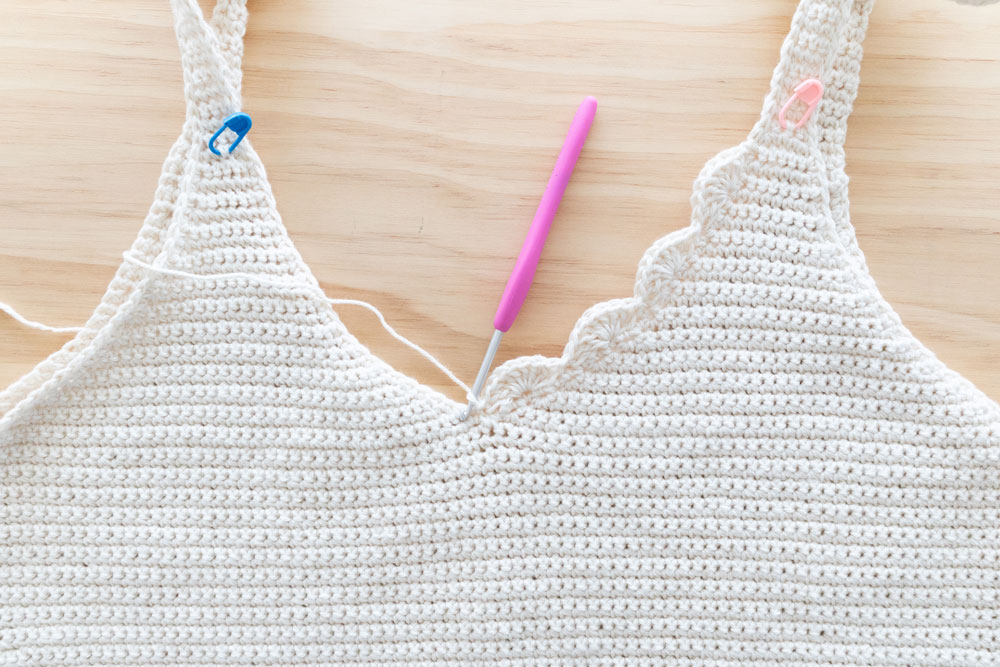
SCALLOP EDGING
With the RS facing, insert hook in st with SM at the top of the V-neckline.
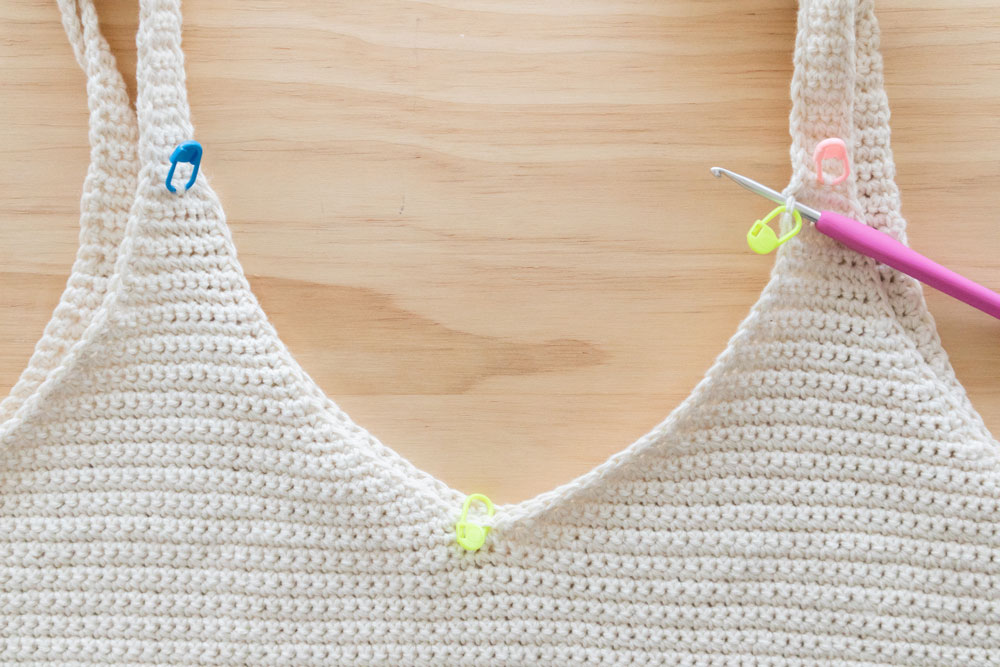
Pull up a loop, ch 1 (counts as a st),*Sk 2 sts, 7DC, sk 2 sts, sl st; rep from * until st with the SM - the last sl st should be in the st with a SM.
You should have 4(4, 5, 5, 5, 5, 6) scallops.
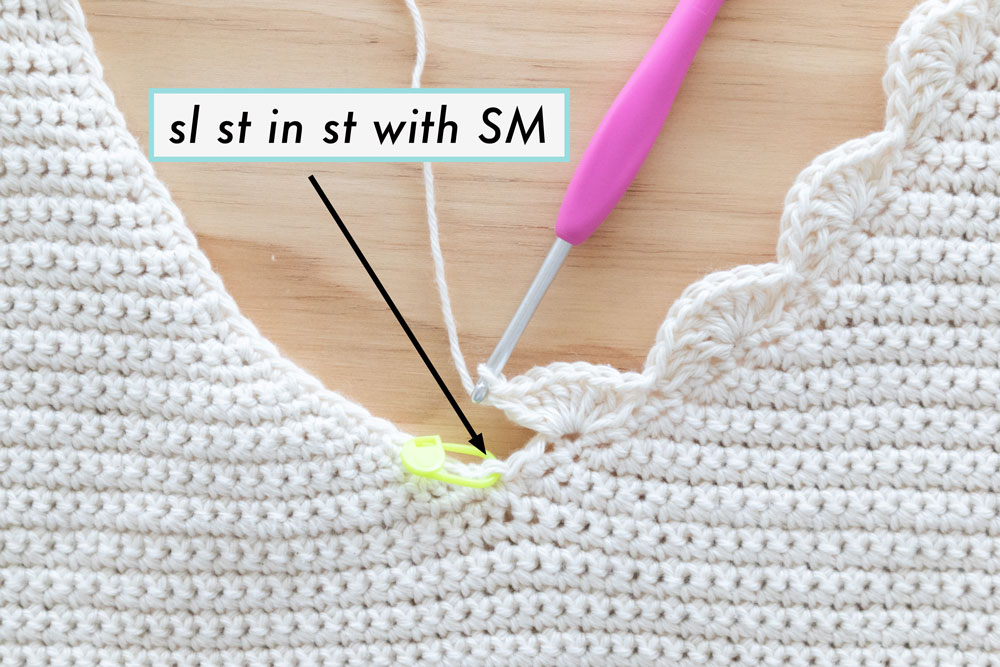
Rep from * until last SC - the last sl st should be in the last SC.
You should have 4(4, 5, 5, 5, 5, 6) scallops.
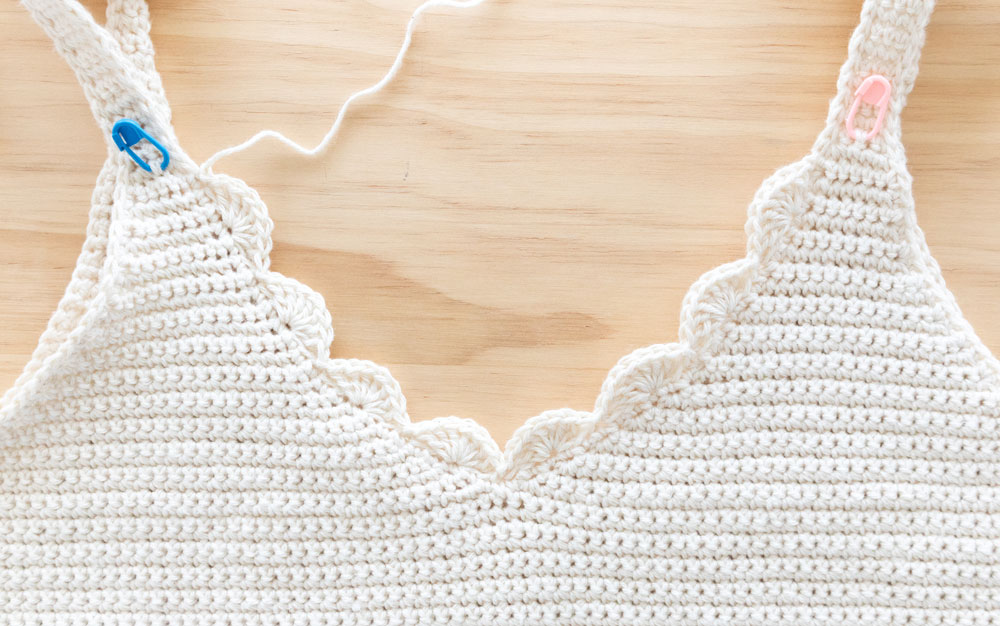
Fasten off.
Optional: Repeat Scallop Edging on the back v-neck of dress.
Weave in all of your ends.
Voilà! You’ve finished your Seascape Scallop Tank 🙂
BRAIDED ROPE BELT
Check out the 4 Strand Braid Rope blog post for a step-by-step video tutorial and photo tutorial!
*Sample braid uses 16 strands of yarn in total. The 16 strands of yarn are separated into ‘4 sets’ of 4 strands of yarn. Each set has 4 strands of yarn.
*Hold onto the yarn tightly as you braid to create a neat and tight cord.
TO PREPARE
1. Cut 16 strands of yarn measuring 200(215, 230, 250, 275, 300, 330) cm / 78(85, 90, 99, 108, 118, 130)” long.
2. Holding all the strands together, tie a knot towards the end of the yarn leaving a 10cm / 4” tassel.
3. Tape the tassel to a flat surface.
*A removable tape like washi tape or painter's tape works best!
4. Separate your 16 strands of yarn into 4 sets of yarn. Each set should have 4 strands.
TO BRAID CORD
5. Holding the yarn tight, take the RIGHT set of yarn and bring it underneath the CENTRE RIGHT and CENTRE LEFT sets of yarn …
6. … Wrap the RIGHT set of yarn over the CENTRE LEFT set of yarn. Pull tight.
7. Pick up the LEFT set of yarn, bring it underneath the CENTRE LEFT and CENTRE RIGHT sets of yarn …
8. … Wrap the LEFT set of yarn over the CENTRE RIGHT set of yarn. Pull tight.
Repeat steps 5 – 8 until you have approx. 12cm / 5” of yarn left.
9. Pinch the base of the braid and tie a knot. Pull tight.
10. Trim tassel.
And you’ve created a braided belt / cord / strap !
Thank you for all your beautiful patterns, Grace. This dress is amazing 😍 and I'd be crocheting this dress next. Please put our more dress patterns as you have them in your mind's eye. Looking forward to a fitted dress tutorial and pattern from you also!
Love all the way from Nigeria!!
Hi, I love your patterns.
Is there a way to make the v-neck smaller and more modest? Love the pattern but wish it was more modest. 🙂
Hi Elizabeth, you can make the v-neck sit higher by crocheting fewer rows for the straps and more rows in the triangle portions. I can't guarantee the fit (since this will change the way to top sits on the body) but feel free to experiment and see if it works for you.
Grace 🙂
Hi, I love your patterns as they’re the most modern I’ve managed to find on the internet! I have made the ruffle top and plan on making this next. Do you know how wide the skirt is please for a size small? I want to make sure it fits my hips! Thank you
Hi Holly,
My patterns follow the Craft Yarn Council Measurement chart - https://www.craftyarncouncil.com/standards/woman-size - so as long as your measurements are equal to or smaller than the size you pick the skirt should fit you 🙂
Grace
Hello!! I love your pattern, the dress looks very cute and the instructions are easy enough to follow for a beginner like me. I would like to ask, is there a way to make the top a size Small and the skirt a Medium?
I have just started working this pattern and have just finished ROW 8 under the RIGHT TRIANGLE portion and am completely stumped by the next directions: REPEAT ROWS 5 - 8 UNTIL ROW 16, these directions make no sense as the next line reads: ROW 9, not ROW 17 as it should. Could you please explain? Thanks!
I’m just starting this pattern and am having the same concern. I’m completely stumped.
how many inches should the straight straps be?