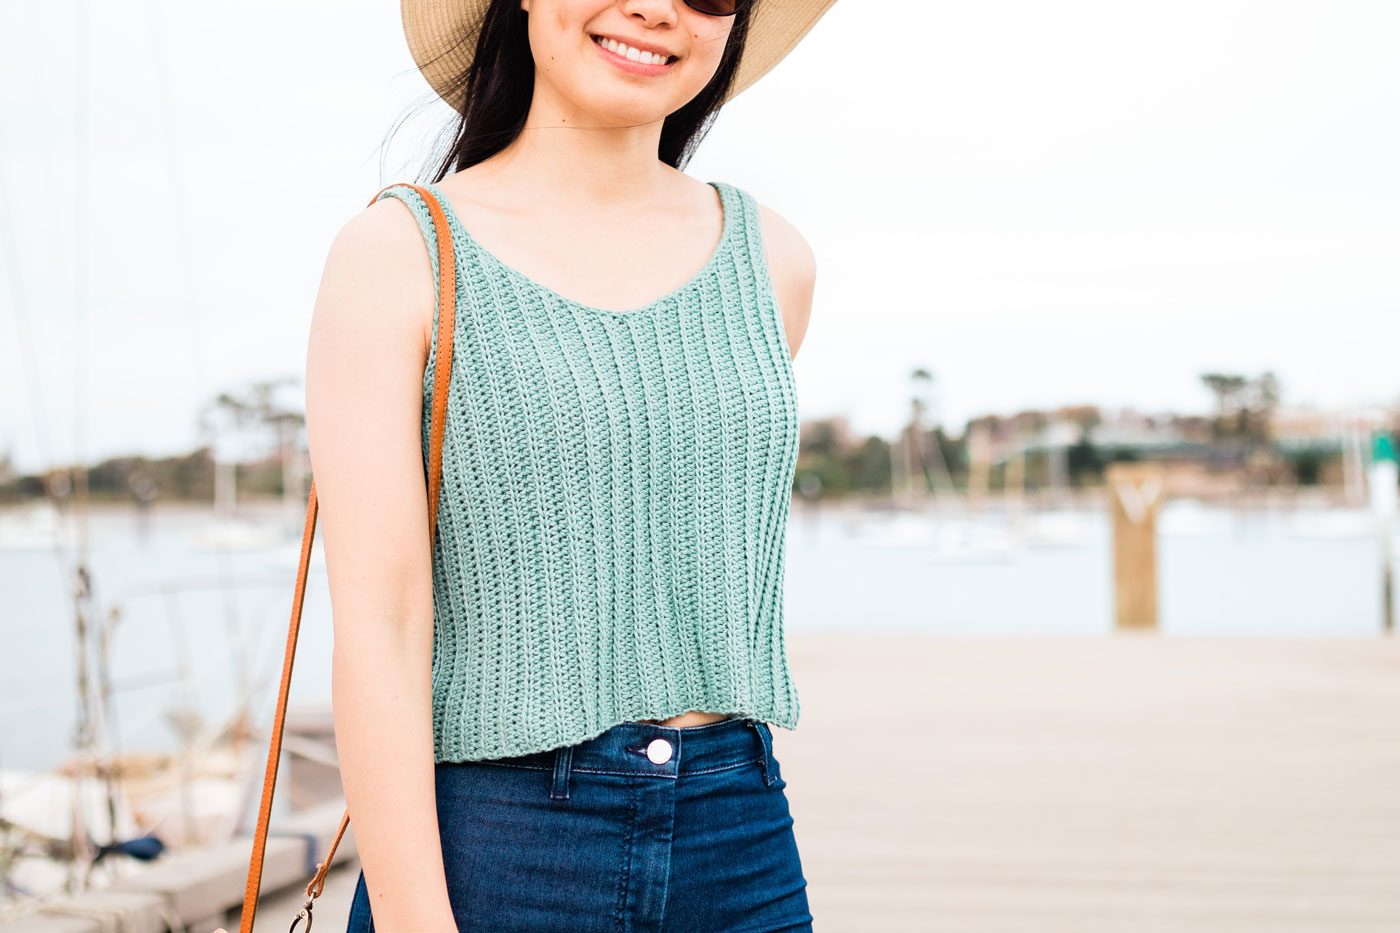
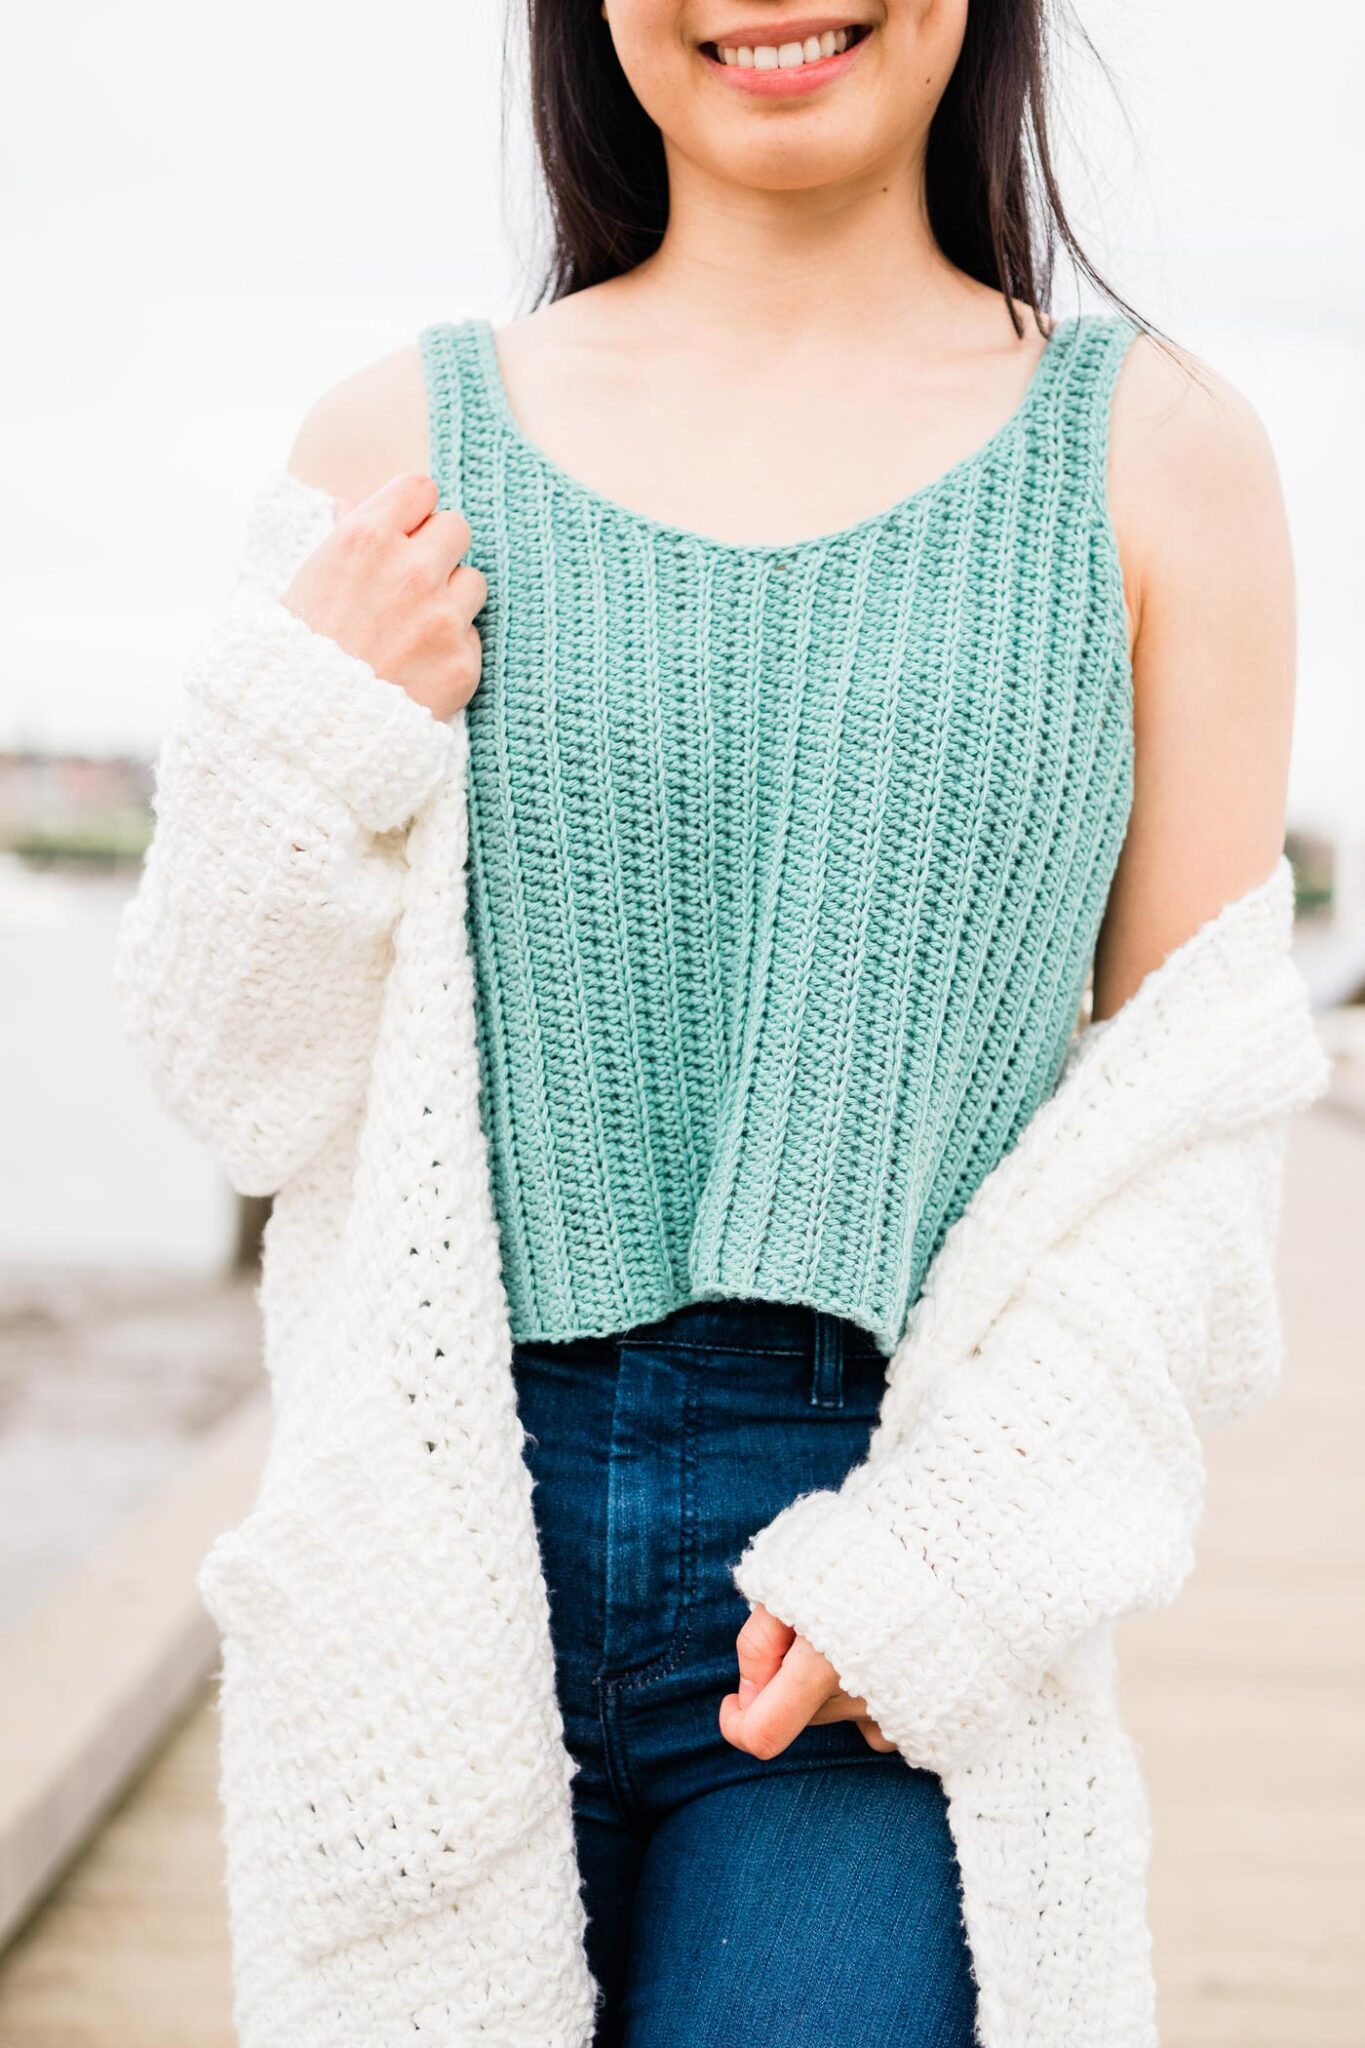
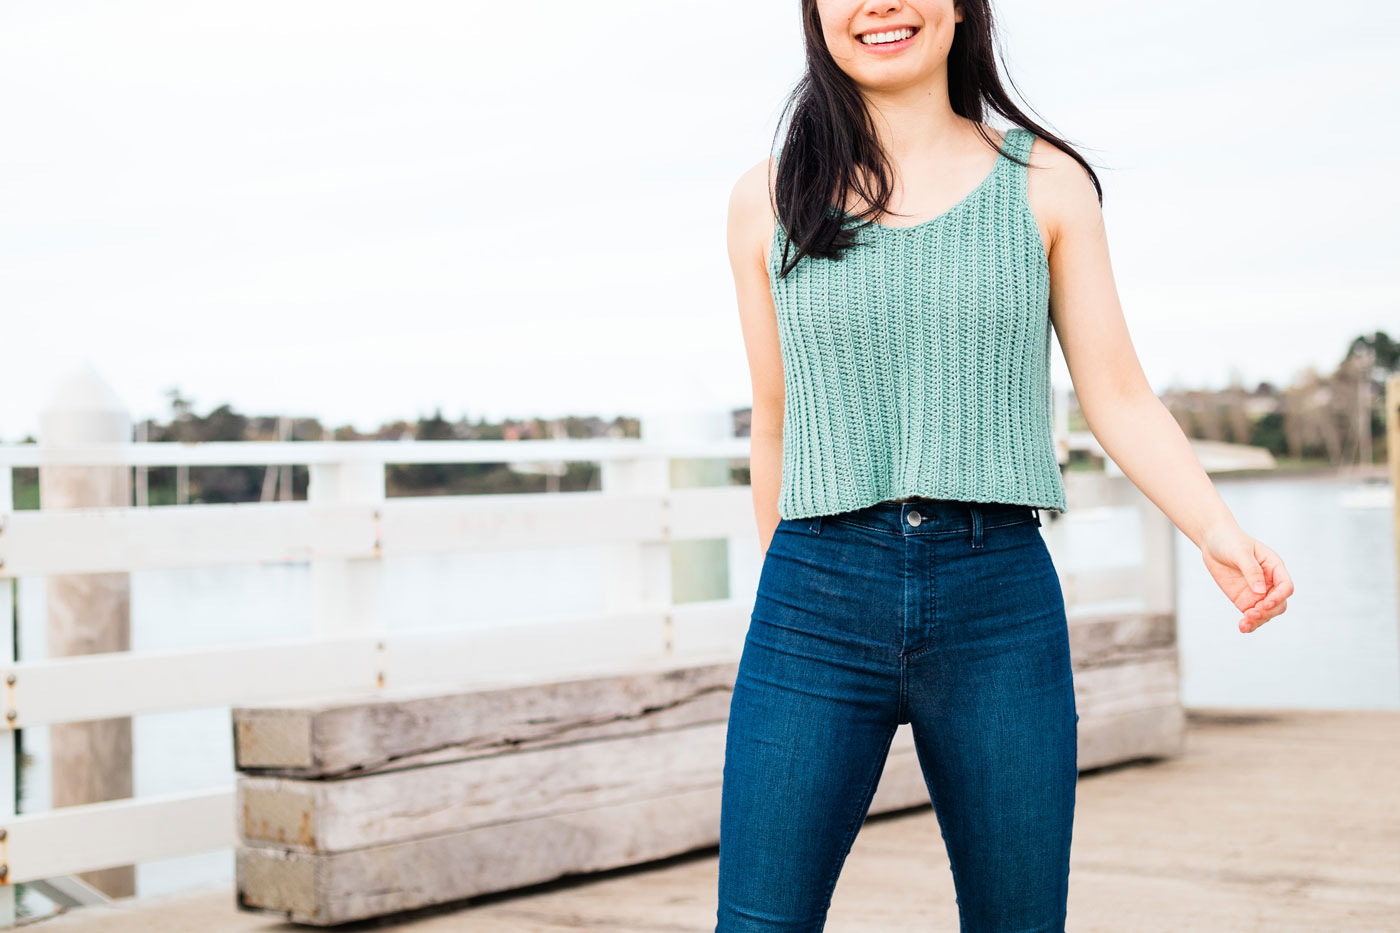
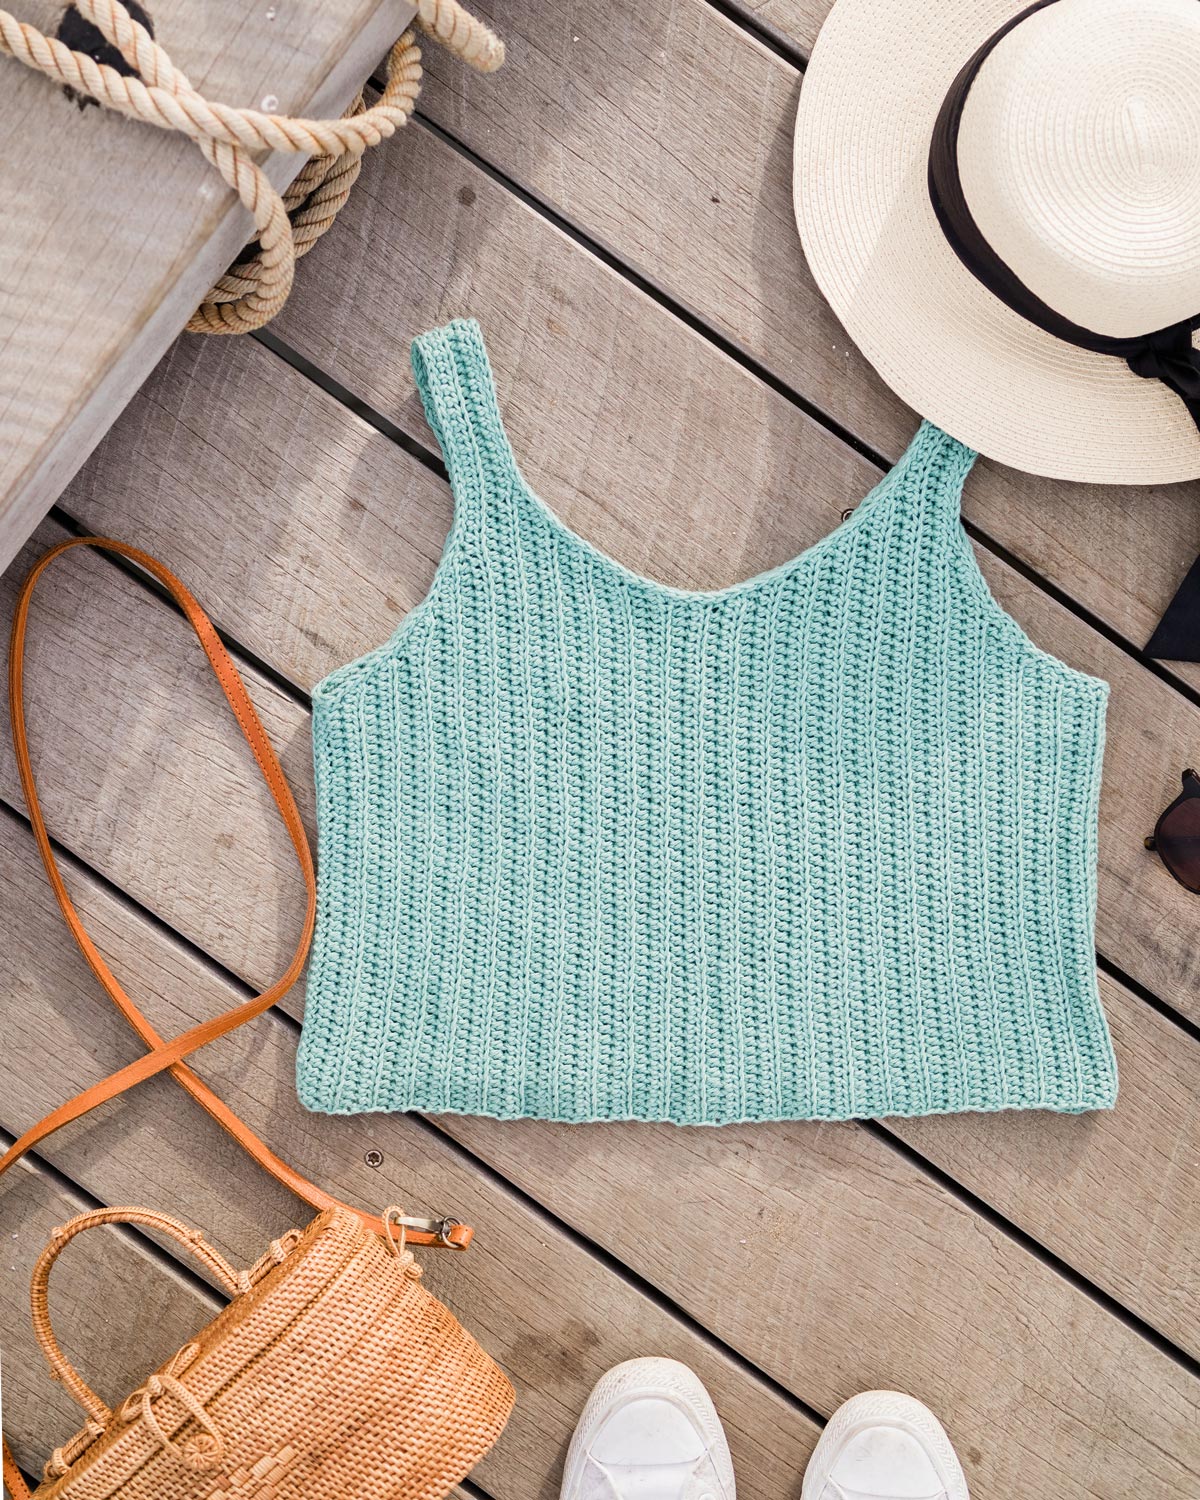
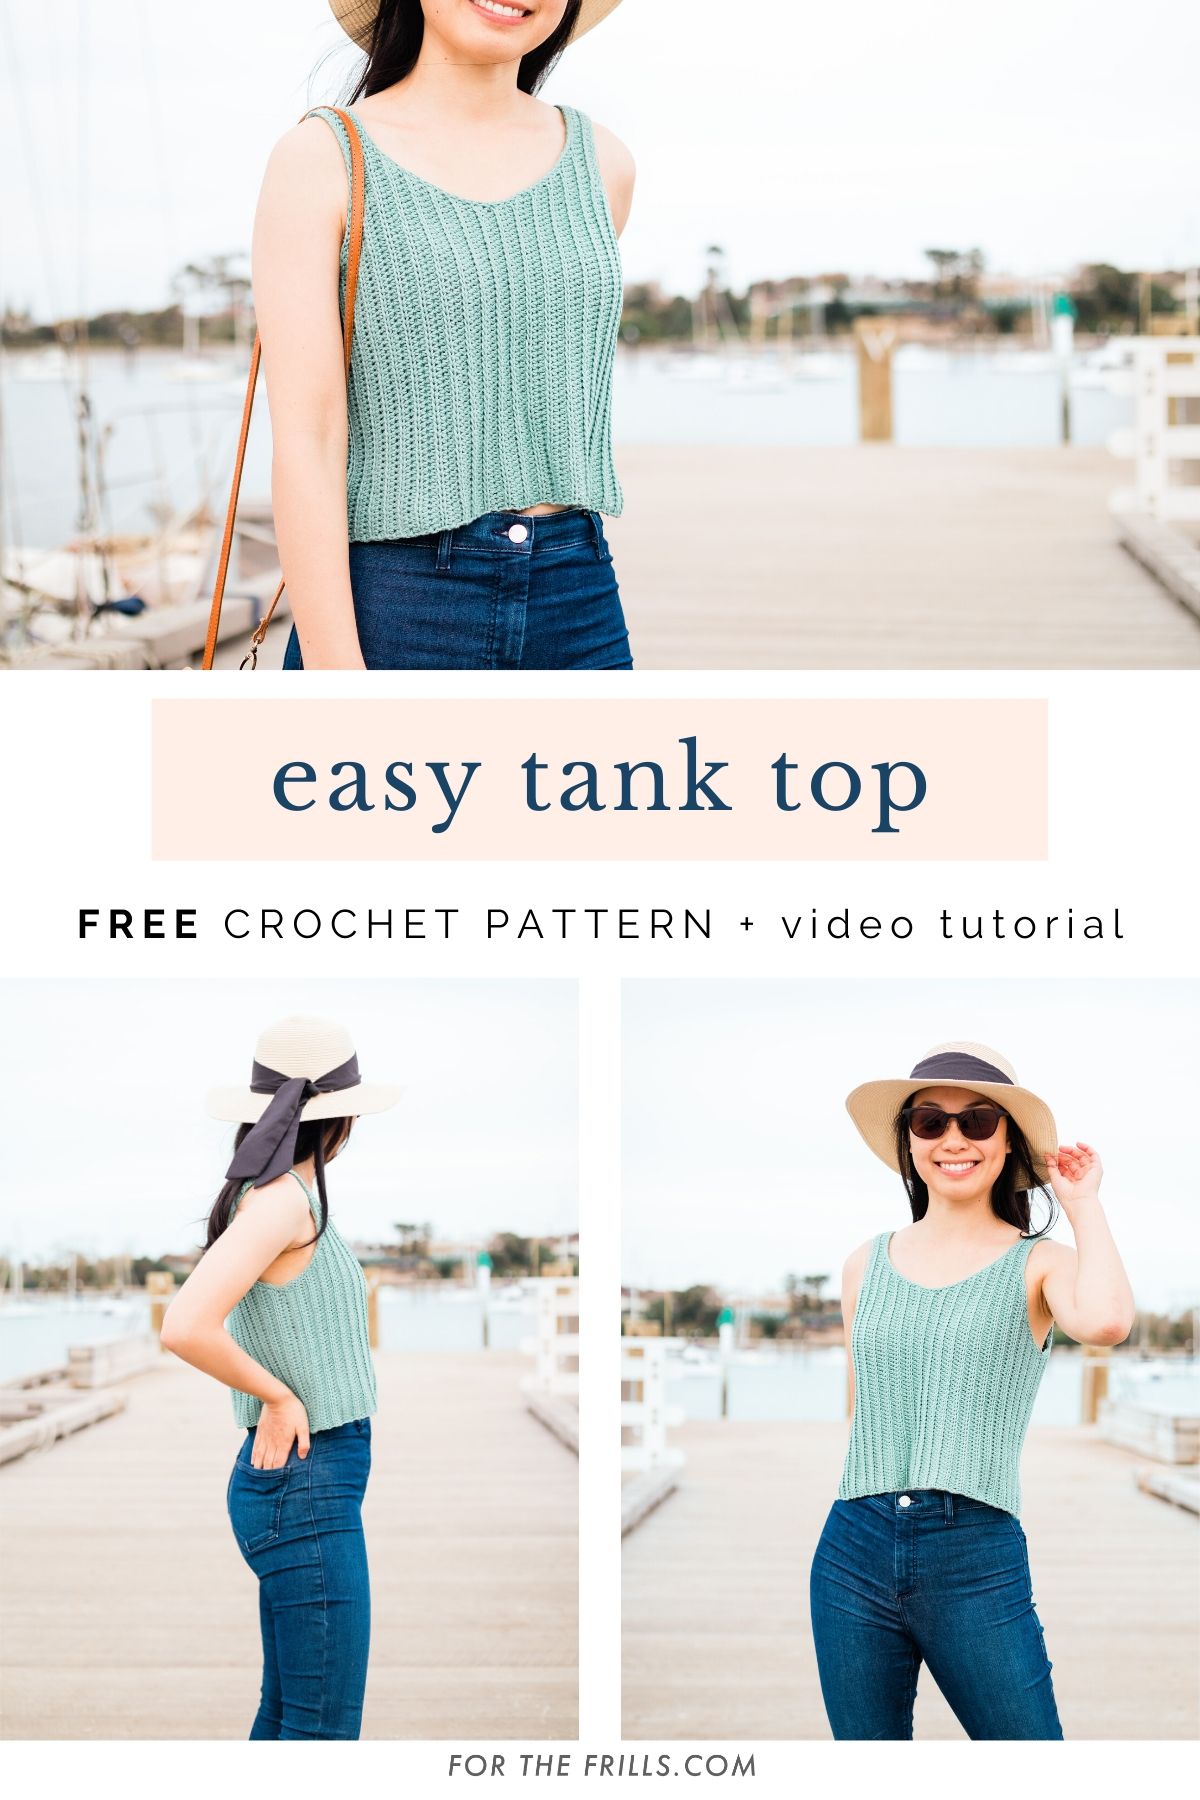
Simple, stylish and modern, the Sagebrush Tank Top is perfect for summer! This easy ribbed tank top features a flattering round neck and comes in cropped and normal length!
The free crochet tank top pattern is accompanied by a video tutorial.
This post may contain affiliate links, view our disclosure policy for details.
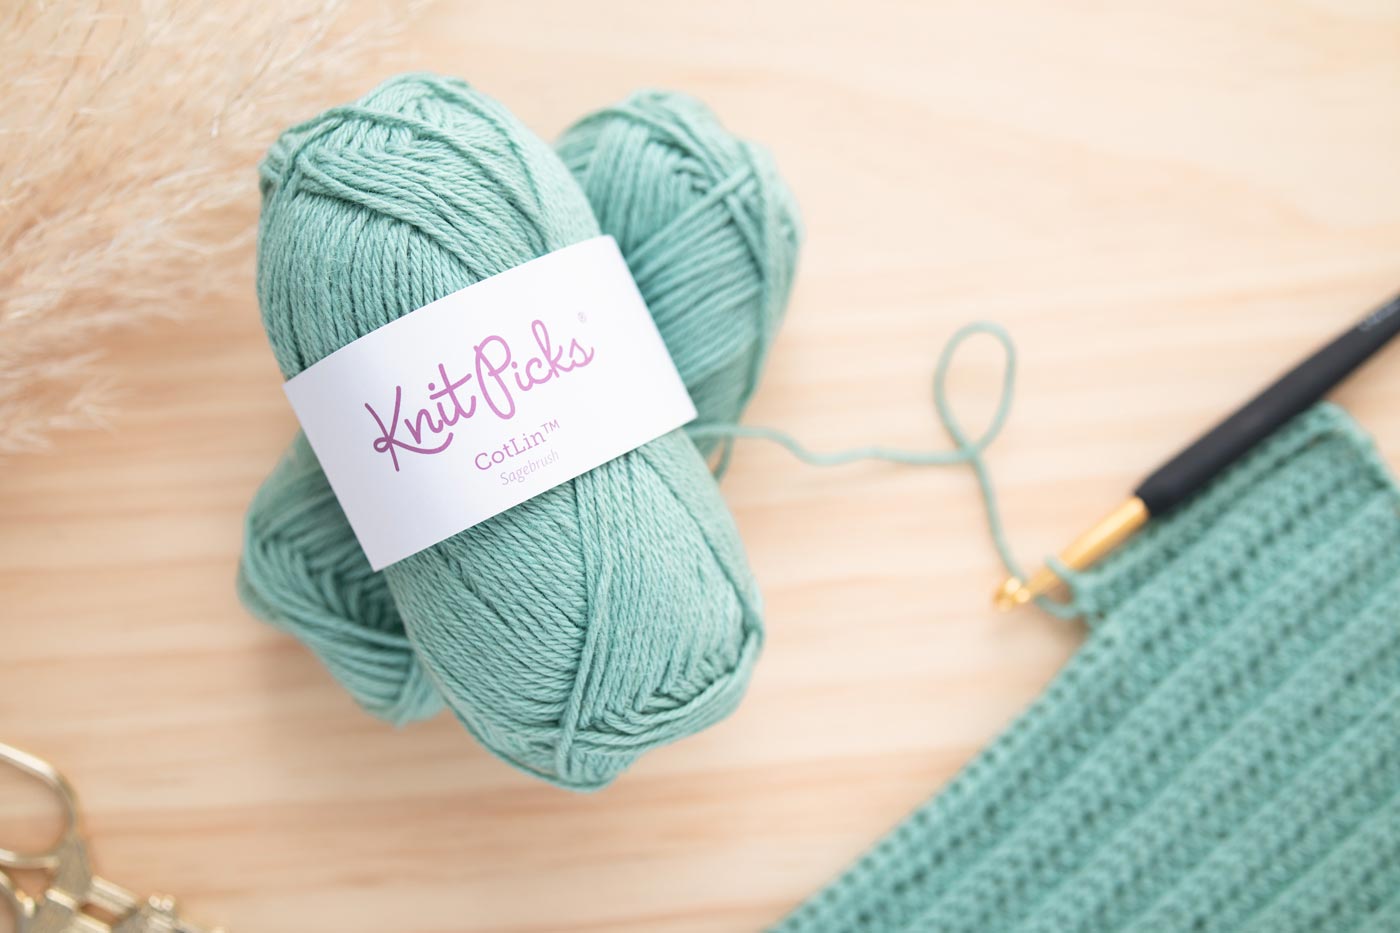
The Sagebrush Tank Top will be a staple piece in your warm weather crochet wardrobe! Made from WeCrochet’s CotLin, this cotton-linen blend tank has incredible drape and a knit-like look to it. This crochet tank top is so versatile and quick to make, you’ll want one in every colour!
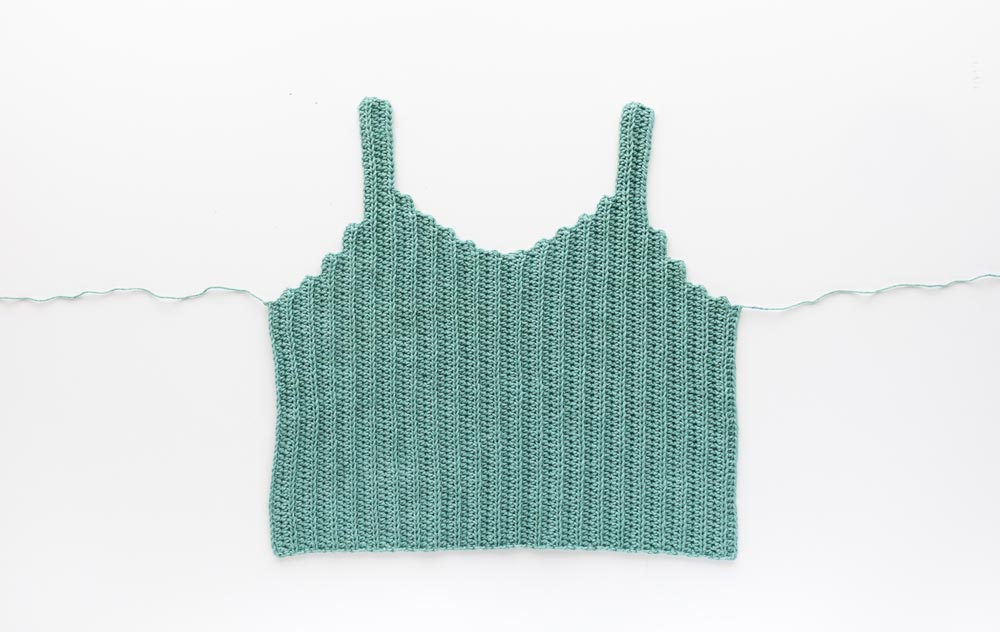
This simple crochet tank top only uses back-loop half double crochets and slip stitches while the unique construction and edging come together right at the end to give a smooth, flattering round neck!
I’ve included two lengths for this pattern cropped and full length as I know everyone loves options! (I'm wearing the cropped length in the photos) If you’re not sure which length to pick, just make sure to measure yourself and compare it to the measurement chart as once you’ve crocheted your foundation chain, you can’t alter the length.
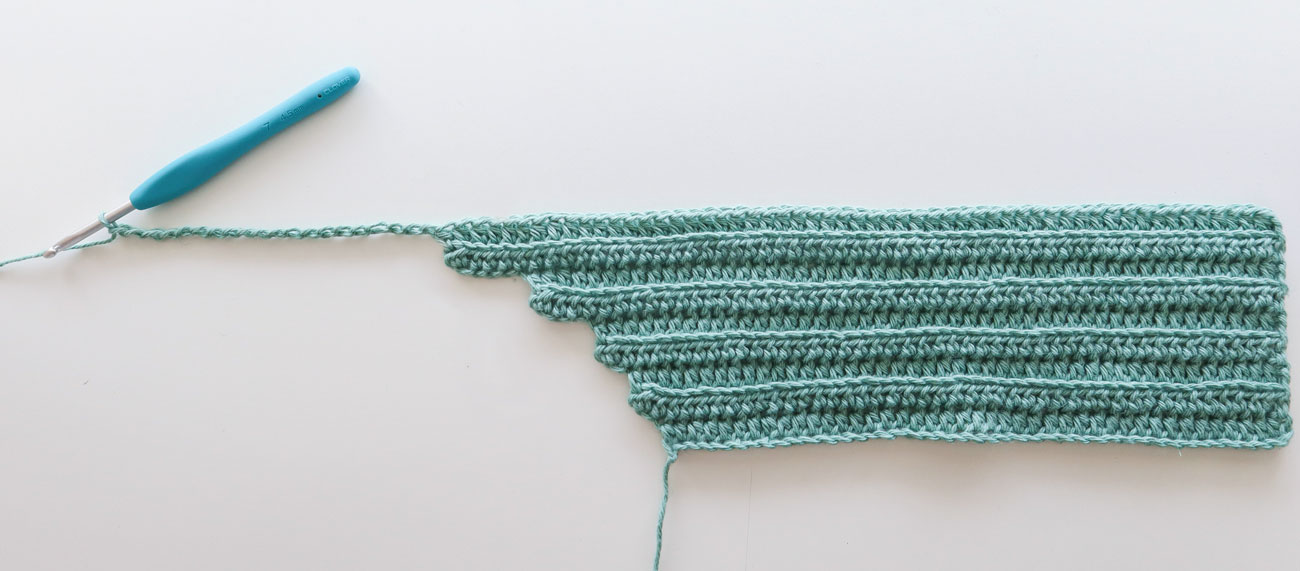
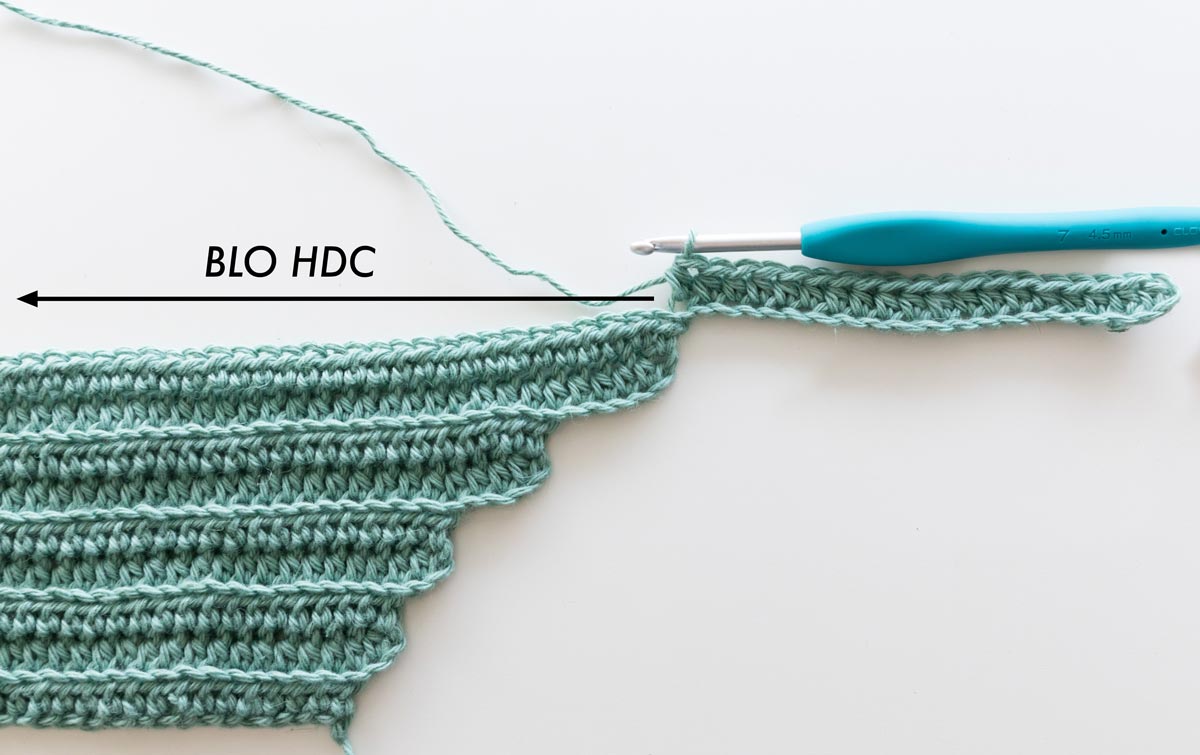
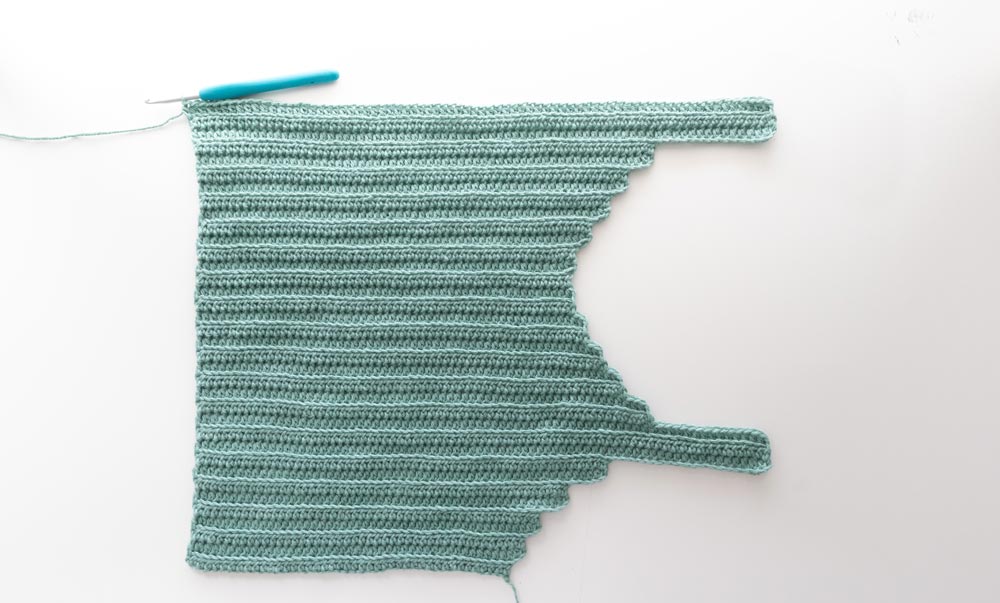
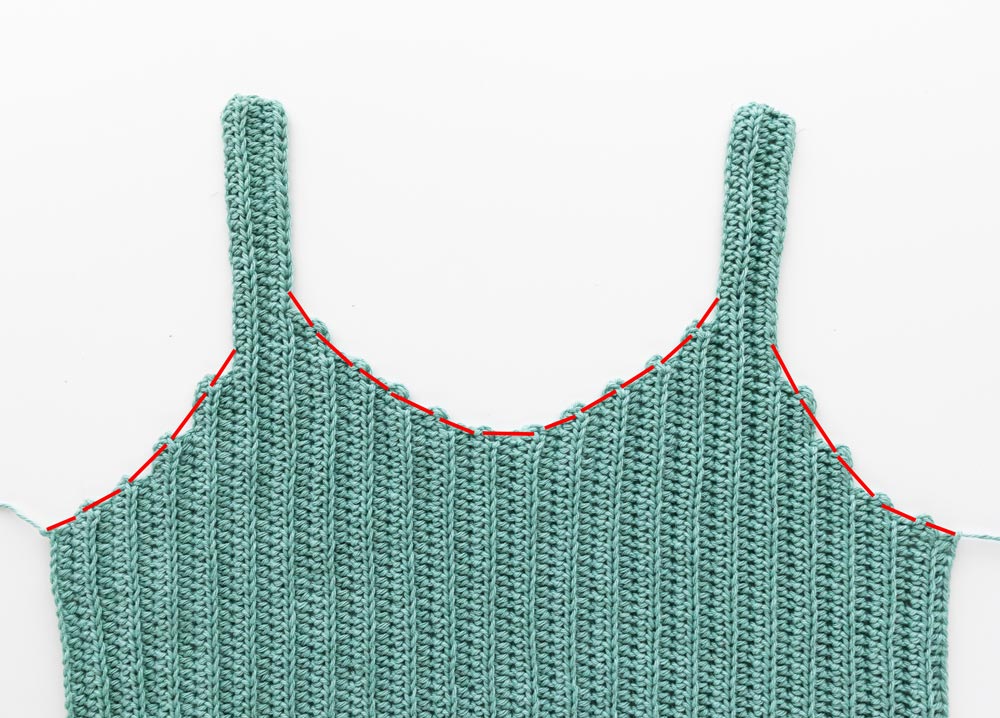
The crochet tank top is made up of 2 identical pieces (the front and back are the same) and are worked lengthways, so the foundation chain runs the length of the top not the width. To crochet a smooth increase and decrease, we only ever place 1 back loop half double crochet in each stitch but increase by chaining at the end of the row and working back into the chain in the next row.
This creates ‘bumpy’ edges that will all be evened out once we crochet the edging! If you’ve never worked stitches evenly along the edge, as you’re crocheting the body of the tank top you might think it looks a bit janky haha … but trust me, once we crochet the 2nd row of edging everything will work out 🙂
Design Inspiration
Do you remember the Skylar Crop Top from a few months back? The Sagebrush Tank Top is the sister pattern to the Skylar Crop Top! Both pieces have a distinct ribbed, knit-like look and are worked lengthways using only half double crochets.
The Skylar Crop Top is the perfect project to start with if you’re a beginner crocheter! You crochet a rectangle, seam it together, braid on straps and you have a top! It’s very easy to customise to any length you want and by simply wrapping the rectangle around your body you can check to see if it fits! The adjustable tie straps also make sizing super easy.
The Sagebrush Tank Top is a great project to try once you’re comfortable with crocheting back loop half double crochets. You’ll make 2 identical panels, seam them together and then crocheting the edging to even out the neck and create the gorgeous round neck!
The singlet does have shaping in most rows (this mean your stitch count increases and decreases to create curves) so I’ve classified it was an easy+ project. If you’re comfortable with crocheting edging this pattern will be super simple but if you’ve never crocheted edging you’ll learn a new technique!
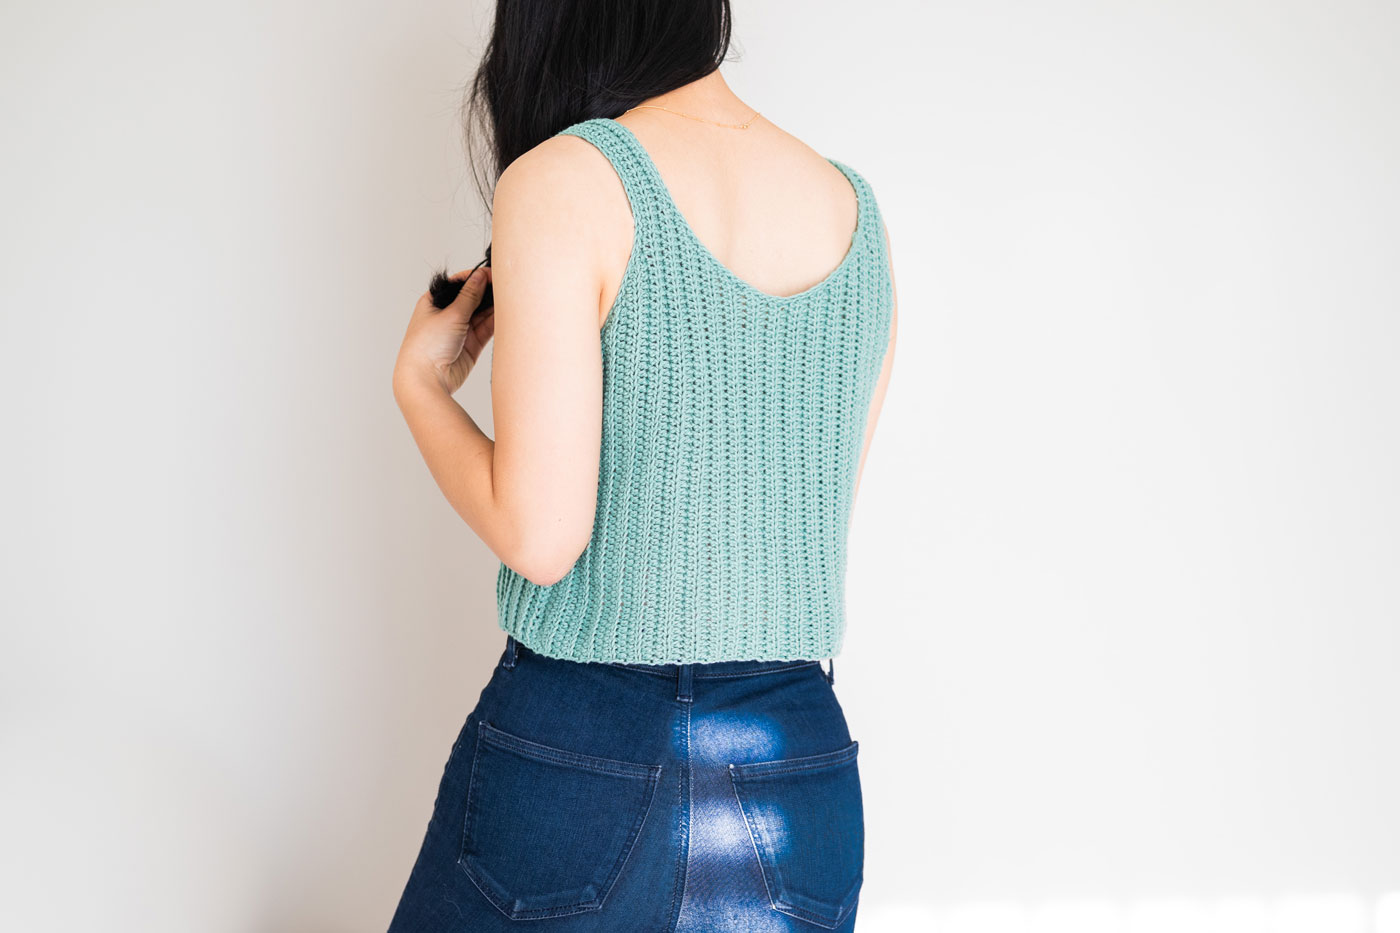
I know I keep going on about this round neck but I just loved the way it turned out! If you’ve crocheted for a while you’ll know that crocheting lends itself well to square, rectangle and ‘grid-like’ shapes but when crocheting flat and in rows, round necks can be quite tricky to make smooth.
It was a huge mission to get a smooth, flattering round neck in every size from XS all the way to 3XL! Initially, I intended to release the Sagebrush Tank the week after the Skylar Crop Top as a matching set, but I ending up reworking the pattern 4 times until I was happy with the way it looked … so here it is 2 months later 🙂
Yarn
For the Sagebrush Tank I used WeCrochet’s CotLin yarn. As the name suggests it’s a lovely lightweight mix of Tanguis cotton and Belgian linen! The Tanguis cotton makes the yarn soft and supple while the linen adds strength and gorgeous small fibre flecks throughout the yarn.
If you’ve ever crocheted with a 100% cotton yarn before you’ll feel the difference in drape and shape straight away! The added linen really helps the yarn and tank top keep its shape, so the ribbing will stay nice a defined without warping 🙂
CotLin comes in 45 different shades – an incredible colour selection! You can find brights, pastels and neutrals, so you’ll be able to find a shade (or 10!) that you’ll love!
Check out more free summer crochet patterns!
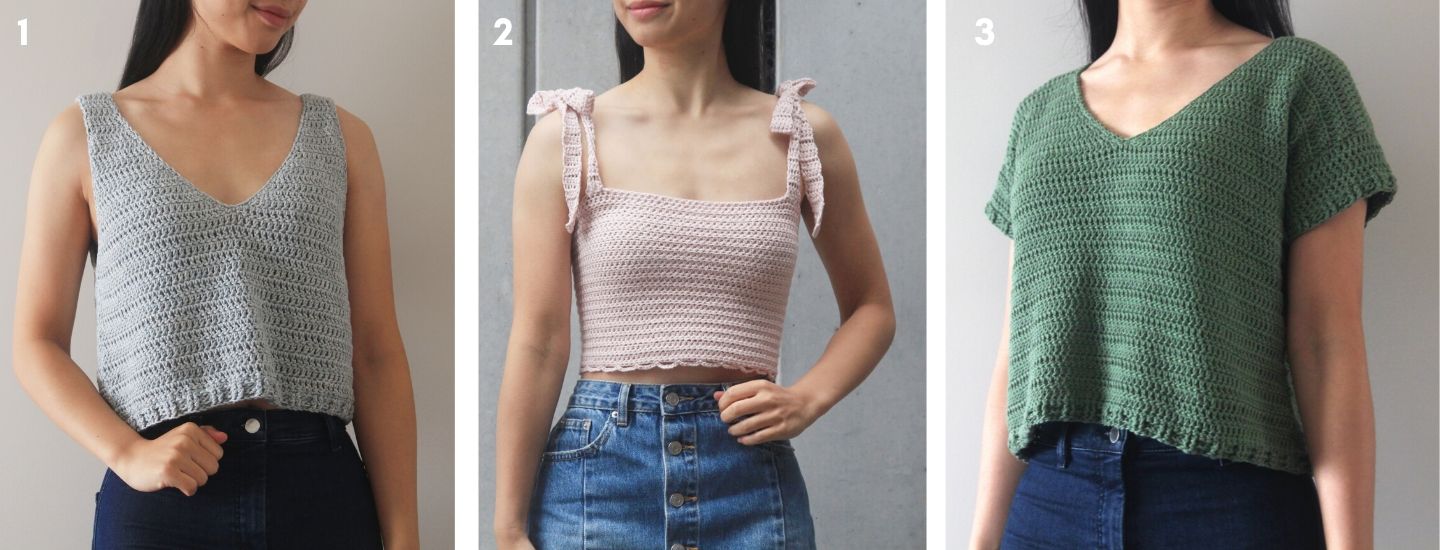
1. Sea Breeze Tank Top / 2. Leila Tie Strap Crop Top / 3. Forest Breeze Tee
Pin me for later!
Crochet Tank Top Video Tutorial
Add to your Ravelry queue here!
Ad-free, printable version here!
*Sample is a size small cropped shown on a 5’3” model with a 32” bust.
*The sizing guide follows size XS(S, M, L, XL, 2XL, 3XL).
*Each size has two lengths – cropped(full length) E.g. “Size XS - Ch 60(80) means for size XS, Ch 60 for cropped and Ch 80 for full length. If there is only one number, it applies to both lengths.
*"HDC 10" means HDC into the next 10 stitches.
*The turning chain ch 1 does NOT count as a stitch, unless otherwise noted.
*Total stitches are indicated between < >.
*This pattern uses US crochet terms.
*This tank top pattern is worked lengthways e.g. the stitches run the length of the top (not the width) and the rows run the width of the top.The top comprises of 2 identical panels that are seamed together.
*The increases and decreases give a ‘bumpy’ look along the edge of the top but the edges are ‘smoothed’ out with slip stitch edging.
LEVEL: Easy+
MATERIALS
Yarn – WeCrochet CotLin – DK/Light (3), 112m/50g, 123yds/1.75oz, 70% Tanguis Cotton + 30% Linen, Sagebrush
Cropped: 4(4, 4, 5, 5, 6, 7) skeins approx. 155(165, 185, 225, 250, 300, 320)g
Full Length: 4(5, 5, 6, 6, 7, 8) skeins approx. 200(210, 235, 280, 300, 350, 385)g
Scissors
STITCHES & ABBREVIATIONS
Ch = Chain
Sl st = Slip Stitch
HDC = Half Double Crochet
BLO = Back Loop
St(s) = Stitch(es)
Measurements cm:
To fit Bust: 76(86, 96, 106, 117, 127, 137)
Width: 39(43, 47, 52, 58, 63, 69)
Cropped Length: 41(41, 43, 45, 48, 50, 52)
Full Length: 50(50, 52, 54, 56, 58, 60)
Armhole: 16(18, 19, 21, 22, 23, 25)
Measurements inches:
To fit Bust: 30(34, 38, 42, 46, 50, 54)
Width: 15.5(17, 18.5, 20.5, 23, 25, 27)
Cropped Length: 16(16, 17, 18, 19, 19.5, 20.5)
Full Length: 19.5(19.5, 20.5, 21, 22, 23, 23.5)
Armhole: 6.5(7, 7.5, 8, 8.5, 9, 10)
GAUGE: 10cm/4” square = 18 stitches wide x 10.5 rows tall in BLO HDC
Sagebrush Tank Top Crochet Pattern
This crochet pattern is separated by size - scroll to the end for assembly instructions and photos. You can also get an easy to read printable pdf pattern here!
SIZE XS
ARMHOLE INCREASE
FOUNDATION CHAIN: Ch 46(62).
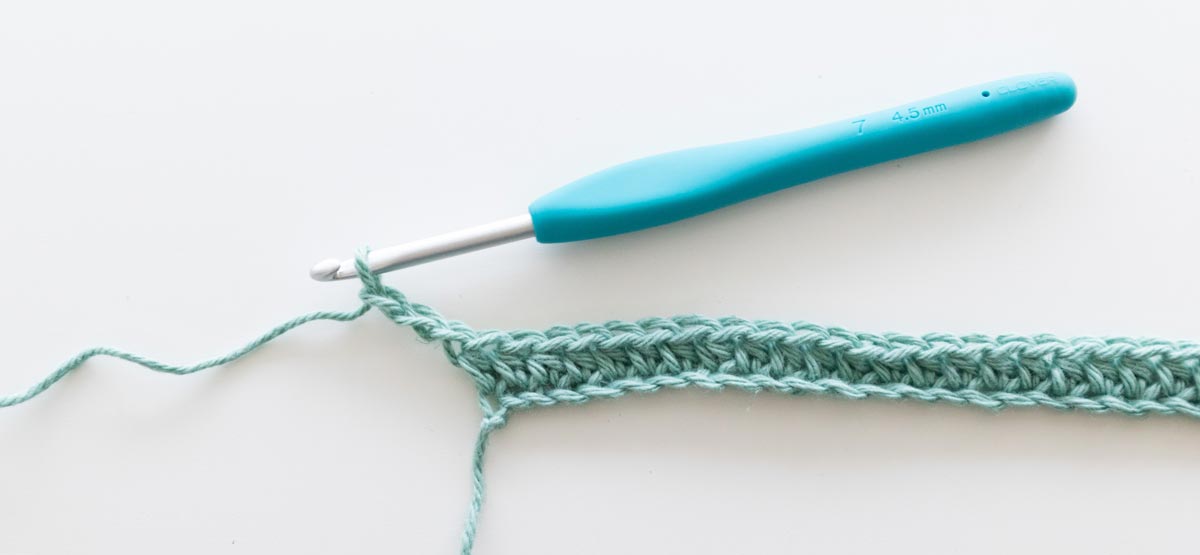
ROW 1: HDC into 2nd ch from hook, HDC in each ch until end, ch 3, turn.
<45(61) sts + 3 chs>
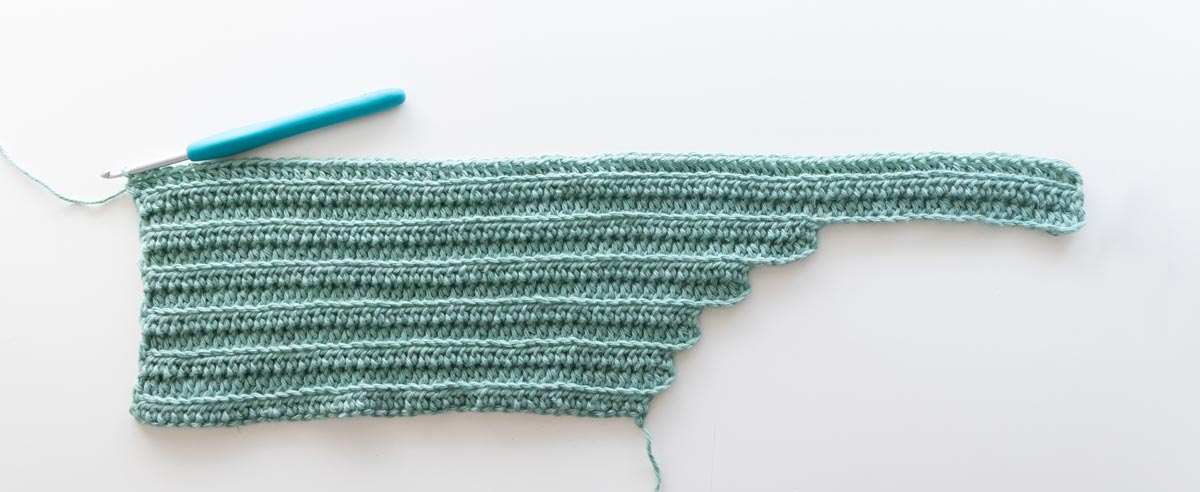
(photo 1)
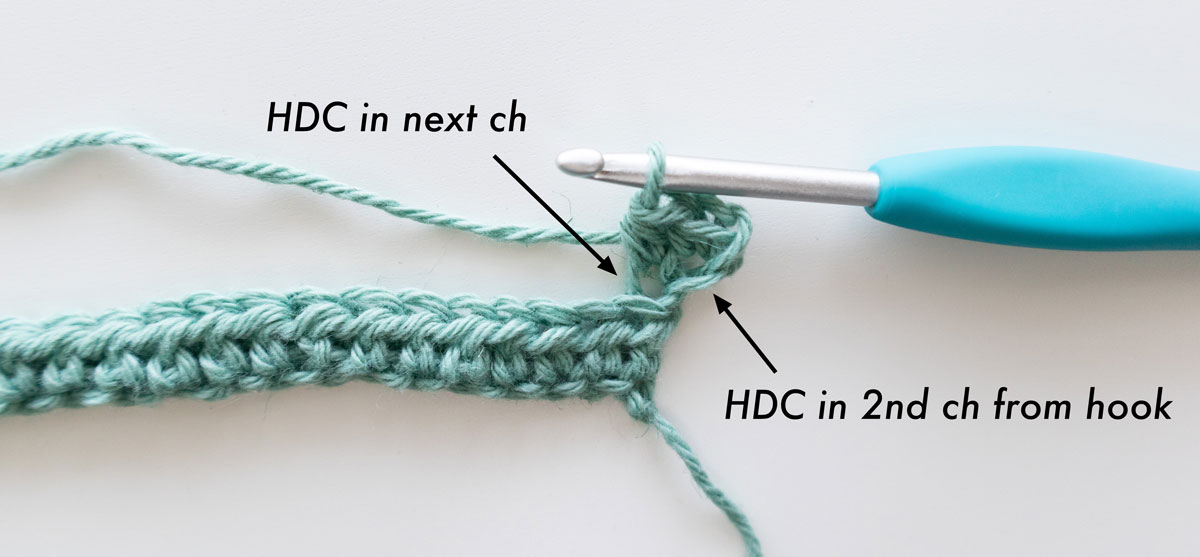
ROW 2: HDC into 2nd ch from hook, HDC in next ch, BLO HDC across, HDC in last st, turn.<47(63)>
(photo 2)
ROW 3: Ch 1, BLO HDC across, HDC in last st, ch 4, turn.
<47(63) sts + 4 chs>
ROW 4: HDC into 2nd ch from hook, HDC in each ch, BLO HDC across, HDC in last st, turn.
<50(66)>
ROW 5: Ch 1, BLO HDC across, HDC in last st, ch 5, turn.
<50(66) sts + 5 chs>
ROW 6: HDC into 2nd ch from hook, HDC in each ch, BLO HDC across, HDC in last st, turn.
<54(70)>
ROW 7: Ch 1, BLO HDC across, HDC in last st, ch 21, turn.
<54(70) sts + 21 chs>
21 chs = strap length.
(photo 3)
Do not fasten off! Proceed directly to ‘FIRST STRAP’ instructions.
FIRST STRAP
ROW 8: HDC into 2nd ch from hook, HDC in each ch, BLO HDC across, HDC in last st, turn.
<74(90)>
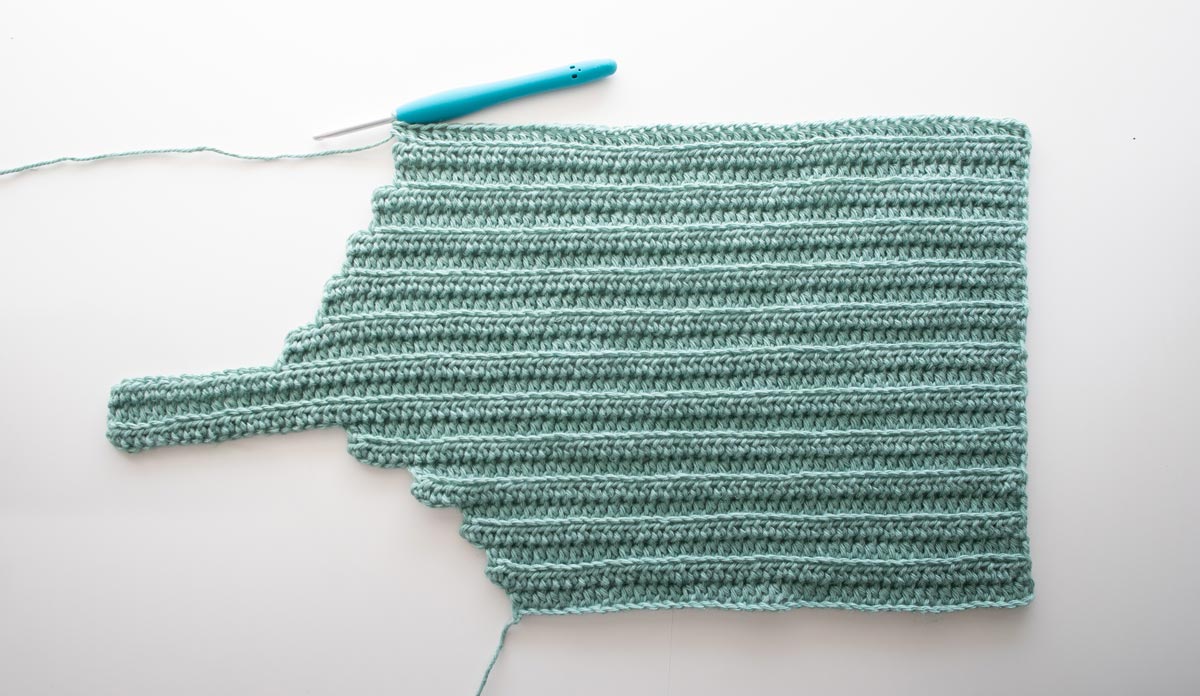
(photo 4)
ROWS 9 - 10: Ch 1, BLO HDC across, HDC in last st, turn.
<74(90)>
(photo 5)
Do not fasten off! Proceed directly to ‘NECKLINE DECREASE’ instructions.
NECKLINE DECREASE
ROW 11: Ch 1, BLO HDC 61(77), HDC in next st, turn.
<62(78)>
ROW 12: Ch 1, BLO HDC across, HDC in last st, turn.
<62(78)>
ROW 13: Ch 1, BLO HDC across until 4 sts left, HDC in next st, turn.
<59(75)>
ROW 14: Ch 1, BLO HDC across, HDC in last st, turn.
<59(75)>
ROW 15: Ch 1, BLO HDC across until 3 sts left, HDC in next st, turn.
<57(73)>
ROW 16: Ch 1, BLO HDC across, HDC in last st, turn.
<57(73)>
ROW 17: Ch 1, BLO HDC across until 3 sts left, HDC in next st, turn.
<55(71)>
ROW 18: Ch 1, BLO HDC across, HDC in last st, turn.
<55(71)>
ROW 19: Ch 1, BLO HDC across until 3 sts left, HDC in next st, turn.
<53(69)>
ROW 20: Ch 1, BLO HDC across, HDC in last st, turn.
<53(69)>
ROW 21: Ch 1, BLO HDC across until 2 sts left, HDC in next st, ch 2, turn.
<52(68) sts + 2 chs>
ROW 21 is the centre line / middle of the top. We’ll now increase the neckline.
(photo 6)
Do not fasten off! Proceed directly to ‘NECKLINE INCREASE’ instructions.
NECKLINE INCREASE
ROW 22: HDC into 2nd ch from hook, BLO HDC across, HDC in last st, turn.
<53(69)>
ROW 23: Ch 1, BLO HDC across, HDC in last st, ch 3, turn.
<53(69) + 3 chs>
ROW 24: HDC into 2nd ch from hook, HDC in next ch, BLO HDC across, HDC in last st, turn.
<55(71)>
ROW 25: Ch 1, BLO HDC across, HDC in last st, ch 3, turn.
<55(71) + 3 chs>
ROW 26: HDC into 2nd ch from hook, HDC in next ch, BLO HDC across, HDC in last st, turn.
<57(73)>
ROW 27: Ch 1, BLO HDC across, HDC in last st, ch 3, turn.
<57(73) + 3 chs>
ROW 28: HDC into 2nd ch from hook, HDC in next ch, BLO HDC across, HDC in last st, turn.
<59(75)>
ROW 29: Ch 1, BLO HDC across, HDC in last st, ch 4, turn.
<59(75) + 4 chs>
ROW 30: HDC into 2nd ch from hook, HDC in each ch, BLO HDC across, HDC in last st, turn.
<62(78)>
ROW 31: Ch 1, BLO HDC across, HDC in last st, ch 13, turn.
<62(78) + 13 chs>
13 chs = strap length
(Note: this number is does not match the number of chs in ROW 7 – we have fewer chains since we’re increasing from the neckline, not the armhole.)
(photo 7 + 8)
Do not fasten off! Proceed directly to ‘SECOND STRAP’ instructions.
SECOND STRAP
ROW 32: HDC into 2nd ch from hook, HDC in each ch, BLO HDC across, HDC in last st, turn.
<74(90)>
ROWS 33 - 34: Ch 1, BLO HDC across, HDC in last st, turn.
<74(90)>
(photo 9)
Do not fasten off! Proceed directly to ‘ARMHOLE DECREASE’ instructions.
ARMHOLE DECREASE
ROW 35: Ch 1, BLO HDC 53(69), HDC in next st, turn.
<54(70)>
ROW 36: Ch 1, BLO HDC across, HDC in last st, turn.
<54(70)>
ROW 37: Ch 1, BLO HDC across until 5 sts left, HDC in next st, turn.
<50(66)>
ROW 48: Ch 1, BLO HDC across, HDC in last st, turn.
<50(66)>
ROW 39: Ch 1, BLO HDC across until 4 sts left, HDC in next st, turn.
<47(63)>
ROW 40: Ch 1, BLO HDC across, HDC in last st, turn.
<47(63)>
ROW 41: Ch 1, BLO HDC across until 3 sts left, HDC in next st.
<45(61)>
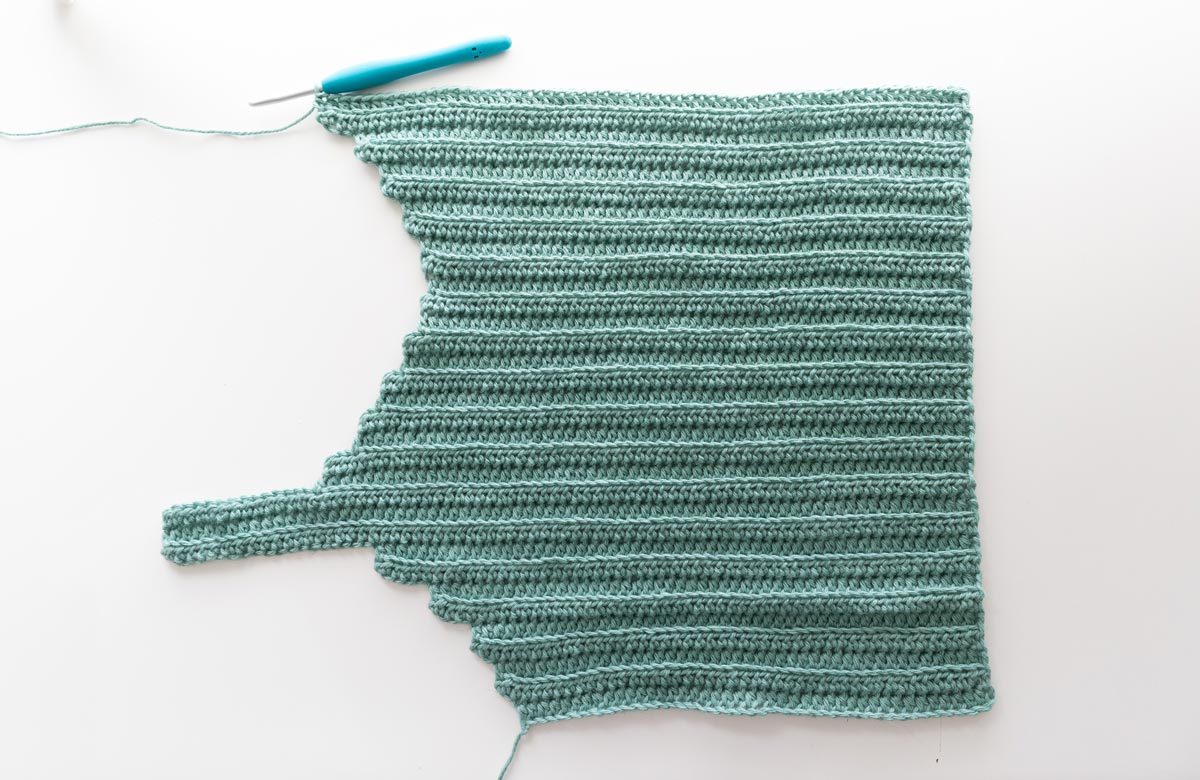
(photo 10)
Fasten off.
Repeat steps for 2nd body piece.
Proceed to 'ASSEMBLY' instructions.
Size S
ARMHOLE INCREASE
FOUNDATION CHAIN: Ch 43(59).
ROW 1: HDC into 2nd ch from hook, HDC in each ch until end, ch 3, turn.
<42(58) sts + 3 chs>
(photo 1)
ROW 2: HDC into 2nd ch from hook, HDC in next ch, BLO HDC across, HDC in last st, turn.
<44(60)>
(photo 2)
ROW 3: Ch 1, BLO HDC across, HDC in last st, ch 3, turn.
<44(60) sts + 3 chs>
ROW 4: HDC into 2nd ch from hook, HDC in next ch, BLO HDC across, HDC in last st, turn.
<46(62)>
ROW 5: Ch 1, BLO HDC across, HDC in last st, ch 5, turn.
<46(62) sts + 5 chs>
ROW 6: HDC into 2nd ch from hook, HDC in each ch, BLO HDC across, HDC in last st, turn.
<50(66)>
ROW 7: Ch 1, BLO HDC across, HDC in last st, ch 6, turn.
<50(66) sts + 6 chs>
ROW 8: HDC into 2nd ch from hook, HDC in each ch, BLO HDC across, HDC in last st, turn.
<55(71)>
ROW 9: Ch 1, BLO HDC across, HDC in last st, ch 20, turn.
<55(71) sts + 20 chs>
20 chs = strap length.
(photo 3)
Do not fasten off! Proceed directly to ‘FIRST STRAP’ instructions.
FIRST STRAP
ROW 10: HDC into 2nd ch from hook, HDC in each ch, BLO HDC across, HDC in last st, turn.
<74(90)>
(photo 4)
ROWS 11 - 12: Ch 1, BLO HDC across, HDC in last st, turn.
<74(90)>
(photo 5)
Do not fasten off! Proceed directly to ‘NECKLINE DECREASE’ instructions.
NECKLINE DECREASE
ROW 13: Ch 1, BLO HDC 59(75), HDC in next st, turn.
<60(76)>
ROW 14: Ch 1, BLO HDC across, HDC in last st, turn.
<60(76)>
ROW 15: Ch 1, BLO HDC across until 4 sts left, HDC in next st, turn.
<57(73)>
ROW 16: Ch 1, BLO HDC across, HDC in last st, turn.
<57(73)>
ROW 17: Ch 1, BLO HDC across until 3 sts left, HDC in next st, turn.
<55(71)>
ROW 18: Ch 1, BLO HDC across, HDC in last st, turn.
<55(71)>
ROW 19: Ch 1, BLO HDC across until 3 sts left, HDC in next st, turn.
<53(69)>
ROW 20: Ch 1, BLO HDC across, HDC in last st, turn.
<53(69)>
ROW 21: Ch 1, BLO HDC across until 3 sts left, HDC in next st, turn.
<51(67)>
ROW 22: Ch 1, BLO HDC across, HDC in last st, turn.
<51(67)>
ROW 23: Ch 1, BLO HDC across until 2 sts left, HDC in next st, ch 2, turn.
<50(66) sts + 2 chs>
ROW 23 is the centre line / middle of the top. We’ll now increase the neckline.
(photo 6)
Do not fasten off! Proceed directly to ‘NECKLINE INCREASE’ instructions.
NECKLINE INCREASE
ROW 24: HDC into 2nd ch from hook, BLO HDC across, HDC in last st, turn.
<51(67)>
ROW 25: Ch 1, BLO HDC across, HDC in last st, ch 3, turn.
<51(67) + 3 chs>
ROW 26: HDC into 2nd ch from hook, HDC in next ch, BLO HDC across, HDC in last st, turn.
<53(69)>
ROW 27: Ch 1, BLO HDC across, HDC in last st, ch 3, turn.
<53(69) + 3 chs>
ROW 28: HDC into 2nd ch from hook, HDC in next ch, BLO HDC across, HDC in last st, turn.
<55(71)>
ROW 29: Ch 1, BLO HDC across, HDC in last st, ch 3, turn.
<55(71) + 3 chs>
ROW 30: HDC into 2nd ch from hook, HDC in next ch, BLO HDC across, HDC in last st, turn.
<57(73)>
ROW 31: Ch 1, BLO HDC across, HDC in last st, ch 4, turn.
<57(73) + 4 chs>
ROW 32: HDC into 2nd ch from hook, HDC in each ch, BLO HDC across, HDC in last st, turn.
<60(76)>
ROW 33: Ch 1, BLO HDC across, HDC in last st, ch 15, turn.
<60(76) + 15 chs>
*15 chs = strap length
(Note: this number is does not match the number of chs in ROW 9 – we have fewer chains since we’re increasing from the neckline, not the armhole.)
(photo 7+8)
Do not fasten off! Proceed directly to ‘SECOND STRAP’ instructions.
SECOND STRAP
ROW 34: HDC into 2nd ch from hook, HDC in each ch, BLO HDC across, HDC in last st, turn.
<74(90)>
ROWS 35 - 36: Ch 1, BLO HDC across, HDC in last st, turn.
<74(90)>
(photo 9)
Do not fasten off! Proceed directly to ‘ARMHOLE DECREASE’ instructions.
ARMHOLE DECREASE
ROW 37: Ch 1, BLO HDC 54(70), HDC in next st, turn.
<55(71)>
ROW 38: Ch 1, BLO HDC across, HDC in last st, turn.
<55(71)>
ROW 39: Ch 1, BLO HDC across until 6 sts left, HDC in next st, turn.
<50(66)>
ROW 40: Ch 1, BLO HDC across, HDC in last st, turn.
<50(66)>
ROW 41: Ch 1, BLO HDC across until 5 sts left, HDC in next st, turn.
<46(62)>
ROW 42: Ch 1, BLO HDC across, HDC in last st, turn.
<46(62)>
ROW 43: Ch 1, BLO HDC across until 3 sts left, HDC in next st, turn.
<44(60)>
ROW 44: Ch 1, BLO HDC across, HDC in last st, turn.
<44(60)>
ROW 45: Ch 1, BLO HDC across until 3 sts left, HDC in next st.
<42(58)>
(photo 10)
Fasten off.
Repeat steps for 2nd body piece.
Proceed to 'ASSEMBLY' instructions.
Size M
ARMHOLE INCREASE
FOUNDATION CHAIN: Ch 44(60).
ROW 1: HDC into 2nd ch from hook, HDC in each ch until end, ch 3, turn.
<43(59) sts + 3 chs>
(photo 1)
ROW 2: HDC into 2nd ch from hook, HDC in next ch, BLO HDC across, HDC in last st, turn.
<45(61)>
(photo 2)
ROW 3: Ch 1, BLO HDC across, HDC in last st, ch 3, turn.
<45(61) sts + 3 chs>
ROW 4: HDC into 2nd ch from hook, HDC in next ch, BLO HDC across, HDC in last st, turn.
<47(63)>
ROW 5: Ch 1, BLO HDC across, HDC in last st, ch 3, turn.
<47(63) sts + 3 chs>
ROW 6: HDC into 2nd ch from hook, HDC in next ch, BLO HDC across, HDC in last st, turn.
<49(65)>
ROW 7: Ch 1, BLO HDC across, HDC in last st, ch 4, turn.
<49(65) sts + 4 chs>
ROW 8: HDC into 2nd ch from hook, HDC in each ch, BLO HDC across, HDC in last st, turn.
<52(68)>
ROW 9: Ch 1, BLO HDC across, HDC in last st, ch 5, turn.
<52(68) sts + 5 chs>
ROW 10: HDC into 2nd ch from hook, HDC in each ch, BLO HDC across, HDC in last st, turn.
<56(72)>
ROW 11: Ch 1, BLO HDC across, HDC in last st, ch 23, turn.
<56(72) sts + 23 chs>
23 chs = strap length.
(photo 3)
Do not fasten off! Proceed directly to ‘FIRST STRAP’ instructions.
FIRST STRAP
ROW 12: HDC into 2nd ch from hook, HDC in each ch, BLO HDC across, HDC in last st, turn.
<78(94)>
(photo 4)
ROWS 13 - 14: Ch 1, BLO HDC across, HDC in last st, turn.
<78(94)>
(photo 5)
Do not fasten off! Proceed directly to ‘NECKLINE DECREASE’ instructions.
NECKLINE DECREASE
ROW 15: Ch 1, BLO HDC 61(77), HDC in next st, turn.
<62(78)>
ROW 16: Ch 1, BLO HDC across, HDC in last st, turn.
<62(78)>
ROW 17: Ch 1, BLO HDC across until 4 sts left, HDC in next st, turn.
<59(75)>
ROW 18: Ch 1, BLO HDC across, HDC in last st, turn.
<59(75)>
ROW 19: Ch 1, BLO HDC across until 3 sts left, HDC in next st, turn.
<57(73)>
ROW 20: Ch 1, BLO HDC across, HDC in last st, turn.
<57(73)>
ROW 21: Ch 1, BLO HDC across until 3 sts left, HDC in next st, turn.
<55(71)>
ROW 22: Ch 1, BLO HDC across, HDC in last st, turn.
<55(71)>
ROW 23: Ch 1, BLO HDC across until 3 sts left, HDC in next st, turn.
<53(69)>
ROW 24: Ch 1, BLO HDC across, HDC in last st, turn.
<53(69)>
ROW 25: Ch 1, BLO HDC across until 2 sts left, HDC in next st, ch 2, turn.
<52(68) sts + 2 chs>
ROW 25 is the centre line / middle of the top. We’ll now increase the neckline.
(photo 6)
Do not fasten off! Proceed directly to ‘NECKLINE INCREASE’ instructions.
NECKLINE INCREASE
ROW 26: HDC into 2nd ch from hook, BLO HDC across, HDC in last st, turn.
<53(69)>
ROW 27: Ch 1, BLO HDC across, HDC in last st, ch 3, turn.
<53(69) + 3 chs>
ROW 28: HDC into 2nd ch from hook, HDC in next ch, BLO HDC across, HDC in last st, turn.
<55(71)>
ROW 29: Ch 1, BLO HDC across, HDC in last st, ch 3, turn.
<55(71) + 3 chs>
ROW 30: HDC into 2nd ch from hook, HDC in next ch, BLO HDC across, HDC in last st, turn.
<57(73)>
ROW 31: Ch 1, BLO HDC across, HDC in last st, ch 3, turn.
<57(73) + 3 chs>
ROW 32: HDC into 2nd ch from hook, HDC in next ch, BLO HDC across, HDC in last st, turn.
<59(75)>
ROW 33: Ch 1, BLO HDC across, HDC in last st, ch 4, turn.
<59(75) + 4 chs>
ROW 34: HDC into 2nd ch from hook, HDC in each ch, BLO HDC across, HDC in last st, turn.
<62(78)>
ROW 35: Ch 1, BLO HDC across, HDC in last st, ch 17, turn.
<62(78) + 17 chs>
*17 chs = strap length
(Note: this number is does not match the number of chs in ROW 11 – we have fewer chains since we’re increasing from the neckline, not the armhole.)
(photo 7+8)
Do not fasten off! Proceed directly to ‘SECOND STRAP’ instructions.
SECOND STRAP
ROW 36: HDC into 2nd ch from hook, HDC in each ch, BLO HDC across, HDC in last st, turn.
<78(94)>
ROWS 37 - 38: Ch 1, BLO HDC across, HDC in last st, turn.
<78(94)>
(photo 9)
Do not fasten off! Proceed directly to ‘ARMHOLE DECREASE’ instructions.
ARMHOLE DECREASE
ROW 39: Ch 1, BLO HDC 55(71), HDC in next st, turn.
<56(72)>
ROW 40: Ch 1, BLO HDC across, HDC in last st, turn.
<56(72)>
ROW 41: Ch 1, BLO HDC across until 5 sts left, HDC in next st, turn.
<52(68)>
ROW 42: Ch 1, BLO HDC across, HDC in last st, turn.
<52(68)>
ROW 43: Ch 1, BLO HDC across until 4 sts left, HDC in next st, turn.
<49(65)>
ROW 44: Ch 1, BLO HDC across, HDC in last st, turn.
<49(65)>
ROW 45: Ch 1, BLO HDC across until 3 sts left, HDC in next st, turn.
<47(63)>
ROW 46: Ch 1, BLO HDC across, HDC in last st, turn.
<47(63)>
ROW 47: Ch 1, BLO HDC across until 3 sts left, HDC in next st, turn.
<45(61)>
ROW 48: Ch 1, BLO HDC across, HDC in last st, turn.
<45(61)>
ROW 49: Ch 1, BLO HDC across until 3 sts left, HDC in next st.
<43(59)>
(photo 10)
Fasten off.
Repeat steps for 2nd body piece.
Proceed to 'ASSEMBLY' instructions.
Size L
ARMHOLE INCREASE
FOUNDATION CHAIN: Ch 45(61).
ROW 1: HDC into 2nd ch from hook, HDC in each ch until end, ch 3, turn.
<44(60) sts + 3 chs>
(photo 1)
ROW 2: HDC into 2nd ch from hook, HDC in next ch, BLO HDC across, HDC in last st, turn.
<46(62)>
(photo 2)
ROW 3: Ch 1, BLO HDC across, HDC in last st, ch 3, turn.
<46(62) sts + 3 chs>
ROW 4: HDC into 2nd ch from hook, HDC in next ch, BLO HDC across, HDC in last st, turn.
<48(64)>
ROW 5: Ch 1, BLO HDC across, HDC in last st, ch 3, turn.
<48(64) sts + 3 chs>
ROW 6: HDC into 2nd ch from hook, HDC in next ch, BLO HDC across, HDC in last st, turn.
<50(66)>
ROW 7: Ch 1, BLO HDC across, HDC in last st, ch 4, turn.
<50(66) sts + 4 chs>
ROW 8: HDC into 2nd ch from hook, HDC in each ch, BLO HDC across, HDC in last st, turn.
<53(69)>
ROW 9: Ch 1, BLO HDC across, HDC in last st, ch 5, turn.
<53(69) sts + 5 chs>
ROW 10: HDC into 2nd ch from hook, HDC in each ch, BLO HDC across, HDC in last st, turn.
<57(73)>
ROW 11: Ch 1, BLO HDC across, HDC in last st, ch 26, turn.
<57(73) sts + 26 chs>
*26 chs = strap length.
(photo 3)
Do not fasten off! Proceed directly to ‘FIRST STRAP’ instructions.
FIRST STRAP
ROW 12: HDC into 2nd ch from hook, HDC in each ch, BLO HDC across, HDC in last st, turn.
<82(98)>
(photo 4)
ROWS 13 - 16: Ch 1, BLO HDC across, HDC in last st, turn.
<82(98)>
(photo 5)
Do not fasten off! Proceed directly to ‘NECKLINE DECREASE’ instructions.
NECKLINE DECREASE
ROW 17: Ch 1, BLO HDC 64(80), HDC in next st, turn.
<65(81)>
ROW 18: Ch 1, BLO HDC across, HDC in last st, turn.
<65(81)>
ROW 19: Ch 1, BLO HDC across until 4 sts left, HDC in next st, turn.
<62(78)>
ROW 20: Ch 1, BLO HDC across, HDC in last st, turn.
<62(78)>
ROW 21: Ch 1, BLO HDC across until 3 sts left, HDC in next st, turn.
<60(76)>
ROW 22: Ch 1, BLO HDC across, HDC in last st, turn.
<60(76)>
ROW 23: Ch 1, BLO HDC across until 3 sts left, HDC in next st, turn.
<58(74)>
ROW 24: Ch 1, BLO HDC across, HDC in last st, turn.
<58(74)>
ROW 25: Ch 1, BLO HDC across until 3 sts left, HDC in next st, turn.
<56(72)>
ROW 26: Ch 1, BLO HDC across, HDC in last st, turn.
<56(72)>
ROW 27: Ch 1, BLO HDC across until 2 sts left, HDC in next st, turn.
<55(71)>
ROW 28: Ch 1, BLO HDC across, HDC in last st, turn.
<55(71)>
ROW 28 is the centre line / middle of the top. We’ll now increase the neckline.
(photo 6)
Do not fasten off! Proceed directly to ‘NECKLINE INCREASE’ instructions.
NECKLINE INCREASE
ROW 29: Ch 1, BLO HDC across, HDC in last st, ch 2, turn.
<55(71) sts + 2 chs>
ROW 30: HDC into 2nd ch from hook, BLO HDC across, HDC in last st, turn.
<56(72)>
ROW 31: Ch 1, BLO HDC across, HDC in last st, ch 3, turn.
<56(72) + 3 chs>
ROW 32: HDC into 2nd ch from hook, BLO HDC across, HDC in last st, turn.
<58(74)>
ROW 33: Ch 1, BLO HDC across, HDC in last st, ch 3, turn.
<58(74) + 3 chs>
ROW 34: HDC into 2nd ch from hook, HDC in next ch, BLO HDC across, HDC in last st, turn.
<60(76)>
ROW 35: Ch 1, BLO HDC across, HDC in last st, ch 3, turn.
<60(76) + 3 chs>
ROW 36: HDC into 2nd ch from hook, HDC in next ch, BLO HDC across, HDC in last st, turn.
<62(78)>
ROW 37: Ch 1, BLO HDC across, HDC in last st, ch 4, turn.
<62(78) + 4 chs>
ROW 38: HDC into 2nd ch from hook, HDC in next ch, BLO HDC across, HDC in last st, turn.
<65(81)>
ROW 39: Ch 1, BLO HDC across, HDC in last st, ch 18, turn.
<65(81) + 18 chs>
*18 chs = strap length
(Note: this number is does not match the number of chs in ROW 11 – we have fewer chains since we’re increasing from the neckline, not the armhole.)
(photo 7+8)
Do not fasten off! Proceed directly to ‘SECOND STRAP’ instructions.
SECOND STRAP
ROW 40: HDC into 2nd ch from hook, HDC in each ch, BLO HDC across, HDC in last st, turn.
<82(98)>
ROWS 41 - 44: Ch 1, BLO HDC across, HDC in last st, turn.
<82(98)>
(photo 9)
Do not fasten off! Proceed directly to ‘ARMHOLE DECREASE’ instructions.
ARMHOLE DECREASE
ROW 45: Ch 1, BLO HDC 56(72), HDC in next st, turn.
<57(73)>
ROW 46: Ch 1, BLO HDC across, HDC in last st, turn.
<57(73)>
ROW 47: Ch 1, BLO HDC across until 5 sts left, HDC in next st, turn.
<53(69)>
ROW 48: Ch 1, BLO HDC across, HDC in last st, turn.
<53(69)>
ROW 49: Ch 1, BLO HDC across until 4 sts left, HDC in next st, turn.
<50(66)>
ROW 50: Ch 1, BLO HDC across, HDC in last st, turn.
<50(66)>
ROW 51: Ch 1, BLO HDC across until 3 sts left, HDC in next st, turn.
<48(64)>
ROW 52: Ch 1, BLO HDC across, HDC in last st, turn.
<48(64)>
ROW 53: Ch 1, BLO HDC across until 3 sts left, HDC in next st, turn.
<46(62)>
ROW 54: Ch 1, BLO HDC across, HDC in last st, turn.
<46(62)>
ROW 55: Ch 1, BLO HDC across until 3 sts left, HDC in next st.
<44(60)>
(photo 10)
Fasten off.
Repeat steps for 2nd body piece.
Proceed to 'ASSEMBLY' instructions.
Size XL
ARMHOLE INCREASE
FOUNDATION CHAIN: Ch 47(61).
ROW 1: HDC into 2nd ch from hook, HDC in each ch, turn.
<46(60)>
ROW 2: Ch 1, BLO HDC across, HDC in last st, turn.
<46(60)>
ROW 3: Ch 1, BLO HDC across, HDC in last st, ch 3, turn.
<46(60) sts + 3 chs>
(photo 1)
ROW 4: HDC into 2nd ch from hook, HDC in next ch, BLO HDC across, HDC in last st, turn.
<48(62)>
(photo 2)
ROW 5: Ch 1, BLO HDC across, HDC in last st, ch 3, turn.
<48(62) sts + 3 chs>
ROW 6: HDC into 2nd ch from hook, HDC in next ch, BLO HDC across, HDC in last st, turn.
<50(64)>
ROW 7: Ch 1, BLO HDC across, HDC in last st, ch 3, turn.
<50(64) sts + 3 chs>
ROW 8: HDC into 2nd ch from hook, HDC in next ch, BLO HDC across, HDC in last st, turn.
<52(66)>
ROW 9: Ch 1, BLO HDC across, HDC in last st, ch 4, turn.
<52(66) sts + 4 chs>
ROW 10: HDC into 2nd ch from hook, HDC in each ch, BLO HDC across, HDC in last st, turn.
<55(69)>
ROW 11: Ch 1, BLO HDC across, HDC in last st, ch 5, turn.
<55(69) sts + 5 chs>
ROW 12: HDC into 2nd ch from hook, HDC in each ch, BLO HDC across, HDC in last st, turn.
<59(73)>
ROW 13: Ch 1, BLO HDC across, HDC in last st, ch 28, turn.
<59(73) sts + 28 chs>
*28 chs = strap length.
(photo 3)
Do not fasten off! Proceed directly to ‘FIRST STRAP’ instructions.
FIRST STRAP
ROW 14: HDC into 2nd ch from hook, HDC in each ch, BLO HDC across, HDC in last st, turn.
<86(100)>
(photo 4)
ROWS 15 - 18: Ch 1, BLO HDC across, HDC in last st, turn.
<86(100)>
(photo 5)
Do not fasten off! Proceed directly to ‘NECKLINE DECREASE’ instructions.
NECKLINE DECREASE
ROW 19: Ch 1, BLO HDC 68(82), HDC in next st, turn.
<69(83)>
ROW 20: Ch 1, BLO HDC across, HDC in last st, turn.
<69(83)>
ROW 21: Ch 1, BLO HDC across until 4 sts left, HDC in next st, turn.
<66(80)>
ROW 22: Ch 1, BLO HDC across, HDC in last st, turn.
<66(80)>
ROW 23: Ch 1, BLO HDC across until 3 sts left, HDC in next st, turn.
<64(78)>
ROW 24: Ch 1, BLO HDC across, HDC in last st, turn.
<64(78)>
ROW 25: Ch 1, BLO HDC across until 3 sts left, HDC in next st, turn.
<62(76)>
ROW 26: Ch 1, BLO HDC across, HDC in last st, turn.
<62(76)>
ROW 27: Ch 1, BLO HDC across until 3 sts left, HDC in next st, turn.
<60(74)>
ROW 28: Ch 1, BLO HDC across, HDC in last st, turn.
<60(74)>
ROW 29: Ch 1, BLO HDC across until 2 sts left, HDC in next st, turn.
<59(73)>
ROW 30: Ch 1, BLO HDC across, HDC in last st, turn.
<59(73)>
ROW 31: BLO HDC across until 2 sts left, HDC in next st, ch 2, turn.
<58(72) sts + 2 chs>
*ROW 31 is the centre line / middle of the top. We’ll now increase the neckline.
(photo 6)
Do not fasten off! Proceed directly to ‘NECKLINE INCREASE’ instructions.
NECKLINE INCREASE
ROW 32: HDC into 2nd ch from hook, BLO HDC across, HDC in last st, turn.
<59(73)>
ROW 33: Ch 1, BLO HDC across, HDC in last st, ch 2, turn.
<59(73) + 2 chs>
ROW 34: HDC into 2nd ch from hook, BLO HDC across, HDC in last st, turn.
<60(74)>
ROW 35: Ch 1, BLO HDC across, HDC in last st, ch 3, turn.
<60(74) + 3 chs>
ROW 36: HDC into 2nd ch from hook, HDC in next ch, BLO HDC across, HDC in last st, turn.
<62(76)>
ROW 37: Ch 1, BLO HDC across, HDC in last st, ch 3, turn.
<62(76) + 3 chs>
ROW 38: HDC into 2nd ch from hook, HDC in next ch, BLO HDC across, HDC in last st, turn.
<64(78)>
ROW 39: Ch 1, BLO HDC across, HDC in last st, ch 3, turn.
<64(78) + 3 chs>
ROW 40: HDC into 2nd ch from hook, HDC in next ch, BLO HDC across, HDC in last st, turn.
<66(80)>
ROW 41: Ch 1, BLO HDC across, HDC in last st, ch 4, turn.
<66(80) + 4 chs>
ROW 42: HDC into 2nd ch from hook, HDC in next ch, BLO HDC across, HDC in last st, turn.
<69(83)>
ROW 43: Ch 1, BLO HDC across, HDC in last st, ch 18, turn.
<69(83) + 18 chs>
*18 chs = strap length
(Note: this number is does not match the number of chs in ROW 13 – we have fewer chains since we’re increasing from the neckline, not the armhole.
(photo 7+8)
Do not fasten off! Proceed directly to ‘SECOND STRAP’ instructions.
SECOND STRAP
ROW 44: HDC into 2nd ch from hook, HDC in each ch, BLO HDC across, HDC in last st, turn.
<86(100)>
ROWS 45 - 48: Ch 1, BLO HDC across, HDC in last st, turn.
<86(100)>
(photo 9)
Do not fasten off! Proceed directly to ‘ARMHOLE DECREASE’ instructions.
ARMHOLE DECREASE
ROW 49: Ch 1, BLO HDC 58(72), HDC in next st, turn.
<59(73)>
ROW 50: Ch 1, BLO HDC across, HDC in last st, turn.
<59(73)>
ROW 51: Ch 1, BLO HDC across until 5 sts left, HDC in next st, turn.
<55(69)>
ROW 52: Ch 1, BLO HDC across, HDC in last st, turn.
<55(69)>
ROW 53: Ch 1, BLO HDC across until 4 sts left, HDC in next st, turn.
<52(66)>
ROW 54: Ch 1, BLO HDC across, HDC in last st, turn.
<52(66)>
ROW 55: Ch 1, BLO HDC across until 3 sts left, HDC in next st, turn.
<50(64)>
ROW 56: Ch 1, BLO HDC across, HDC in last st, turn.
<50(64)>
ROW 57: Ch 1, BLO HDC across until 3 sts left, HDC in next st, turn.
<48(62)>
ROW 58: Ch 1, BLO HDC across, HDC in last st, turn.
<48(62)>
ROW 59: Ch 1, BLO HDC across until 3 sts left, HDC in next st, turn.
<46(60)>
ROW 60: Ch 1, BLO HDC across, HDC in last st, turn.
<46(60)>
ROW 61: Ch 1, BLO HDC across, HDC in last st.
<46(60)>
(photo 10)
Fasten off.
Repeat steps for 2nd body piece.
Proceed to 'ASSEMBLY' instructions.
Size 2XL
ARMHOLE INCREASE
FOUNDATION CHAIN: Ch 49(63).
ROW 1: HDC into 2nd ch from hook, HDC in each ch, turn.
<48(62)>
ROW 2: Ch 1, BLO HDC across, HDC in last st, turn.
<48(62)>
ROW 3: Ch 1, BLO HDC across, HDC in last st, ch 3, turn.
<48(62) sts + 3 chs>
(photo 1)
ROW 4: HDC into 2nd ch from hook, HDC in next ch, BLO HDC across, HDC in last st, turn.
<50(64)>
(photo 2)
ROW 5: Ch 1, BLO HDC across, HDC in last st, ch 3, turn.
<50(64) sts + 3 chs>
ROW 6: HDC into 2nd ch from hook, HDC in next ch, BLO HDC across, HDC in last st, turn.
<52(66)>
ROW 7: Ch 1, BLO HDC across, HDC in last st, ch 3, turn.
<52(66) sts + 3 chs>
ROW 8: HDC into 2nd ch from hook, HDC in next ch, BLO HDC across, HDC in last st, turn.
<54(68)>
ROW 9: Ch 1, BLO HDC across, HDC in last st, ch 4, turn.
<54(68) sts + 4 chs>
ROW 10: HDC into 2nd ch from hook, HDC in each ch, BLO HDC across, HDC in last st, turn.
<57(71)>
ROW 11: Ch 1, BLO HDC across, HDC in last st, ch 5, turn.
<57(71) sts + 5 chs>
ROW 12: HDC into 2nd ch from hook, HDC in each ch, BLO HDC across, HDC in last st, turn.
<61(75)>
ROW 13: Ch 1, BLO HDC across, HDC in last st, ch 30, turn.
<61(75) sts + 30 chs>
*30 chs = strap length.
(photo 3)
Do not fasten off! Proceed directly to ‘FIRST STRAP’ instructions.
FIRST STRAP
ROW 14: HDC into 2nd ch from hook, HDC in each ch, BLO HDC across, HDC in last st, turn.
<90(104)>
(photo 4)
ROWS 15 - 18: Ch 1, BLO HDC across, HDC in last st, turn.
<90(104)>
(photo 5)
Do not fasten off! Proceed directly to ‘NECKLINE DECREASE’ instructions.
NECKLINE DECREASE
ROW 19: Ch 1, BLO HDC 73(87), HDC in next st, turn.
<74(88)>
ROW 20: Ch 1, BLO HDC across, HDC in last st, turn.
<74(88)>
ROW 21: Ch 1, BLO HDC across until 4 sts left, HDC in next st, turn.
<71(85)>
ROW 22: Ch 1, BLO HDC across, HDC in last st, turn.
<71(85)>
ROW 23: Ch 1, BLO HDC across until 4 sts left, HDC in next st, turn.
<68(82)>
ROW 24: Ch 1, BLO HDC across, HDC in last st, turn.
<68(82)>
ROW 25: Ch 1, BLO HDC across until 3 sts left, HDC in next st, turn.
<66(80)>
ROW 26: Ch 1, BLO HDC across, HDC in last st, turn.
<66(80)>
ROW 27: Ch 1, BLO HDC across until 3 sts left, HDC in next st, turn.
<64(78)>
ROW 28: Ch 1, BLO HDC across, HDC in last st, turn.
<64(78)>
ROW 29: Ch 1, BLO HDC across until 3 sts left, HDC in next st, turn.
<62(76)>
ROW 30: Ch 1, BLO HDC across, HDC in last st, turn.
<62(76)>
ROW 31: BLO HDC across until 2 sts left, HDC in next st, turn.
<61(75)>
ROW 32: Ch 1, BLO HDC across, HDC in last st, turn.
<61(75)>
ROW 33: Ch 1, BLO HDC across until 2 sts left, HDC in next st, turn.
<60(74)>
ROW 34: Ch 1, BLO HDC across, HDC in last st, turn.
<60(74)>
*ROW 34 is the centre line / middle of the top. We’ll now increase the neckline.
(photo 6)
Do not fasten off! Proceed directly to ‘NECKLINE INCREASE’ instructions.
NECKLINE INCREASE
ROW 35: Ch 1, BLO HDC across, HDC in last st, ch 2, turn.
<60(74) + 2 chs>
ROW 36: HDC into 2nd ch from hook, BLO HDC across, HDC in last st, turn.
<61(75)>
ROW 37: Ch 1, BLO HDC across, HDC in last st, ch 2, turn.
<61(75) + 2 chs>
ROW 38: HDC into 2nd ch from hook, BLO HDC across, HDC in last st, turn.
<62(76)>
ROW 39: Ch 1, BLO HDC across, HDC in last st, ch 3, turn.
<62(76) + 3 chs>
ROW 40: HDC into 2nd ch from hook, HDC in next ch, BLO HDC across, HDC in last st, turn.
<64(78)>
ROW 41: Ch 1, BLO HDC across, HDC in last st, ch 3, turn.
<64(78) + 3 chs>
ROW 42: HDC into 2nd ch from hook, HDC in next ch, BLO HDC across, HDC in last st, turn.
<66(80)>
ROW 43: Ch 1, BLO HDC across, HDC in last st, ch 3, turn.
<66(80) + 3 chs>
ROW 44: HDC into 2nd ch from hook, HDC in next ch, BLO HDC across, HDC in last st, turn.
<68(82)>
ROW 45: Ch 1, BLO HDC across, HDC in last st, ch 4, turn.
<68(82) + 4 chs>
ROW 46: HDC into 2nd ch from hook, HDC in each ch, BLO HDC across, HDC in last st, turn.
<71(85)>
ROW 47: Ch 1, BLO HDC across, HDC in last st, ch 4, turn.
<71(85) + 4 chs>
ROW 48: HDC into 2nd ch from hook, HDC in each ch, BLO HDC across, HDC in last st, turn.
<74(88)>
ROW 49: Ch 1, BLO HDC across, HDC in last st, ch 17, turn.
<74(88) + 17 chs>
*17 chs = strap length
(Note: this number is does not match the number of chs in ROW 13 – we have fewer chains since we’re increasing from the neckline, not the armhole.)
(photo 7+8)
Do not fasten off! Proceed directly to ‘SECOND STRAP’ instructions.
SECOND STRAP
ROW 50: HDC into 2nd ch from hook, HDC in each ch, BLO HDC across, HDC in last st, turn.
<90(104)>
ROWS 51 - 54: Ch 1, BLO HDC across, HDC in last st, turn.
<90(104)>
(photo 9)
Do not fasten off! Proceed directly to ‘ARMHOLE DECREASE’ instructions.
ARMHOLE DECREASE
ROW 55: Ch 1, BLO HDC 60(74), HDC in next st, turn.
<61(75)>
ROW 56: Ch 1, BLO HDC across, HDC in last st, turn.
<61(75)>
ROW 57: Ch 1, BLO HDC across until 5 sts left, HDC in next st, turn.
<57(71)>
ROW 58: Ch 1, BLO HDC across, HDC in last st, turn.
<57(71)>
ROW 59: Ch 1, BLO HDC across until 4 sts left, HDC in next st, turn.
<54(68)>
ROW 60: Ch 1, BLO HDC across, HDC in last st, turn.
<54(68)>
ROW 61: Ch 1, BLO HDC across until 3 sts left, HDC in next st, turn.
<52(66)>
ROW 62: Ch 1, BLO HDC across, HDC in last st, turn.
<52(66)>
ROW 63: Ch 1, BLO HDC across until 3 sts left, HDC in next st, turn.
<50(64)>
ROW 64: Ch 1, BLO HDC across, HDC in last st, turn.
<50(64)>
ROW 65: Ch 1, BLO HDC across until 3 sts left, HDC in next st, turn.
<48(62)>
ROW 66: Ch 1, BLO HDC across, HDC in last st, turn.
<48(62)>
ROW 67: Ch 1, BLO HDC across, HDC in last st.
<48(62)>
(photo 10)
Fasten off.
Repeat steps for 2nd body piece.
Proceed to 'ASSEMBLY' instructions.
Size 3XL
ARMHOLE INCREASE
FOUNDATION CHAIN: Ch 51(65).
ROW 1: HDC into 2nd ch from hook, HDC in each ch, turn.
<50(64)>
ROW 2: Ch 1, BLO HDC across, HDC in last st, turn.
<50(64)>
ROW 3: Ch 1, BLO HDC across, HDC in last st, ch 3, turn.
<50(64) sts + 3 chs>
(photo 1)
ROW 4: HDC into 2nd ch from hook, HDC in next ch, BLO HDC across, HDC in last st, turn.
<52(66)>
(photo 2)
ROW 5: Ch 1, BLO HDC across, HDC in last st, ch 3, turn.
<52(66) sts + 3 chs>
ROW 6: HDC into 2nd ch from hook, HDC in next ch, BLO HDC across, HDC in last st, turn.
<54(68)>
ROW 7: Ch 1, BLO HDC across, HDC in last st, ch 3, turn.
<54(68) sts + 3 chs>
ROW 8: HDC into 2nd ch from hook, HDC in next ch, BLO HDC across, HDC in last st, turn.
<56(70)>
ROW 9: Ch 1, BLO HDC across, HDC in last st, ch 4, turn.
<56(70) sts + 4 chs>
ROW 10: HDC into 2nd ch from hook, HDC in each ch, BLO HDC across, HDC in last st, turn.
<59(73)>
ROW 11: Ch 1, BLO HDC across, HDC in last st, ch 4, turn.
<59(73) sts + 4 chs>
ROW 12: HDC into 2nd ch from hook, HDC in each ch, BLO HDC across, HDC in last st, turn.
<62(76)>
ROW 13: Ch 1, BLO HDC across, HDC in last st, ch 5, turn.
<62(76) sts + 5 chs>
ROW 14: HDC into 2nd ch from hook, HDC in each ch, BLO HDC across, HDC in last st, turn.
<66(80)>
ROW 15: Ch 1, BLO HDC across, HDC in last st, ch 29, turn.
<66(80) sts + 29 chs>
*29 chs = strap length.
(photo 3)
Do not fasten off! Proceed directly to ‘FIRST STRAP’ instructions.
FIRST STRAP
ROW 16: HDC into 2nd ch from hook, HDC in each ch, BLO HDC across, HDC in last st, turn.
<94(108)>
(photo 4)
ROWS 17 - 20: Ch 1, BLO HDC across, HDC in last st, turn.
<94(108)>
(photo 5)
Do not fasten off! Proceed directly to ‘NECKLINE DECREASE’ instructions.
NECKLINE DECREASE
ROW 21: Ch 1, BLO HDC 77(91), HDC in next st, turn.
<78(92)>
ROW 22: Ch 1, BLO HDC across, HDC in last st, turn.
<78(92)>
ROW 23: Ch 1, BLO HDC across until 4 sts left, HDC in next st, turn.
<75(89)>
ROW 24: Ch 1, BLO HDC across, HDC in last st, turn.
<75(89)>
ROW 25: Ch 1, BLO HDC across until 4 sts left, HDC in next st, turn.
<72(86)>
ROW 26: Ch 1, BLO HDC across, HDC in last st, turn.
<72(86)>
ROW 27: Ch 1, BLO HDC across until 3 sts left, HDC in next st, turn.
<70(84)>
ROW 28: Ch 1, BLO HDC across, HDC in last st, turn.
<70(84)>
ROW 29: Ch 1, BLO HDC across until 3 sts left, HDC in next st, turn.
<68(82)>
ROW 30: Ch 1, BLO HDC across, HDC in last st, turn.
<68(82)>
ROW 31: Ch 1, BLO HDC across until 3 sts left, HDC in next st, turn.
<66(80)>
ROW 32: Ch 1, BLO HDC across, HDC in last st, turn.
<66(80)>
ROW 33: BLO HDC across until 3 sts left, HDC in next st, turn.
<64(78)>
ROW 34: Ch 1, BLO HDC across, HDC in last st, turn.
<64(78)>
ROW 35: Ch 1, BLO HDC across until 2 sts left, HDC in next st, turn.
<63(77)>
ROW 36: Ch 1, BLO HDC across, HDC in last st, turn.
<63(77)>
ROW 37: Ch 1, BLO HDC across until 2 sts, left, HDC in next st, ch 2, turn.
<62(76) + 2 chs>
*ROW 37 is the centre line / middle of the top. We’ll now increase the neckline.
(photo 6)
Do not fasten off! Proceed directly to ‘NECKLINE INCREASE’ instructions.
NECKLINE INCREASE
ROW 38: HDC into 2nd ch from hook, BLO HDC across, HDC in last st, turn.
<63(77)>
ROW 39: Ch 1, BLO HDC across, HDC in last st, ch 2, turn.
<63(77) + 2 chs>
ROW 40: HDC into 2nd ch from hook, BLO HDC across, HDC in last st, turn.
<64(78)>
ROW 41: Ch 1, BLO HDC across, HDC in last st, ch 3, turn.
<64(78) + 2 chs>
ROW 42: HDC into 2nd ch from hook, HDC in next ch, BLO HDC across, HDC in last st, turn.
<66(80)>
ROW 43: Ch 1, BLO HDC across, HDC in last st, ch 3, turn.
<66(80) + 3 chs>
ROW 44: HDC into 2nd ch from hook, HDC in next ch, BLO HDC across, HDC in last st, turn.
<68(82)>
ROW 45: Ch 1, BLO HDC across, HDC in last st, ch 3, turn.
<68(82) + 3 chs>
ROW 46: HDC into 2nd ch from hook, HDC in next ch, BLO HDC across, HDC in last st, turn.
<70(84)>
ROW 47: Ch 1, BLO HDC across, HDC in last st, ch 3, turn.
<70(84) + 3 chs>
ROW 48: HDC into 2nd ch from hook, HDC in next ch, BLO HDC across, HDC in last st, turn.
<72(86)>
ROW 49: Ch 1, BLO HDC across, HDC in last st, ch 4, turn.
<72(86) + 4 chs>
ROW 50: HDC into 2nd ch from hook, HDC in each ch, BLO HDC across, HDC in last st, turn.
<75(89)>
ROW 51: Ch 1, BLO HDC across, HDC in last st, ch 4, turn.
<75(89) + 4 chs>
ROW 52: HDC into 2nd ch from hook, HDC in each ch, BLO HDC across, HDC in last st, turn.
<78(92)>
ROW 53: Ch 1, BLO HDC across, HDC in last st, ch 17, turn.
<78(92) + 17 chs>
*17 chs = strap length
(Note: this number is does not match the number of chs in ROW 15 – we have fewer chains since we’re increasing from the neckline, not the armhole.)
(photo 7+8)
Do not fasten off! Proceed directly to ‘SECOND STRAP’ instructions.
SECOND STRAP
ROW 54: HDC into 2nd ch from hook, HDC in each ch, BLO HDC across, HDC in last st, turn.
<94(108)>
ROWS 55 - 58: Ch 1, BLO HDC across, HDC in last st, turn.
<94(108)>
(photo 9)
Do not fasten off! Proceed directly to ‘ARMHOLE DECREASE’ instructions.
ARMHOLE DECREASE
ROW 59: Ch 1, BLO HDC 65(79), HDC in next st, turn.
<66(80)>
ROW 60: Ch 1, BLO HDC across, HDC in last st, turn.
<66(80)>
ROW 61: Ch 1, BLO HDC across until 5 sts left, HDC in next st, turn.
<62(76)>
ROW 62: Ch 1, BLO HDC across, HDC in last st, turn.
<62(76)>
ROW 63: Ch 1, BLO HDC across until 4 sts left, HDC in next st, turn.
<59(73)>
ROW 64: Ch 1, BLO HDC across, HDC in last st, turn.
<59(73)>
ROW 65: Ch 1, BLO HDC across until 4 sts left, HDC in next st, turn.
<56(70)>
ROW 66: Ch 1, BLO HDC across, HDC in last st, turn.
<56(70)>
ROW 67: Ch 1, BLO HDC across until 3 sts left, HDC in next st, turn.
<54(68)>
ROW 68: Ch 1, BLO HDC across, HDC in last st, turn.
<54(68)>
ROW 69: Ch 1, BLO HDC across until 3 sts left, HDC in next st, turn.
<52(66)>
ROW 70: Ch 1, BLO HDC across, HDC in last st, turn.
<52(66)>
ROW 71: Ch 1, BLO HDC across until 3 sts left, HDC in next st, turn.
<50(64)>
ROW 72: Ch 1, BLO HDC across, HDC in last st, turn.
<50(64)>
ROW 73: Ch 1, BLO HDC across until 3 sts left, HDC in next st.
<50(64)>
(photo 10)
Fasten off.
Repeat steps for 2nd body piece.
Proceed to 'ASSEMBLY' instructions.
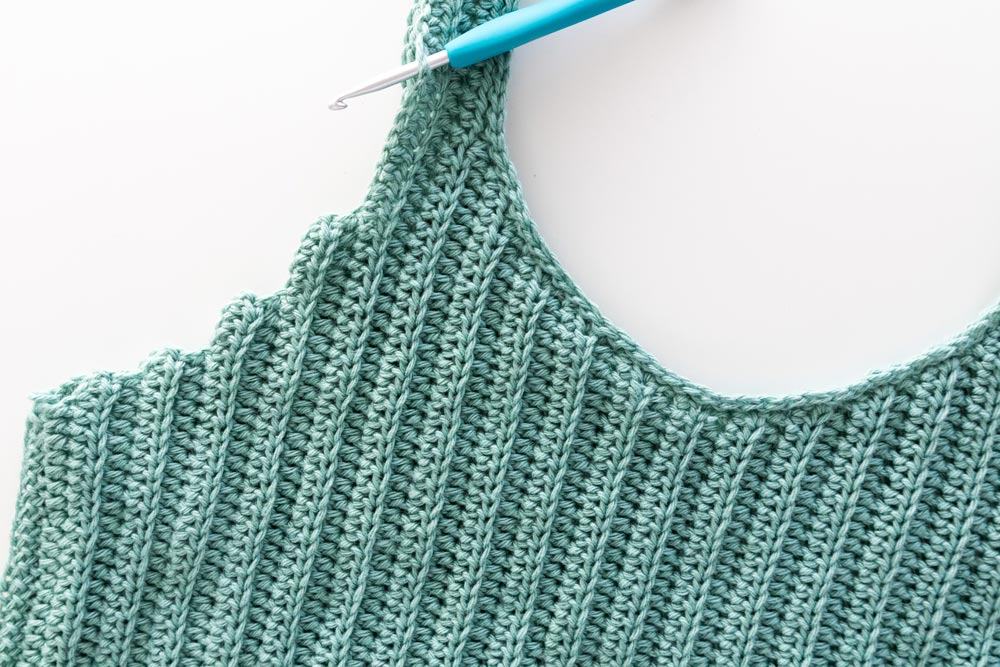
ASSEMBLY
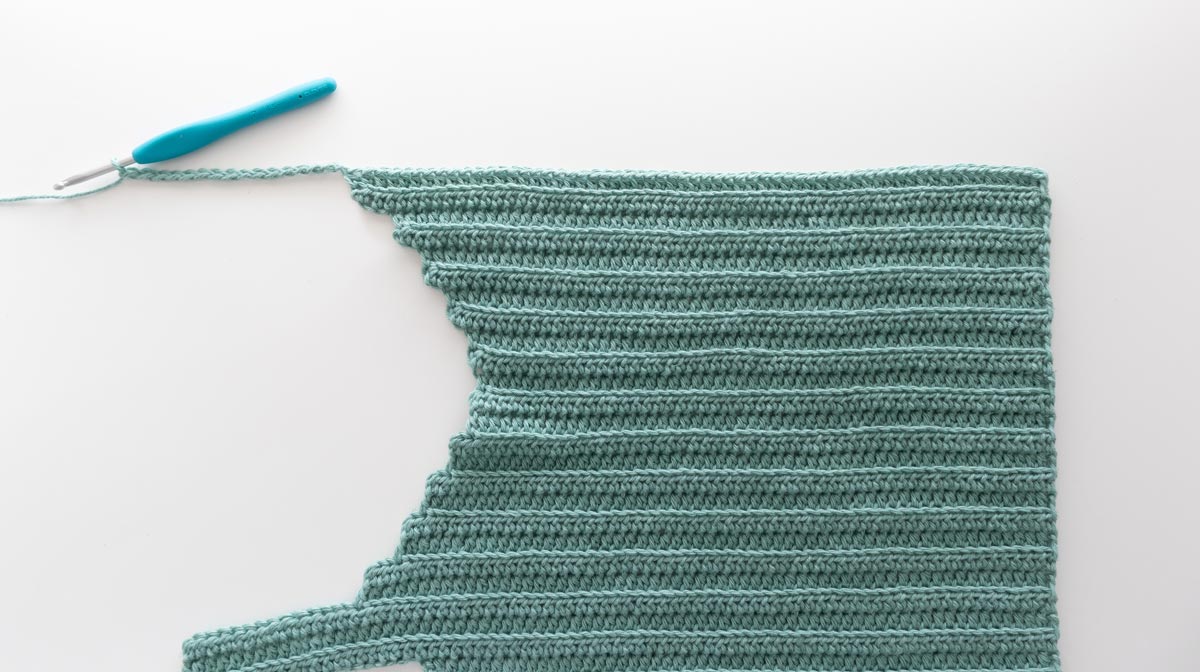
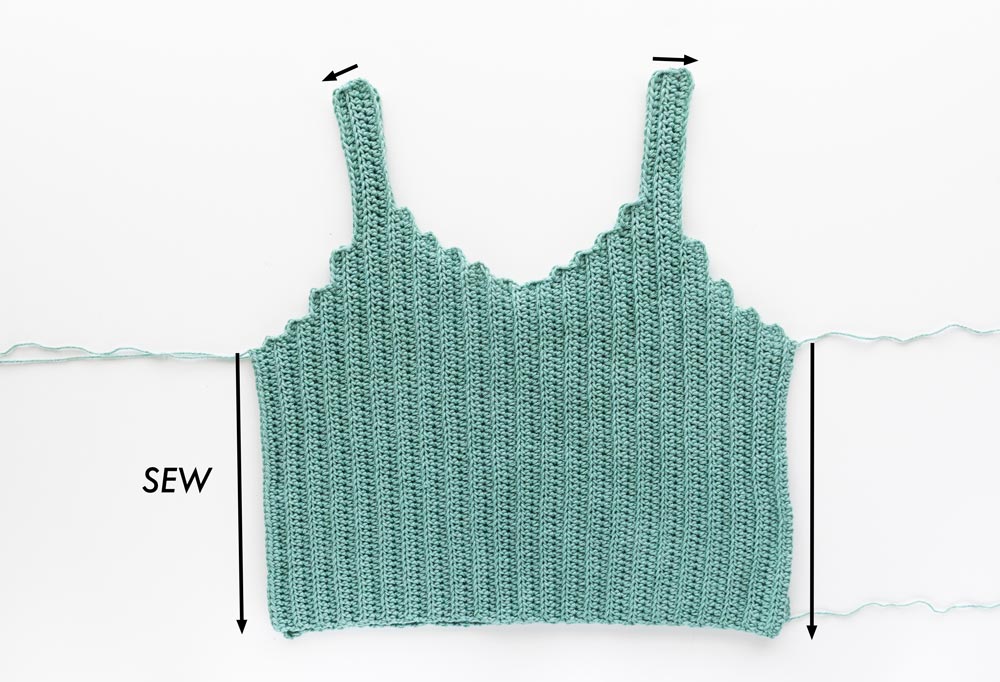
Lay the 2 body pieces on top of each other.
(photo 11)
Whip stitch the tops of the straps together and down the sides of the top.
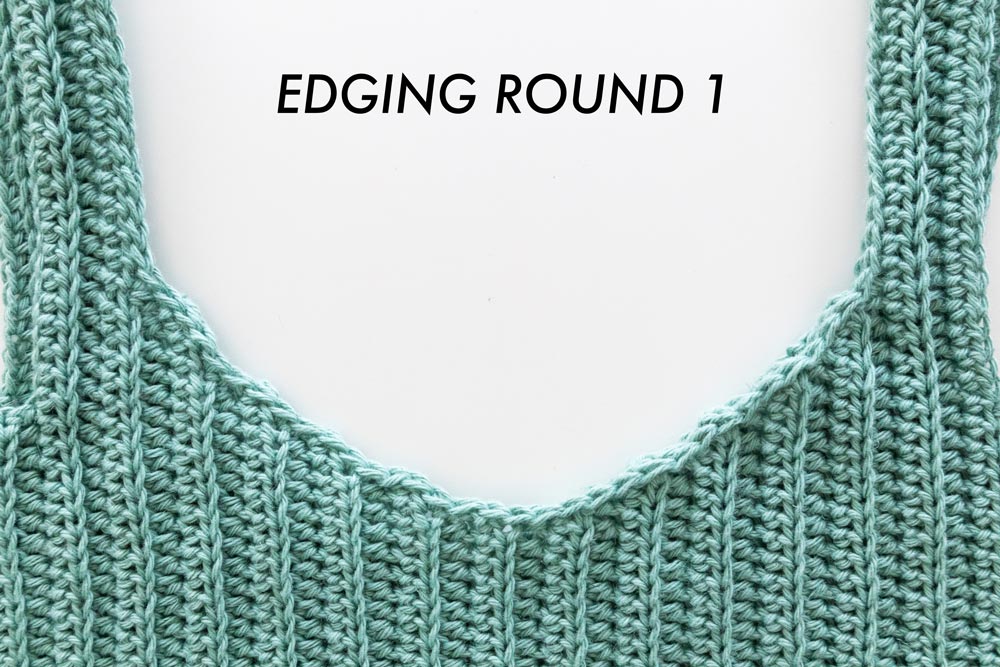
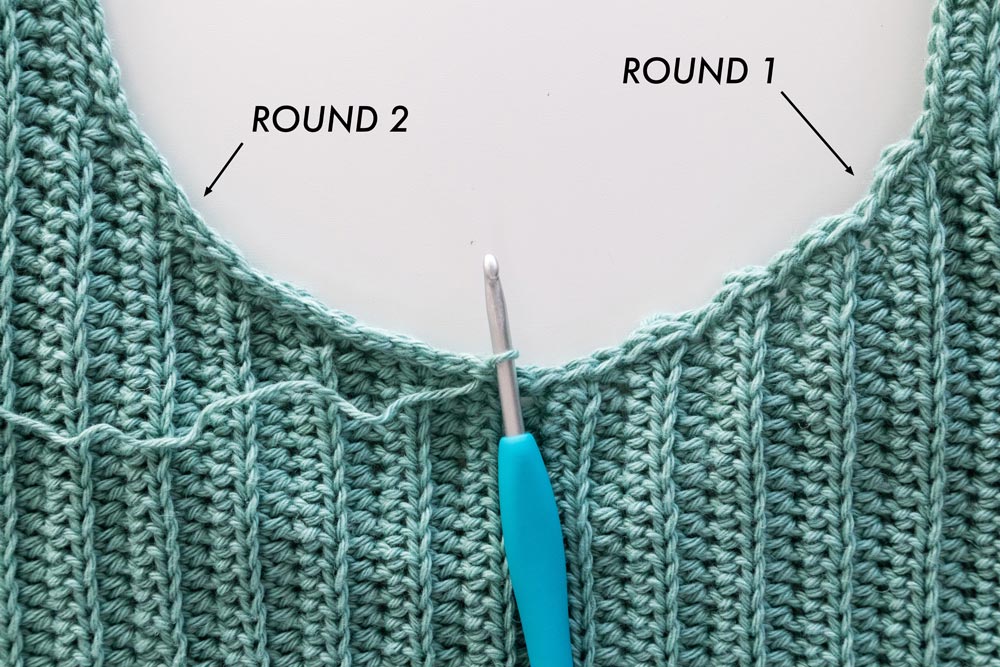
EDGING
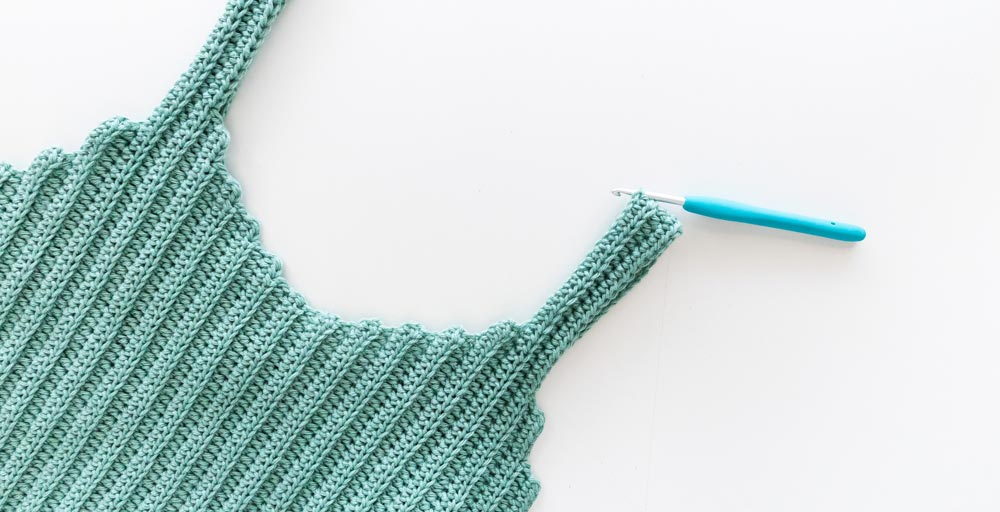
With the right side facing up, insert hook along the inner edge of strap. Secure yarn and pull up a loop.
(photo 12)
ROUND 1: Ch 1 (counts as a st), sl st evenly along the edge of the neckline.
(Please refer to the detailed demonstration in the video and photos).
Sl st into 1st ch to join, turn.
Edging Tips:
- Along the straps place 1 ch in each st.
- Along the increases and decreases, the goal is to ‘smooth out’ the bumps. I found that the best way is to space stitches evenly in a curved line. (photo 13)
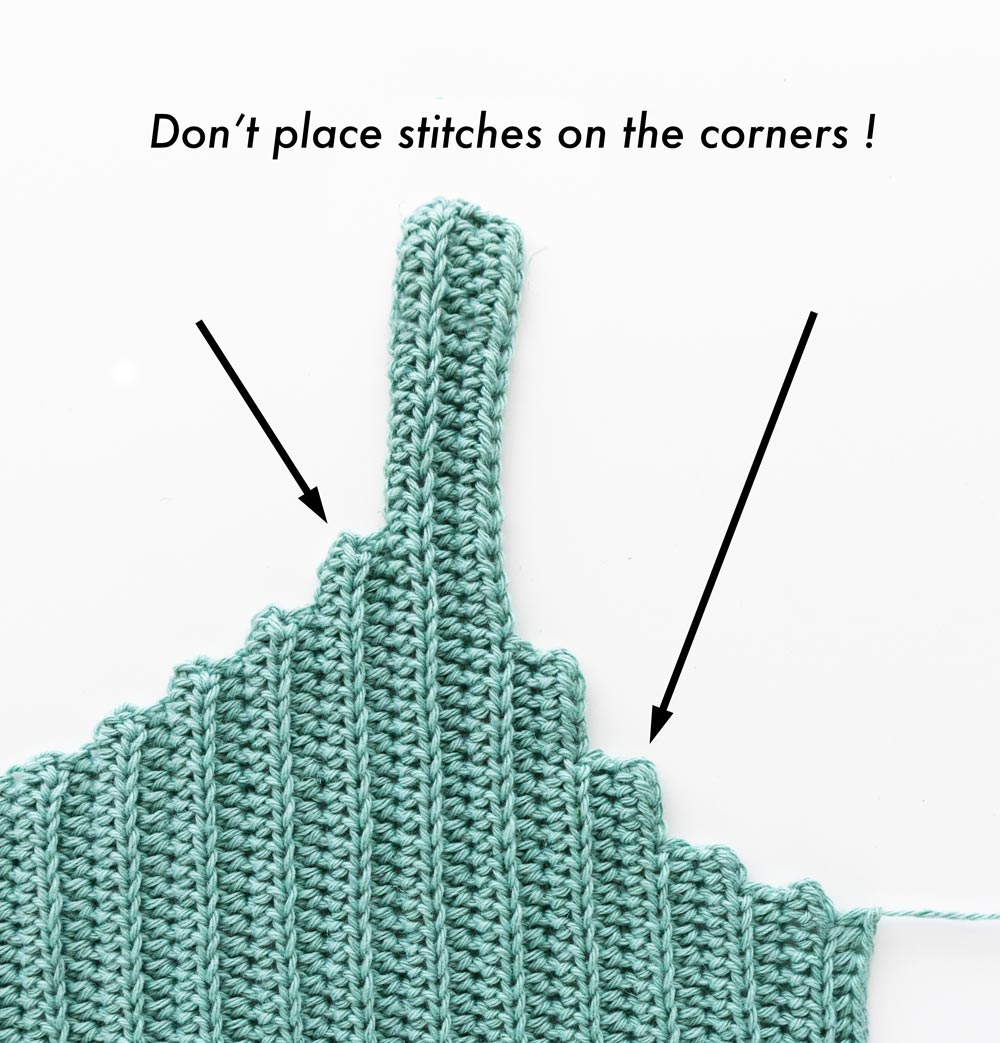
- Don’t place stitches in the points/tips of the corners (this ‘highlights’ the bumps instead of smoothing them out), rather insert your hook into the middle of the stitch. (photo 14)
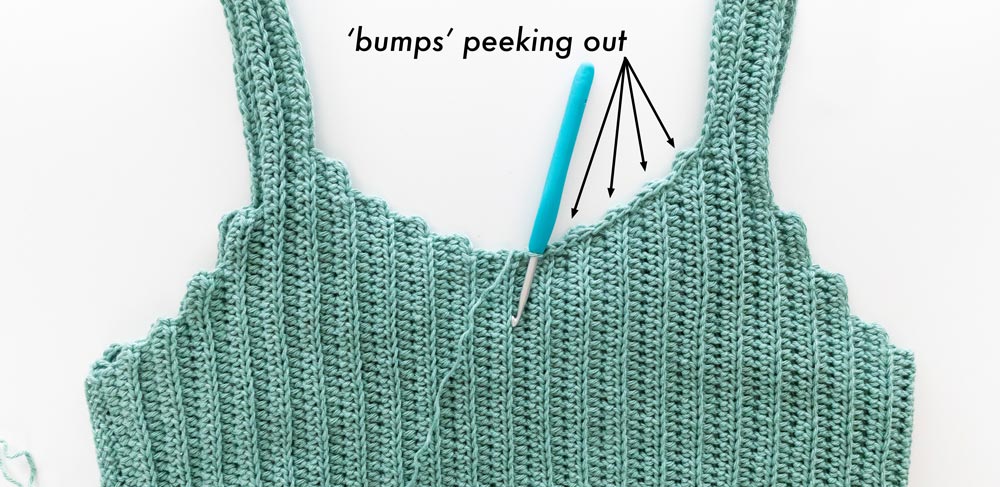
- Also, don’t worry if a small amount (less than 0.4cm / 1/8”) of the corners ‘peek out’ from behind the sl sts, they’ll be hidden in the next round of stitches. (photo 15 + 16)
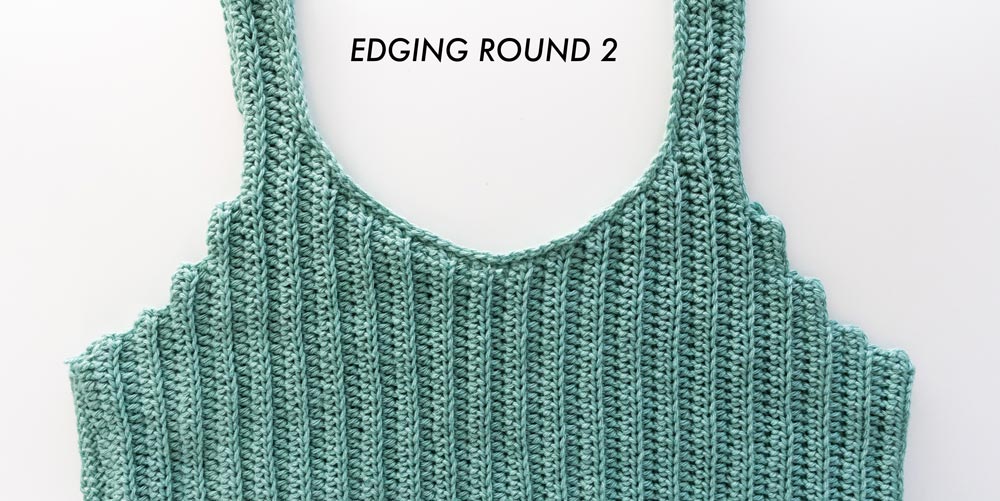
ROUND 2: Ch 1 (counts as a st), BLO sl st in each st around, sl st into 1st ch to join.
Fasten off.
*Make sure your BLO sl sts are worked into the sl sts of ROUND 1 – not the BLO HDCs!
(photo 17+18)
Repeat the EDGING steps for the two armholes.
(photo 19)
Weave in all of your ends.
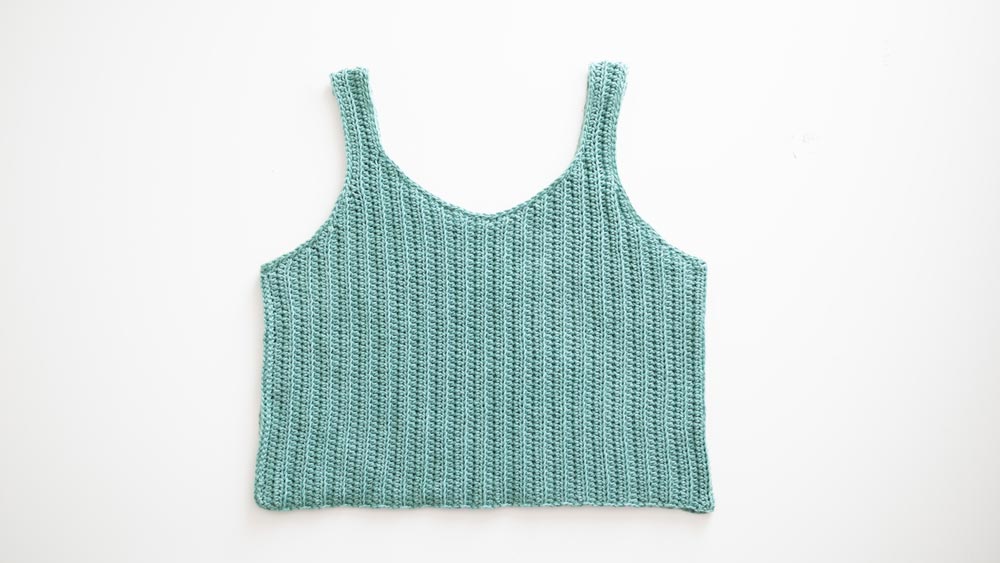
(photo 20)
Voilà! You’ve finished your Sagebrush Tank Top 🙂
PHOTOS
Love this. I just finished it and it was so easy to make.
Love how beautiful this looks in all its simplicity. I have Drops Muskat dk mercerized cotton that I would like to use. Will that work with this pattern?
in the medium directions on row 13-14 you do not have the extra chains listed to make the strap
Hi Cheryl, for size M the strap extension occurs in row 11 - rows 13-14 add thickness to the strap and then we decrease for the neckline. Grace 🙂
Hi Grace, if I want the strap 1-2 rows thicker, is it OK to add it/them after row 14, then continue the rest of the pattern? Thank you.
Hi Elisa, yes you can add extra rows to your strap but just keep in mind that this will make your entire top wider so you might need to size down!
Grace 🙂
Hi Grace, if I want a slightly thicker strap, is it OK to add 1 or 2 rows after row 14, then continue with the rest of the pattern? Thank you.
Hi Grace,
I’m having a problem with the stitch count. When you make your turning chain, do you HDCs into the NEXT stitch or the 2nd from the turning chain? I can’t tell from your video.
Hi Terri, the turning chain of Ch 1 doesn't count as a stitch - so the first st of each row should be worked into the last st of the previous row. I find this method gives straighter edges 🙂
I hope this helps,
Grace
Hi! So I'm really new to this, could you please explain what the number in the parentheses represents? Ch 46(62) for example, do I chain 46, or 62? Thank you ! 🙂
Hi, this pattern is separated by size and since the pattern is worked lengthways Ch 46(62) = ch 46 stitches for the cropped length or ch 62 for a longer length. All the measurements are provided in the notes of the pattern 🙂
Grace
Hi Grace! I love this pattern and I am almost finished! I was just wondering how I would go about washing this top. I made mine with 100% acrylic yarn.
Hi Sam, I just follow the washing instructions on the yarn label. Some yarns can be machine washed while others need to be hand washed. If I'm machine washing I always make sure to use a delicates bag and wash on the gentle cycle.
Grace 🙂
Love it, so simple and stylish. Is there a reason you don't continue straight around in one piece, rather than sewing the two sides together? I made a circular pattern once like this that had a good joining technique for the two end edges so it doesn't look too much like a seam.
Hi Phoebe,
So glad you like the pattern 🙂 Each panel has an uneven number of rows so if you continued to crochet in one piece the ribbing of the two sides won't perfectly match up. If this doesn't bother you then feel free to crochet one piece 🙂
Grace
Hi Grace, i made the M size of this top and it turned out to be super small
I think the problem is with yarn. My question is: how do i choose the right yarn ? The label says that i should use a 3mm hook and i used a 4mm hook. Do you think that might be the problem ? Should i change the yarn or use a bigger hook ?
Hi Gazal, this pattern uses a DK / Light (3) yarn and the thickness of the yarn will be on the yarn label. I'd also recommend creating a gauge swatch before your start, to make sure your top will match the suggested measurements. If your gauge is too small, increase your hook size and if it's too large decrease your hook size.
I hope this helps,
Grace 🙂
Is it possible to adjust this pattern to make the tank top square-necked?
Hi Emily, yes you can make a square neck just don't increase and decrease along the neckline - you'll just need to experiment figure out exactly where the square neckline should fall on your body 🙂
Grace
Thank you, Grace! If I manage to figure it joy, I’ll post some instructions in case others would like it.
Hi how did your square neckline work? I want to make this top with a square neck. Thanks!
Hi! I'm wondering if a yarn that is 70% Bamboo 30% Cotton can be used for this pattern or if you have any recommendations for a yarn other than cotton/linen?
Hi, any DK weight yarn should be fine for this pattern as long as you can meet gauge 🙂
Grace
Hey Grace. Really love this design. This isn't second time doing it, but I always get the neckline uneven - a side is higher than the other. Could it be something I'm doing? Or is the neckline uneven at first before making it round?
One strap is also shorter
Hi. I really love this design and this is my second time attempting to make it. But both times I tried, the neckline is uneven and one strap is shorter than the other. Is this how it is supposed to be? Or could there be something I am doing wrong? If so, how can I correct it? I've given up both times because I can't wrap my head around it
Hi,
It seems like your gauge is changing throughout the pattern - both straps of the tank should be the same length. Make sure to maintain even yarn tension throughout the pattern and along the neckline so that you get a smooth edge!
Grace 🙂
Hi Grace. Thank you for a great pattern.
Hi Grace! In the pictures, are you wearing the cropped or full length version? Thank you for all your patterns!
Hi Elizabeth,
I'm wearing the cropped version in a size small 🙂
Grace
Hello,
Thank you for your pattern and video!
I am crocheting the top now with a 4.5mm hook and my guage is 18 stitches wide and 13 rows tall for a 10cmx10cm square. What do I do if it's 13 rows and not 10.5 rows for 10cm..? If I use a bigger hook, I'm worried that the wideness will increase also.
Hi,
I'd recommend searching 'crochet gauge height' or 'crochet golden loop' tutorials on YouTube and you'll learn how to change your gauge when you only want to adjust stitch height 🙂
Grace
When I fold 1 piece in half, the edges don’t match. There are extra rows. Im thinking of frogging the last 2 rows. Or will it eventually match with the second piece?
Hi Venus,
When you fold the tank top in half both sides should be perfectly symmetrical. You might have missed a few rows on one side? Make sure you have the same number of rows as the pattern and your increase/decreases are also at the end/beginning of the correct rows.
Grace
Hi, Grace! I love your pattern so much, but I have a problem wondering if you could help. I did the pattern on the size M, but I realized half way that it might be too big for my body. On the back piece, I’m thinking of minimizing a row each side. Would that work? I hope you are able to reply. Thanks!
Yeah i’ve had the same problem and i’ve obsessively counted rows and stitches. I’ve attempted this pattern 3 times each time more careful than the last. so not sure what’s going on. pretty frustrating.
Ugh, I had a very hard time following this pattern. I spent three hours working on the first 10 rows only to have a big rectangle. Too difficult so I quit.
Thank you for a beautiful pattern! Any chance you'd consider coming up with a dress version of this, like you did for the scallop tank?
Hi Julienne,
This pattern is worked from side to side, so sizing for a dress would be really tricky! Hopefully one day I'll be skilled enough to do it 🙂
Grace
Hello, Grace,
Thank you for the lovely pattern. I made this and it’s almost perfect. The next one will have longer straps to alleviate the closeness under the arms. I’m also thinking of adding five additional stitches on each row to get a longer length. This shouldn’t be a problem, right? I made the first one using Cascade Ultra Pima cotton and the finished product is beautiful.
Best regards,
Pat
Hi Pat,
Sure length is really easy to add! With regards to the straps, just make sure that both straps have same total number of stitches - the exact number you chain is different if you're extending the strap from the armhole vs. extending the strap from the neckline since they have different curves.
I hope this helps,
Grace 🙂
Lion Brand just re-released their Cotton Ease yarn, and I'd really like to use it for this top. However, it's a bit heavier than what your pattern calls for: Weight 4 (worsted), 13.5 sc x 15 r on H-8 (5mm). Is it possible to size down my hook far enough to use this yarn? I plan to make this in size Large.
Hi Theresa,
The only way to know if it'll work out is to crochet a swatch to make sure you can meet gauge. CotLin isn't a very thick DK yarn, so chances are that a worsted (4) will be too thick and the stitches will be really dense. If the stitches are too dense the tank top will be really stiff. As always if you're willing to experiment you can go ahead and try 🙂 But if the gauge doesn't match the pattern your top will most likely end up bigger than the suggested measurements.
I hope this helps,
Grace
Hi, sorry, I'm using a thinner kind of thread and I don't know what is the correct length of the origin chain, I try with the number of chains of the pattern but it is too small, thanks you a lot
Hi Natalia,
For this pattern you really need to have the same gauge as what's listed or it won't work properly since it has curved edges. I recommend picking a DK cotton and crocheting a swatch to make sure you meet gauge.
Grace
Thank you for your free patterns! They have kept me sane during COVID!
Hi Anna,
So glad these patterns have been helping you! 🙂
Happy crocheting,
Grace
Loved making this pattern. When I’m doing the edging, am I crocheting on the right side or wrong side?
Hi Cheryl,
Row 1 of the edging starts with the right side facing up. I've added this note to the pattern 🙂
Grace
This was a fun pattern to make thanks for sharing
Hi Grace,
This tank is adorable. I’m doing the x-small which says to start with 46 chains. However, I did see that the next sizes up start with less chains (43, 44, 45, etc.). Should the initial chain be 42?
Thank you, Susie
Hola, crec que com hi ha menys files( 1-41), és possible que hagi centrat el treball començant per la quarta fila de les altres talles.
Hola, crec que com hi ha menys files (1-41), és possible que hagi centrat el treball començant per la quarta fila de les altres talles.
Hi Grace, thank you for sharing this free pattern!
I just want to check - is it correct that size XS starts with a longer chain than sizes S and M?
Thanks again 🙂
Having a problem with the decrease on row 16. The stitch count is 78 then row 17 is 75, but the decrease is 4 stitches. Do I count the chain? I don't think the chain counted on row 16.
This top is so lovely! I am really struggling with the neckline, however. Even trying to keep my tension loose, when I sl st around the neckline it ends up cinching it quite a bit smaller, making it more like a halter top than a curved neckline. I’m not sure what else to do or try to fix this?
try using a hook one size up or using sc instead of slst
Hi, I can't find the VIDEO TUTORIAL.
Where can i see it?
Thanks
Thanks for sharing this gorgeous pattern! Have you tried making both pieces together in one piece and then only having a seam up one side? I think it would be pretty straightforward, but figured it was worth asking before jumping in and trying it.
Hey Grace, I was wondering if there's a way to use this pattern to add sleeves? I love how easy this looks but I was wondering if there was method to continue to add sleeves rather than make the sleeves separately.
Thanks!
Loved this design so much and have started making it for my grand daughter .
I have a suggestion! Instead of keeping a count of the rows inside the mind, it's better to write the numbers down and tick them off as the rows get done! I found it helpful because it is hard for me to keep track with so many distractions, hope it helps you 🙂
And again- really loved the simple way you taught this!!
Hi Grace, thanks for wonderful design and the clear instructions. Loved it. I made one based on your pattern, using DC instead of HDC and with some changes. I would like to post the photo on yarn supplier hobbii. com referring to your site. Would that be OK for you?
Lovely pattern! Where can I find the video tutorial? I need help with sewing the edging and I scrolled this page so many times I didn't see any video.
I am excited to try this pattern. I did a swatch and it indicates that my stitches are not tall enough. I am between a S and a M (36” bust) so I was wondering if I could just make a M and assume it will be more of an S+ or M-? Advice?
hi grace! i've been eagerly working on this pattern as soon as my yarn arrived but i'm having some concerns about the total length. is the length measurement of the finished top from the top of the straps to the bottom hem? i'm working on the size large (full length) and have just reached row 12 of the instructions but it doesn't seem like my top will reach 21".
thank you!
The video posted isn't for this pattern. I'm also quite confused in the pattern where your supposed to HDC in each ch and then also BLO HDC across.....? If there's a HDC in each chain, how am I supposed to also BLO HDC in each stitch as well?
Hi, I am making the XL and on the neckline decrease part the counts are not adding up. There should be decrease stitches in there but you just have BLO HDC across.
Nevermind… I figured it out 🤦🏼♀️
I love your summer top, however, I have a question on the first strap section of the 2X. In rows 19 and 20 you have 88 stitches, then in row 21 you are asked to leave four stitches unworked leaving 85. That is an incorrect number of stitches unless I’m missing something. Could you please help? Thanks!
Thank you for the easy to follow pattern! Just finished it in the xs for my daughter. I ended up crocheting in one piece and adding a few rows under the arms to size correctly for her child frame. I also did a mix of ss,sc,hdc along the neckline as I had trouble smoothing out the edges with just ss.. I switched to back loop as I went along the straps, doing blo hdc on one side of the strap to add thickness and following the rib pattern and blo sc on the other side to avoid too thick. I used Yarn Lane crème cotton (87% cotton, 13% nylon) which is medium weight (4) and 3.75mm F hook. It turned out great!
My first non-baby top. I picked the Sagebrush Crop Top to make for my niece. I'm only 17 rows in and may I say I LOVE THIS PATTERN! You could not have made it easier and you feel like you are making so much progress so fast! Thank you!!! I'll post again when I'm finished but am just so excited about how it's working up, I had to say something.
Wonderful, fast, easy pattern and well explained. Looked at the directions and watched the tutorial. I did have difficulty with the rounding of the neck and armholes, but tried a few times and got it where I thought it looked ok. I will definitely make more of your creations. Thank you!