
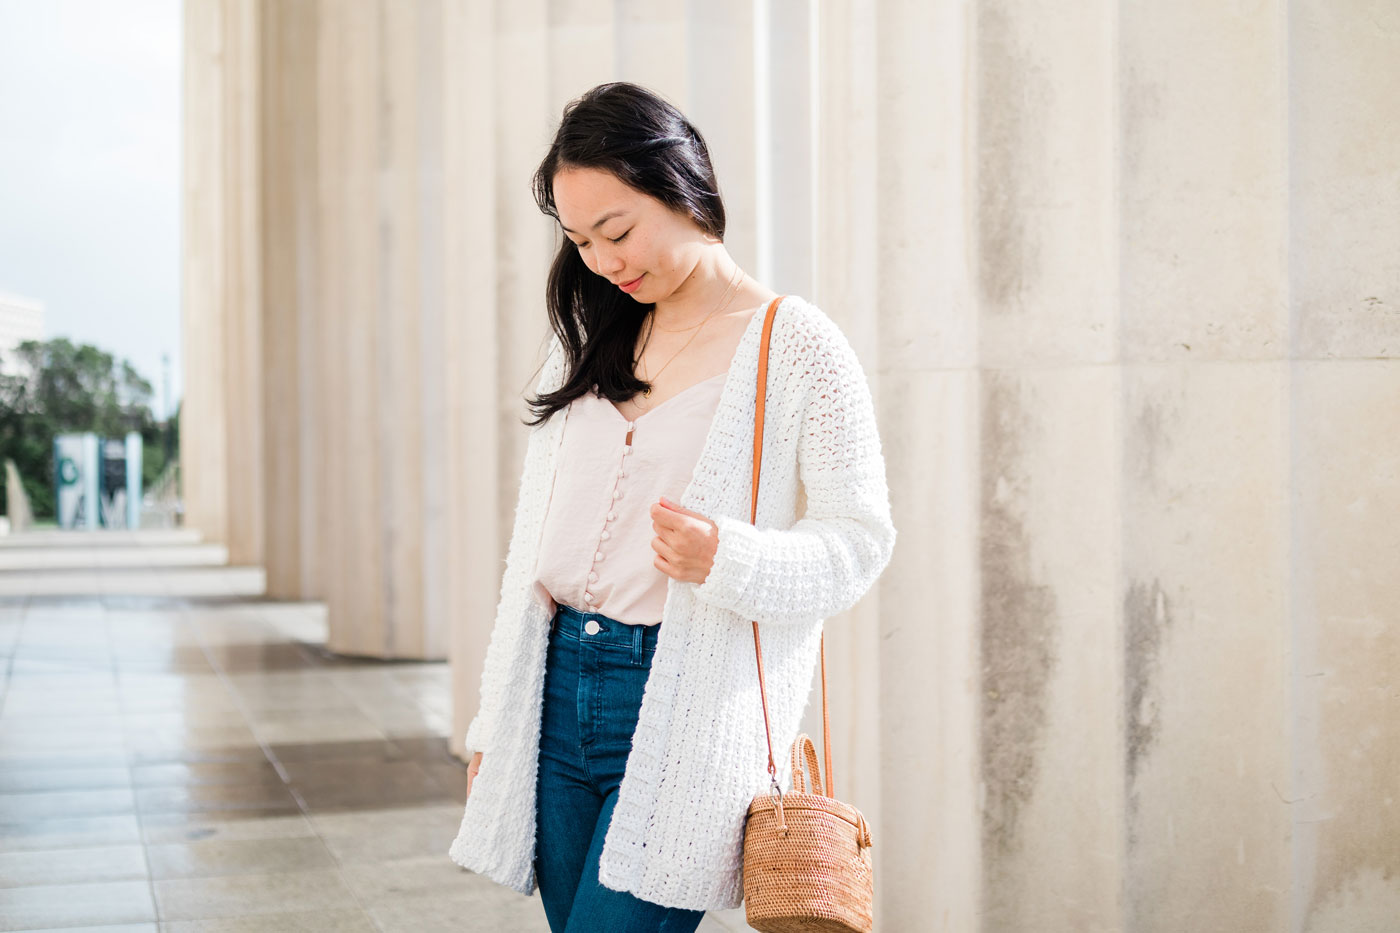
The In The Clouds Cardigan is the ultimate easy oversized crochet cardigan! Airy, light and ultra-soft, this long cardigan is the perfect layering piece in any season!
This free crochet cardigan pattern is accompanied by a video tutorial.
This post may contain affiliate links, view our disclosure policy for details.
Thank you to WeCrochet for sponsoring this free crochet cardigan pattern!
As always all thoughts and opinions are 100% my own 🙂
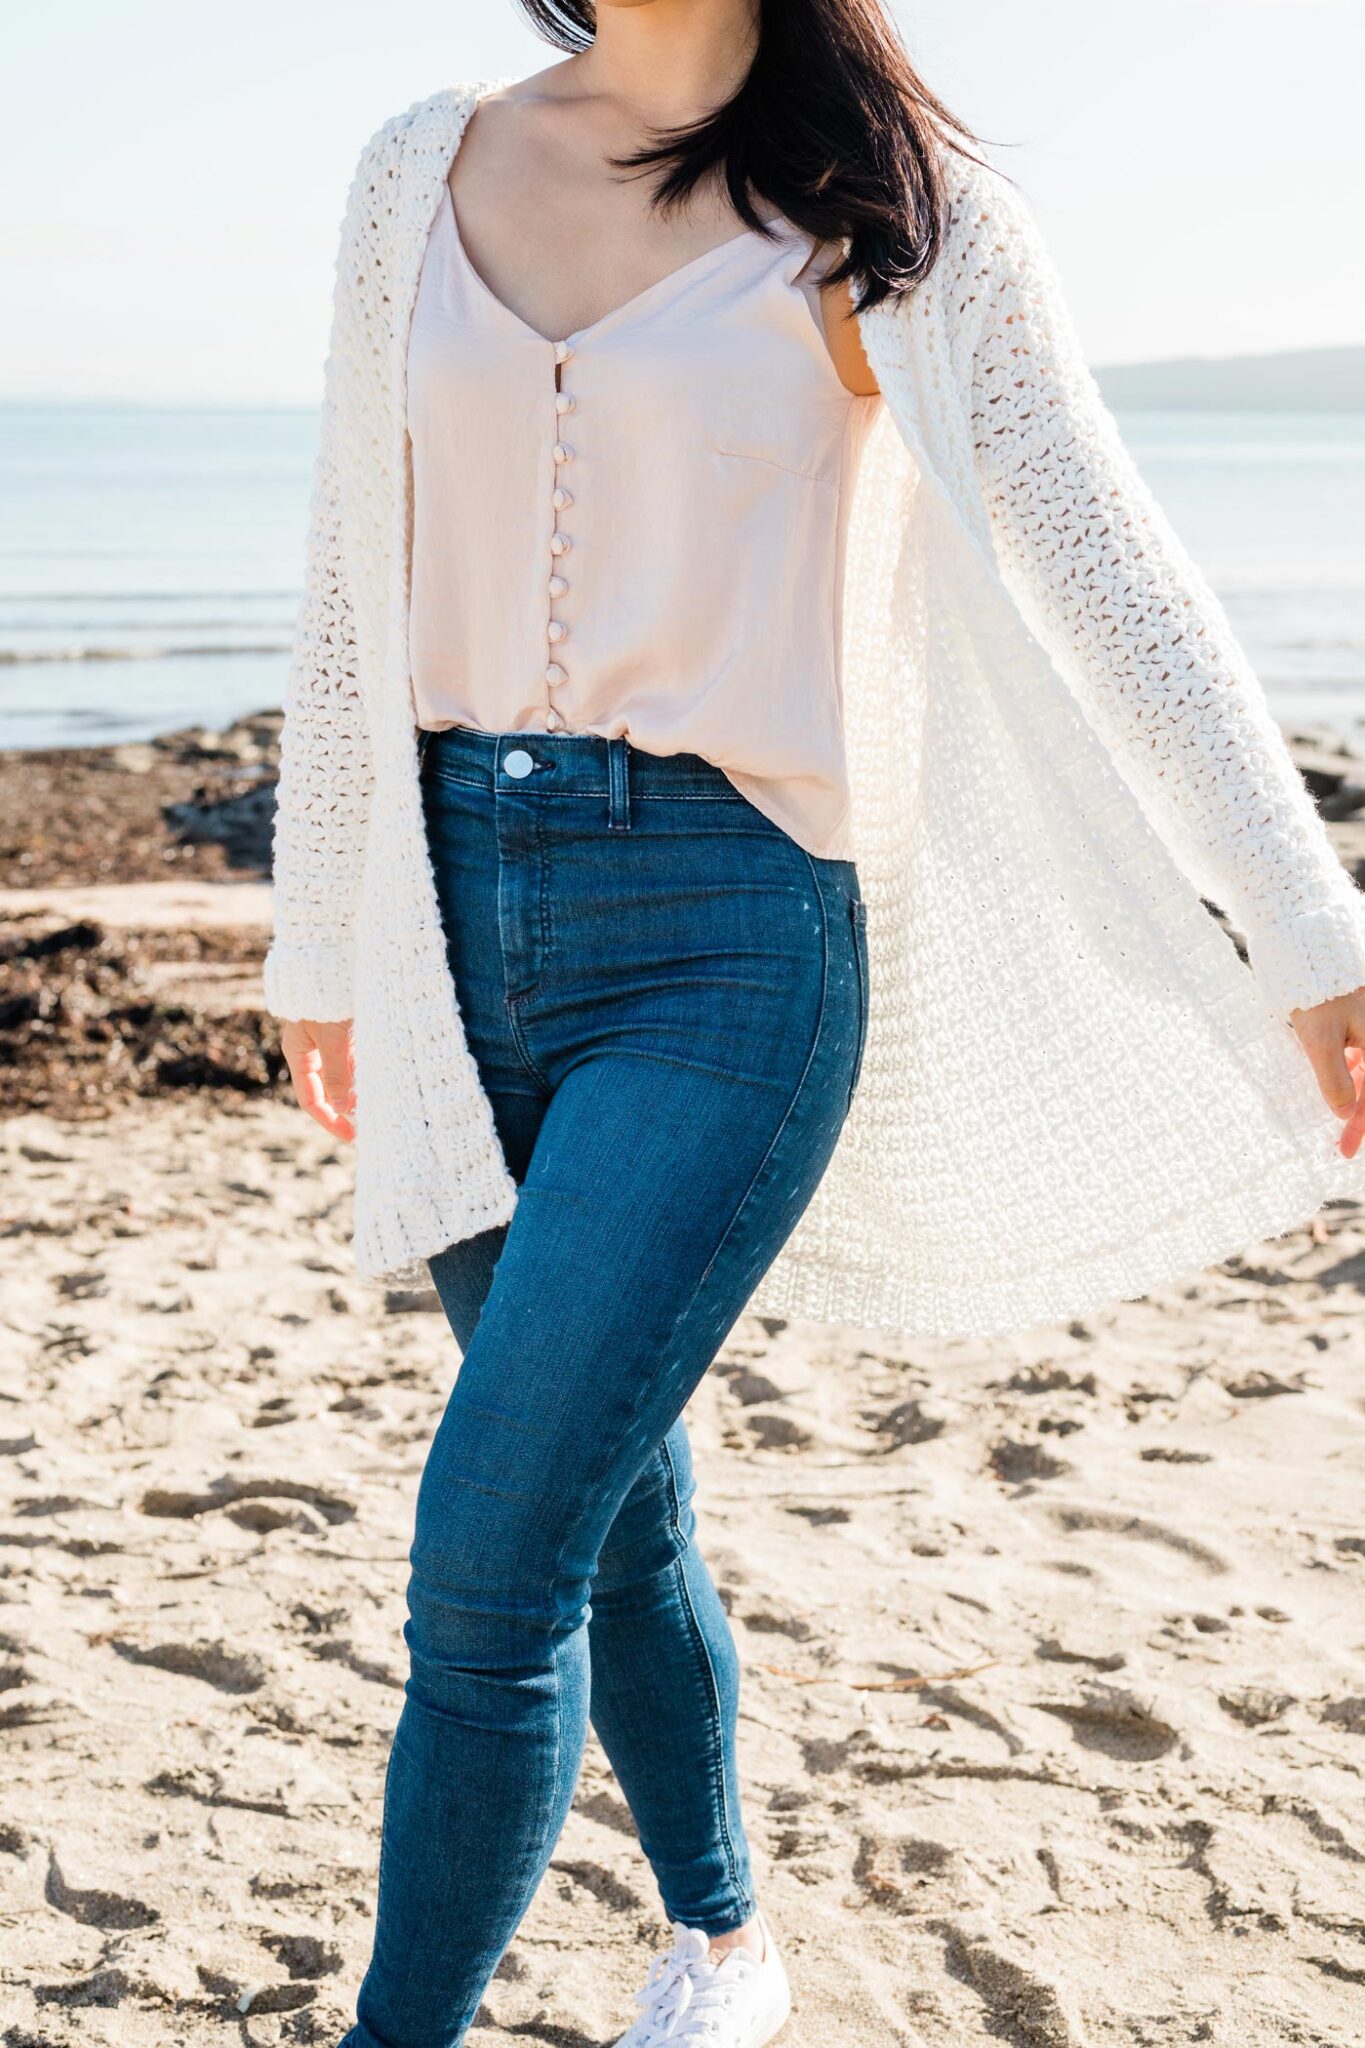
The In The Clouds Cardigan is an easy level crochet cardigan that adds cosy vibes to any outfit! The mix of single crochets and chains create a lovely textured surface while the loose and relaxed drape make it the ultimate comfy staple item in anyone’s wardrobe.
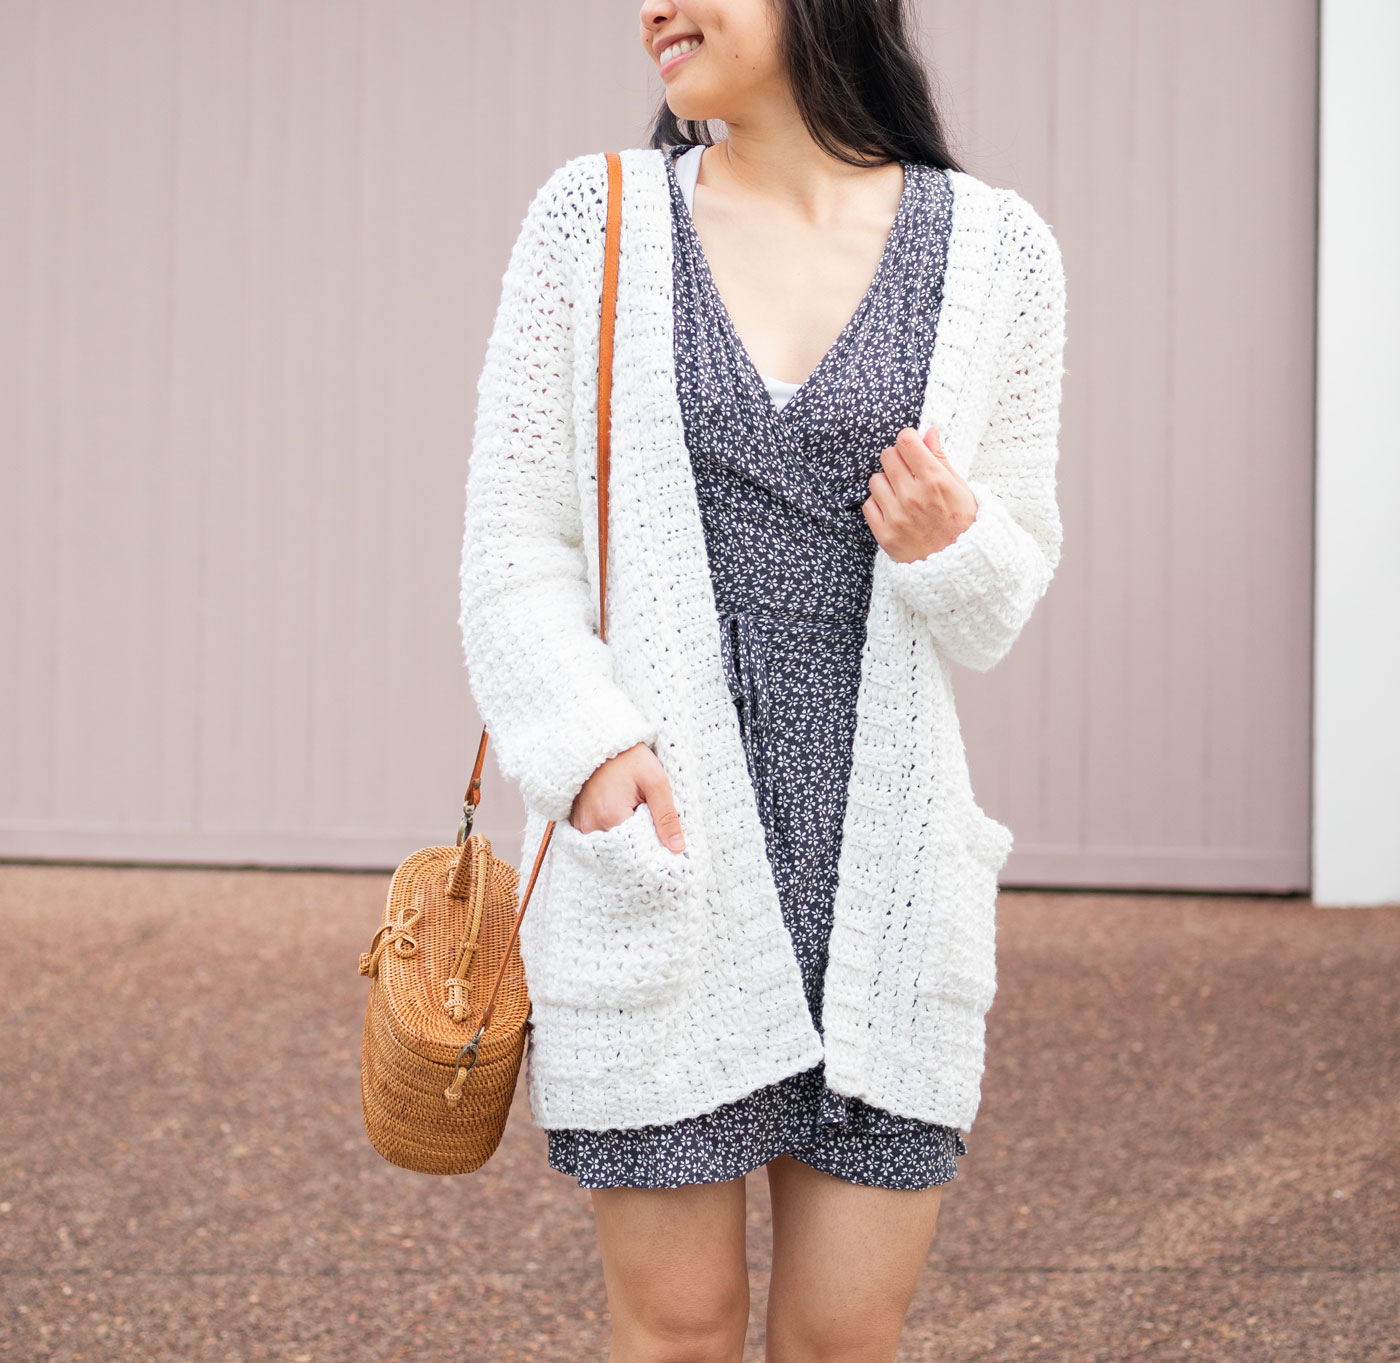
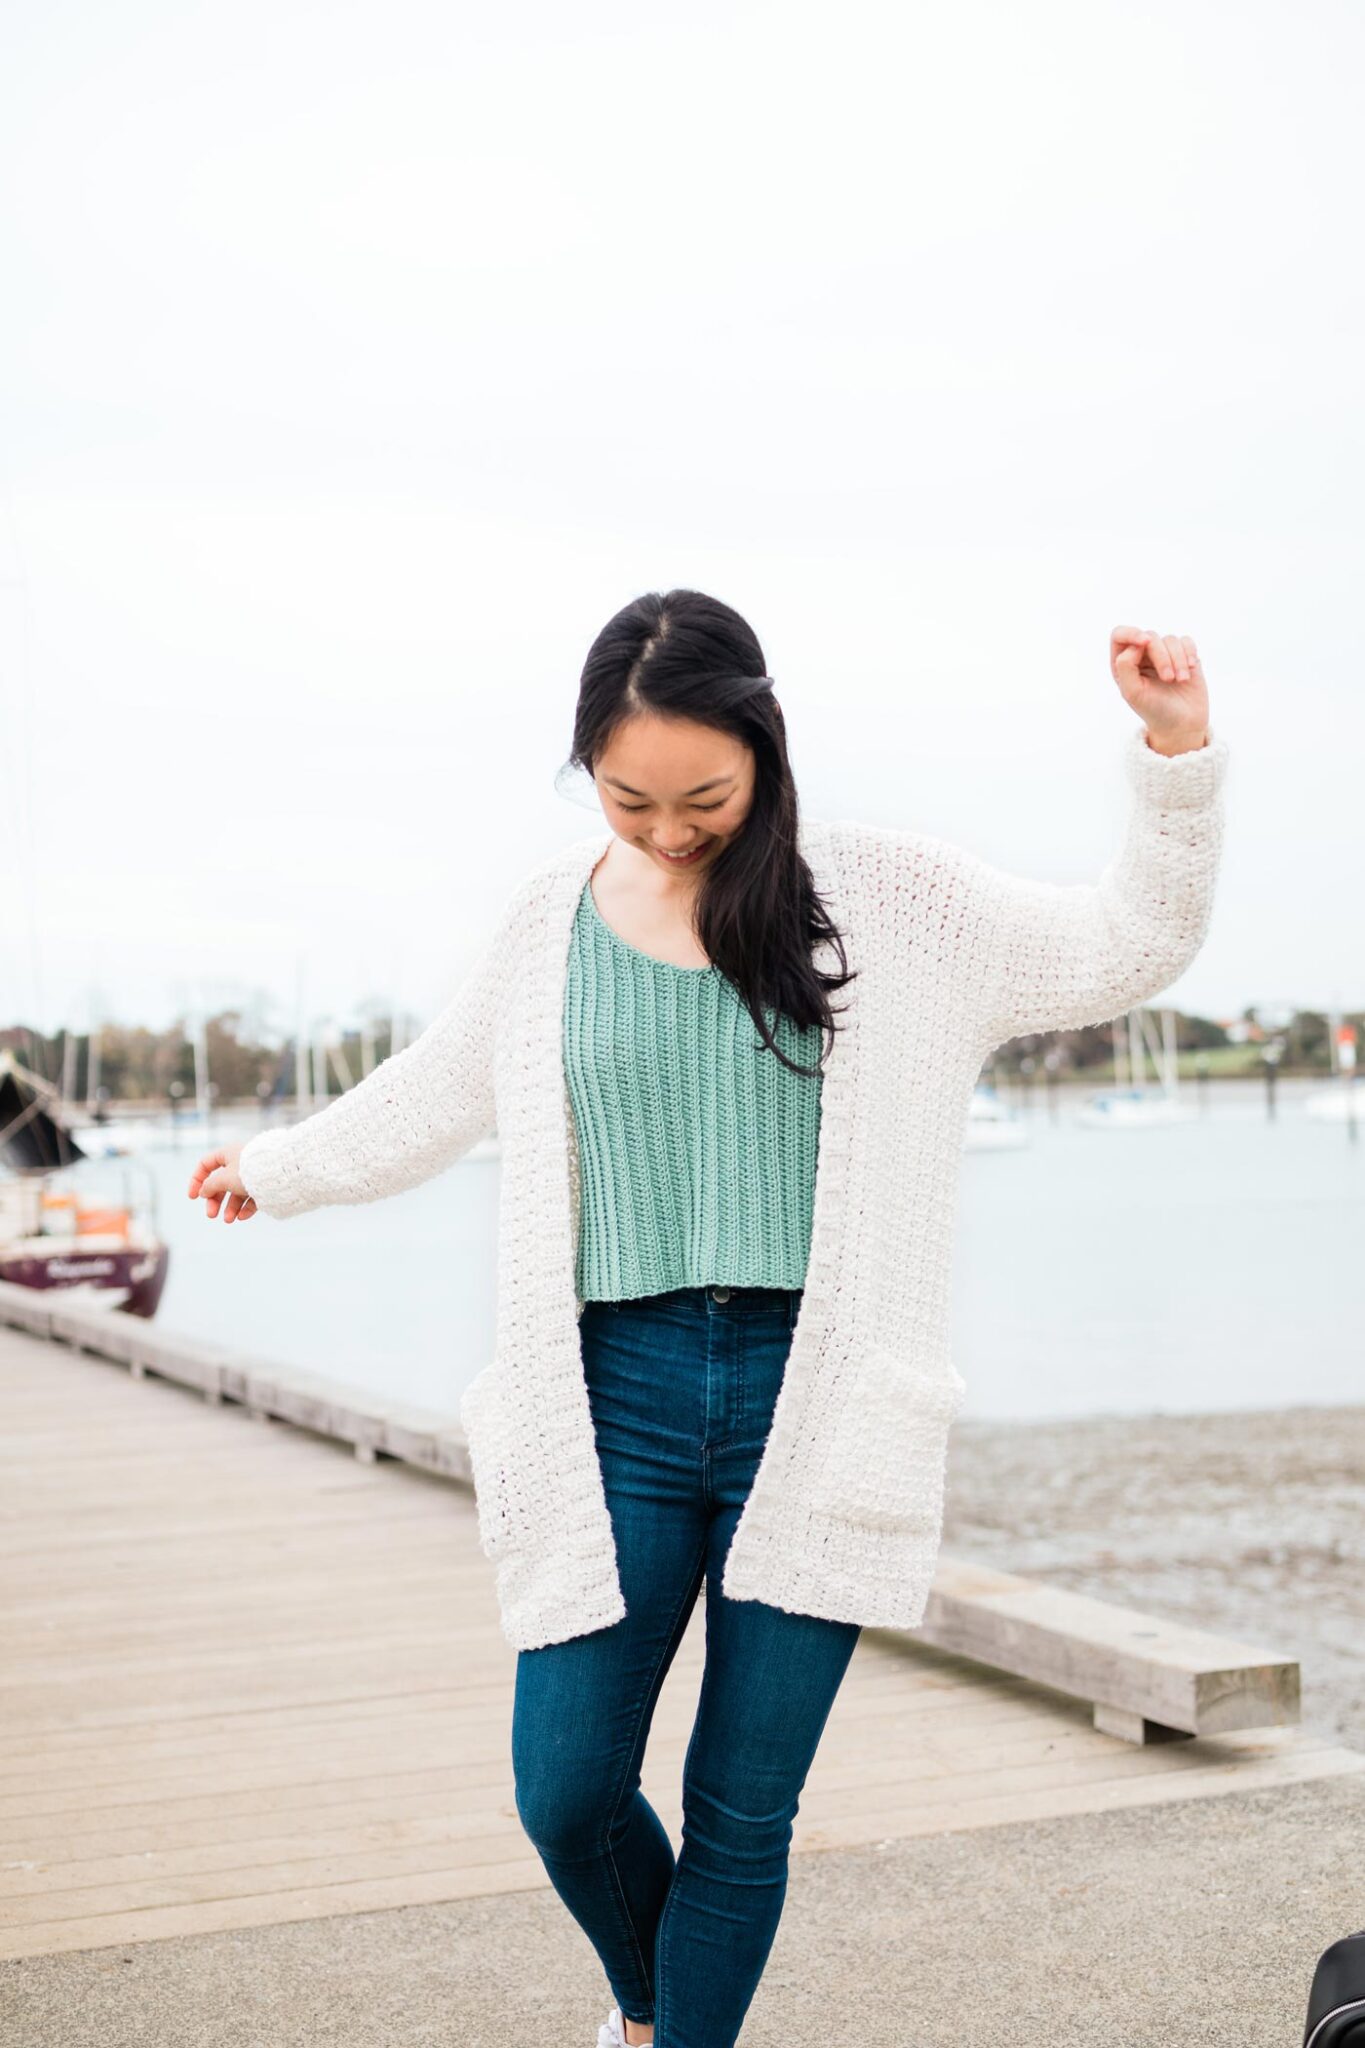
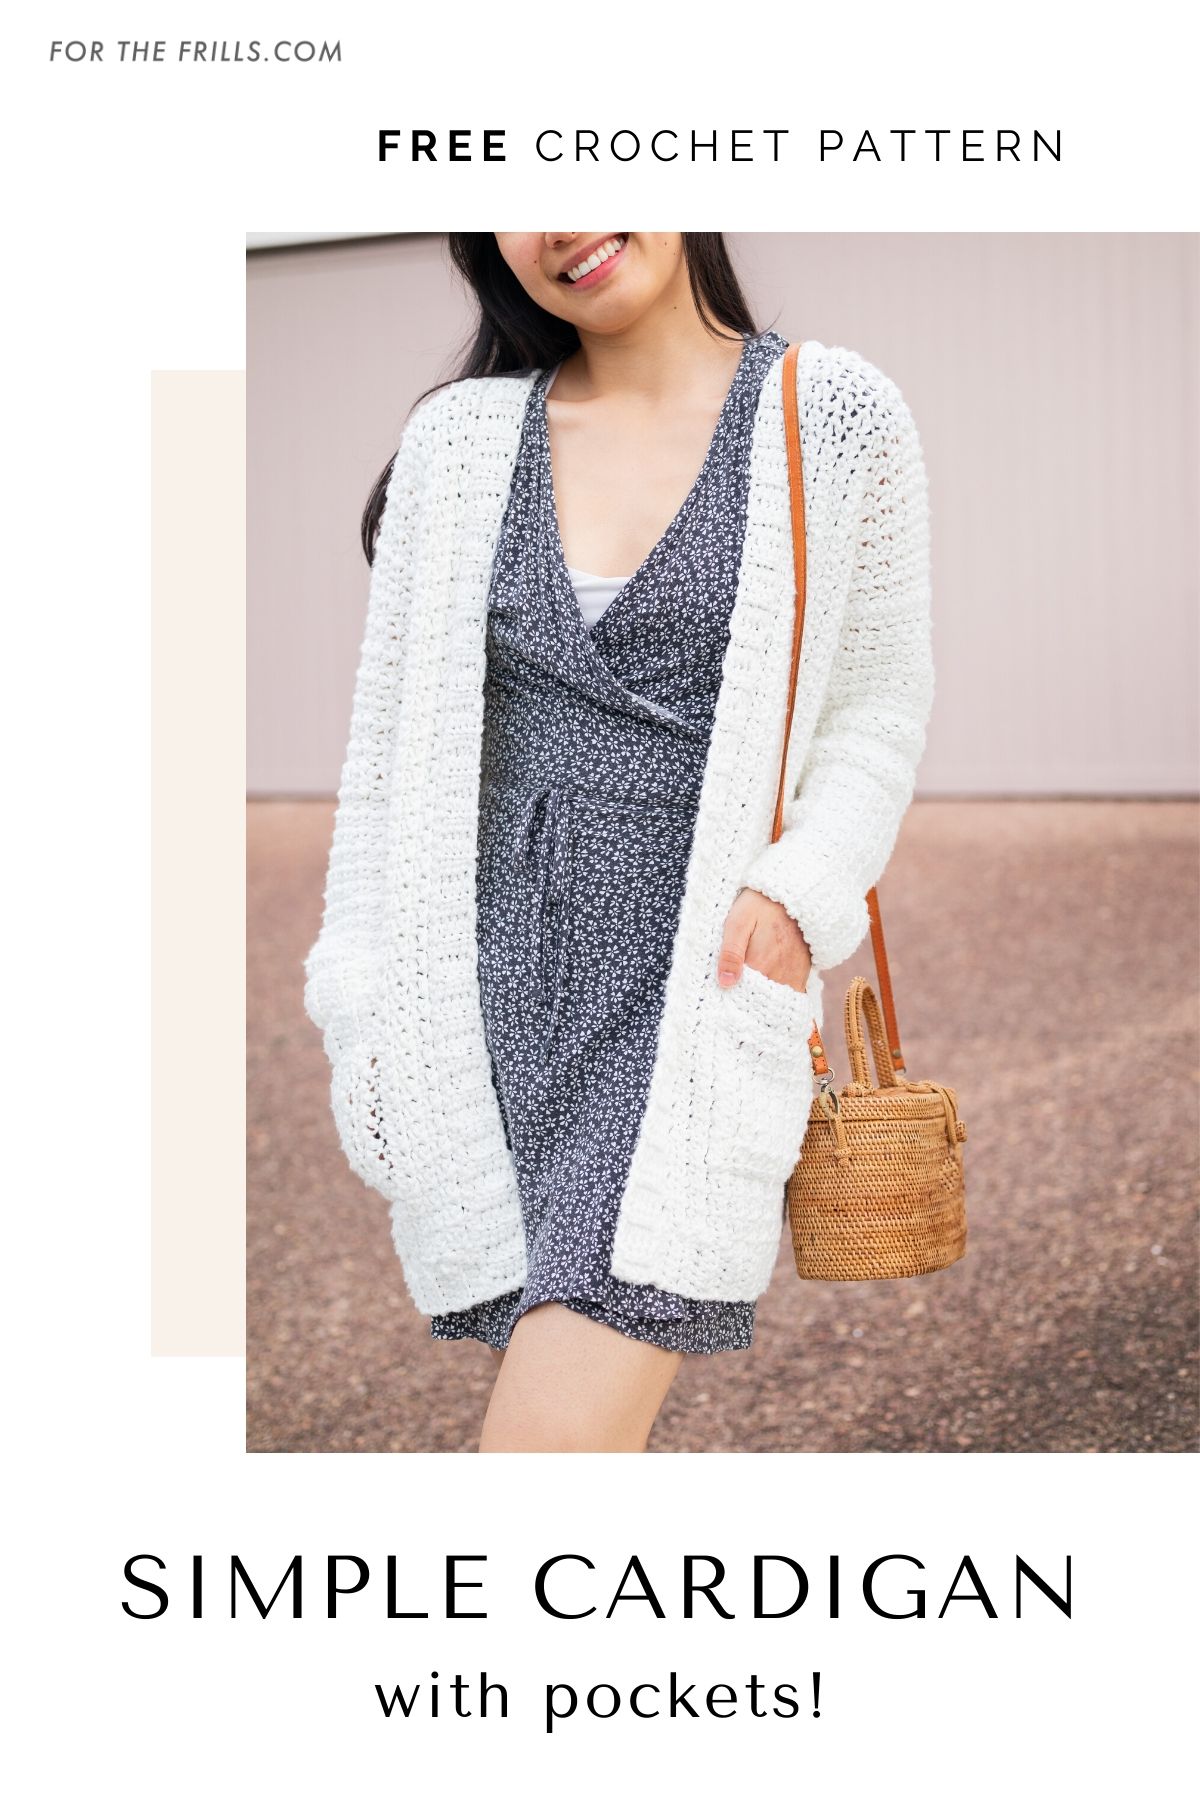
You can also add pockets to your cardigan or leave it plain for breezy, effortless drape. Pair it with dresses and sandals for a cute summer look or over jeans and a t-shirt for a casual everyday outfit!
Design Inspiration
It’s been a long while since I’ve designed an oversized cardigan (check out the Briar Cardigan!) and the single crochet column stitch (also used in the Weekend Snuggle Sweater) has the most incredible drape so I thought it would be great to create a slouchy, oversized cardigan with it!
The single crochet column stitch is really so simple (it only uses single crochets and chains) but has such amazing texture too it. It’s the epitome of minimum effort to maximum return – my favourite kind of crochet stitch!
The chains allow the cardigan to be super airy and breezy and it creates more of a mesh like fabric rather than a solid stitched surface. Combined with a pima cotton yarn, this means the In The Clouds Cardigan is great in warmer weather! It’s the ultimate throw on and go sweater – perfect for windy summer nights or beach days, it would just be the cosiest thing to cuddle up in by a beach bonfire! (Can you tell that I’m already desperately missing summer in New Zealand? haha)
The construction of this cardigan is a bit different to the average flat crochet sweater. The body (which consists of 2 front pieces and a back piece) is crocheted lengthways so the entire body is crocheted in one piece with gaps for the sleeves. This means you only have to seam to tops of the shoulders together and then the sleeves to the body.
The sleeves are worked from the cuffs up, with back loop half double crochets forming the ribbing. The sleeves are crocheted directly onto the ribbing and worked in rows and then seamed together.
For a cleaner look, I crocheted the hemline and neckline ribbing separately and then whip stitched them to the body. Don’t worry about the sewing (there’s no need for perfect stitches!) as this cardigan stitch has a waffle-like stitch texture! So, it’s great practice if you’re just learning how to seam crochet pieces together 🙂
You can also attach pockets to your cardigan (checkout photos to see what the cardigan looks like with and without the pockets!) These are easy crochet pockets that are crocheted separately and then sewn onto the cardigan. If you’re looking for hidden or inset pockets, the Stonewash Pocket Coatigan and Chunky Crochet Bomber are great options.
Yarn
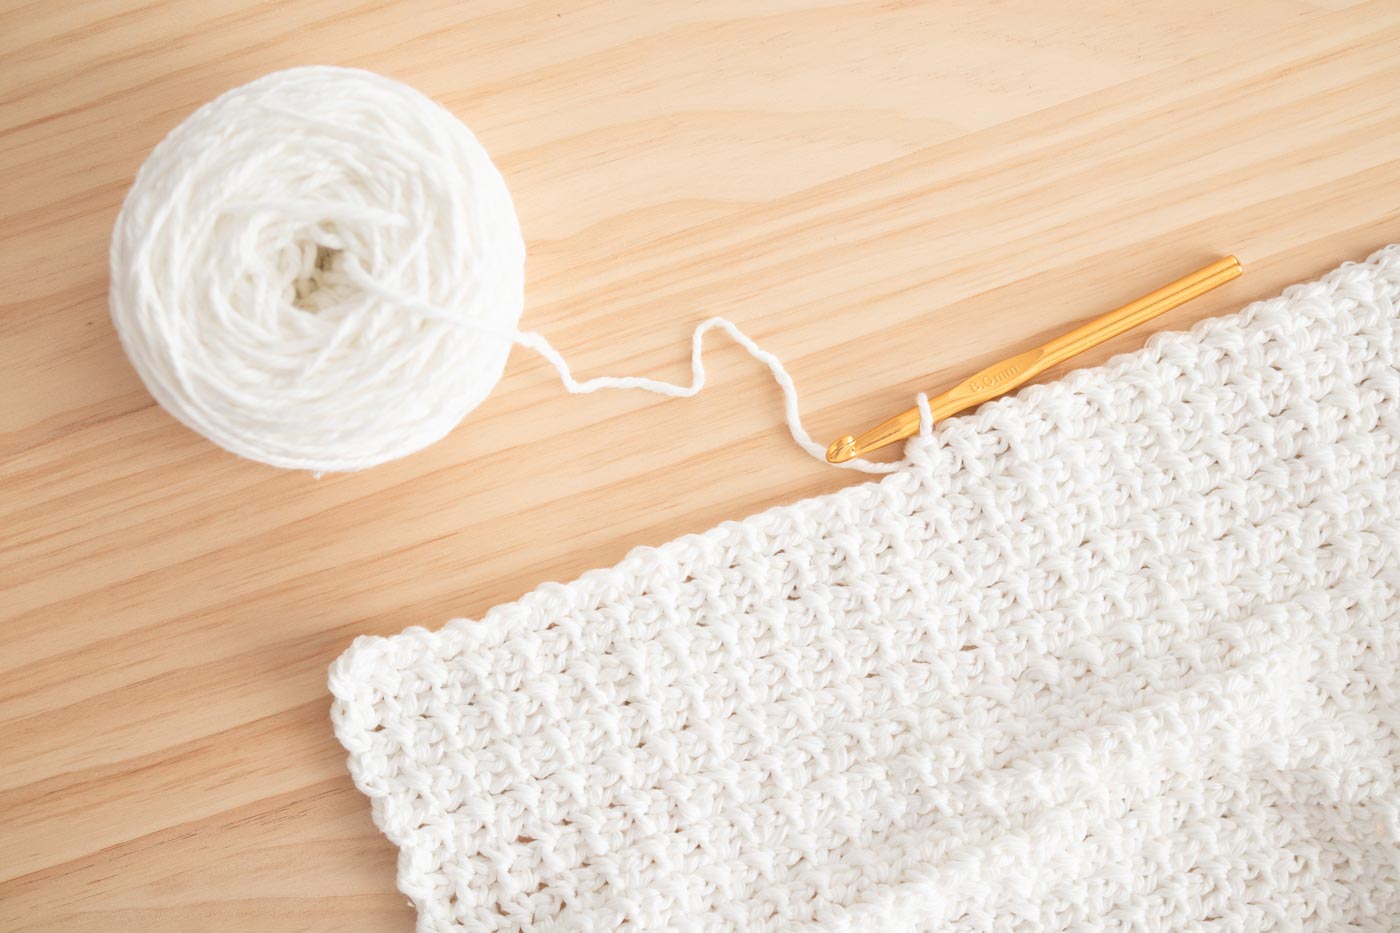
The In The Clouds Cardigan uses WeCrochet’s Billow Yarn in the colour white. It’s a 100% pima cotton and a bulky (5) weight yarn. So, you might be thinking, a bulky weight cardigan for summer? However, Billow is unlike any other cotton I’ve ever crocheted with!
It’s incredibly light so you get amazing yardage per 100g and it has a downy, almost lofty halo like texture to it. In my opinion it crochets like an acrylic or merino rather than a traditional twisted cotton but it really is in it’s own category.
Have you ever tried those incredibly thick 4 ply tissues infused with aloe vera and eucalyptus? Growing up we could only use them when we were sick because they were quite pricey but they were worth EVERY PENNY. They had a soft, pillowy feel and that’s what this pima cotton yarn reminds me of hahaha.
If I could use one word to describe, Billow it would be LUSH. This yarn is so luxurious with an almost silky touch but at the same time its soft and cloudlike! The yarn changes from thick to thin for a more rustic feel but it works so well with the single crochet column stitch to create a modern look. It comes in 24 shades ranging with neutrals, pastels and a few brights! I seriously cannot wait to crochet more projects with this yarn!
When looking for a substitute for Billow (and if you can’t find a bulky weight pima or mako cotton) I’d recommend a lighter bulky weight acrylic or merino. You could probably also get away with a very thick aran/worsted weight yarn that’s suitable for a 6.5mm (K) crochet hook. An economical substitute would be WeCrochet’s Brava Bulky, it’s a 100% acrylic yarn that’s only $1.99 a skein! Or if you’d like this cardigan for warmer weather, Swish Bulky is a great merino option 🙂
Check out more free crochet patterns here!

1. Cuddly Cardigan / 2. Stormborn Wrap / 3. Briar Cardigan
Pin me for later!
Video Tutorial
Add to your Ravelry queue here!
Ad-free, printable version here!
*Sample is a size small shown on a 5’3” model with a 32” bust.
*The sizing guide follows size XS(S, M, L, XL, 2XL, 3XL). E.g. “Ch 71(79, 87, 95, 103, 111, 119) means Ch 71 for XS, Ch 79 for Small, Ch 87 for Medium, Ch 95 for Large, Ch 103 for XL, Ch 111 for 2XL and Ch 119 for 3XL.” If there is only one number, it applies to all sizes.
*"SC 10" means SC into the next 10 stitches.
*The turning chain, ch 1 does NOT count as a stitch, otherwise ch 1 does count as a stitch.
*Total stitches are indicated between < >.
*This pattern uses US crochet terms.
*This cardigan comprises of 1 body panel, 2 sleeves, 2 pockets, hemline ribbing and neckline ribbing.
*The body panel is worked in rows lengthways (the foundation chain runs the length of the panel not the width). We crochet the first front panel, back panel and then second front panel in one piece, leaving gaps for the armholes. The sleeves, pockets, hemline and neckline ribbing are crocheted separately and sewn onto the body.
*The 6mm hook is used for the BLO HDC ribbing.
*The 7mm hook is used for the Single Crochet Column Stitch.
LEVEL: Easy
Materials
Yarn – WeCrochet Billow – Chunky/Bulky (5), 110m/100g, 120yds/3.5oz, 119m/100g, 100% Pima Cotton, White
8(8, 9, 10, 10, 11, 12) skeins
approx. 720(770, 840, 940, 1000, 1100, 1160)g
*WeCrochet’s Billow is a very unique pima cotton – the texture is downy, soft and closer to a merino-cotton blend or an acrylic, rather than a traditional 100% cotton yarn. If substituting this yarn look for a heavy aran or light bulky yarn that’s suitable for a 6.5mm crochet hook and has similar yardage per 100g.
Stitches & Abbreviations
Ch = Chain
SC = Single Crochet
HDC = Half Double Crochet
BLO = Back Loop
St(s) = Stitch(es)
Rep = Repeat
Sk = Skip
Ch-sp = Chain Space
Measurements cm:
To fit Bust: 76(81, 91, 101, 112, 122, 132)
Back Width: 47(50, 55, 60, 65, 70, 75)
Length: 66(68, 68, 70, 70, 72, 72)
Armhole: 18(19, 19, 22, 22, 23, 23)
Sleeve length: 38(40, 40, 40, 40, 40, 40)
Measurements inches:
To fit Bust: 30(32, 36, 40, 44, 48, 52)
Back Width: 18.5(20, 21.5, 23.5, 25.5, 27.5, 29.5)
Length: 26(27, 27, 27.5, 27.5, 28.5, 28.5)
Armhole: 7(7.5, 7.5, 9, 9, 9.5, 9.5)
Sleeve length: 15(16, 16, 16, 16, 16, 16)
*Measurements taken from garment lying flat. The length and width of the cardigan will stretch out by 3-5cm / 1-2” after being worn a few times.
GAUGE: 10cm/4” square = 12 stitches wide x 12.5 rows tall in single crochet column stitch
Gauge Swatch - Single Crochet Columns:
With the 7mm hook, chain an even number of chains.
ROW 1: SC in 2nd ch from hook, *ch 1, sk 1 st, SC; rep from * until end, turn.
ROW 2: Ch 1, SC in 1st st, *ch 1, sk 1 st, SC; rep from * until end, turn.
Repeat ROW 2 until you reach desired length.
In The Clouds Cardigan Free Crochet Pattern
BODY PANEL
FIRST FRONT PANEL
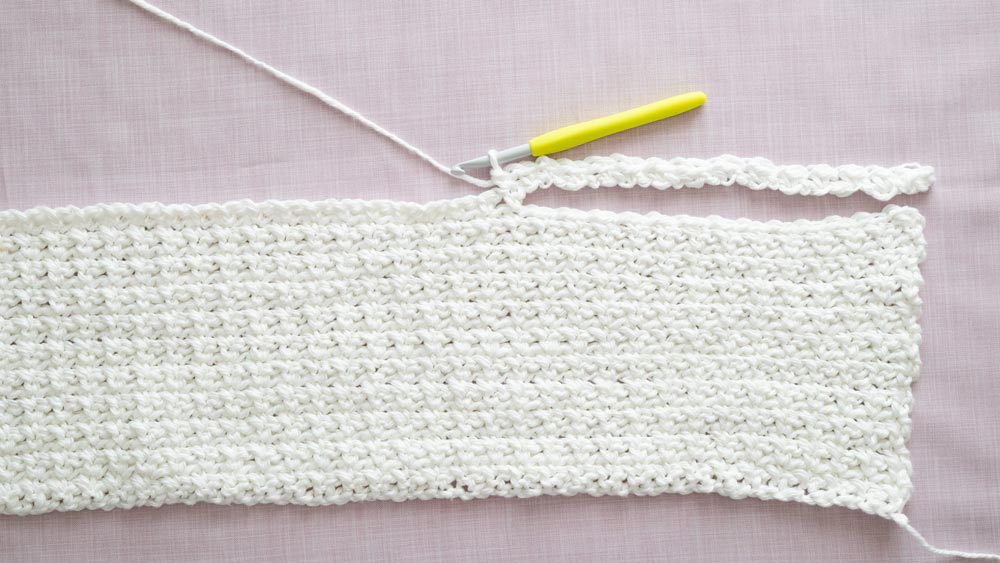
FOUNDATION CHAIN: With the 7mm hook, ch 78(80, 80, 82, 82, 84, 84).
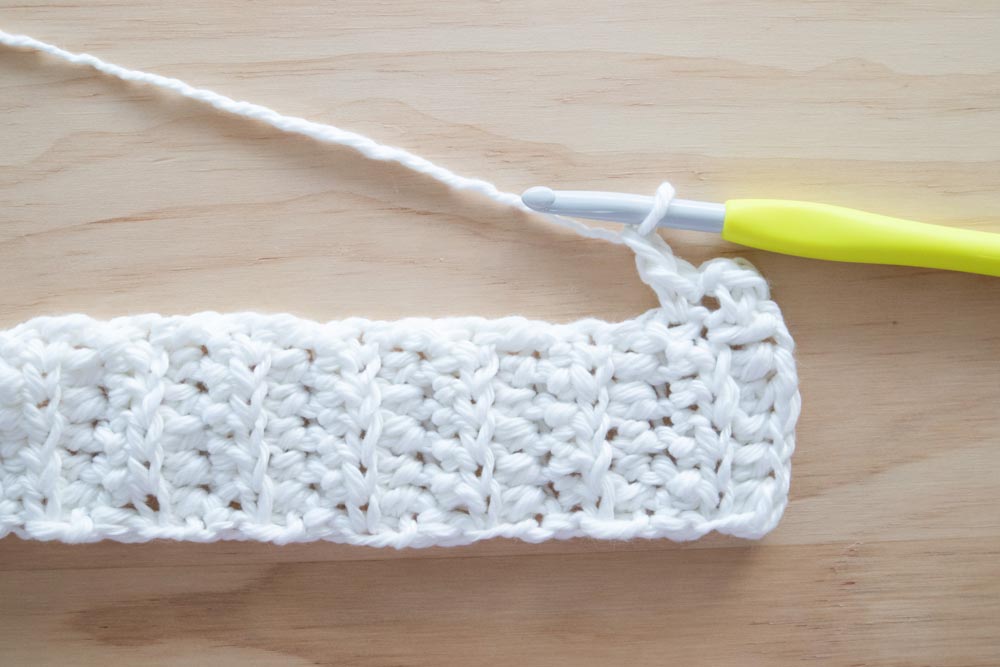
ROW 1: SC into 2nd ch from hook, *ch 1, sk 1 st, SC; rep from * until end, turn.
<77(79, 79, 81, 81, 83, 83)>
ROW 2: Ch 1, SC in 1st st, *ch 1, sk 1 st, SC; rep from * until end, turn.
<77(79, 79, 81, 81, 83, 83)>
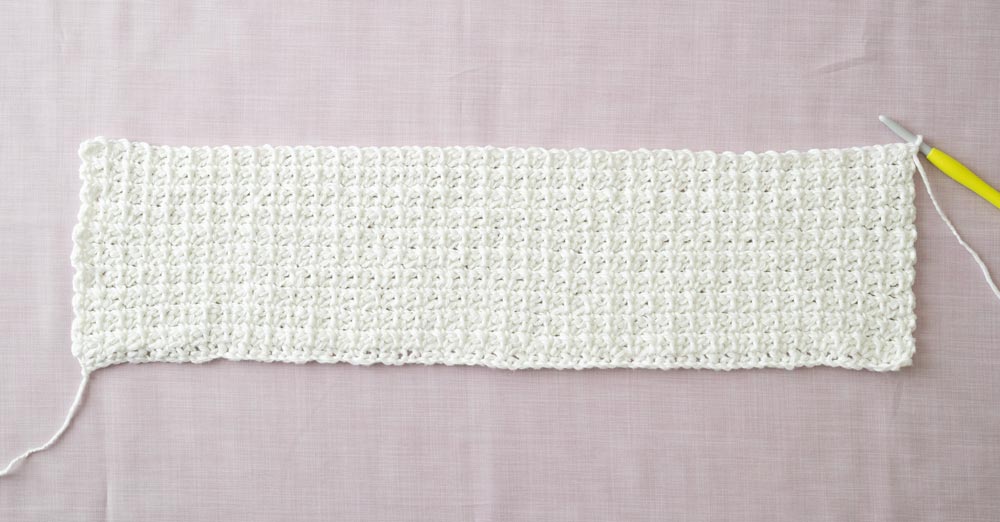
Repeat ROW 2 until ROW 20(20, 24, 26, 30, 32, 34).
(photo 1)
Do not fasten off! Proceed directly to ‘BACK PANEL’ instructions.
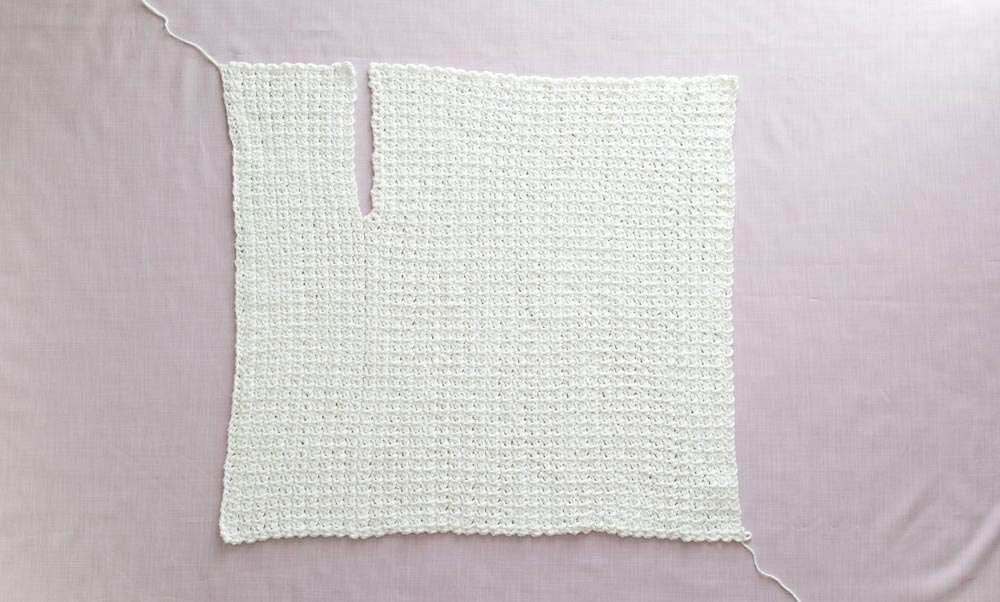
BACK PANEL
ROW 1: Ch 1, SC in 1st st, *ch 1, sk 1 st, SC; rep from * until you have 24(26, 26, 30, 30, 32, 32) sts left in the row, ch 25(27, 27, 31, 31, 33, 33), turn.
<78(80, 80, 82, 82, 84, 84)>
*The opening created by the chains = armhole gap to sew 1st sleeve onto the body.
(photo 2)
ROW 2: SC into 2nd ch from hook, *ch 1, sk 1 st, SC; rep from * until end, turn.
<77(79, 79, 81, 81, 83, 83)>
(photo 3)
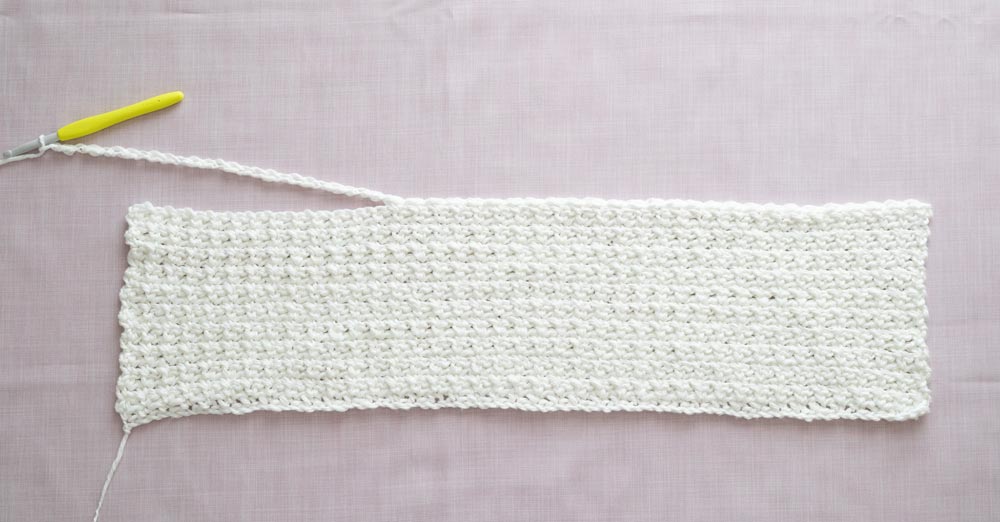
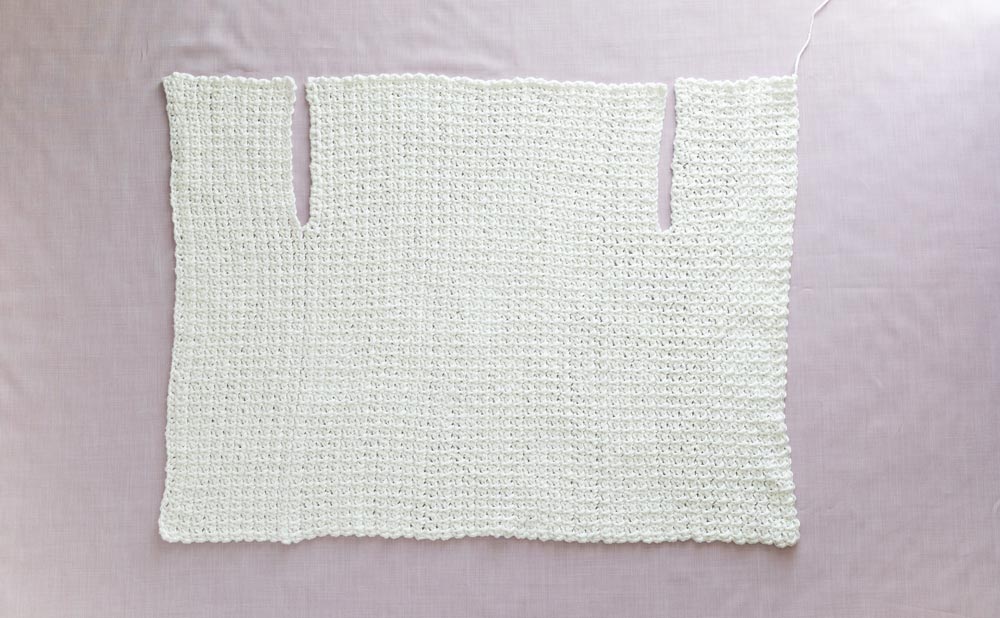
ROW 3: Ch 1, SC in 1st st, *ch 1, sk 1 st, SC; rep from * until end, turn.
<77(79, 79, 81, 81, 83, 83)>
Repeat ROW 3 until ROW 56(60, 66, 72, 78, 84, 90).
(photo 4)
FINAL BACK PANEL ROW: Repeat BACK PANEL ROW 1
Total Body Panel Rows: <77(81, 91, 99, 109, 117, 125)>
Do not fasten off! Proceed directly to ‘SECOND FRONT PANEL’ instructions.
SECOND FRONT PANEL
ROW 1: SC into 2nd ch from hook, *ch 1, sk 1 st, SC; rep from * until end, turn.
<77(79, 79, 81, 81, 83, 83)>
ROW 2: Ch 1, SC in 1st st, *ch 1, sk 1 st, SC; rep from * until end, turn.
<77(79, 79, 81, 81, 83, 83)>
Repeat ROW 2 until ROW 20(20, 24, 26, 30, 32, 34).
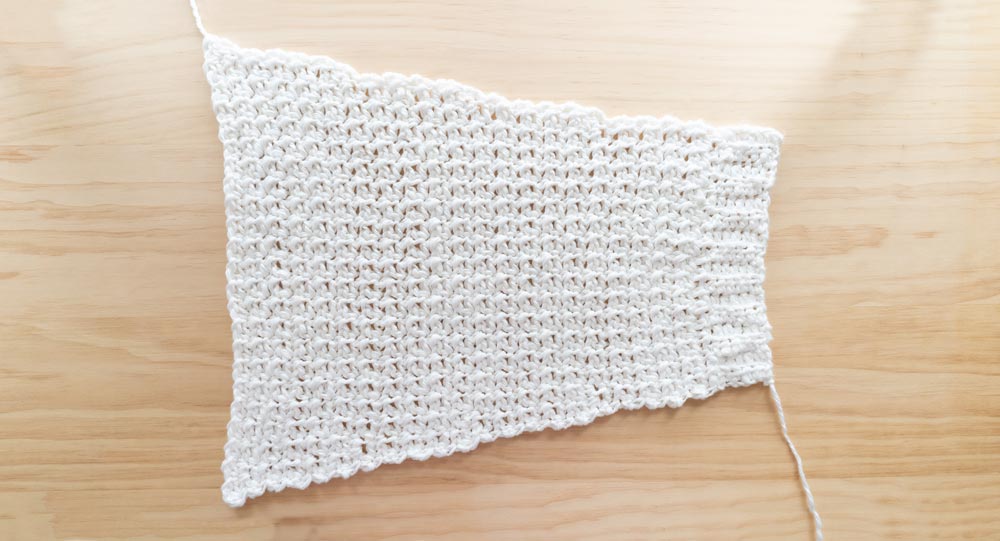
Total Body Panel Rows: <97(101, 115, 125, 139, 149, 159)>
(photo 5)
Fasten off.
SLEEVES
*Make 2
*The sleeves are worked from the cuff up. The ribbing is crocheted vertically and then the sleeves are crocheted directly on to the edge of the ribbing.
*The sleeves are intended to be extra-long so that the cuffs can be rolled up. Make sleeves approx. 4cm / 1.5” shorter if you don’t want to roll up the cuffs.
SIZES XS(S, M)
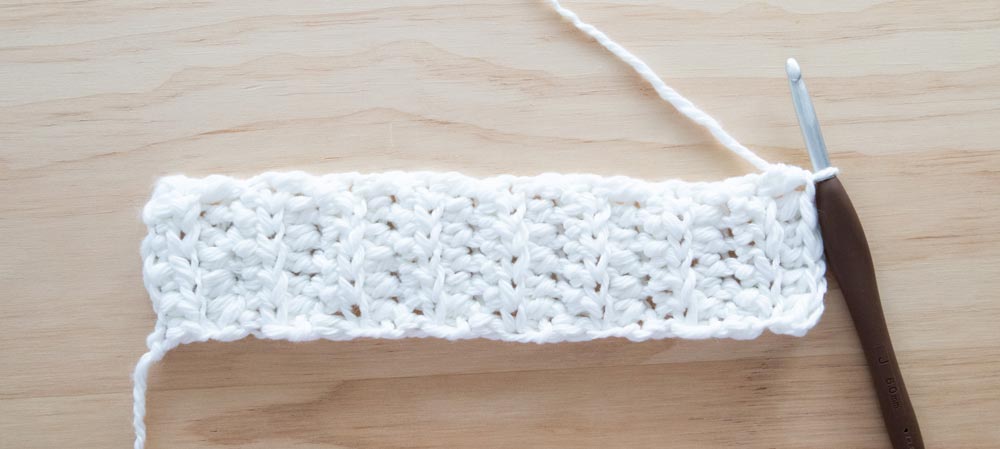
SLEEVE RIBBING
FOUNDATION CHAIN: With the 6mm (US J) hook, ch 7.
ROW 1: HDC into 2nd ch from hook, HDC in each ch until end, turn.
<6>
ROW 2: Ch 1, BLO HDC 5, HDC in last st, turn.
<6>
Repeat ROW 2 until ROW 16.
(photo 6)
Do not fasten off! Rotate your work 45 degrees and we will now crochet along the long edge of the band.
SLEEVE
ROW 1: With the 7mm hook, ch 1, SC in 1st row, *ch 1, SC in next row; rep from * until last row, turn.
<31>
(photo 7)
ROWS 2 – 10: Ch 1, SC in 1st st, *ch 1, sk 1 st, SC; rep from * until end, turn.
<31>
ROW 11: Ch 1, SC in 1st st, ch 1, SC in ch-sp, ch 1, *SC, ch 1, sk 1 st; rep from * until last ch-sp, SC in ch-sp, ch 1, SC in last st, turn.
<35>
Repeat ROWS 2-11 until your sleeve measures 38(40, 40) cm / 15(16, 16)”
approx. ROW 38(42, 42).
<43(47, 47)>
(photo 8)
ROWS 12 – 20: As Rows 2 – 10
<35>
ROW 21: As Row 11
<39>
ROWS 22 – 30: As Rows 2 – 10
<39>
ROW 31: As Row 11
<43>
ROWS 32 – 40: As Rows 2 – 10
<43>
ROW 41: As Row 11
<47>
ROWS 42 – 50: As Rows 2 – 10
<47>
Fasten off.
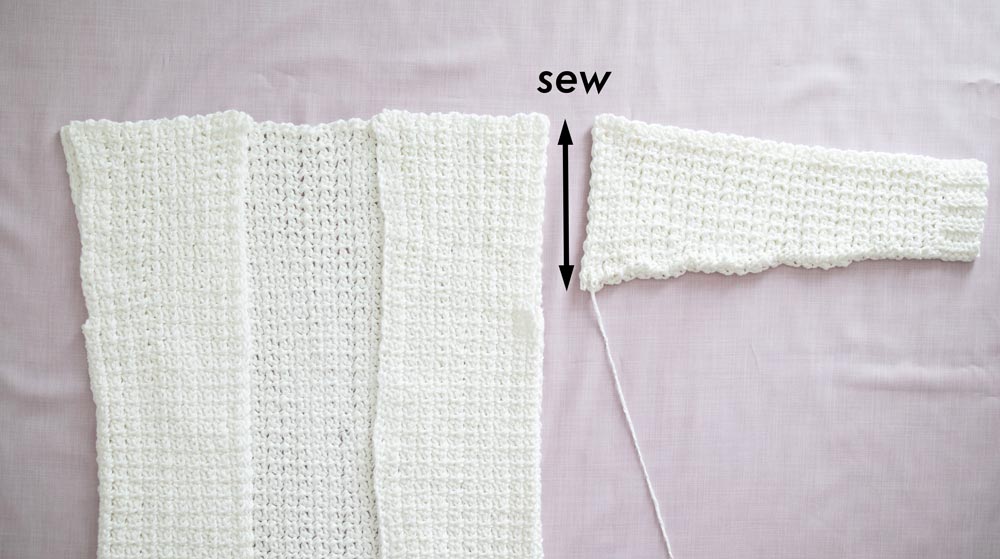
Fold sleeve in half length ways and whip stitch up the side of the sleeve.
(photo 9)
SIZES (L, XL, 2XL, 3XL)
SLEEVE RIBBING
FOUNDATION CHAIN: With the 6mm (US J) hook, ch 7.
ROW 1: HDC into 2nd ch from hook, HDC in each ch until end, turn.
<6>
ROW 2: Ch 1, BLO HDC 5, HDC in last st, turn.
<6>
Repeat ROW 2 until ROW (18, 18, 20, 20).
(photo 6)
Do not fasten off! We will now crochet along the long edge of the band.
SLEEVE
ROW 1: With the 7mm hook, ch 1, SC in 1st row, *ch 1, SC in next row; rep from * until last row, turn.
<(35, 35, 39, 39)>
(photo 7)
ROWS 2 – 8: Ch 1, SC in 1st st, *ch 1, sk 1 st, SC; rep from * until end, turn.
<(35, 35, 39, 39)>
ROW 9: Ch 1, SC in 1st st, ch 1, SC in ch-sp, ch 1, *SC, ch 1, sk 1 st; rep from * until last ch-sp, SC in ch-sp, ch 1, SC in last st, turn.
<(39, 39, 43, 43)>
Repeat ROWS 2-9 until your sleeve measures 40 cm / 16”
approx. ROW 42<(55, 55, 59, 59)>
(photo 8)
ROWS 10 – 16: As Rows 2 – 8
<(39, 39, 43, 43)>
ROW 17: As Row 9
<(43, 43, 47, 47)>
ROWS 18 – 24: As Rows 2 – 8
<(43, 43, 47, 47)>
ROW 25: As Row 9
<(47, 47, 51, 51)>
ROWS 26 – 32: As Rows 2 – 8
<(47, 47, 51, 51)>
ROW 33: As Row 9
<(51, 51, 55, 55)>
ROWS 34 – 40: As Rows 2 – 8
<(51, 51, 55, 55)>
ROW 41: As Row 9
<(55, 55, 59, 59)>
ROWS 42 – 48: As Rows 2 – 8
<(55, 55, 59, 59)>
Fasten off.
Fold sleeve in half length ways and whip stitch up the side of the sleeve.
(photo 9)
ASSEMBLY
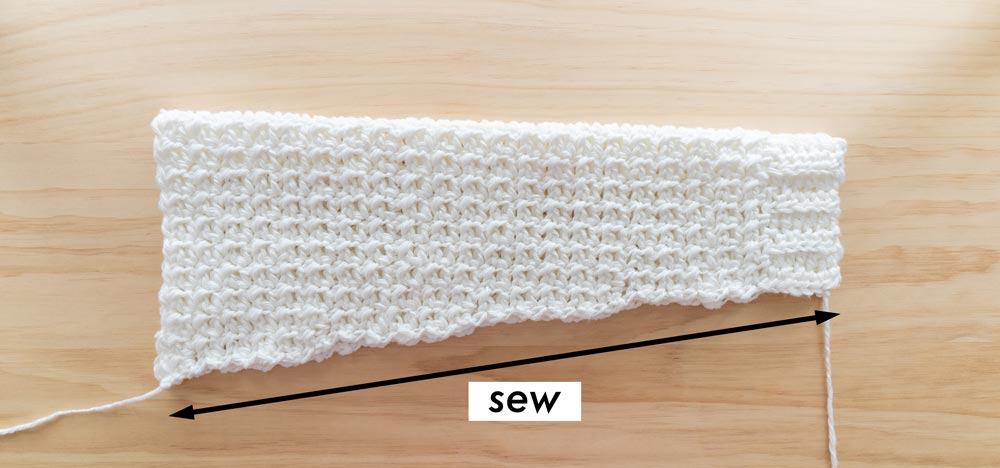
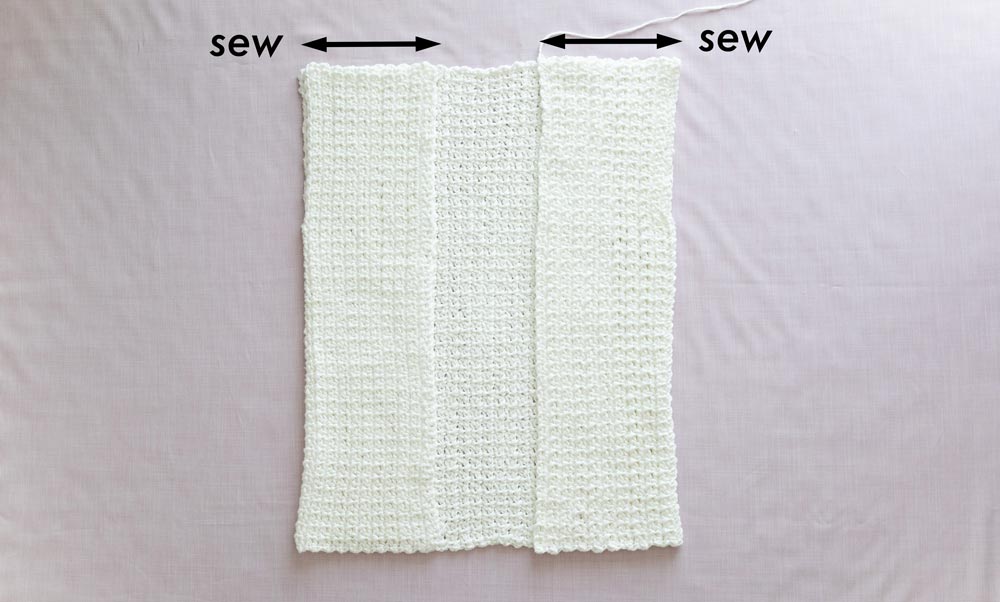
Fold the front panels on top of the back panel.
Whip stitch along the top of the shoulder seams.
(photo 10)
Align top of the sleeve with the shoulder seam.
*It’s ok if the sleeve’s armhole is shorter than the opening on the body panel.
(photo 11)
Whip stitch sleeves to the armhole opening on the body panel.
*If you have a gap underneath the armhole, whip stitch the gap together.
HEMLINE + NECKLINE RIBBING
FOUNDATION CHAIN: With the 6mm (US J) hook, ch 6.
ROW 1: HDC into 2nd ch from hook, HDC in each st until end, turn.
<5>
ROW 2: Ch 1, BLO HDC 4, HDC in last st, turn.
<5>
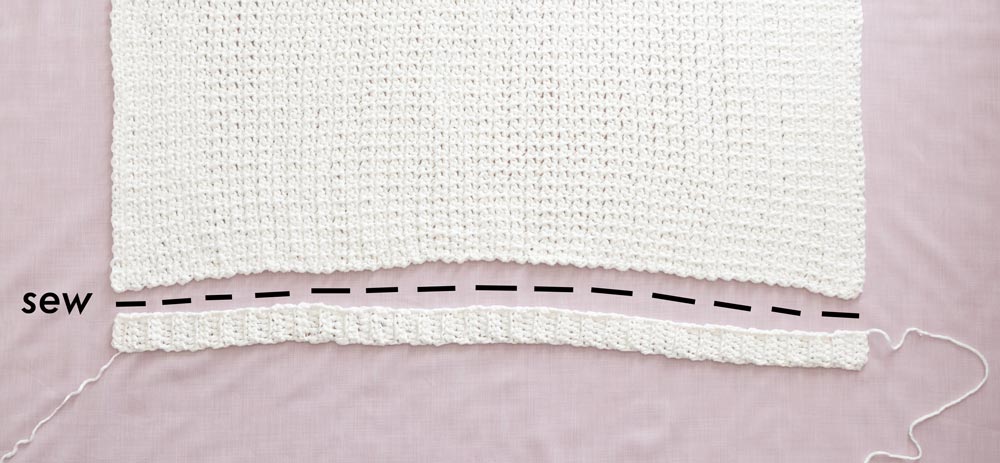
Repeat ROW 2 until ribbing measures the length of the hemline.
approx. ROW 64(67, 75, 83, 91, 99, 106).
(photo 12)
Using stitch markers or safety pins, pin the hemline ribbing to the bottom edge of the cardigan.
Whip stitch the hemline ribbing to the edge of the cardigan.
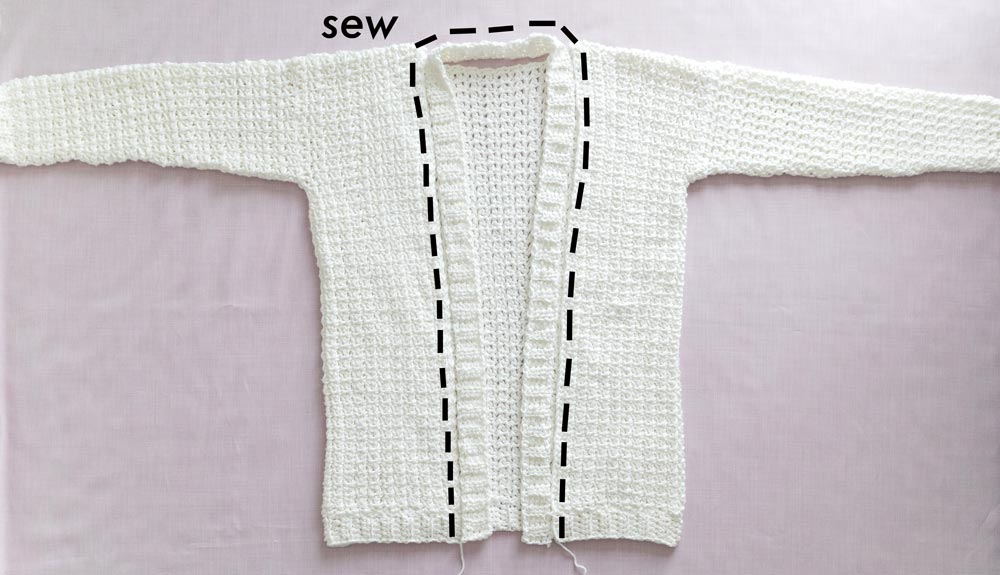
Repeat steps for the neckline ribbing.
approx. ROW 109(114, 113, 116, 115, 119, 120).
(photo 13)
Pin ribbing along neckline and whip stitch ribbing to neckline.
POCKETS
*Make 2
*As with the body panel, the pockets are crocheted lengthways. The ribbing is crocheted separately and sewn to the pocket.
FOUNDATION CHAIN: With the 7mm hook, ch 14(14, 14, 16, 16, 16, 16).
ROW 1: SC into 2nd ch from hook, *ch 1, sk 1 st, SC; rep from * until end, turn.
<13(13, 13, 15, 15, 15, 15)>
ROW 2: Ch 1, SC in 1st st, *ch 1, sk 1 st, SC; rep from * until end, turn.
<13(13, 13, 15, 15, 15, 15)>
Repeat ROW 2 until ROW 15(15, 15, 17, 17, 17, 17).
Fasten off.
POCKET RIBBING
FOUNDATION CHAIN: With the 6mm (US J) hook, ch 6.
ROW 1: HDC into 2nd ch from hook, HDC in each st until end, turn.
<5>
ROW 2: Ch 1, BLO HDC 4, HDC in last st, turn.
<5>
Repeat ROW 2 until ribbing measures the length of the pocket
approx. ROW 11(11, 11, 12, 12, 12, 12).
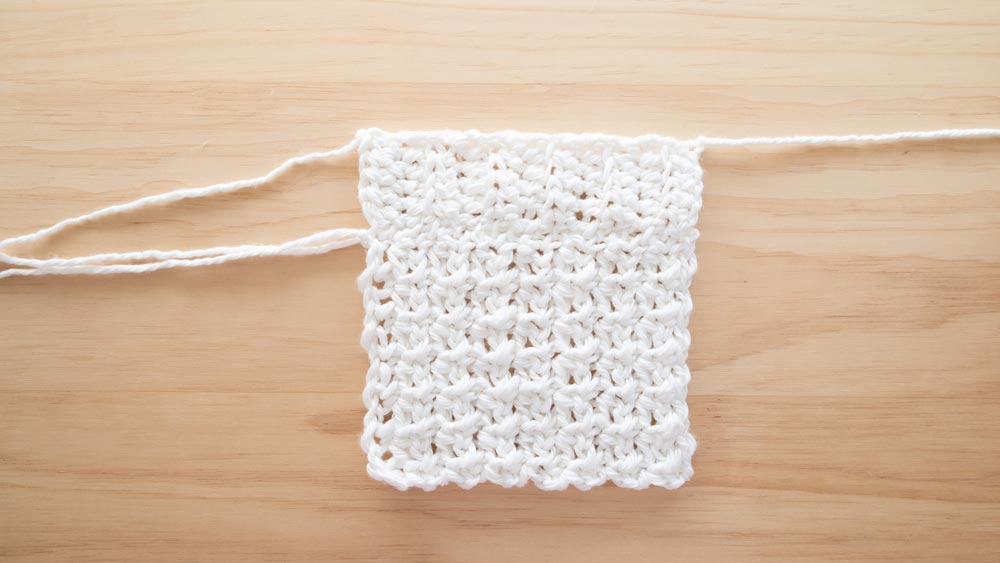
Whip stitch ribbing to the edge of the pocket.
(photo 14 + 15)
Using stitch markers/safety pins, pin the pockets into place.
*I suggest trying on the cardigan to double check the pocket placement.
(photo 16)
Whip stitch the edges of the pocket to the front panels.
Weave in all of your ends.
Voilà! You’ve finished your Cloud Dreamer Cardigan!
PHOTOS


Could you use 4ply for this? Like redheart with love? Thank you kindly for your reply..I love the cardigan!
The pattern and the images in the steps are different than the cardigan from the beginning. That cardigan is way longer. Kinda wished it was stated to make it longer/do looser stitches bc I didnt realize until i already started.
Hi Emily, I'm sorry your cardigan didn't work out on the first try. I always recommend creating a gauge swatch before you start to make sure your cardigan will match the measurements!
Grace 🙂
I noticed that to pattern doesnt match instructions it shows totally diffrent stitch like a HDC thruout entire body nothin indicates whats writen. C1 sk 1 sc in nxt stitch til you reach body lenghth then in the ribbing for foundstion is only place that says HDC in blo this isnt correct. So i improvised. Thank god i know how to fix this confusion. So it came out ok just not same pattern as shes showing... Hope it works out 4ya.
Hi Grace, would Lionbrand Landscapes Yarn be a good alternative for the Pima Cotton yarn?
Hi Lucy, sure I think Lion Brand Landscapes would work well with this pattern. Your cardigan will just be warmer than if you'd used cotton.
Grace 🙂
Hi Grace! I'm new to crocheting so I need a few pointers!
I saw the one ladies comment on her cardigan not being as long as yours. I'm a size small as well, so is there anything not written in your blog to help me make sure my cardigan is just as long? Also I'm confused on how many 100g hanks I should purchase for my cardigan! Would it be eight as a reference to your blog saying 770g, if I'm reading correctly?
Hi Mackenzi, If you follow gauge and use the same yarn as the sample your cardigan should end up like mine! I'm quite short (160cm/5'3") but as long as you follow the gauge your cardigan should match the measurements in the pattern. I'd also recommend checking your gauge as you crochet to make sure you're still on the right track. Yes for 770g I'd get 8 skeins of Billow Yarn 🙂 If you're using a different yarn I'd recommend getting a bit extra just to be safe!
I hope this helps,
Grace
Mine is a lot shorter than I thought it would be. I even used the gauge listed above and mine was around that. I am around 5'5 or 5'6 so im not too tall. I chose to do medium and it still looks way shorter than I thought it was going to be. I at least hoped it would reach my thigh but it didn't :(. My measurements are quite close to yours, so how did yours end up so long?
Hi Sabrina, If you followed gauge then your cardigan should match the finished measurements. I'm a bit shorter than you (I'm 160cm/5'3") and the yarn I used made the cardigan stretched out a lot after I wore it a few times. So if you used a different type of yarn that will also affect the final drape and length of the cardigan.
I hope this helps,
Grace
Hi Grace! When stitch my sleeves, one side is being increased but the other side isn't. I did the increasing pattern (h 1, SC in 1st st, ch 1, SC in ch-sp, ch 1) and after doing that at the beginning of the row, I finish off the row with the basic pattern (SC, ch 1, and repeat). How do I make it increase on both side of the sleeve?
Hi Imani, I think you're missing the increase at the end of the row - you should SC in ch-sp, ch 1, SC in last stitch - that will give the increase along the sleeve.
Grace 🙂
The size guide says to ch 119 for 3xl but when I go to the pattern it says to chain 84 for 3xl. Which one of the right ch amount?
Hi Jamie, the size guide notes are just a generalised example to understand how to read the pattern. Follow the stitch counts in the actual pattern itself.
Grace
Hi, how many yarn (5ply) should I purchase if I'm making the cardigan in the m size?
Id do the 119
Hey Grace,
Just wondering if its possible to crochet a separate hood for this cardigan and if you might have a pattern. Thanks
Rhonda, that's a great idea! I love hoods on my sweaters too!
Hello, I’m currently working on this cardigan pattern. Would it hurt anyway if I added a few more rows to the back panel or would that throw everything off? Thank u.
Do you have a pattern to add a large floppy hood to this cardigan? That would make it so perfect!
Hi, I live in South Africa and used a Double knit wool. My stiches much tighter than the video shows, I am a beginner. Thus my cardigan too small. lol
I loved this pattern and video, was so easy for me to follow.
Please can you give some suggestions to make the front two pieces wider, now that my cardigan is complete. The back fits but the front is far to small.
I will really appreciate some advice.
Hi Veronica,
Before crocheting a project I recommend crocheting a swatch to make sure you meet the gauge of the pattern so it fits correctly! Sicne you've already crocheted your cardigan you can extend the front panels by crocheting thicker ribbing.
Grace 🙂
hi i have made 2 of these but i had to alter the sleeves a bit followed your pattern but where not wide enough to fit arm holes so i altered yours and did my and fitted like a glove i used acrylic yarn and a cotton and viscose
really pleased with them
I love this pattern! I have made 2 of them so far and am going to make some more. Thank you so much for sharing!
Hi Rebecca,
So glad you're enjoying the pattern so much that you've made mulitple cardis!
Happy crocheting,
Grace 🙂
Hi Grace! Beautiful cardigan!
Do you think I would be able to make this with a size 4/worsted weight cotton yarn instead?
Thanks!
Hi Irene,
You might be able to get away with a thick worsted yarn, just make sure to crochet a gauge swatch. That way you'll know if you need to adjust your hook size to meet gauge.
Grace 🙂
Hello again, I'm trying to make this cardigan without spending to much money. Would %100 polyester yarn work for this?
Hi Chloe,
As long as you can meet the gauge listed in the pattern your cardigan should turn out the same size as the listed measurements 🙂
Grace
Hello Grace,
I am about to crochet this beautiful cardigan. What size do you think I would be if I am 5'3" with a 38" bust?
Hi, when making a crochet cardigan do you block pieces individually or when the garment is finished and sewn together, thanks Lea
your medium is for a small what a waste of time
I just love so much this pattern. It's so clear, versatile and beautiful.
Thank you so much!
Hi I'd really like to have a go at this cardigan but am quite a newbie and confused by what crochet hooks I would need to use. I'm in the UK and would really like to use a cotton, when you say 6mm and 7mm is that UK sizes as I can only find cotton that seems to be for 3mm to 4.5mm hooks?
Hi Grace I’m making this cardigan right now but the yarn keeps shedding everywhere. Do you know how I can stop it?
Hi Grace
Would Lion Brand 24/7 cotton work for this?
Thank you
I loventhis pattern! I already made one and I am making another. I would love to add a hood to this. How would I do that?
Hi there! Love this pattern so much, Thank you! I’m having trouble seeing the video, I have an iPhone 13pro and the video won’t play…any ideas?