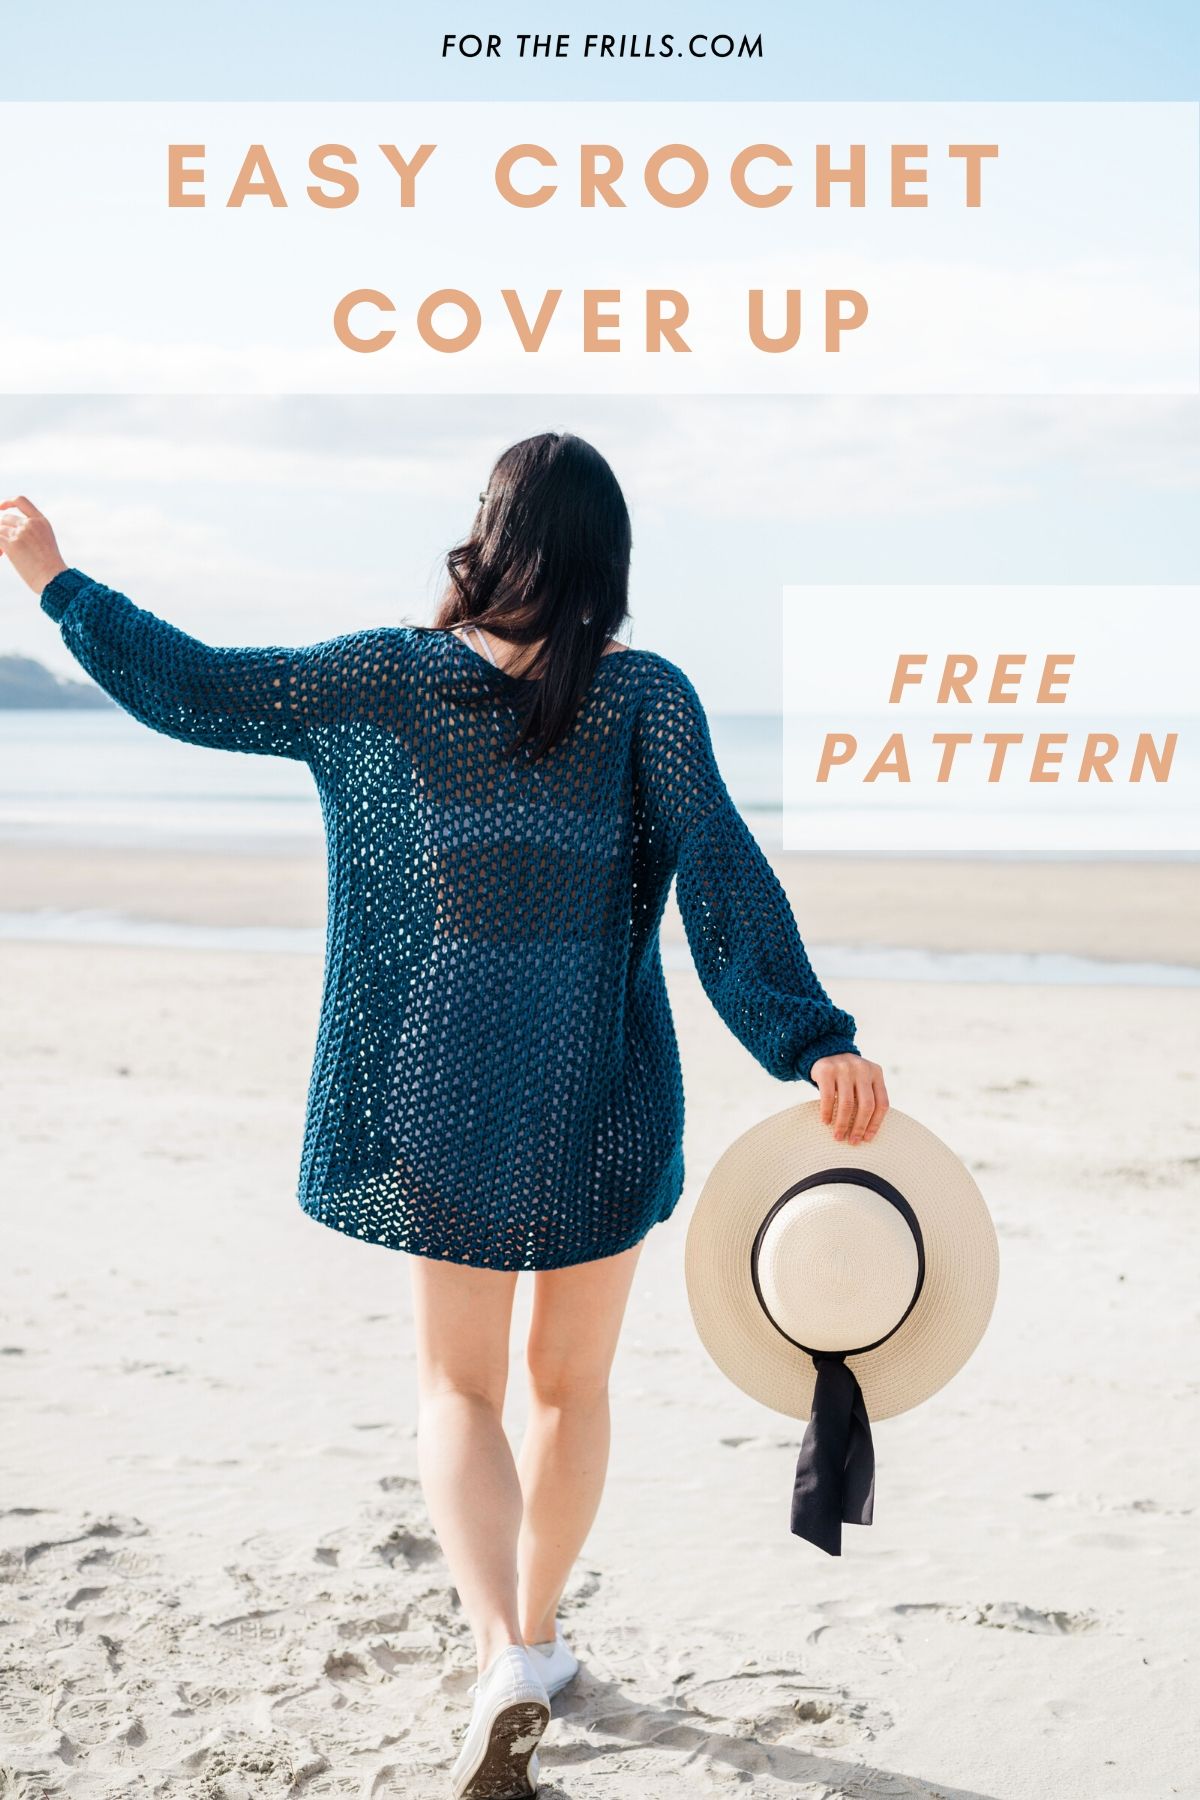
Learn how to crochet a mesh swimsuit cover up for summer! Easy, simple crochet stitches and chains combine to make a comfy, lacy beach sweater.
This free crochet sweater pattern is accompanied by a step-by-step video tutorial.
This post may contain affiliate links, view our disclosure policy for details.
Thank you to WeCrochet for sponsoring this free crochet cover up pattern!
As always all thoughts and opinions are 100% my own 🙂
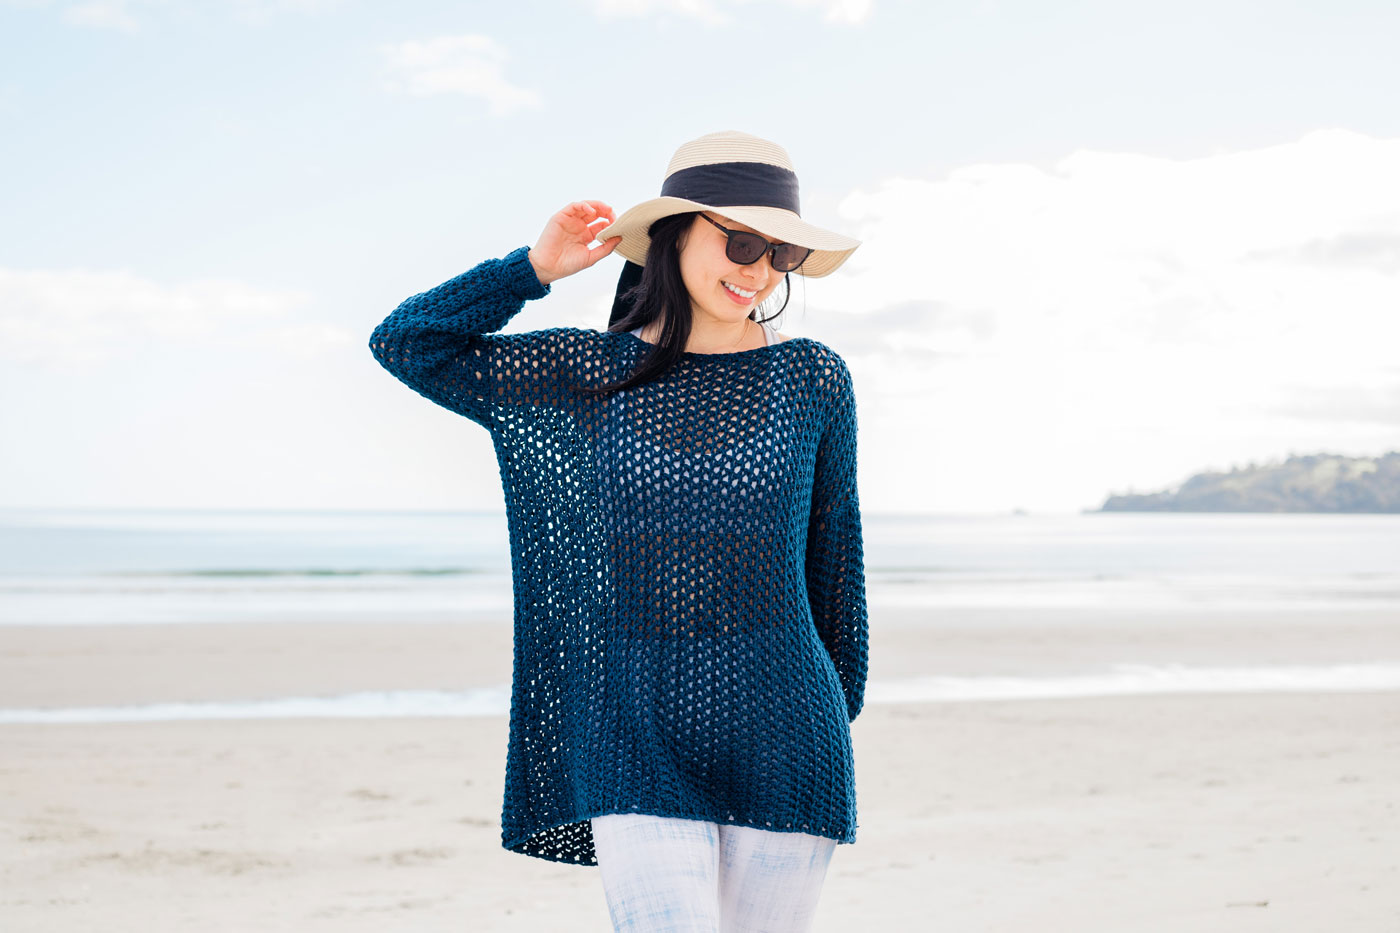
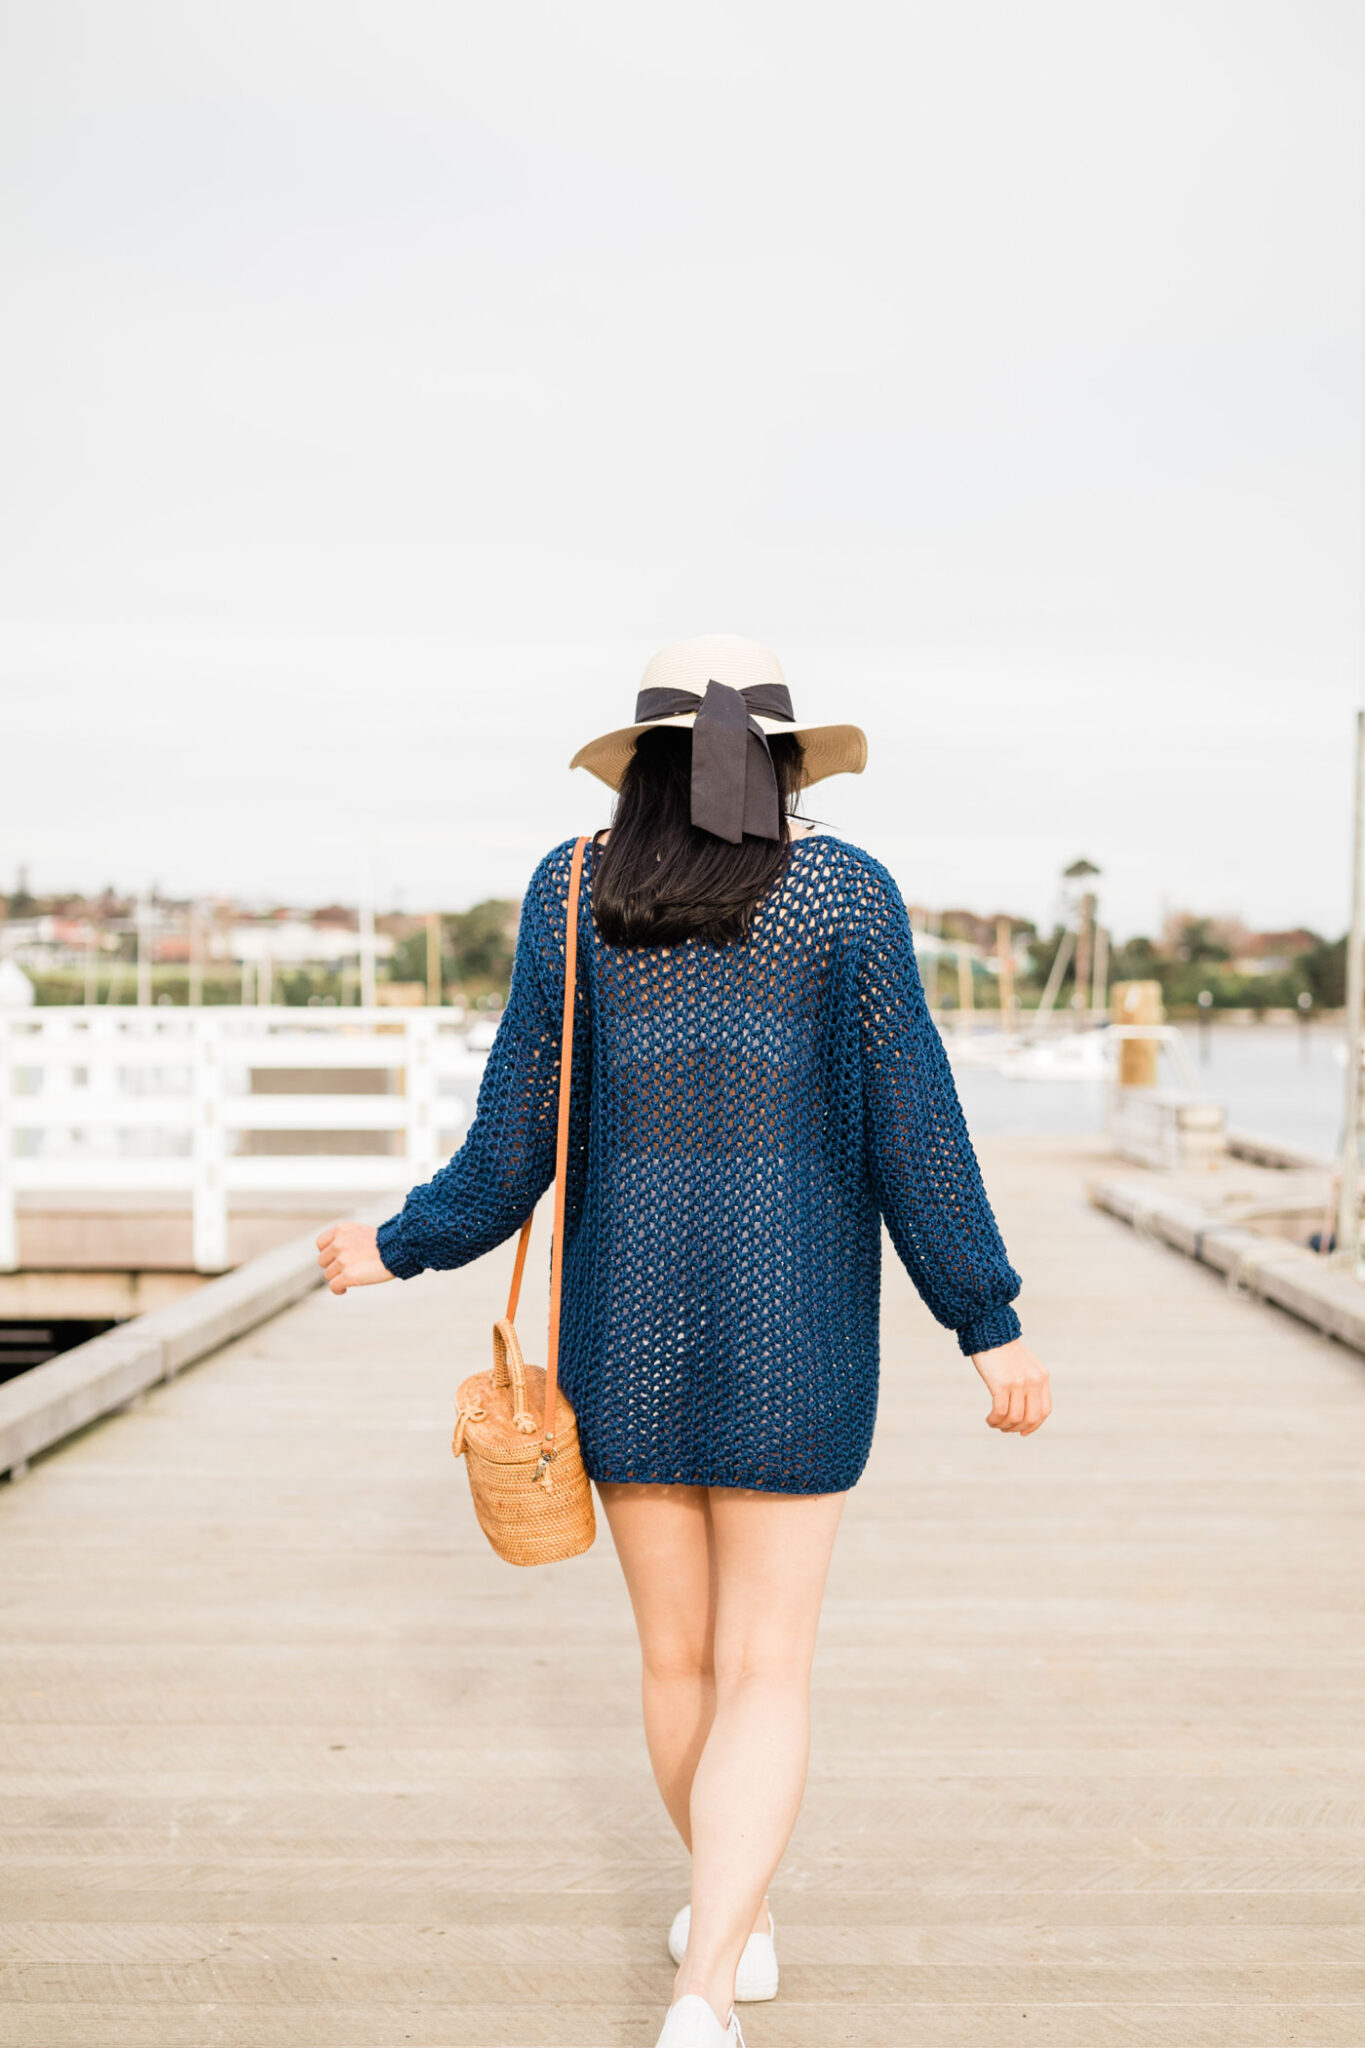
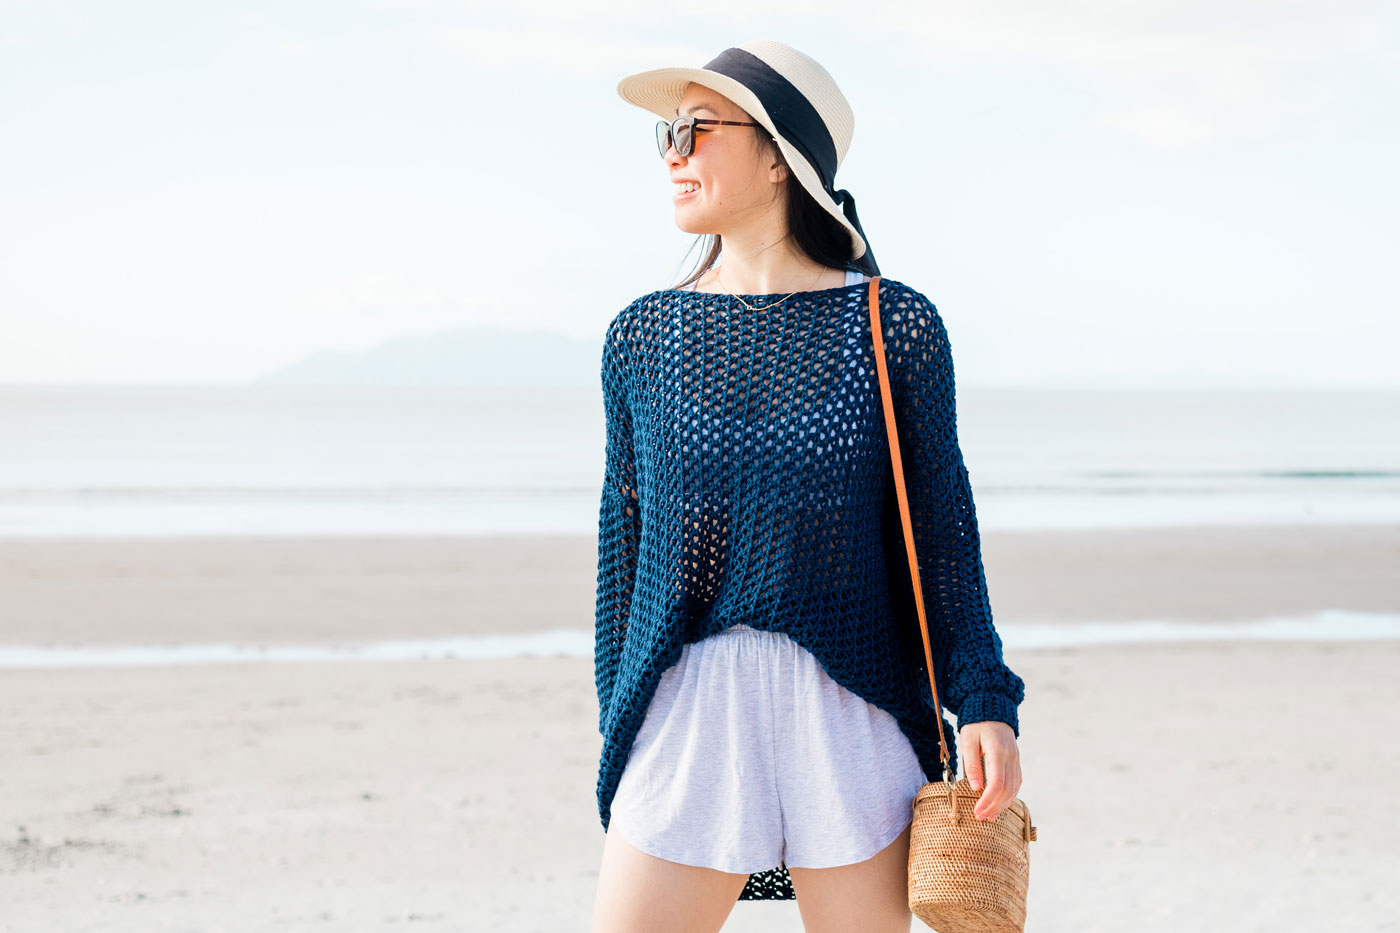
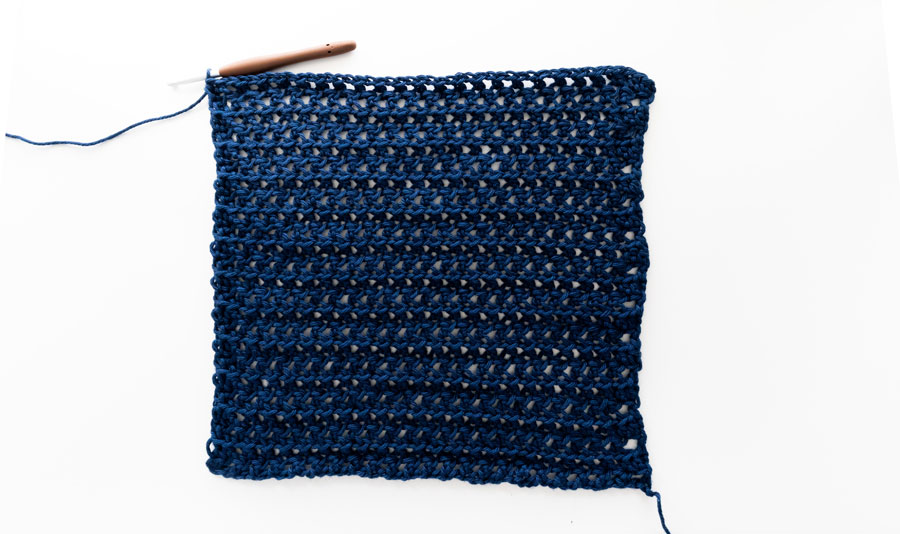
The Tide Knot Cover Up is the perfect beach sweater! This relaxed crochet cover up is oversized with cuffed sleeves, so it’s comfy and practical at the same time!
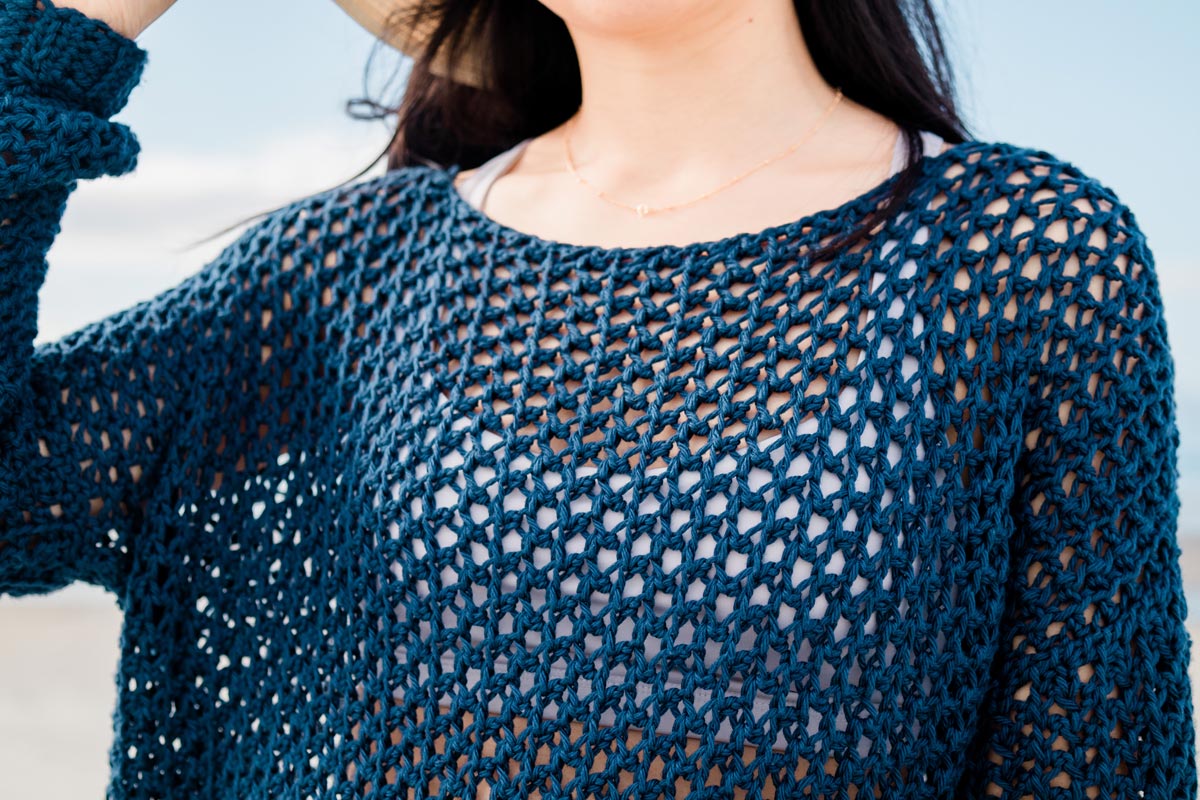
The loose and airy stitches work together to give the sweater a knotted stitch texture that form pentagon eyelets. Wear it to beach, throw it on over a swim suit or pair the cover up with jeans and a singlet underneath – this relaxed and slouchy sweater exudes all the summer vibes!
Design Inspiration
I’ve been dreaming of a lacy, mesh cover up for months but I couldn’t quite settle on a stitch texture that I loved. If you’ve crocheted for a while, you’ll know that it’s super easy to create a grid-like mesh texture but it’s a lot more difficult to round eyelets.
After creating dozens of swatches, I discovered this stitch combination that creates pentagon, round-ish eyelets and it has the most incredible drape! I love how it doesn’t look typically ‘crochet’ at all but more like a hand-knotted fabric 🙂
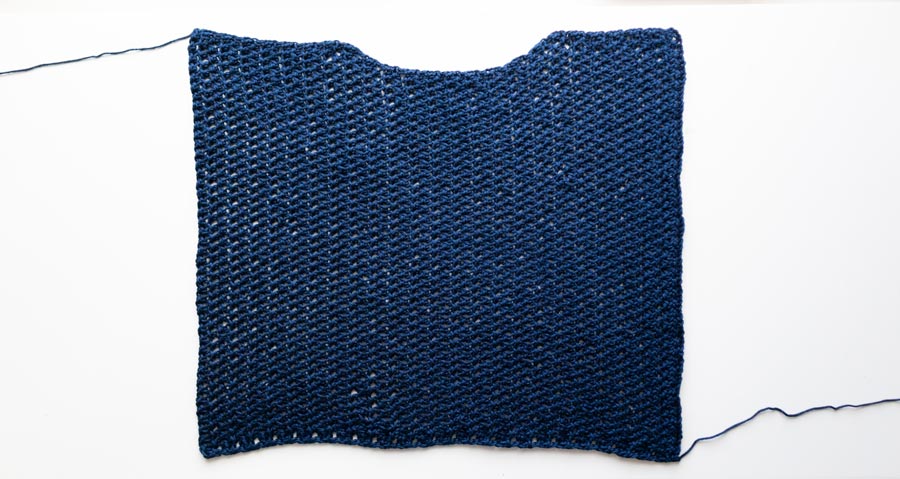
The body of the Tide Knot Sweater is slouchy, relaxed and VERY oversized so it’s super comfy and airy. The body panels are worked lengthways which means that the foundation chain runs the length of the sweater, not the width!
You can easily make a cropped beach cover up by reducing your chains and then follow the general pattern for the increases and decreases to create the boat neckline.
The sleeves are also worked lengthways and finished off with simple back loop half double crochet ribbing, so the sleeves are out of the way when you move your arms.
The sleeves and body panels are seamed together and once you’ve worn your cover up a few times you’ll notice that the sweater will stretch out and become even more relaxed and drapey! Also, I didn’t block this sweater because the yarn is already very soft and stitches were already open and flat. I find that sometimes cotton yarns can stretch too much after blocking! But if you’re using a different yarn feel free to block your sweater if you want 🙂

Yarn
For the Tide Knot Cover Up, I used We Crochet’s Shine Worsted in the shade Sailor (a true navy blue). Shine Worsted is a pima cotton mixed with modal which is a natural beech wood fibre. I think the modal really helps the yarn to have all the softness of a pima cotton without all the fluff and pilling! And even though the yarn is on the thicker side of an aran/worsted yarn it’s still so light with a soft, silky feel.
Pima cotton is quickly becoming one of my favourite fibres to crochet with and it really is the perfect yarn for wearable summer crochet projects! If you’ve never tried Shine Worsted comes in 30 shades and there’s also a thinner sport version of this yarn for more lightweight projects!
Pin me for later!
Video Tutorial
Add to your Ravelry queue here!
Ad-free, printable version here!
*Sample is a size small shown on a 5’3” model with a 32” bust.
*The sizing guide follows size XS(S, M, L, XL, 2XL, 3XL). E.g. “Ch 71(79, 87, 95, 103, 111, 119) means Ch 71 for XS, Ch 79 for Small, Ch 87 for Medium, Ch 95 for Large, Ch 103 for XL, Ch 111 for 2XL and Ch 119 for 3XL.” If there is only one number, it applies to all sizes.
*"HDC 10" means HDC into the next 10 stitches.
*The turning chain ch 1 does NOT count as a stitch, otherwise ch 1 counts as a stitch.
*Total stitches are indicated between < >.This pattern uses US crochet terms.
*The body of the pullover is very oversized, wide and loose and will also stretch out approx. 5-8cm / 2-3” in width and 2-5cm / 1-2” in length.
*The sweater is made up of 4 pieces – front, back and 2 sleeves.The body panels and sleeves are worked lengthways – the foundation chain runs the length of the sweater and the sleeves, not the width.
*All pieces – front, back, 2 sleeves - are seamed together and then the neckline is finished off with a SC border.
*The sample uses WeCrochet’s Shine is on the thicker side of a cotton aran yarn. (In between an aran/worsted and bulky yarn).
LEVEL: Easy
Materials
Yarn – WeCrochet Shine – Aran/Worsted/Medium (4), 68m/50g, 75yds/1.75oz, 60% Pima Cotton + 40% Modal, Sailor
10(11, 12, 13, 14, 15, 16) skeins approx. 490(540, 575, 620, 695, 725, 750)g
Stitches & Abbreviations
Ch = Chain
Ch-sp = Chain Space
SC = Single Crochet
SC2tog = Single Crochet 2 Stitches Together
HDC = Half Double Crochet
FLO = Front Loop
BLO = Back Loop
St(s) = Stitch(es)
Rep = Repeat
Sk = Skip
Measurements cm:
To fit Bust: 71(81, 91, 101, 112, 122, 132)
Width: 53(58, 61, 66, 71, 74, 76)
Length: 55(58, 58, 58, 61, 61, 61)
Armhole: 15(15, 16, 18, 19, 21, 22)
Sleeve length: 34(34, 36, 36, 37, 37, 37)
Measurements inches:
To fit Bust: 30(34, 38, 42, 46, 50, 54)
Width: 21(23, 24, 26, 28, 29, 30)
Length: 22(23, 23, 23, 24.5, 24.5, 24.5)
Armhole: 6(6, 6.5, 7, 7.5, 8, 8.5)
Sleeve length: 13.5(13.5, 14, 14, 14.5, 14.5, 14.5)
GAUGE: 10cm/4” square = 15 stitches wide x 8 rows tall in Front Loop Half Double Crochet
Tide Knot Cover Up Crochet Pattern
Back Panel
FOUNDATION CHAIN: Ch 84(88, 88, 88, 92, 92, 92).
ROW 1: HDC into 2nd ch from hook, *ch 1, sk 1 ch, HDC; rep from * until end, turn.
<83(87, 87, 87, 91, 91, 91)>
ROW 2: Ch 1, FLO HDC in 1st st, FLO HDC in ch, *ch 1, sk 1 st, FLO HDC in ch; rep from * until last ch, HDC in last st, turn.
<83(87, 87, 87, 91, 91, 91)>
ROW 3: Ch 1, FLO HDC in 1st st, ch 1, sk 1 st, *FLO HDC in ch, ch 1, sk 1 st; rep from * until last st, HDC in last st, turn.
<83(87, 87, 87, 91, 91, 91)>
ROW 4: Ch 1, FLO HDC in 1st st, FLO HDC in ch, *ch 1, sk 1 st, FLO HDC in ch; rep from * until last ch, HDC in last st, turn.
<83(87, 87, 87, 91, 91, 91)>
Repeat ROWS 3-4 until ROW 44(48, 50, 54, 58, 60, 62).
Fasten off.
Front Panel
FOUNDATION CHAIN: Ch 84(88, 88, 88, 92, 92, 92).
ROW 1: HDC into 2nd ch from hook, *ch 1, sk 1 ch, HDC; rep from * until end, turn.
<83(87, 87, 87, 91, 91, 91)>
ROW 2: Ch 1, FLO HDC in 1st st, FLO HDC in ch, *ch 1, sk 1 st, FLO HDC in ch; rep from * until last ch, HDC in last st, turn.
<83(87, 87, 87, 91, 91, 91)>
ROW 3: Ch 1, FLO HDC in 1st st, ch 1, sk 1 st, *FLO HDC in ch, ch 1, sk 1 st; rep from * until last st, HDC in last st, turn.
<83(87, 87, 87, 91, 91, 91)>
Repeat ROWS 2-3 until ROW 13(15, 15, 17, 19, 19, 19).
Do not fasten off! Proceed directly to ‘NECKLINE DECREASE’ instructions.
NECKLINE DECREASE
NECKLINE DECREASE ROW 1: Ch 1, FLO HDC in 1st st, *FLO HDC in ch, ch 1, sk 1 st; rep from * until last ch, HDC in last ch-sp, turn.
<82(86, 86, 86, 90, 90, 90)>
NECKLINE DECREASE ROW 2: Ch 1, sk 1st st, *FLO HDC in ch, ch 1, sk 1 st; rep from * until last st, HDC in last st, turn.
<81(85, 85, 85, 89, 89, 89)>
NECKLINE DECREASE ROW 3: Ch 1, FLO HDC in 1st st, *FLO HDC in ch, ch 1, sk 1 st; rep from * until last ch-sp, HDC in last ch, turn.
<80(84, 84, 84, 88, 88, 88)>
NECKLINE DECREASE ROW 4: Ch 1, sk 1st st, *FLO HDC in ch, ch 1, sk 1 st; rep from * until last st, HDC in last st, turn.
<79(83, 83, 83, 87, 87, 87)>
Total rows: <17(19, 19, 21, 23, 23, 23)>
Do not fasten off! Proceed directly to ‘NECKLINE’ instructions.
NECKLINE
Repeat FRONT PANEL ROWS 2-3, 5(5, 6, 6, 6, 7, 8) more times.
<79(83, 83, 83, 87, 87, 87)>
Total Rows: <27(29, 31, 33, 35, 37, 39)>
Do not fasten off! Proceed directly to ‘NECKLINE INCREASE’ instructions.
NECKLINE INCREASE
NECKLINE INCREASE ROW 1: Ch 1, FLO HDC in 1st st, FLO HDC in ch, *ch 1, sk 1 st, FLO HDC in ch; rep from * until last ch, ch 1, HDC in last st, turn.
<80(84, 84, 84, 88, 88, 88)>
NECKLINE INCREASE ROW 2: Ch 1, FLO HDC in 1st st, ch 1, *FLO HDC in ch, ch 1, sk 1 st; rep from * until last st, HDC in last st, turn.
<81(85, 85, 85, 89, 89, 89)>
NECKLINE INCREASE ROW 3: Ch 1, FLO HDC in 1st st, FLO HDC in ch, *ch 1, sk 1 st, FLO HDC in ch; rep from * until last ch, ch 1, HDC in last st, turn.
<82(86, 86, 86, 90, 90, 90)>
NECKLINE INCREASE ROW 4: Ch 1, FLO HDC in 1st st, ch 1, *FLO HDC in ch, ch 1, sk 1 st; rep from * until last st, HDC in last st, turn.
<83(87, 87, 87, 91, 91, 91)>
Total rows: <31(33, 35, 37, 39, 41, 33)>
Do not fasten off!
Alternate between FRONT PANEL ROWS 2-3 until TOTAL ROW 44(48, 50, 54, 58, 60, 62).
<83(87, 87, 87, 91, 91, 91)>
Fasten off.
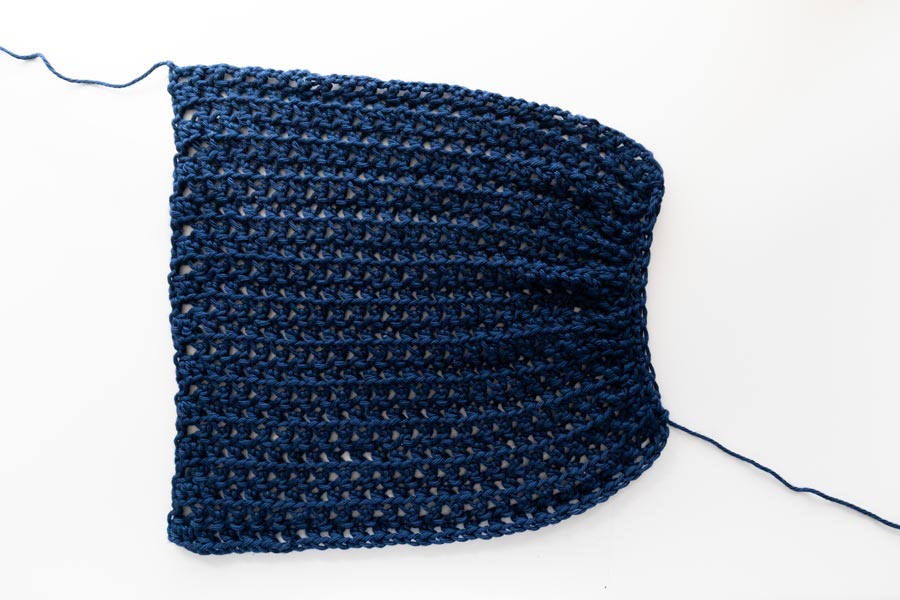
SLEEVES
(Make 2)
FOUNDATION CHAIN: Ch 46(46, 48, 48, 50, 50, 50).
ROW 1: HDC into 2nd ch from hook, *ch 1, sk 1 ch, HDC; rep from * until end, turn.
<45(45, 47, 47, 49, 49, 49)>
ROW 2: Ch 1, FLO HDC in 1st st, FLO HDC in ch, *ch 1, sk 1 st, FLO HDC in ch; rep from * until last ch, HDC in last st, turn.
<45(45, 47, 47, 49, 49, 49)>
ROW 3: Ch 1, FLO HDC in 1st st, ch 1, sk 1 st, *FLO HDC in ch, ch 1, sk 1 st; rep from * until last st, HDC in last st, turn.
<45(45, 47, 47, 49, 49, 49)>
ROW 4: Ch 1, FLO HDC in 1st st, FLO HDC in ch, *ch 1, sk 1 st, FLO HDC in ch; rep from * until last ch, HDC in last st, turn.
<45(45, 47, 47, 49, 49, 49)>
Repeat ROWS 3-4 until ROW 24(24, 26, 28, 30, 32, 34).
<45(45, 47, 47, 49, 49, 49)>
Rotate sleeve 45 degrees and we’ll now crochet along the edge of the sleeve to form the ‘bell shape’ cuff.
Note: Each row = 1 stitch.
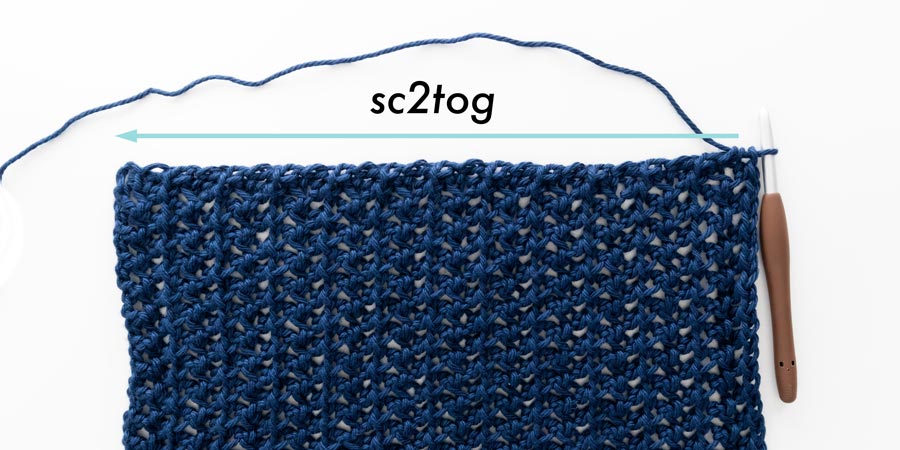
DECREASE ROW 1: Ch 1, SC2tog across, turn.
<12(12, 13, 14, 15, 16, 17)>
*Wrap the cuff around your wrist to double check that it fits. If the cuff is too tight, SC2tog with looser tension.
DECREASE ROW 2: Ch 1, SC across.
*Keep your SCs loose – don’t tighten the cuff.
<12(12, 13, 14, 15, 16, 17)>
Fasten off.
SLEEVE RIBBING
FOUNDATION CHAIN: Ch 6.
ROW 1: HDC in 2nd ch from hook, HDC in each ch, turn.
<5>
ROW 2: Ch 1, BLO HDC 4, HDC in last st, turn.
<5>
Repeat ROW 2 until long edge of ribbing equals the width of DECREASE ROW 2.
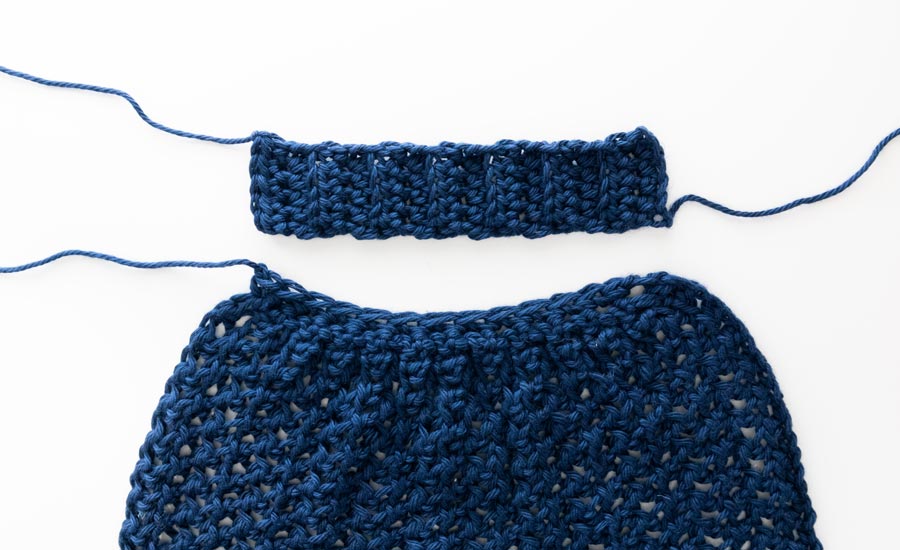
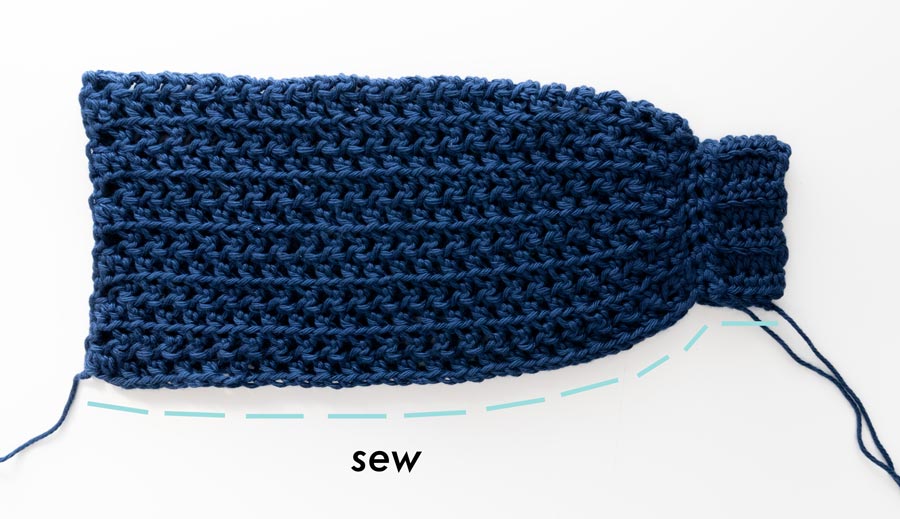
SLEEVE ASSEMBLY
Whip stitch ribbing to DECREASE ROW 2.
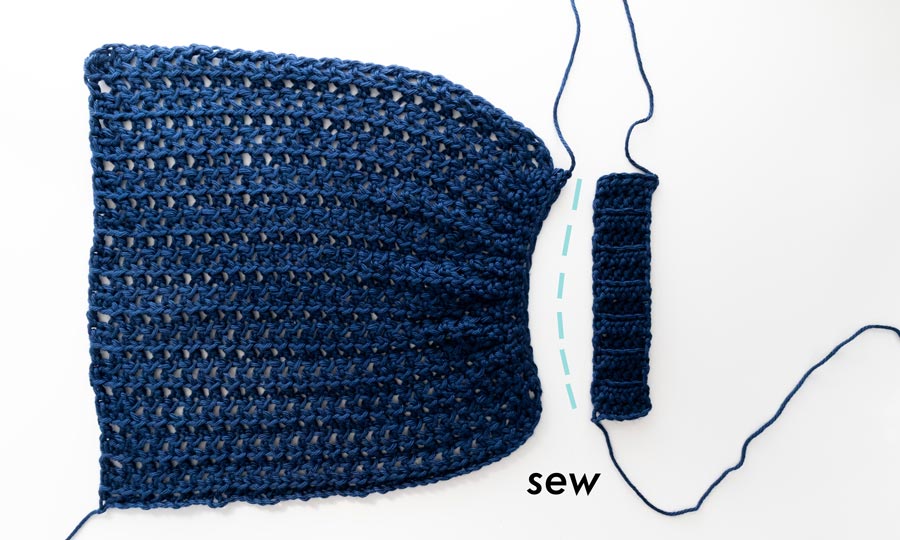
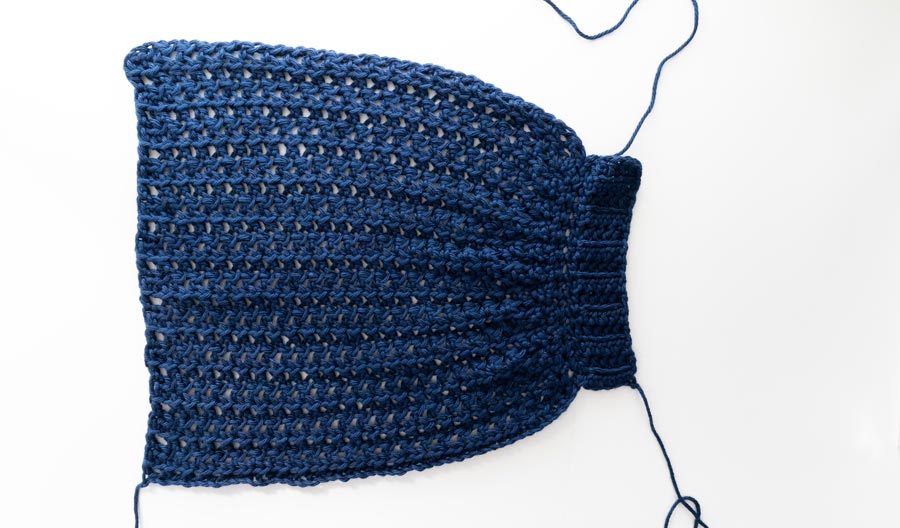
Fold sleeve in half lengthways and whip stitch edges together.
ASSEMBLY
Lay the body panels on top of each other. Whip stitch the tops of the shoulders together.
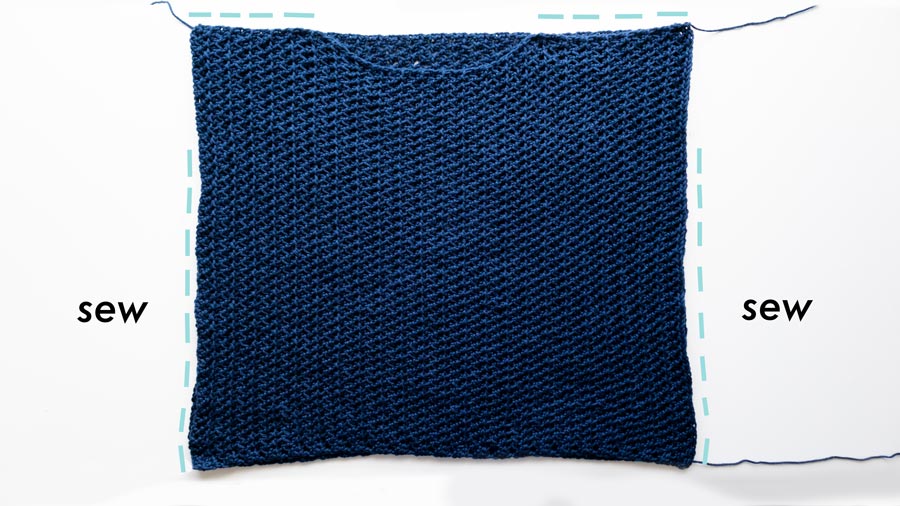
Whip stitch up the sides of the sweater, leaving a 15(17, 18, 19, 20, 21, 23)cm / 6(6.5, 7, 7.5, 8, 8.5, 9)” gap for the sleeves.
Whip stitch tops of sleeves to the arm holes.
Weave in all of your ends.
Voilà! You’ve finished your Beach Cover Up 🙂
When whip stitching the panels together are you doing this on the right side or the wrong side? or Do you need to turn the garment inside out when finishes?
Hi,
I always whip stitch with the wrong side facing outwards and then turn the garment inside out when I'm done so that the right side is facing. However, since this pattern has the knotted stitch texture you can't really tell either way 🙂
Grace
Is there a video? I see no link.
Hi Debra,
The video is embedded on the page just before the pattern starts 🙂
Grace
still can't find link to video. could you be more specific. thanks
Hi Darlene,
You can also view the video tutorial on YouTube - https://youtu.be/zb1bgtRbadc
Grace 🙂
Hi thank you for the pretty patterns you share with us! I just want to ask if which is better, the 8 ply or 12 ply for this pattern? I can't get a hold of 10 ply yarn in my place. I hope you can help me. Thank you very much!
Hi Jea, WeCrochet Shine is quite a thick 10 ply yarn - so if you can get hold of a thinner 12 ply yarn (suitable for a 6-6.5mm hook) you should probably be able to meet gauge 🙂
Grace
Hi, would you have a yarn estimate for a cropped version in size XS? Thank you 🙂
Confused as to how many skeins are needed for medium and large sizes
The sweater is not as long as I thought it would be. Is there a suggestion on how to extend the length without frogging, I’ve completed the back.
Is there a sizing trick for bringing this down to a child's size?
Could I substitute Lions Brand 24/7 cotton yarn for this project? Thank you!
I love this pattern! It was so easy to follow! My only problem was after I finished the entire sweater and tried it on it was a crop top on me and I followed the pattern to a T for 3X. I’m in the process of taking it completely apart and starting again adding ALOT more chains to the very beginning!
I can't download the free pattern.
Hi, I’m making this for a size M and my row count doesn’t seem to add up correctly with the neckline decrease to increase. I started the decrease at row 15, decreased for the 4 rows (83 stitches total) for a row total of 19. The increase however says to repeat front panel rows 2-3 6 times for a medium, which adds up to 25 not 31. So then, when I do the 4 row increase to get back to 87 stitches, I’ll only be at row 29, not 35. So, what would my final row count be? I don’t think it would be 50, otherwise i think the sweater front panel would be lopsided? I haven’t done the back panel yet, so I can make it work with 44 rows, (29+15) to make it even for when I make the back panel and everything should line up correctly?
I took a screen shot, but can’t post it