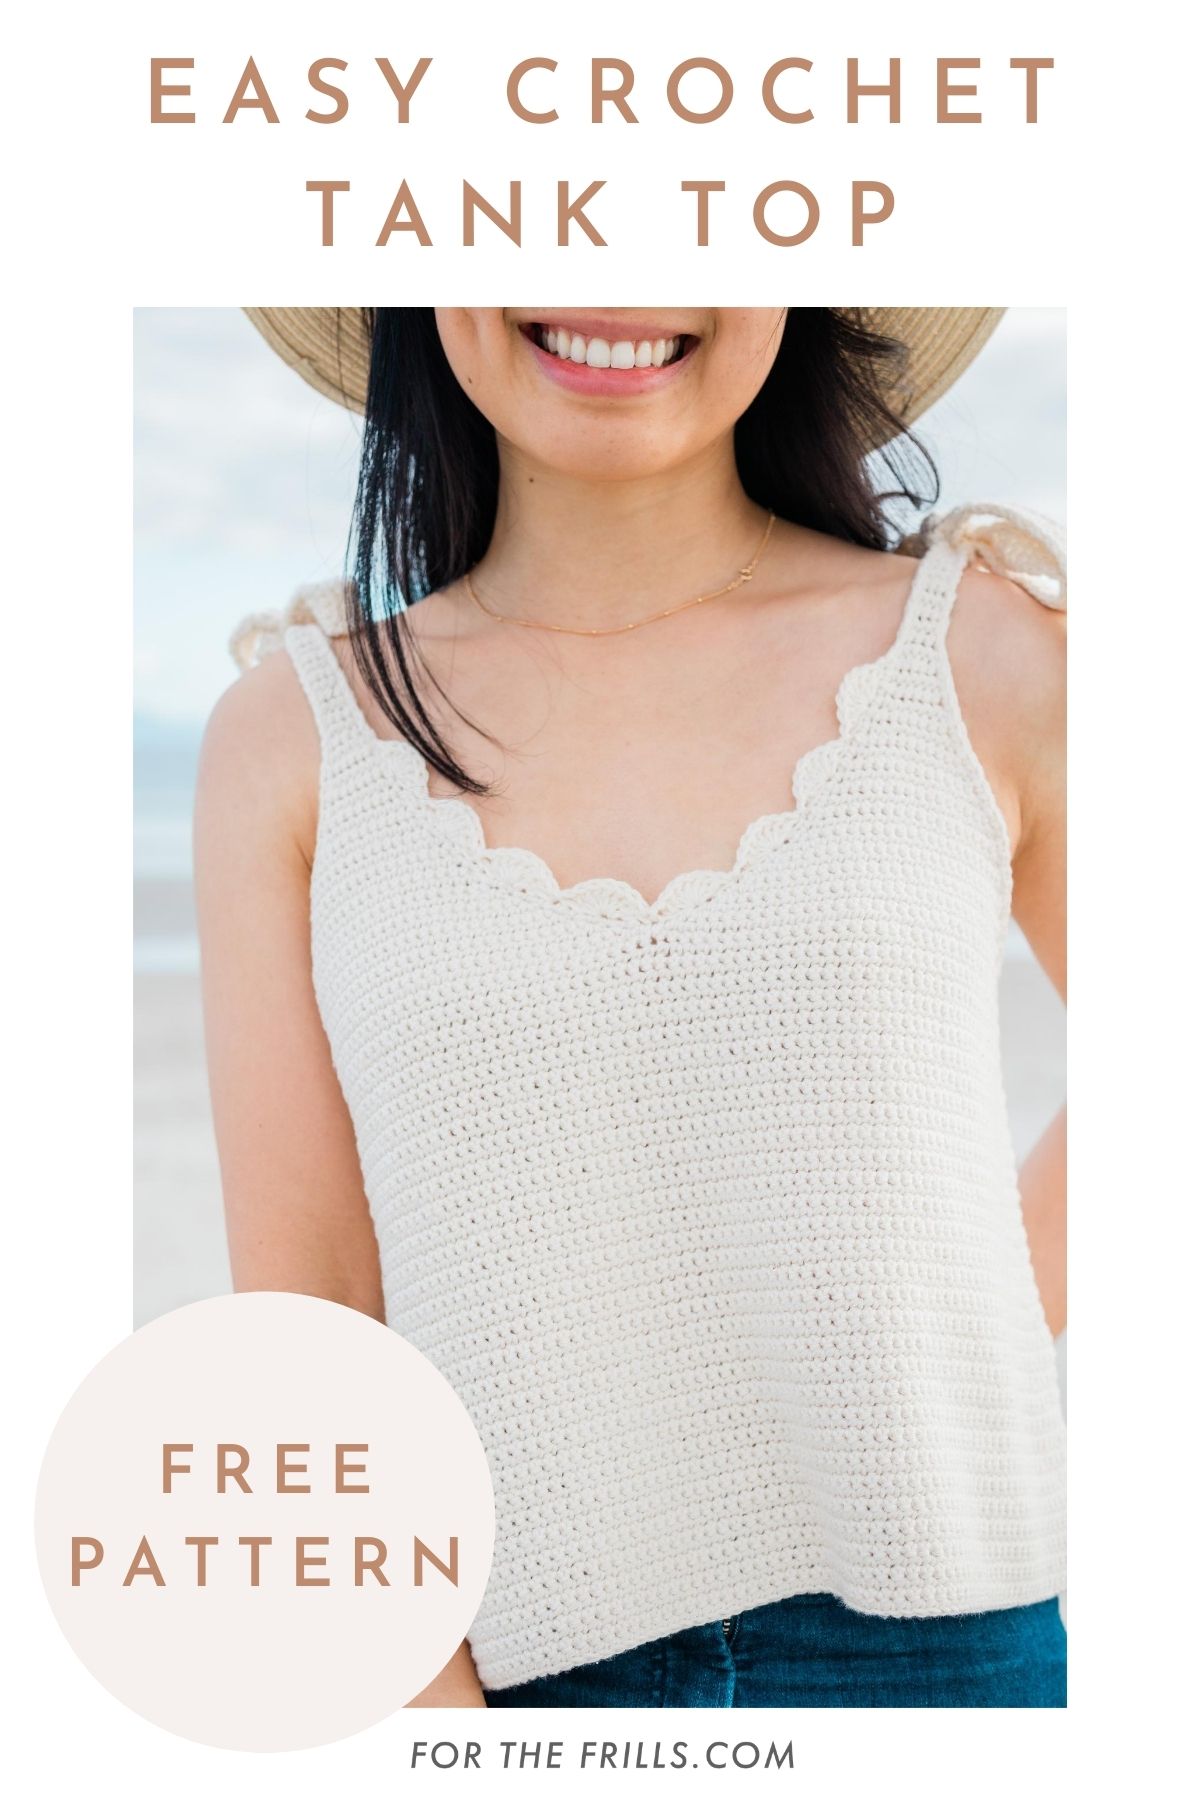
The Seascape Scallop Tank uses light cotton yarn and simple stitches to create a relaxed summer top! Worked top down and in one piece, the length is customisable and there are no seams to sew together!
If you enjoy crocheting easy and versatile summer tops, you’ll love the Sagebrush Tank Top, Forest Breeze Tee or Skylar Crop Top! And all of these free crochet top patterns have a video tutorial!
This post may contain affiliate links, view our disclosure policy for details.
Thank you to WeCrochet for providing the yarn for this free crochet tank top pattern! As always all thoughts and opinions are 100% my own 🙂
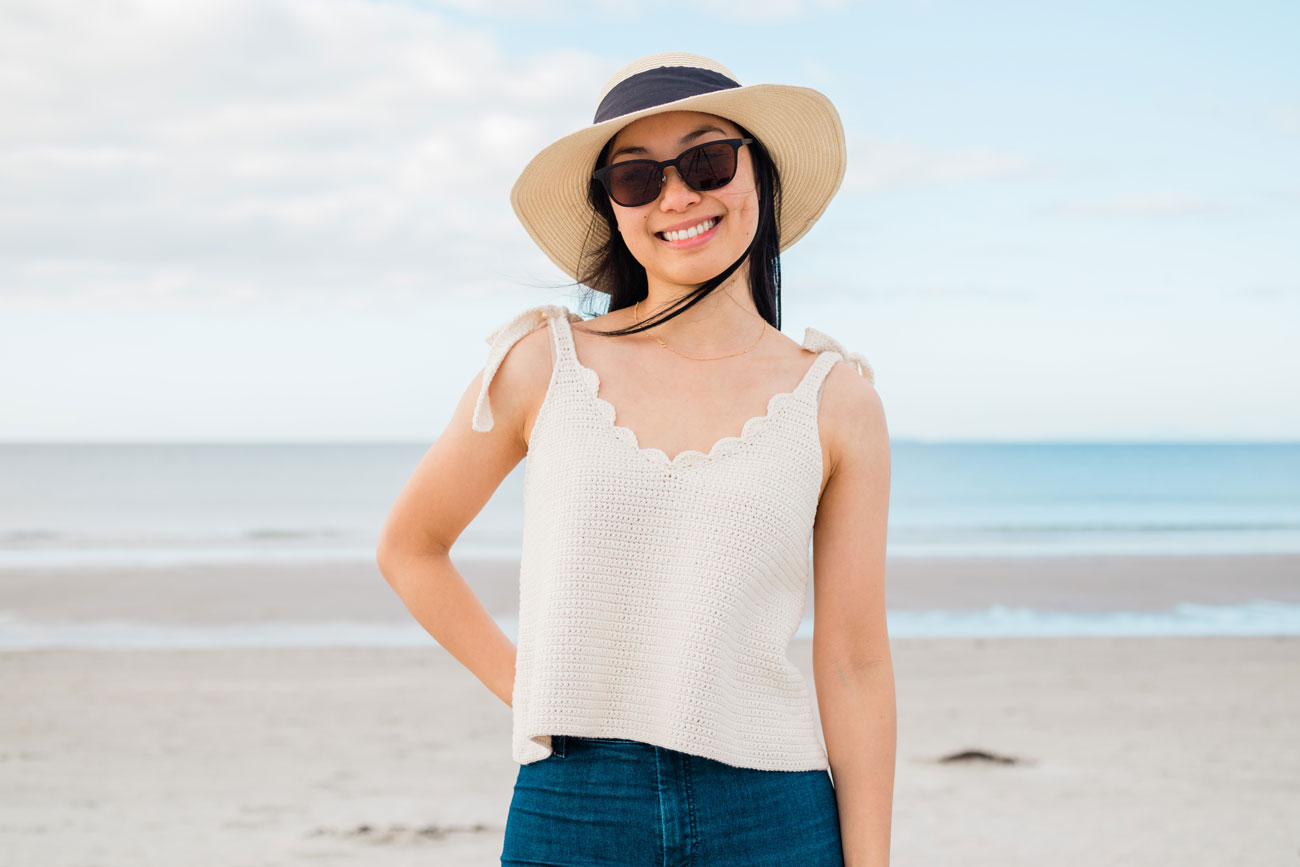
The Seascape Tank Top is summer in a top! The breezy drape combined with the seashell scallop edging remind me of long beach days basking under the golden New Zealand sun! The top body portion is made entirely of single crochets, so it’s perfect for mindless crocheting while you listen to waves crashing on the beach, as a road trip project or while watching TV.
The scallop stitch edge and tie straps add a feminine touch to the sleek silhouette, but there are also options for plain straight straps and you can easily leave off the scallops for a simple v-neck tank top!
Design Inspiration
Although I’m a fall girl at heart, summer tops might just be my favourite projects to design and crochet! The scallop stitch is one of my favourite crochet edging stitches (For more scallop stitch projects, check out the Forget-Me-Not Tee and Béatrice Sweater) and I’ve wanted a scallop v-neck camisole for ages so I decided to make my own 🙂
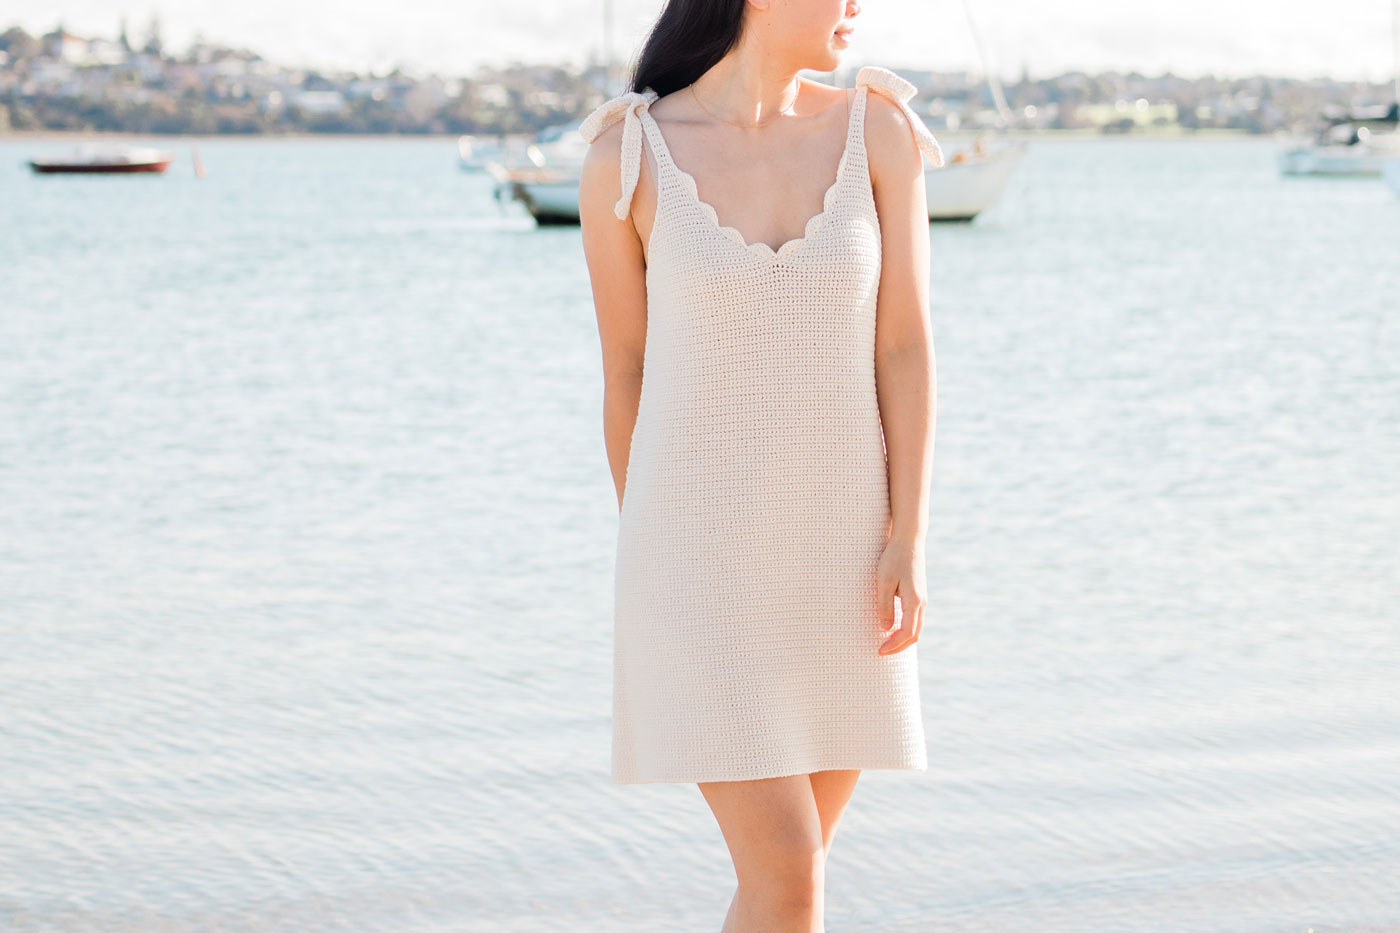
Initially I wanted the straps to be very thin, like a satin camisole / singlet top but I quickly realised that I could create a dress with the same ‘base pattern’ and thin straps would never hold up with the weight of the skirt! (The dress version will be released next week! 🙂 Sign up to my newsletter, so you’ll be the first to know when the pattern releases!)
Construction
The Seascape Tank is worked from the top down and there is absolutely no sewing! (If you like top down seamless patterns you’ll love the Magnolia Top or Brooklyn Sweater!)
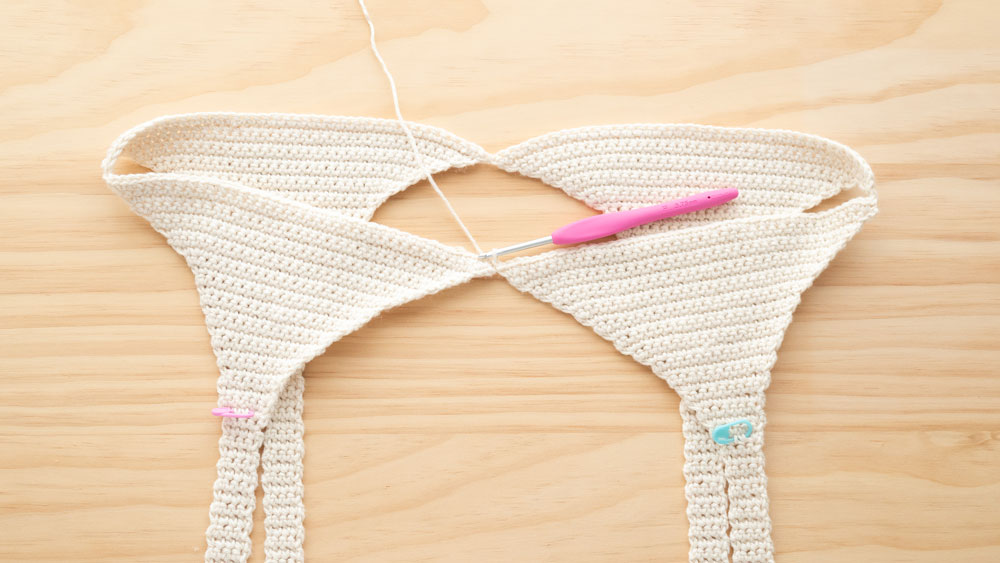
First, we’ll crochet the straps, then a triangle is crocheted directly onto the straps. In total, we’ll have 4 crochet triangles and they’ll be joined together with crochet stitches (remember no sewing necessary! 🙂 ). The 4 triangles form the the v-neck portion of the camisole.
The tank top is then worked in the round and you can extend the body to any length you want 🙂 Feel like a cropped tank top? Simply crochet fewer rounds! As we extend the top we’ll increase after every few rounds so the body of the tank top has a very loose and relaxed drape, that flares out slightly in a subtle trapeze shape.
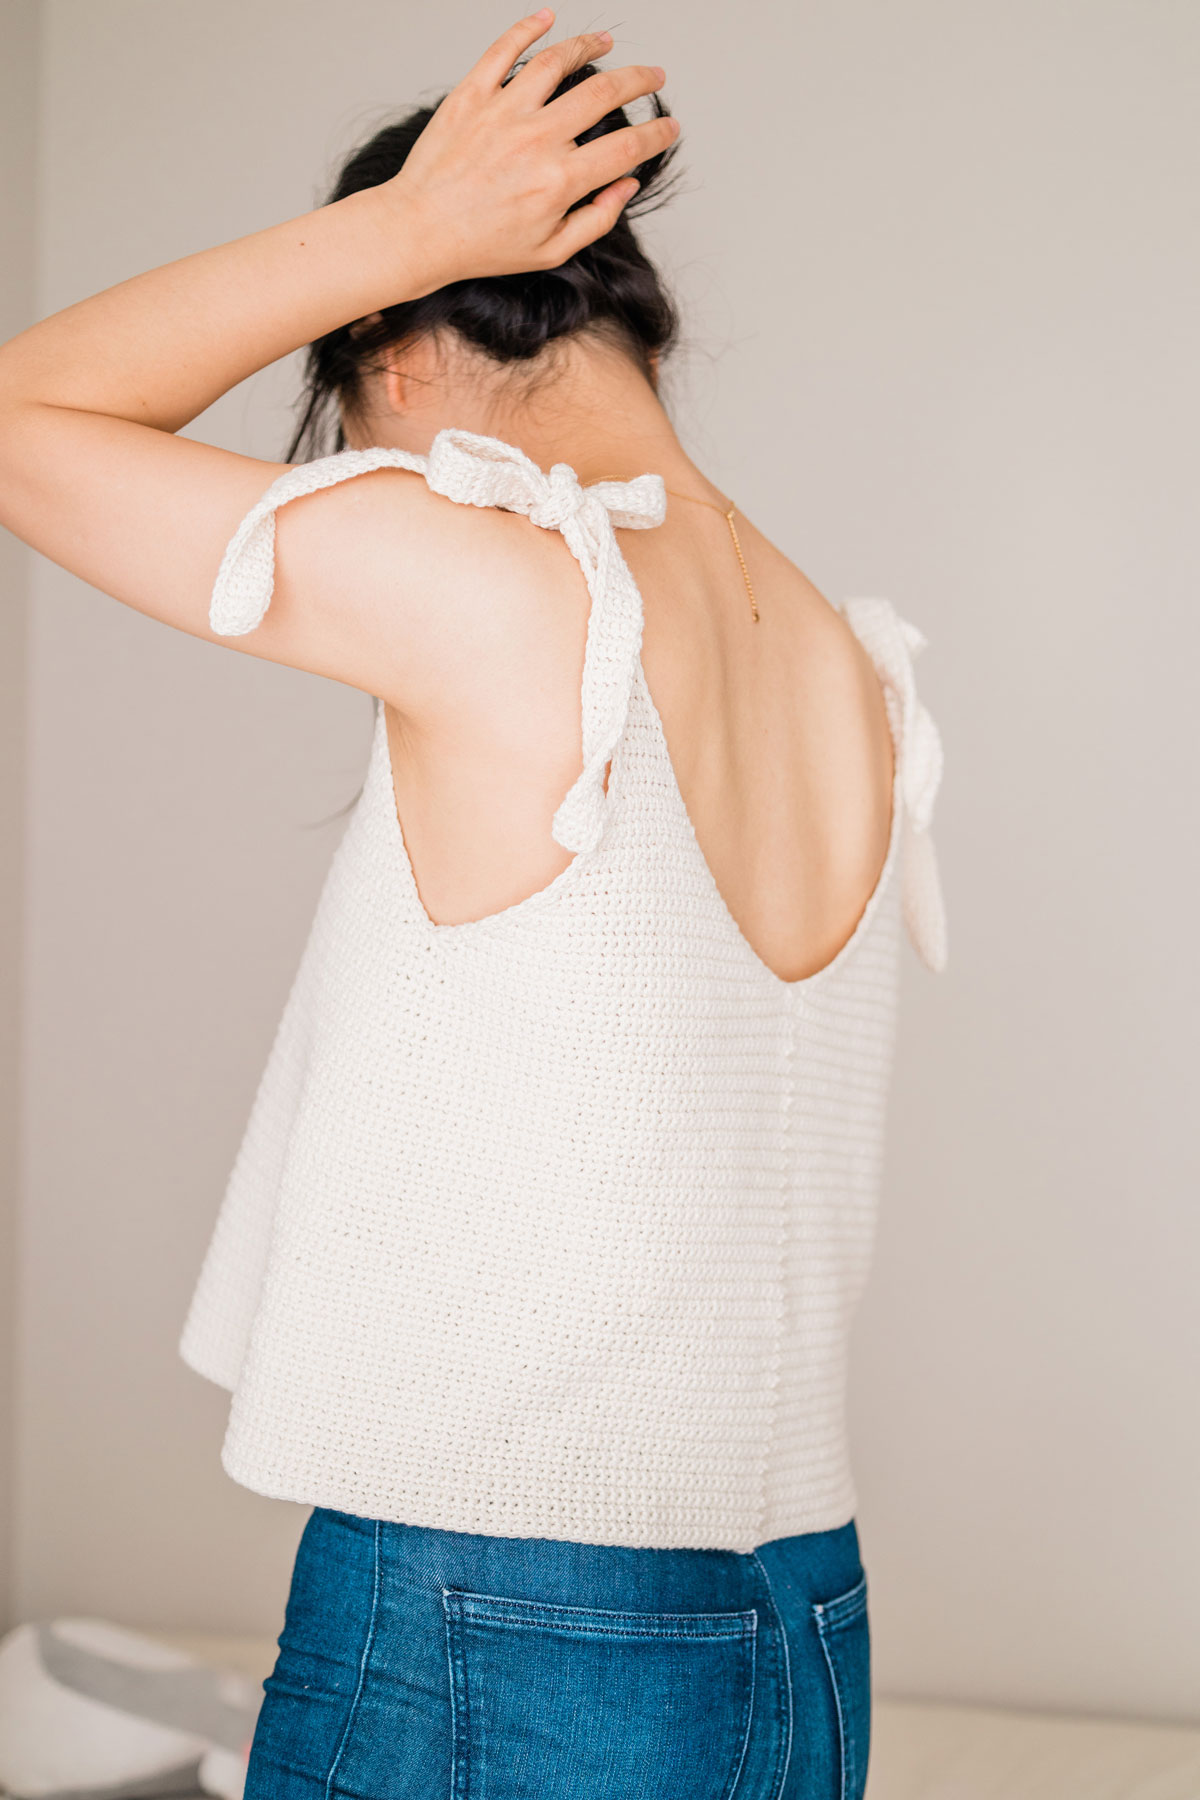
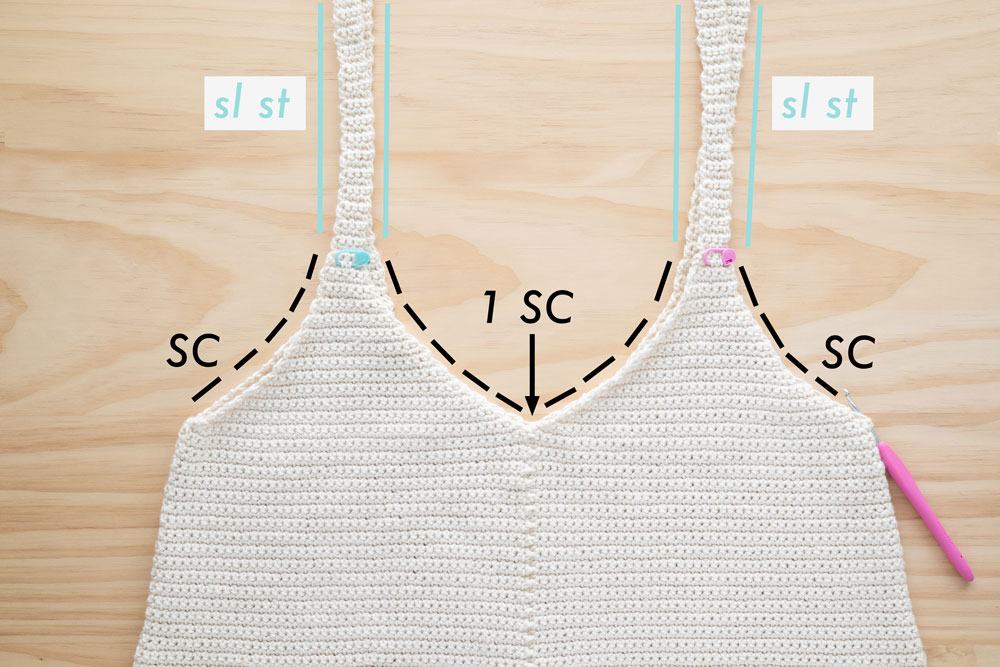
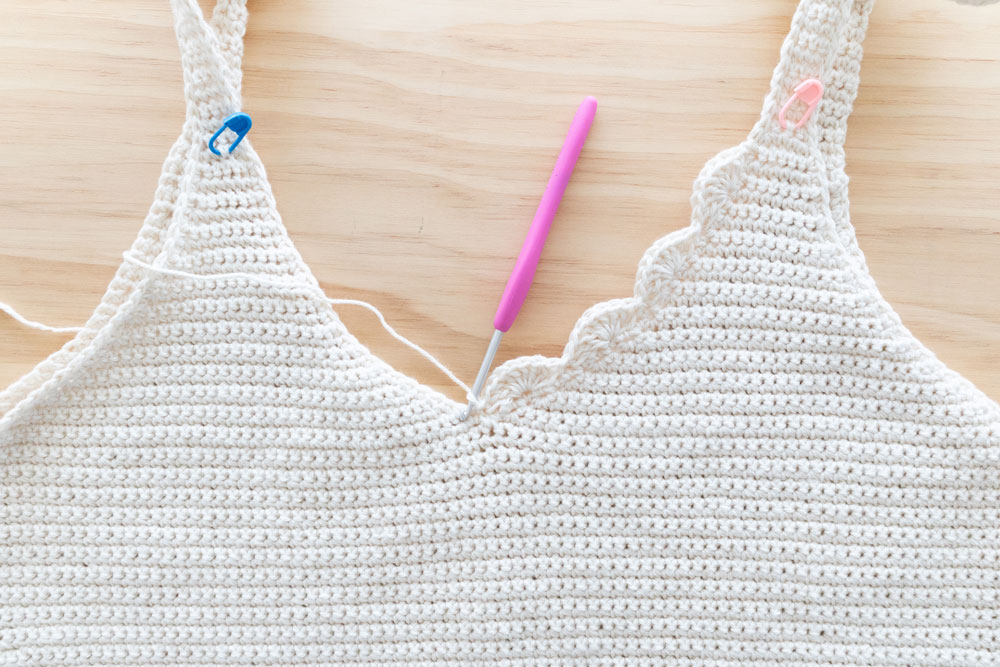
After you’ve reached your desired length, simply fasten off and we’ll crochet the edging. Slip stitches are worked down the straps (to help prevent them from stretching out) and then single crochets are worked along the v-neck portions of the tank top.
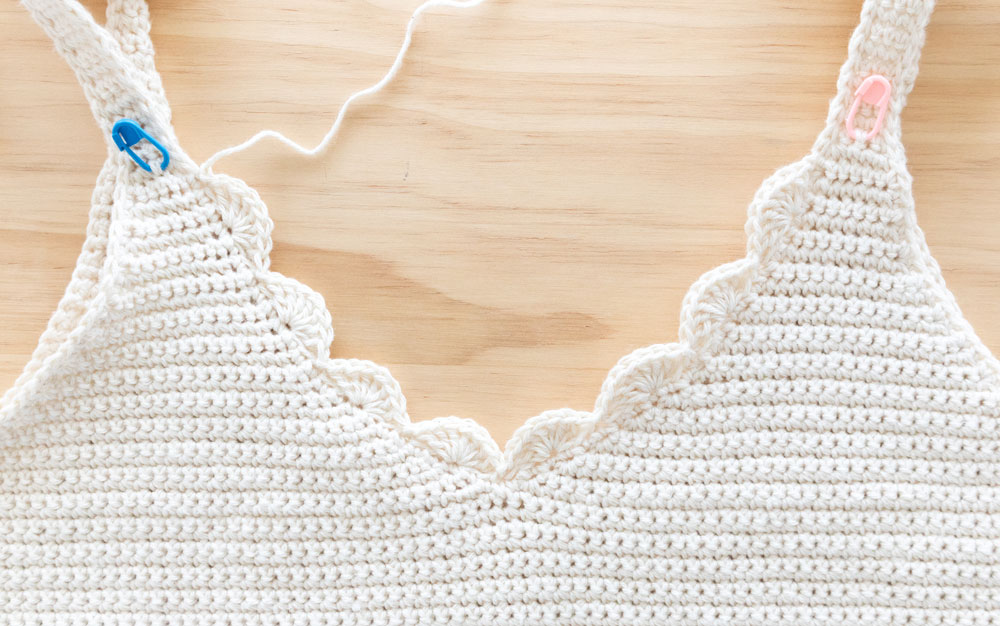
If you love the modern and streamlined look you can leave the v-neck of the tank top as is or add the scallop edging to the camisole using double crochets.
How to use stitch markers
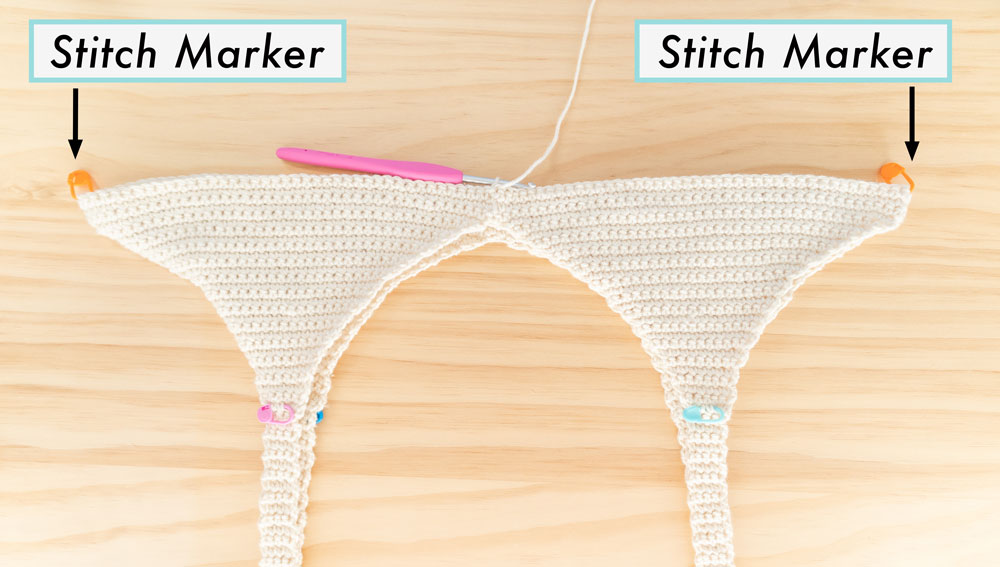
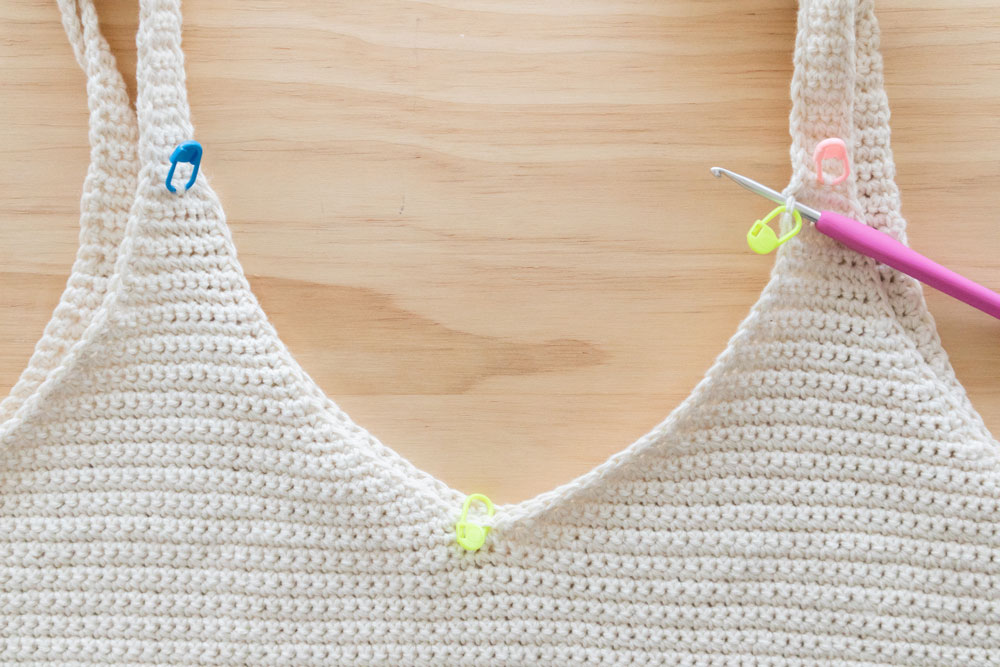
Throughout this pattern we’ll use stitch markers to help us organise the triangles and make the body portion of this top truly mindless! For a neatly finished look it’s crucial that we use stitch markers to indicate the right sides of the top so that all of our triangles match when we crochet them together.
We’ll also use stitch markers on the sides of the body to indicate when and where we should increase. And if you’re adding the scallop edge the stitch markers will help you have a balanced and perfectly symmetrical scallop neckline.
If you’ve never used stitch markers before don’t worry – they are really easy to use and throughout the pattern I indicate when and where you need them! You can also refer to the video tutorial (coming with the dress pattern next week!) to see where I place the stitch markers or refer to progress photos. And if you don’t have stitch markers no problem! Instead of stitch markers you can use safety pins or bobby pins 🙂
Looking for more free crochet tank top patterns?
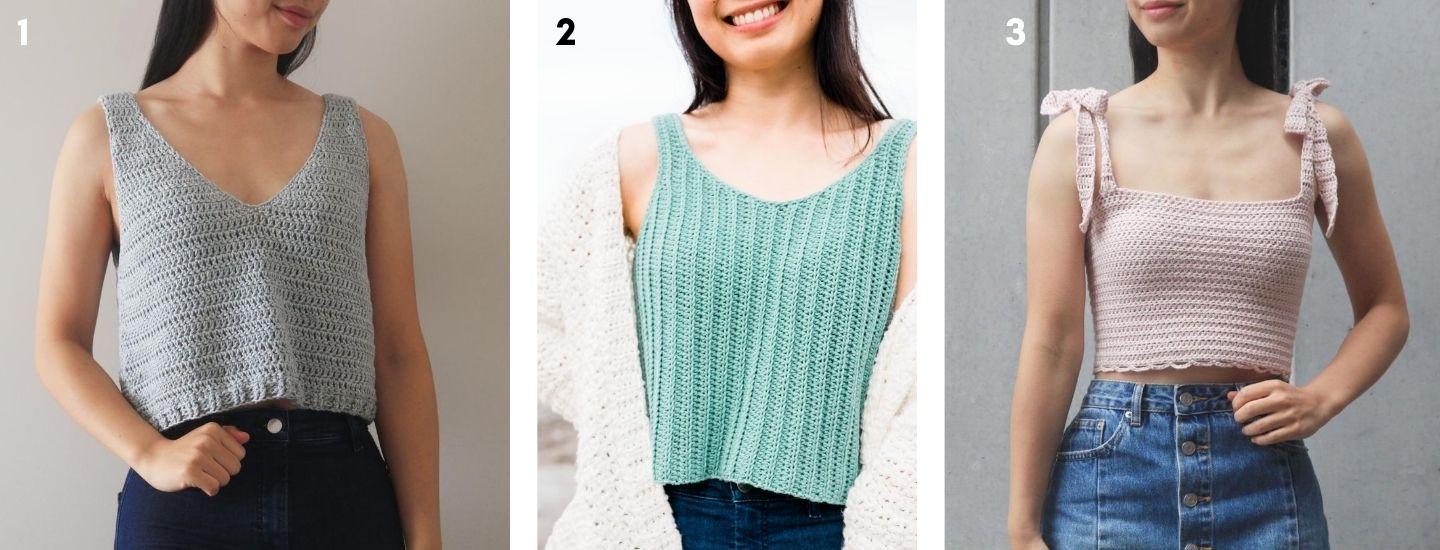
1. Sea Breeze V-neck Tank Top / 2. Sagebrush Ribbed Tank Top / 3. Leila Tie Strap Crop Top
Yarn
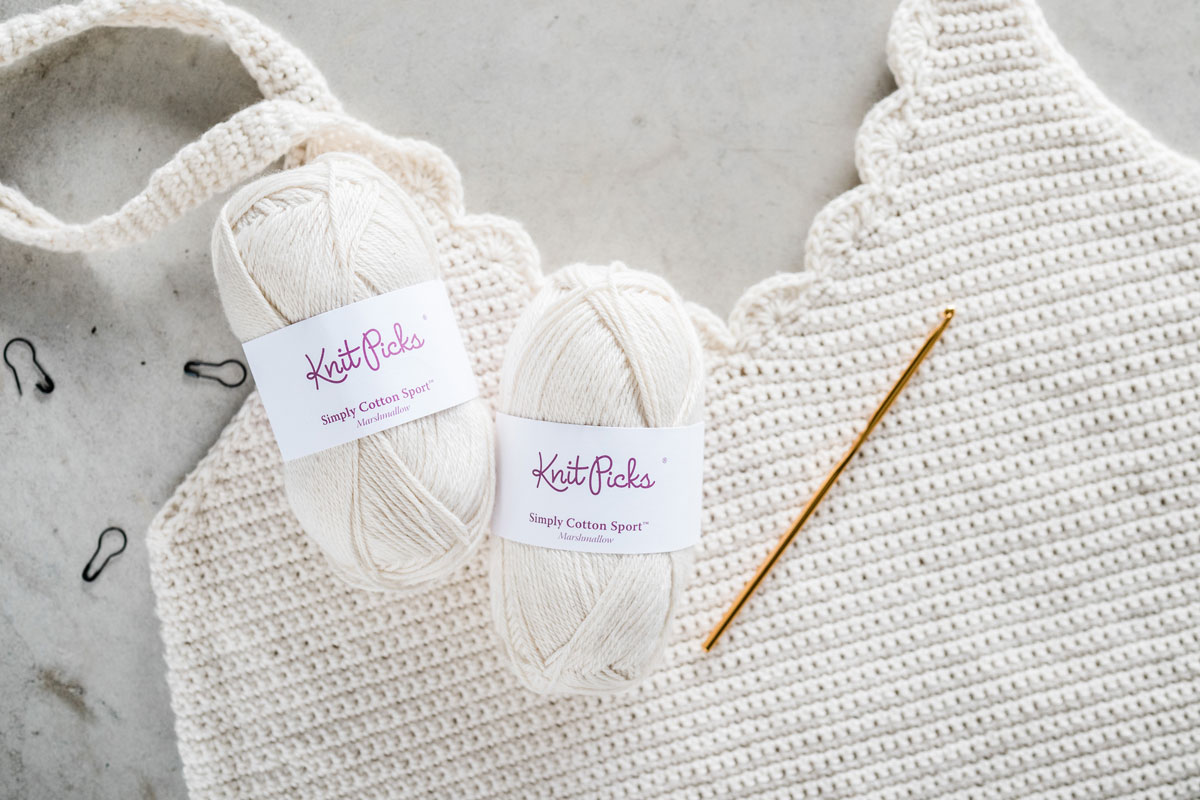
The Seascape Scallop Tank Top uses WeCrochet Simply Cotton Organic Sport. This organic cotton yarn is a creamy vanilla shade with tiny flecks of brown (that aren’t noticeable in the final look).
It’s super soft, light and airy - not stiff like many 100% cotton yarns and it has a squishy marshmallowy feel which makes it perfect for garments! Since it’s so soft it does fluff up a bit but the stitch definition is still incredibly clear.
This yarn only comes in its natural unbleached, undyed shade which makes it a great yarn for hand-dying. Otherwise check out WeCrochet’s Shine Sport for a lovely, soft pima cotton that also has incredible drape!
One thing to note is that I think Simply Cotton Organic Sport is quite a thick sport weight cotton yarn, very very close to a thin cotton DK (not quite a DK though). So, if substituting this yarn make sure that you are using a thick sport weight yarn and you might even be able to meet gauge with a thin DK. A normal sport weight cotton yarn will probably be too thin to match gauge and you’ll end up with loose, holey stitches!
Pin me for later!
Add the Seascape Scallop Tank Top to your Ravelry queue!
Ad-free, printable version of the Seascape Scallop Tank Top!
*Sample is a size small shown on a 5’3” model with a 32” bust.
(If you are in between sizes, size down - size small is a bit large on me)
*The sizing guide follows size XS(S, M, L, XL, 2XL, 3XL). E.g. “Ch 71(79, 87, 95, 103, 111, 119) means Ch 71 for XS, Ch 79 for Small, Ch 87 for Medium, Ch 95 for Large, Ch 103 for XL, Ch 111 for 2XL and Ch 119 for 3XL.” If there is only one number, it applies to all sizes.
*"SC 10" means SC into the next 10 stitches.
*"2 SC" means place 2 SC into the same stitch.
*The turning chain ch 1 does NOT count as a stitch, unless otherwise noted.
*Total stitches are indicated between < >.This pattern uses US crochet terms.
LEVEL: Easy
Materials
Yarn – WeCrochet Simply Cotton Organic Sport – Sport/Fine (2), 150m/50g, 164yds/1.75 oz, 100% Organic Cotton
TANK: 5(5, 5, 6, 7, 7, 8) skeins
approx. 210(230, 250, 270, 310, 335, 380)g
Stitches & Abbreviations
Ch = Chain
Sl st = Slip Stitch
SC = Single Crochet
DC = Double Crochet
St(s) = Stitch(es)
Rep = Repeat
SM = Stitch Marker
RS = Right Side
Measurements cm:
Bust: 78(84, 94, 102, 111, 120, 135)
Tank Length: 43(44, 45, 46, 47, 48, 50)
Measurements inches:
Bust: 30.5(34, 37, 40, 44, 47.5, 53)
Tank Length: 17(17.25, 17.75, 18, 18.5, 19.5)
GAUGE: 10cm/4” square = 19.5 stitches wide x 23 rows tall in single crochet
Seascape Pattern
STRAP + RIGHT TRIANGLE
(make 2)
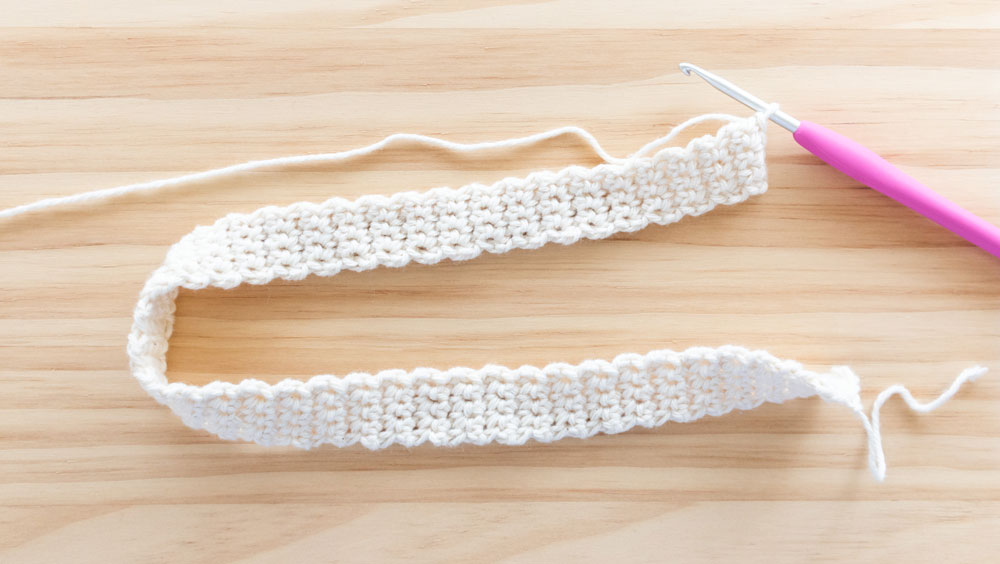
STRAPS
FOUNDATION CHAIN: Ch 5(5, 5, 5, 9, 9, 9).
ROW 1: SC into 2nd ch from hook, SC in each st until end, turn.
<4(4, 4, 4, 8, 8, 8)>
ROW 2: Ch 1, SC across, turn.
<4(4, 4, 4, 8, 8, 8)>
STRAIGHT STRAPS: Repeat ROW 2 until ROW 14(14, 16, 16, 18, 18, 20).
TIE STRAPS: Repeat ROW 2 until ROW 84(84, 86, 88, 90, 92, 94).
length approx. 36(36, 37, 37, 38, 38, 39)cm / 14(14, 14.5, 14.5, 15, 15, 15.5)”
Do not fasten off! Proceed directly to ‘Right Triangle’ instructions.
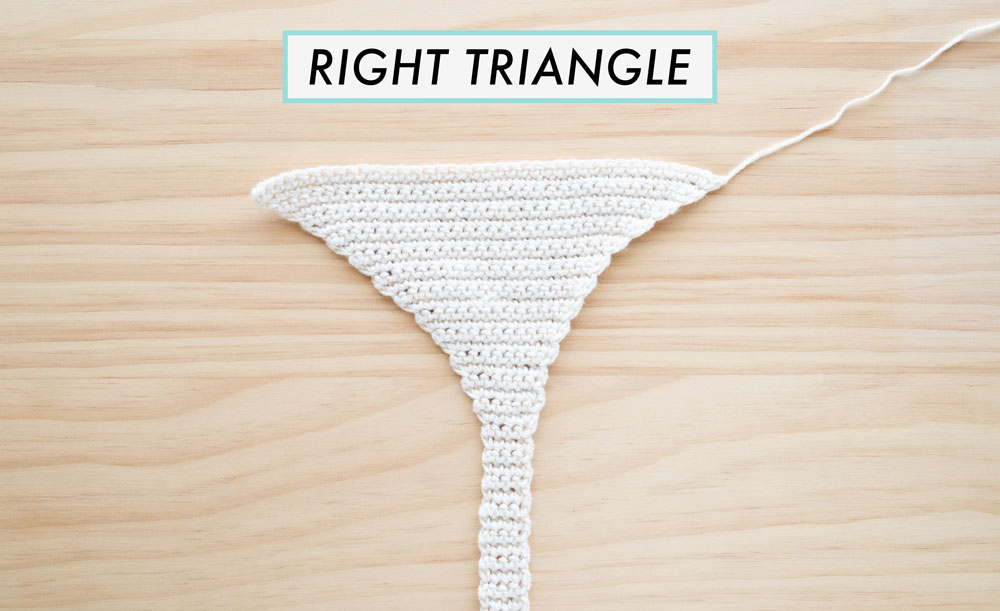
RIGHT TRIANGLE
ROW 1(RS): Ch 1, 2SC, SC in each st until last st, 2SC in last st, turn.
<6(6, 6, 6, 10, 10, 10)>
*You can place a SM in first row to make it easier to count the triangle rows and to indicate the RS.
ROW 2: Ch 1, SC across turn.
<6(6, 6, 6, 10, 10, 10)>
ROW 3: Ch 1, SC in each st until last st, 2SC, turn.
<7(7, 7, 7, 11, 11, 11)>
ROW 4: Ch 1, SC across, turn.
<7(7, 7, 7, 11, 11, 11)>
ROW 5: Ch 1, SC in each st until last st, 2SC, turn.
<8(8, 8, 8, 12, 12, 12)>
ROW 6: Ch 1, SC in each st until last st, 2SC, turn.
<9(9, 9, 9, 13, 13, 13)>
ROW 7: Ch 1, SC in each st until last st, 2SC, turn.
<10(10, 10, 10, 14, 14, 14)>
ROW 8: Ch 1, 2SC, SC in each st until last st, 2SC in last st, turn.
<12(12, 12, 12, 16, 16, 16)>
Repeat ROWS 5 – 8 until ROW 16.
ROW 9: Ch 1, SC in each st until last st, 2SC, turn.
<13(13, 13, 13, 17, 17, 17)>
ROW 10: Ch 1, SC in each st until last st, 2SC, turn.
<14(14, 14, 14, 18, 18, 18)>
ROW 11: Ch 1, SC in each st until last st, 2SC, turn.
<15(15, 15, 15, 19, 19, 19)>
ROW 12: Ch 1, 2SC, SC in each st until last st, 2SC in last st, turn.
<17(17, 17, 17, 21, 21, 21)>
ROW 13: Ch 1, SC in each st until last st, 2SC, turn.
<18(18, 18, 18, 22, 22, 22)>
ROW 14: Ch 1, SC in each st until last st, 2SC, turn.
<19(19, 19, 19, 23, 23, 23)>
ROW 15: Ch 1, SC in each st until last st, 2SC, turn.
<20(20, 20, 20, 24, 24, 24)>
ROW 16: Ch 1, 2SC, SC in each st until last st, 2SC in last st, turn.
<22(22, 22, 22, 26, 26, 26)>
ROW 17: Ch 1, 2SC, 2SC, SC in each st until last st, 2SC in last st, turn.
<25(25, 25, 25, 29, 29, 29)>
ROW 18: Ch 1, 2SC, SC in each st until last st, 2SC in last st, turn.
<27(27, 27, 27, 31, 31, 31)>
Repeat ROW 18 until ROW 22(24, 26, 28, 28, 30, 34).
<35(39, 43, 47, 51, 55, 63)>
Fasten off.
Repeat STRAPS + RIGHT TRIANGLE instructions.
Row-by-Row Stitch Count:
ROW 19: Ch 1, 2SC, SC in each st until last st, 2SC in last st, turn.
<29(29, 29, 29, 33, 33, 33)>
ROW 20: Ch 1, 2SC, SC in each st until last st, 2SC in last st, turn.
<31(31, 31, 31, 35, 35, 35)>
ROW 21: Ch 1, 2SC, SC in each st until last st, 2SC in last st, turn.
<33(33, 33, 33, 37, 37, 37)>
ROW 22: Ch 1, 2SC, SC in each st until last st, 2SC in last st, turn.
<35(35, 35, 35, 39, 39, 39)>
Size XS – final row
ROW 23: Ch 1, 2SC, SC in each st until last st, 2SC in last st, turn.
<(37, 37, 37, 41, 41, 41)>
ROW 24: Ch 1, 2SC, SC in each st until last st, 2SC in last st, turn.
<(39, 39, 39, 43, 43, 43)>
Size S – final row
ROW 25: Ch 1, 2SC, SC in each st until last st, 2SC in last st, turn.
<(41, 41, 45, 45, 45)>
ROW 26: Ch 1, 2SC, SC in each st until last st, 2SC in last st, turn.
<(43, 43, 47, 47, 47)>
Size M – final row
ROW 27: Ch 1, 2SC, SC in each st until last st, 2SC in last st, turn.
<(45, 49, 49, 49)>
ROW 28: Ch 1, 2SC, SC in each st until last st, 2SC in last st, turn.
<(47, 51, 51, 51)>
Size L + XL – final row
ROW 29: Ch 1, 2SC, SC in each st until last st, 2SC in last st, turn.
<(53, 53)>
ROW 30: Ch 1, 2SC, SC in each st until last st, 2SC in last st, turn.
<(55, 55)>
Size 2XL – final row
ROW 31: Ch 1, 2SC, SC in each st until last st, 2SC in last st, turn.
<(57)>
ROW 32: Ch 1, 2SC, SC in each st until last st, 2SC in last st, turn.
<(59)>
ROW 33: Ch 1, 2SC, SC in each st until last st, 2SC in last st, turn.
<(61)>
ROW 34: Ch 1, 2SC, SC in each st until last st, 2SC in last st, turn.
<(63)>
Size 3XL – final row
STRAP + LEFT TRIANGLE
(make 2)
STRAPS
FOUNDATION CHAIN: Ch 5(5, 5, 5, 9, 9, 9).
ROW 1: SC into 2nd ch from hook, SC in each st until end, turn.
<4(4, 4, 4, 8, 8, 8)>
ROW 2: Ch 1, SC across, turn.
<4(4, 4, 4, 8, 8, 8)>
STRAIGHT STRAPS: Repeat ROW 2 until ROW 14(14, 16, 16, 18, 18, 20).
TIE STRAPS: Repeat ROW 2 until ROW 84(84, 86, 88, 90, 92, 94).
length approx. 36(36, 37, 37, 38, 38, 39)cm / 14(14, 14.5, 14.5, 15, 15, 15.5)”
Do not fasten off! Proceed directly to ‘Left Triangle’ instructions.
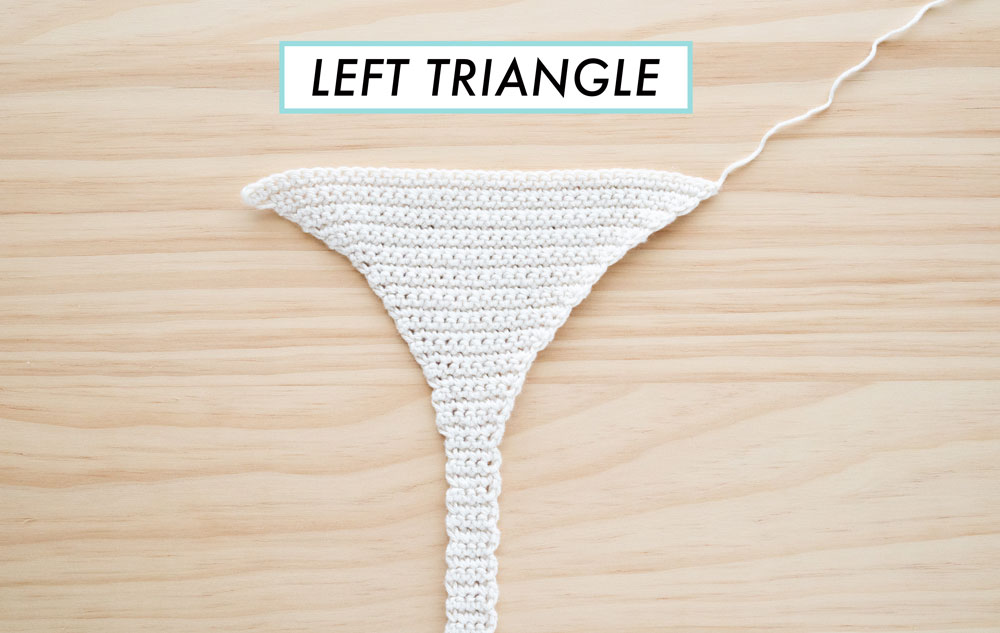
LEFT TRIANGLE
ROW 1 (RS): Ch 1, 2SC, SC in each st until last st, 2SC in last st, turn.
<6(6, 6, 6, 10, 10, 10)>
You can place a SM in first row to make it easier to count the triangle rows and to indicate the RS.
ROW 2: Ch 1, SC across, turn.
<6(6, 6, 6, 10, 10, 10)>
ROW 3: Ch 1, 2SC, SC across, turn.
<7(7, 7, 7, 11, 11, 11)>
ROW 4: Ch 1, SC across, turn.
<7(7, 7, 7, 11, 11, 11)>
ROW 5: Ch 1, 2SC, SC across, turn.
<8(8, 8, 8, 12, 12, 12)>
ROW 6: Ch 1, 2SC, SC across, turn.
<9(9, 9, 9, 13, 13, 13)>
ROW 7: Ch 1, 2SC, SC across, turn.
<10(10, 10, 10, 14, 14, 14)>
ROW 8: Ch 1, 2SC, SC in each st until last st, 2SC in last st, turn.
<12(12, 12, 12, 16, 16, 16)>
Repeat ROWS 5 – 8 until ROW 16.
ROW 9: Ch 1, 2SC, SC across, turn.
<13(13, 13, 13, 17, 17, 17)>
ROW 10: Ch 1, 2SC, SC across, turn.
<14(14, 14, 14, 18, 18, 18)>
ROW 11: Ch 1, 2SC, SC across, turn.
<15(15, 15, 15, 19, 19, 19)>
ROW 12: Ch 1, 2SC, SC in each st until last st, 2SC in last st, turn.
<17(17, 17, 17, 21, 21, 21)>
ROW 13: Ch 1, 2SC, SC across, turn.
<18(18, 18, 18, 22, 22, 22)>
ROW 14: Ch 1, 2SC, SC across, turn.
<19(19, 19, 19, 23, 23, 23)>
ROW 15: Ch 1, 2SC, SC across, turn.
<20(20, 20, 20, 24, 24, 24)>
ROW 16: Ch 1, 2SC, SC in each st until last st, 2SC in last st, turn.
<22(22, 22, 22, 26, 26, 26)>
ROW 17: Ch 1, 2SC, SC in each st until last 2 sts, 2SC, 2SC in last st, turn.
<25(25, 25, 25, 29, 29, 29)>
ROW 18: Ch 1, 2SC, SC in each st until last st, 2SC in last st, turn.
<27(27, 27, 27, 31, 31, 31)>
Repeat ROW 18 until ROW 22(24, 26, 28, 28, 30, 34).
<35(39, 43, 47, 51, 55, 63)>
(Please refer to Right Triangle ROWS 19 – 34 instructions for the row-by-row stitch count)
Fasten off.
Repeat STRAPS + LEFT TRIANGLE instructions but for the 2nd Left Triangle do not fasten off!
With the 2nd Left Triangle, proceed directly to ‘JOINING ROW’ instructions.
JOINING ROW
JOINING ROW: Ch 1, 2SC, SC in each st until last 2 sts, 2SC, 2SC in last st.
<38(42, 46, 50, 54, 58, 66)>
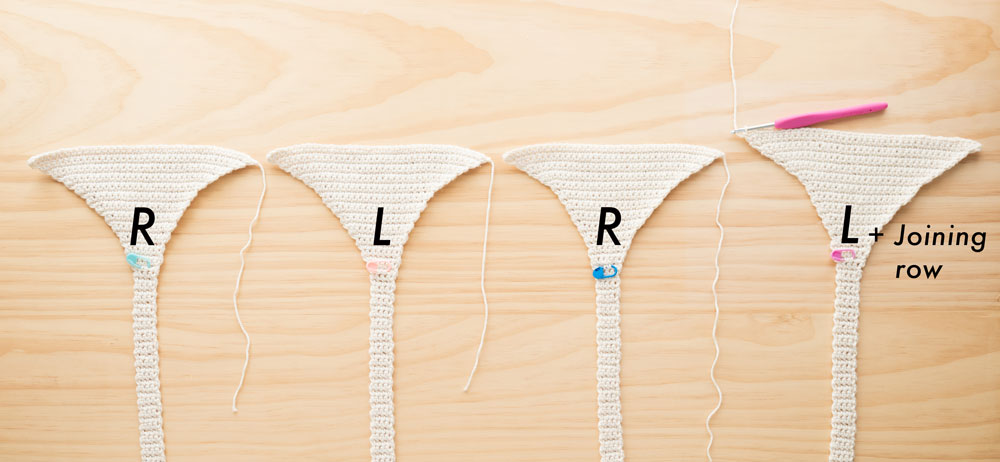
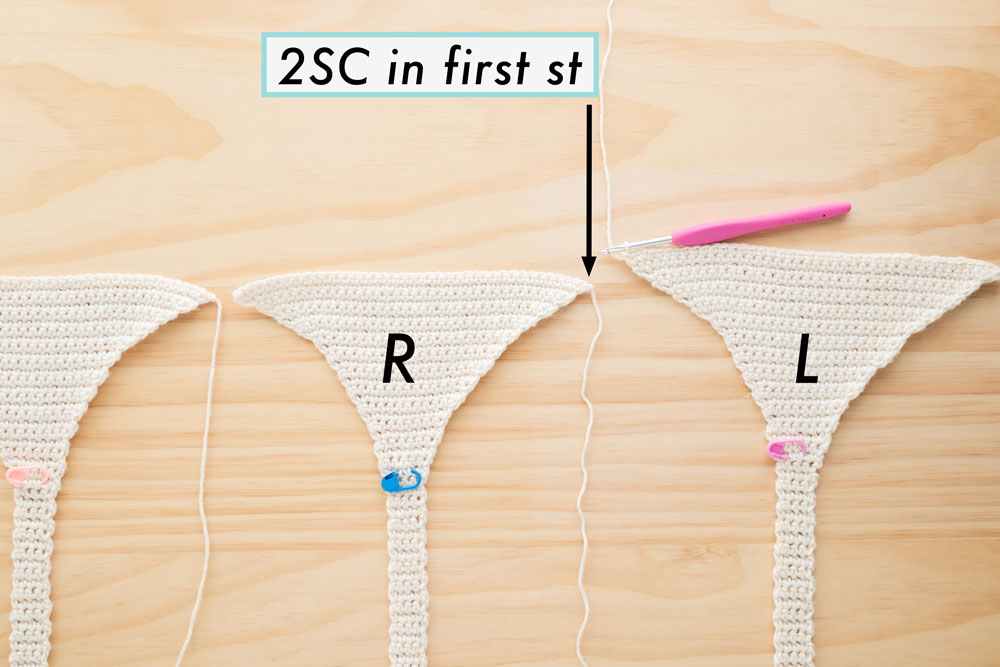
With the RS facing, place a Right Triangle the left of the Left Triangle.
2SC into the first st of the Right Triangle, 2SC, SC in each st until last st, 2SC in last st.
<76(84, 92, 100, 108, 116, 132)>
With the RS facing, place the 2nd Left Triangle the left of the Right Triangle.
2SC into the first st of the 2nd Left Triangle, SC in each st until last 2 sts, 2SC, 2SC in last st.
<114(126, 138, 150, 162, 174, 198)>
With the RS facing, place the 2nd Right Triangle the left of the 2nd Left Triangle.
2SC into the first st of the 2nd Right Triangle, 2SC, SC in each st until last st, 2SC in last st.
<152(168, 184, 200, 216, 232, 264)>

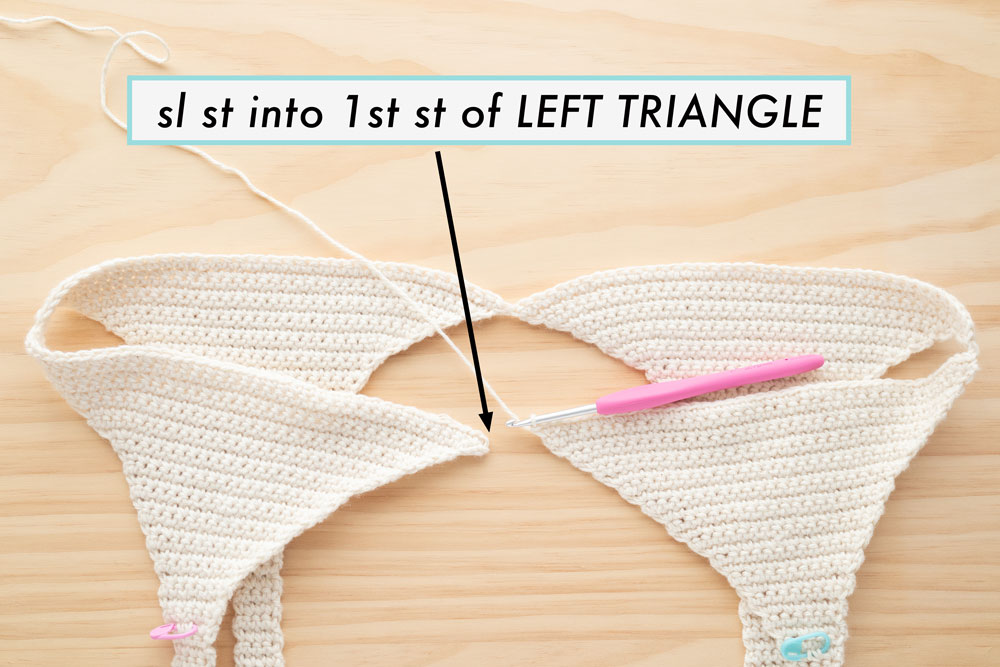
Sl st into the 1st st of the Left Triangle to join, turn. Make sure that your 4 triangles aren’t twisted!
BODY
BODY ROUNDS 1 - 3: Ch 1, SC around, sl st to join, turn.
<152(168, 184, 200, 216, 232, 264)>
The sl sts form a ‘seam’ that runs down the centre back of the dress.
Place a SM underneath each armhole.
BODY ROUND 4: Ch 1, SC in each st until around 1st SM, 2SC – remove SM and place SM in 2SC, SC in each st until around 2nd SM, 2SC – remove SM and place SM in 2SC, SC in each st around, sl st to join, turn.
<154(170, 186, 202, 218, 234, 266)>
*You do not need to place the 2SC increases perfectly ‘on top’ of each other or in the same st with a SM.
*Place the 2SC increases in the general area underneath the armhole (varying the st placement results in a smoother hemline) - the SM just serves as a reminder of roughly where and which round to increase.
TANK
Repeat BODY ROUNDS 1 – 4 until BODY ROUND 60 or until you reach your desired length.
<182(198, 214, 230, 246, 262, 294)>
STRAIGHT STRAPS ASSEMBLY + FINISHING
Sew the tops of the straps together.
ARMHOLE FINISHING
With the RS facing, insert hook at the top of the strap, secure yarn and pull up a loop, ch 1 – place SM.
Sl st evenly along edge of strap, SC evenly along edge of armhole, sl st evenly along edge of strap until SM, sl st into 1st st to join.
Fasten off.
Repeat for 2nd armhole.
NECKLINE FINISHING
*SMs only necessary for scallop edge.
With the RS facing, insert hook at the top of the strap, secure yarn and pull up a loop, ch 1 – place SM.
Sl st evenly along edge of strap, when you reach the V-neckline SC evenly along 1st side of V-neck approx. SC 24(24, 30, 30, 30, 30, 36) – place SM in first SC,
*Depending on your tension you might need to add or remove SCs.
*If you want a plain v-neck the number of stitches doesn’t matter.
*If you want to add the scallop edging just make sure that the number of SCs is a multiple of 6 and crochet the same number of stitches on each side of the v-neck.
SC in the point of the V – place SM,
SC evenly along the 2nd side of the V-neck approx. 24(24, 30, 30, 30, 30, 36) sts,
Sl st evenly along edge of strap.
When you reach the back neckline, SC evenly along the 1st side of the V-neck approx. 24(24, 30, 30, 30, 30, 36) sts - place SM in first SC,SC in the point of the V – place SM,
SC evenly along the 2nd side of the V-neck approx. 24(24, 30, 30, 30, 30, 36) sts,
Sl st evenly along edge of strap until 1st SM, sl st in 1st st to join.
Fasten off.
TIE STRAPS FINISHING
With the RS facing, insert hook at bottom of armhole, secure yarn and pull up a loop, ch 1 – place SM.
SC evenly along edge of armhole,
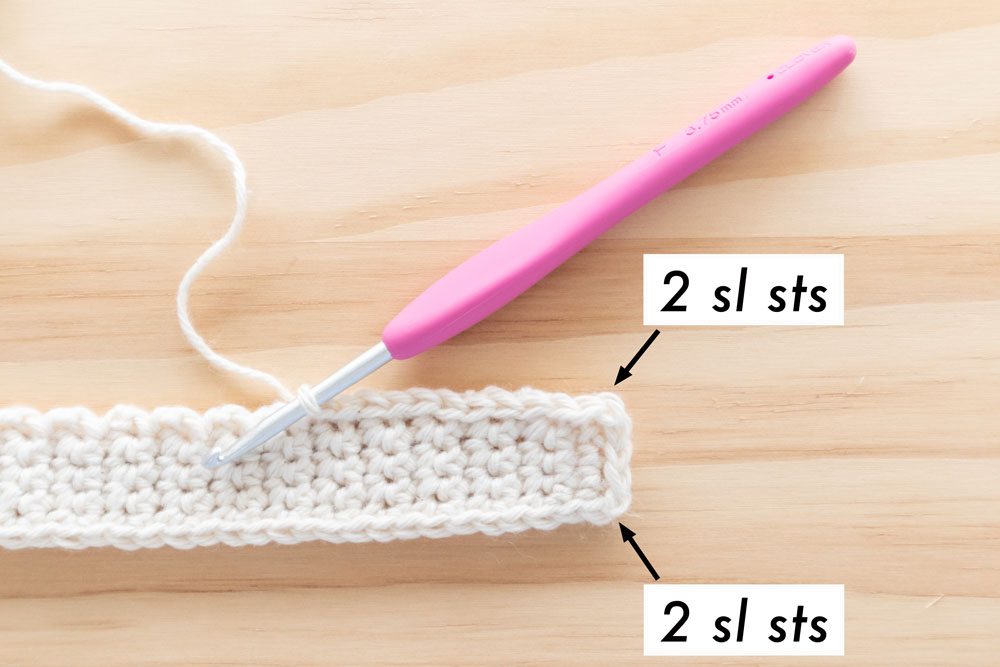
Sl st evenly along edge of strap, place 2 sl sts in the corner st of strap, sl st across top of strap, place 2 sl sts in the corner st of strap, sl st evenly along edge of strap,
When you reach the V-neckline SC evenly along 1st side of V-neck approx. SC 24(24, 30, 30, 30, 30, 36) – place SM in first SC,
*Depending on your tension you might need to add or remove SCs.
*If you want a plain v-neck the number of stitches doesn’t matter.
*If you want to add the scallop edging just make sure that the number of SCs is a multiple of 6 and crochet the same number of stitches on each side of the v-neck.
SC in the point of the V – place SM,SC evenly along the 2nd side of the V-neck approx. 24(24, 30, 30, 30, 30, 36) sts,
Sl st evenly along edge of strap, place 2 sl sts in the corner st of strap, sl st across top of strap, place 2 sl sts in the corner st of strap, sl st evenly along edge of strap,
SC evenly along edge of armhole, sl st evenly along edge of strap, place 2 sl sts in the corner st of strap, sl st across top of strap, place 2 sl sts in the corner st of strap, sl st evenly along edge of strap,
When you reach the back neckline, SC evenly along the 1st side of the V-neck approx. 24(24, 30, 30, 30, 30, 36) sts - place SM in first SC,SC in the point of the V – place SM,
SC evenly along the 2nd side of the V-neck approx. 24(24, 30, 30, 30, 30, 36) sts,
Sl st evenly along edge of strap, place 2 sl sts in the corner st of strap, sl st across top of strap, place 2 sl sts in the corner st of strap, sl st evenly along edge of strap,
SC evenly along edge of armhole until 1st SM, sl st in 1st st to join.
Fasten off.
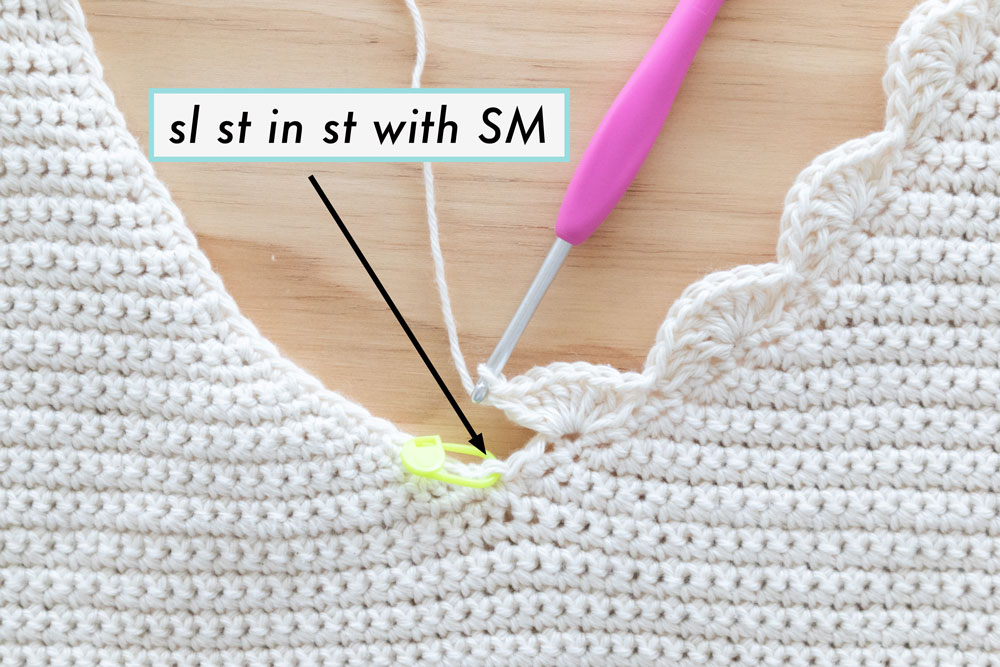
SCALLOP EDGING
With the RS facing, insert hook in st with SM at the top of the V-neckline.
Pull up a loop, ch 1 (counts as a st),*Sk 2 sts, 7DC, sk 2 sts, sl st; rep from * until st with the SM - the last sl st should be in the st with a SM.
*You should have 4(4, 5, 5, 5, 5, 6) scallops.
Rep from * until last SC - the last sl st should be in the last SC.
*You should have 4(4, 5, 5, 5, 5, 6) scallops.
Fasten off.
Optional: Repeat Scallop Edging on the back v-neck of tank.
Remove all SMs and weave in all of your ends.
Voilà! You’ve finished your Seascape Scallop Tank 🙂
Beautiful! Wish I were small enough to wear this!
I am confused about sewing the tops of the straps together, I thought you tie the straps together! Where do you sew the tops of the straps together?
Hi Enid, I think you might be reading the 'Straight Straps Assembly' Instructions! If you crocheted tie straps, scroll down to the 'Tie Straps Finishing' instructions 🙂
Grace
Grace, thank you, got it?
Thank you so much for sharing your designs!
I am still having trouble locating the tie strap jnstructions above. 🤦♀️
Please help:) Thank you
Hi,
Just want to say, your patterns are awesome soooooooo easy to follow, it’s very well set out and instructions are clear. I can’t wait to finish this one, This is the second tank Of yours that I’ve made for myself . I also did the sea breeze tank. Both sizes are 2xl, I’m looking forward to trying out more of your patterns . Thank you !
Hi Becky, thank you so much for your kind words! I'm so glad you enjoyed the pattern!
Grace 🙂
What a lovely pattern! I accidentally forgot to mark the right side of the triangles. Is there a way I can tell? 😅
Hi Hannah,
You can see in the photos that after you fasten off, the strand of yarn should come from the right corner of each triangle. You can also tell which side is the right side by looking at the 'slope of the increases'. On the left triangles the the left corner of triangle should be more curved than the right corner of the left triangle. For the right triangles, the right corner of the triangle should curve up more than the left corner. This is also from the same view point of what you see the photos.
I hope this helps,
Grace
Thanks Grace!
Hello! I’m making my first crochet clothing project using your pattern and I’m super excited 😝 but I’m a bit confused on this part on the left triangle
“ Repeat ROW 18 until ROW 22(24, 26, 28, 28, 30, 34).
”
I don’t get what this means . Could you help me out? Thank you in advance!
Sorry. I meant to say I don’t understand what this specific part means.
Repeat ROW 18 until ROW 22(24, 26, 28, 28, 30, 34).
——-> <——
Hi Melany,
E.g. if you're making a size XS, you repeat the instructions from ROW 18 until you have 22 rows in total. I'd suggest googling 'how to read a crochet pattern' and there are a lot of step by step video tutorials on youtube!
I hope this helps,
Grace
Similarly, I’m confused about the ‘repeat rows 5-8 until 16’ since rows 9-16 are listed beneath that line. Do I go back to row 5 or continue following the line by line instructions?
Hi, I really want ot make this but I am not sure if I will be able to find the yarn you use in my area. Would I be bale to use a cotton blend yarn? Also, how are you able to tell if a cotton yarn is thicker or thinner? I have been looking at yarns online and they only say DK or Sport etc.
Hi Maayan,
I normally look at the thickness in store and if I'm purchasing online at the reviews on Ravelry or on yarnsub.com The yarn weight for this pattern is listed and you can use that as a starting point 🙂
Grace
Hi!
Thank you for the pattern! 🙂 I started yesterday the first triangle but I have a question?
You say Repeat ROWS 5 – 8 until ROW 16.
And you continue with row 9, then you say at row18 to repeat until 26 (for M)
So...is it correct for size M having a total of rows= 8+8(2repetition from5to8)+10(rows9-18)+8=34?
Thank you!
Marta
Hi Marta,
Repeat Rows 5 - 8 until row 16 tells you the stitch patterns to follow and afterwards you have a row by row breakdown so that you know the total stitches you need at the end of each row. You don't repeat the rows again. So as noted in the pattern, you should have 26 rows in total for size M
Grace
Thank you!
I got it 😉
Sorry...maybe is the different language..
I have another question:when you says "turn" in body round instructions, what do you mean?
Thank you!
Marta
P.s it is the first time I try to make a complex project.😊 I only did simple things .
Hi Marta,
Turn means you need to rotate your work 180 degrees and start crocheting in the other direction. You can turn clock wise or counter counter clockwise just make sure it's always in the same direction.
I hope this helps,
Grace 🙂
Hi Grace! Beautiful pattern! I have a similar question. Where it says "Repeat ROWS 5 – 8 until ROW 16." Does this mean I am repeating the directions in row 5-8 until I have 16 rows of the 5-8 repeat and then begin with row 9? Or did you write out Row 9 as if it is the repeat of row 5-therefore following from row 8 straight into 9? I'm super familiar with knitting patterns, but crochet terminology is a bit new for me. I'm a little confused on where to go next. Thank you so much!
Hi Grace,
When you say 10cm/4” square for the gauge, does it mean that these are the measurements of a sqaure swatch or do you need to make a bigger swatch and count the rows/stitches for the correct gauge? Thank you!
Hi Lisa,
Personally I like to crochet a bigger swatch (at least a 15cm square) and then measure the stitches in the centre. You'll get the most accurate results this way 🙂
Grace
Grace,
I have a similar question about the swatch. Since this yarn is cotton and will likely have some shrinkage, are you counting gauge without washing & drying the swatch or after washing & drying?
Thanks!
Hi Grace, I am so excited to be attempting this pattern but the back of my tank where the slip stitches align has a weird pucker and is pointed, not flat (like there are too many stitches?). I’m not sure what I’m doing wrong... any advice? Thank you!
Hi Ivanna,
The most likely cause is that you might've accidentally added an extra stitch right at the end of the round. That last 'gap' isn't actually a stitch, it's connected to the turning chain. Squeezing in the extra stitch is what causes the 'point'. Unfortunately, the only way to get rid of it is to frog your stitches and re-crochet them, sorry!
I hope this helps,
Grace 🙂
Hi Grace, I am new at Crochet, and would like to try your pattern. If I am using 3.5mm hook instead of 3.75mm should I make it a size bigger to fit? I suppose I’m size S, so with 3.5 I’ll do pattern for M? *confused*
Thank you 🙂
Hi Dee,
If your gauge (the number of stitches and rows per 10cm/4" square) doesn't match the pattern and your top won't turn out the same size as the suggested measurements. Since you're new to crocheting I'd highly recommend searching for 'crochet gauge' tutorials on YouTube to learn how to alter your gauge and 'golden loop' tutorials will teach you how to alter stitch height. Once you have the correct gauge you'll be able to follow the instructions as written. (This particular pattern is quite hard to alter as it has a 'v' neck and since you're a newer crocheter I wouldn't recommend just winging it 🙂 )
I hope this helps,
Grace
I’ll check the gauge guide and also golden loop. Thank you so much for the info and this beautiful pattern. 😄👍🏻
What should I do when my yarns and hook are smaller than yours . My hook is 2.5 mm and my yarn is 4ply . I really want to do this project for funding to donate . Customer's bust may be 45 . I 'm beginner level and I cannot think how to increse to get nice piece .
Please help me.
I am not the designer but have been crocheting for many many years. Your question is typical so I thought I would answer. Grace’s pattern is gorgeous but trying to adjust for smaller hook and different yarn weight is too difficult for a beginner. I suggest you find an easier pattern. Start with simple, keep practicing and work your way up. Circle back to this one when you learn more about garment construction, pattern reading and gauge adjusting. Have fun and don’t get discouraged.
Thank you so much
I just finished my top and I cannot wait to wear it. Thank you so much for an awesome pattern!
Hi Grace!
I wear a size small and wanted to make the dress pattern. How many skeins of yarn should I buy of the yarn you used for the dress?
Hi Grace, thanks for the design - I can’t wait to wear it this summer. I’ve finished the triangles and the first body round but I’m a bit stuck and hope you can help. I’m left handed so I’ve had to adjust a few parts of this design (as I must do with most designs) but I’m absolutely stuck on this: “BODY ROUNDS 1 - 3: Ch 1, SC around, sl st to join, turn.”
I want the seam to appear down the back because it’s a nice touch, but I’m not at all seeing when I would “turn”. All the stitches go in one direction since it’s a circle - if I turned the piece of work, I would be crocheting *against* the normal flow of stitches which I don’t believe you’re indicating here. So I’m confused! If you understand my question, please help!
I was trying to read other peoples' questions & answers about repeating rows, but I still could not completely understand, even after doing some "how to read a crochet pattern" research.
I am trying to create the size XS tank top & I just finished ROW 8 for my first right triangle, but I do not understand the instructions on how to do "Repeat ROWS 5-8 until ROW 16". I see that you have instructions to continue with ROW 9-18, but then I run into similar instructions that I do not understand once again, "Repeat ROW 18 until ROW 22".
I appreciate your feedback and help! If you have a video tutorial on how to make this beautiful tank top pattern, I would love to have the link since I am a visual learner!
Do I keep increasing the body until desired length? Or do I stop increasing at some point?
Thanks