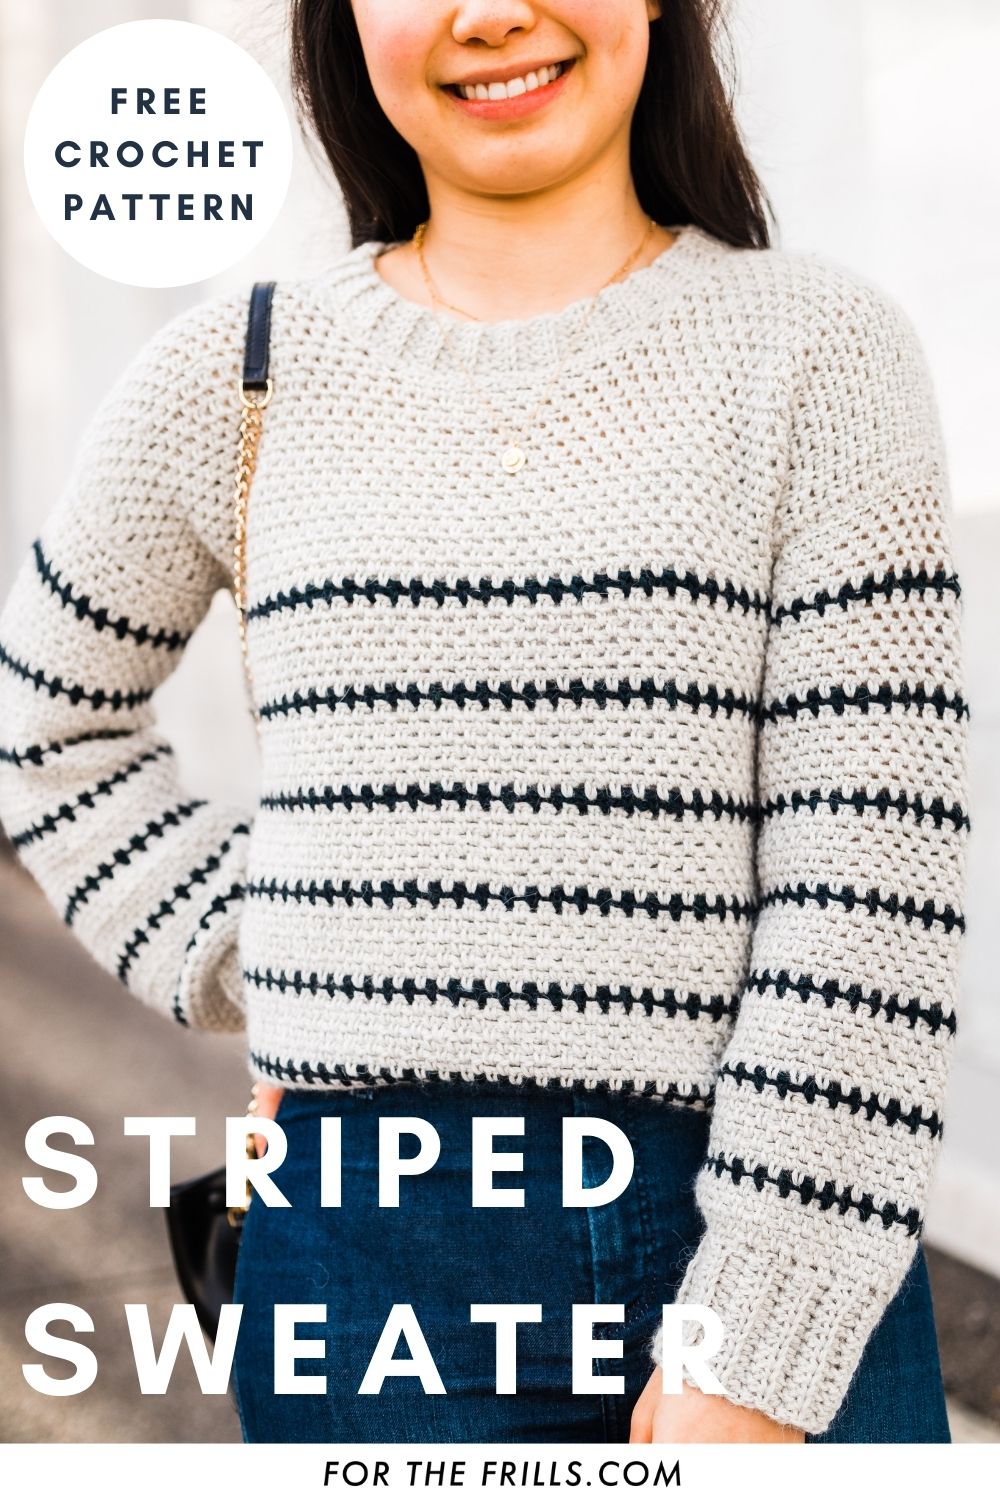
Learn how to crochet a striped sweater! With a simple silhouette and relaxed easy fit, the Breton Sweater is the perfect legging length pullover for fall!
Scroll down for the free crochet sweater pattern and step-by-step video tutorial, or purchase the ad-free, printable PDF here.
This post may contain affiliate links, view our disclosure policy for details.
Thank you to WeCrochet for providing the yarn for this free crochet sweater pattern! As always all thoughts and opinions are 100% my own 🙂
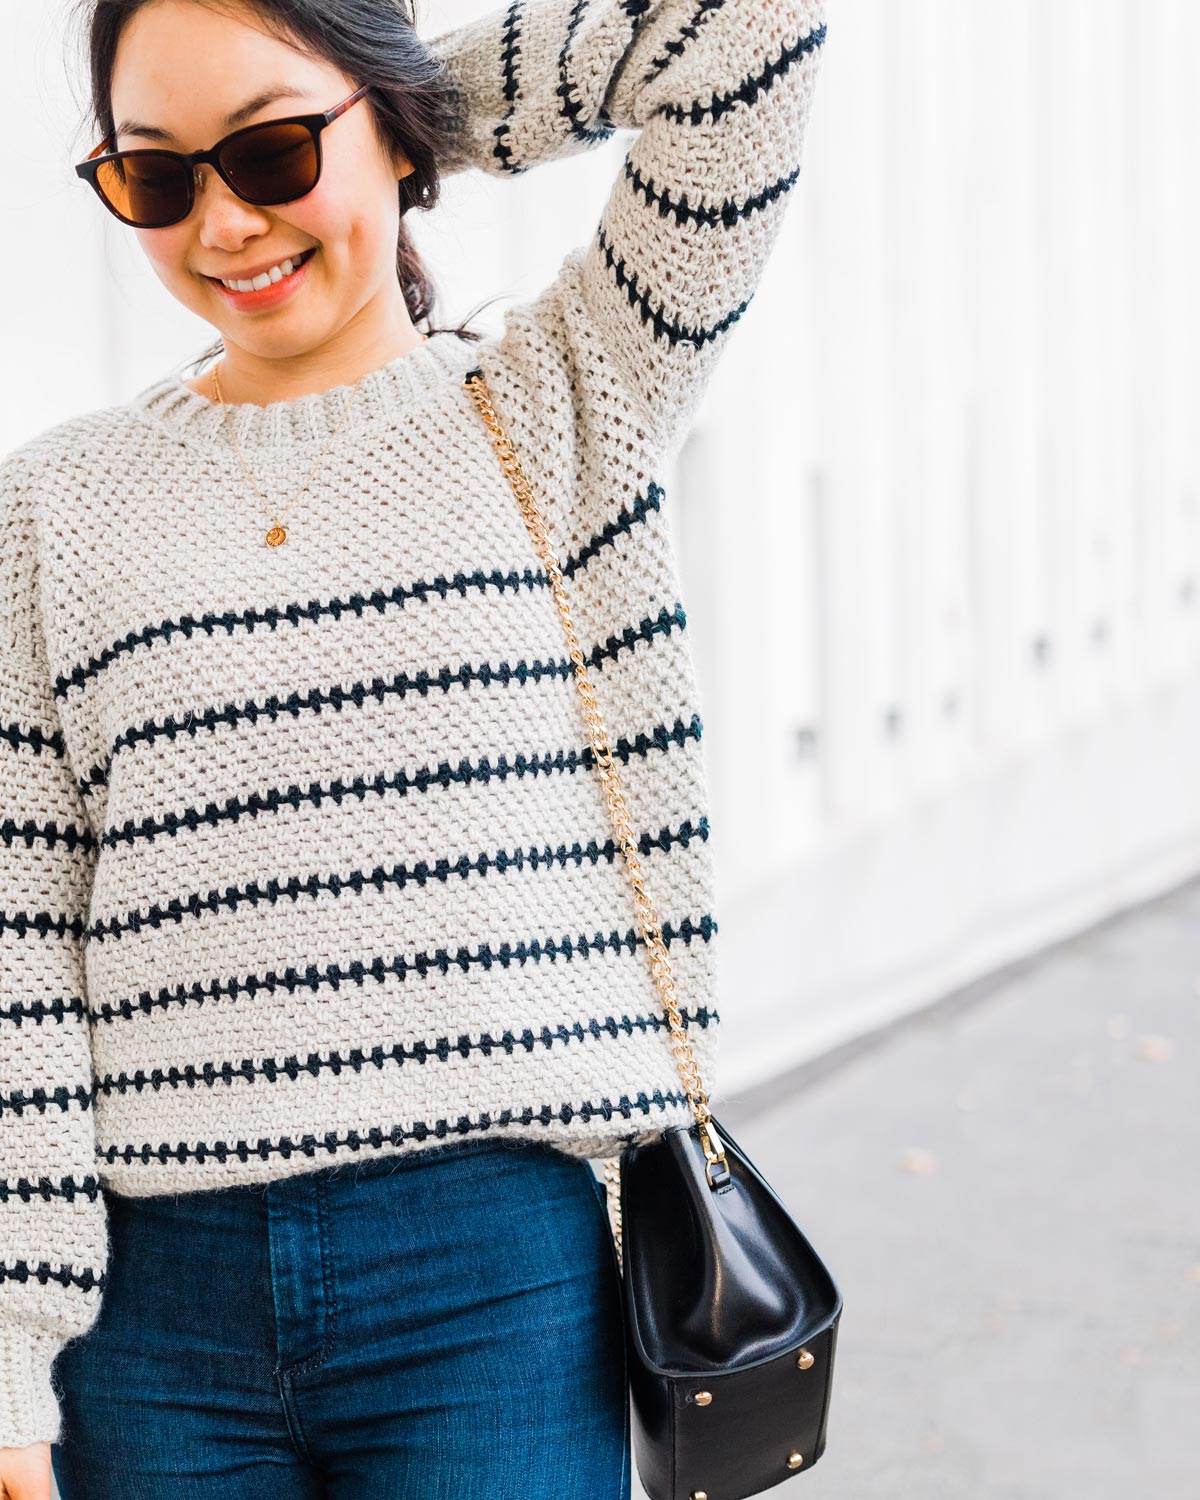
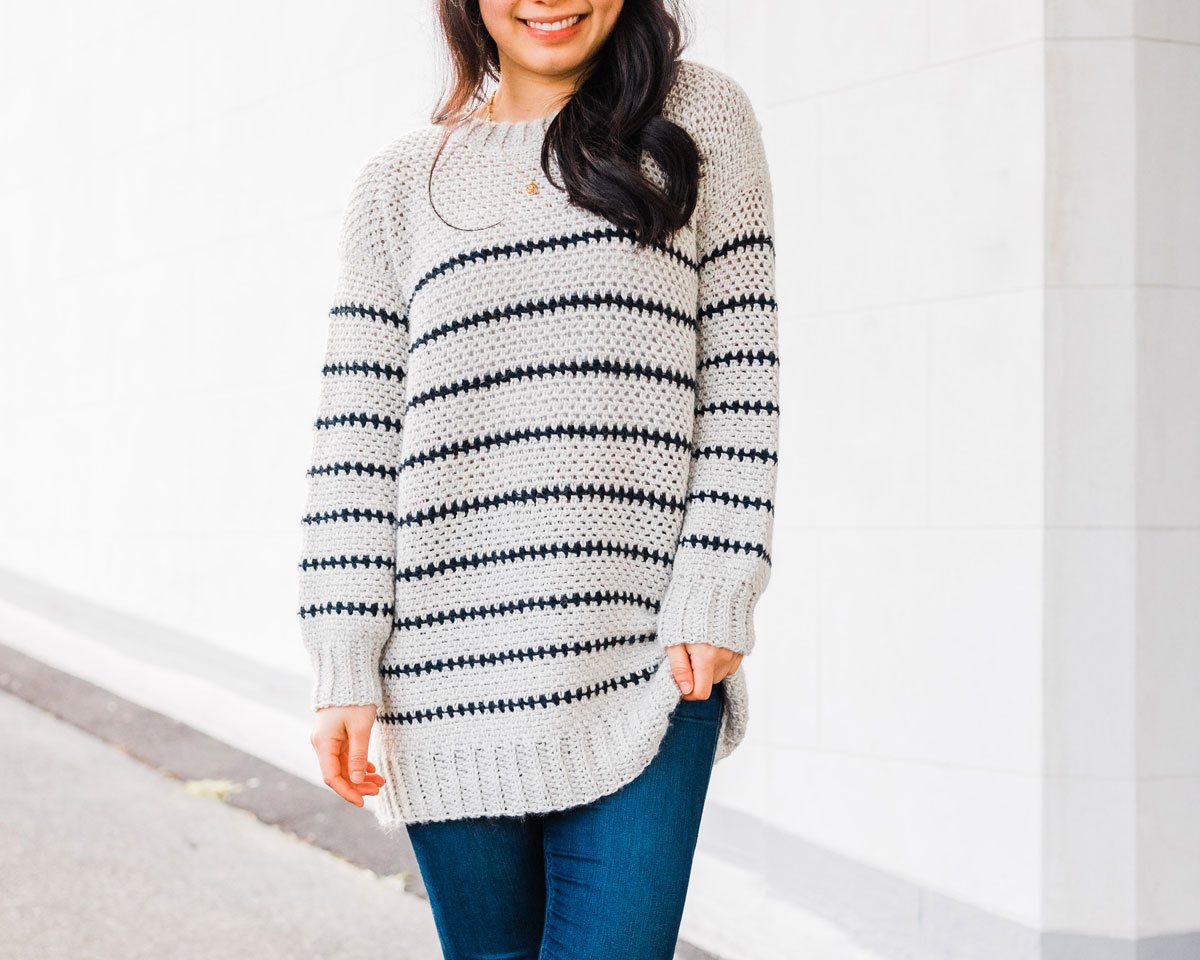
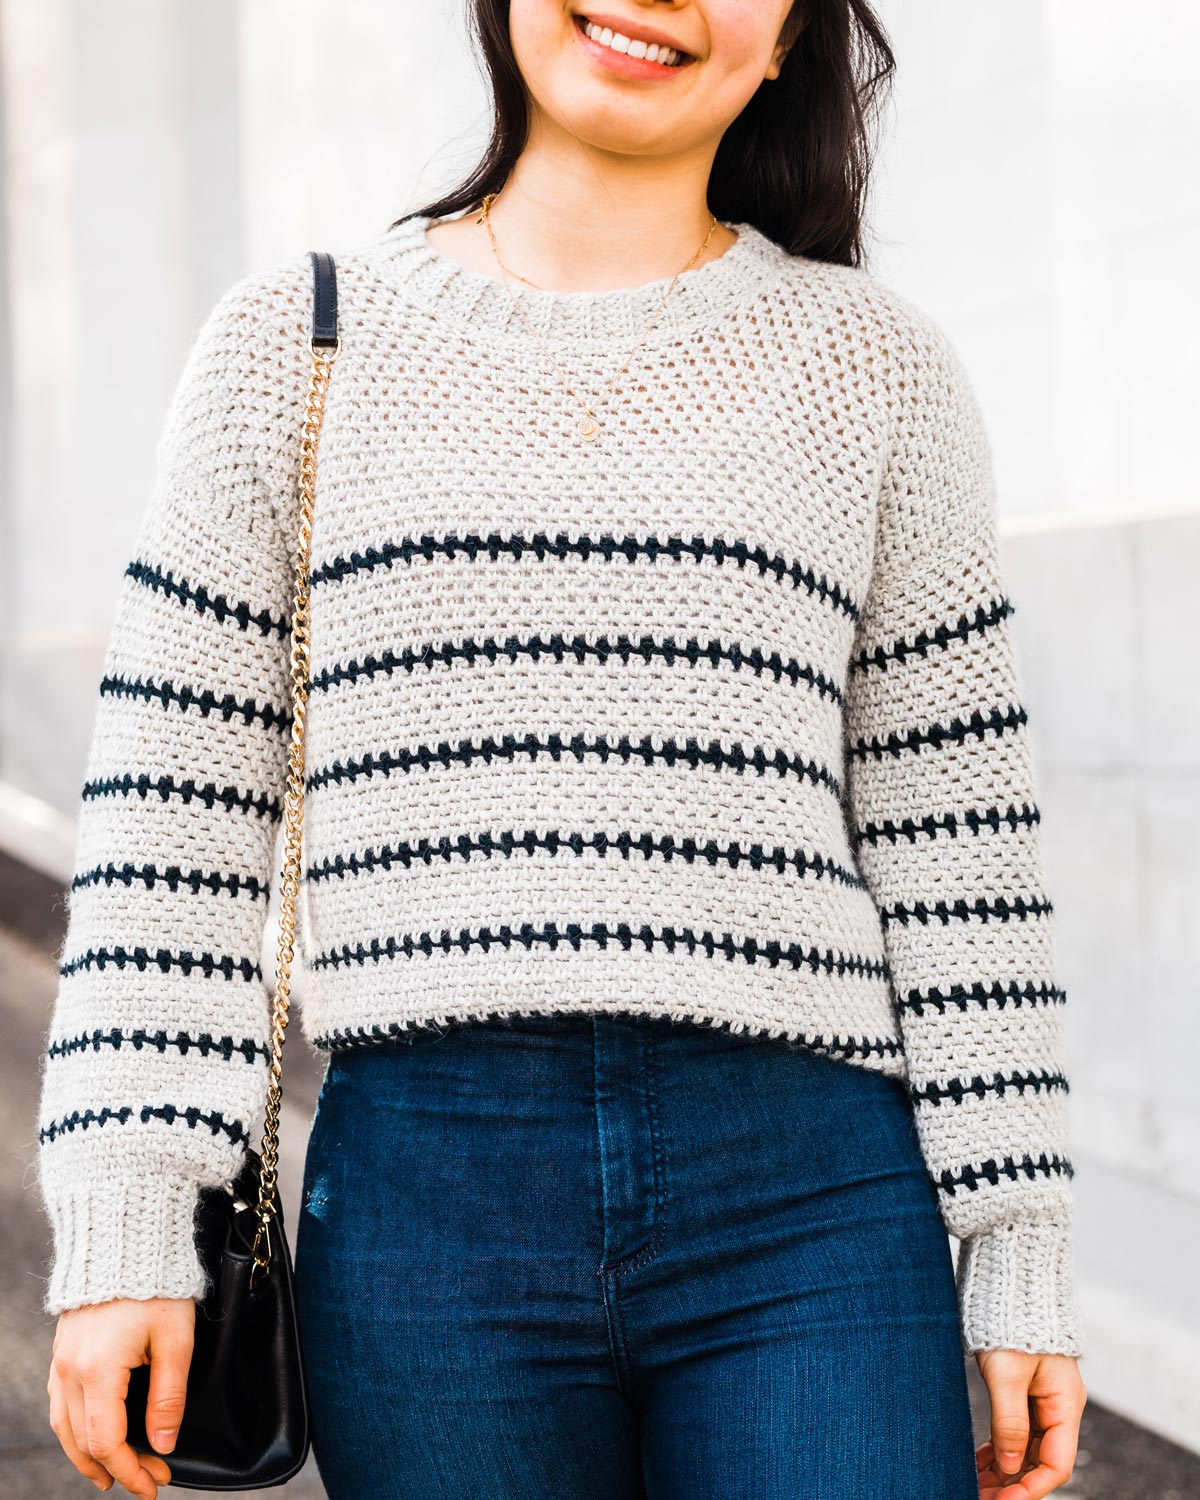
The Breton Stripe Sweater combines a simple round, loose balloon sleeves, oversized fit and stripe details to create an effortlessly chic and comfy sweater! The length of the sweater and stripes can all be altered to fit any style or colour palette. For a more minimalist look, you can crochet solid coloured sweater or colour block for a statement look!
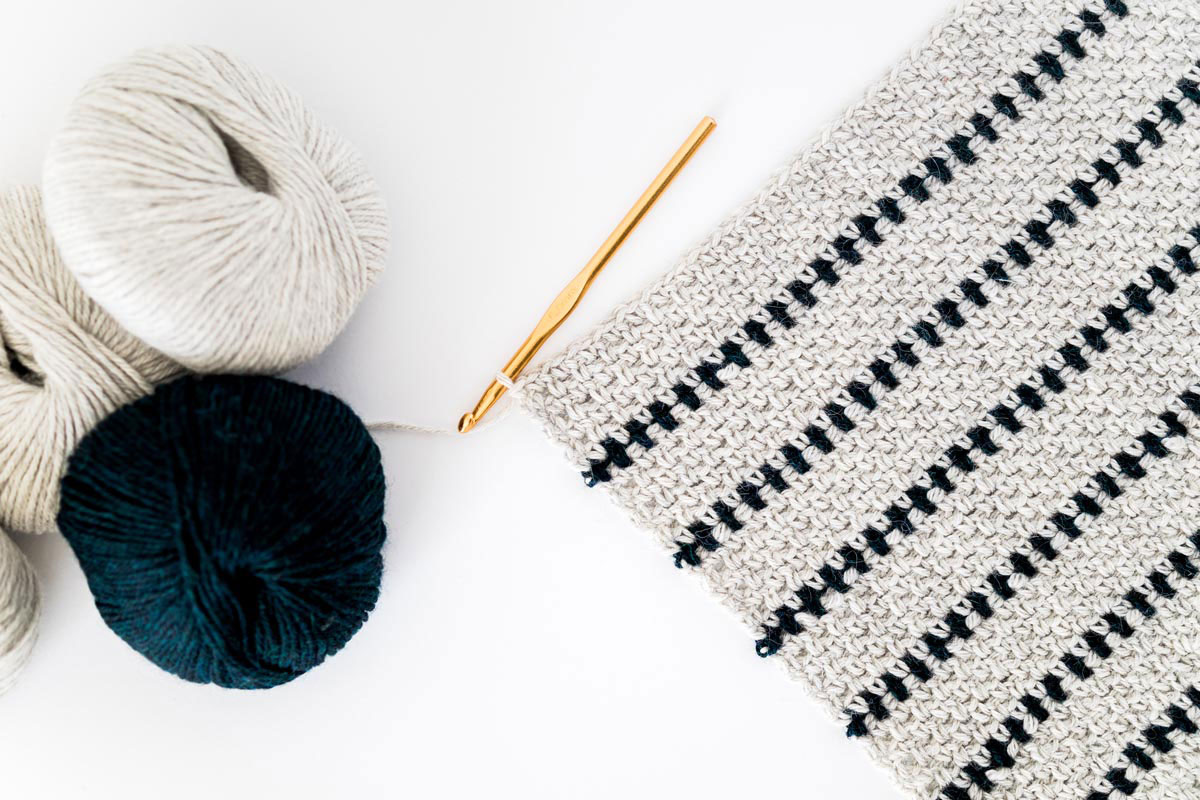
The majority of this design is worked up in the Linen Stitch (aka the Moss Stitch) which has incredible drape and movement. This stitch is also used in the Aria Button Cardigan!
Made up of single crochets and chains, this beginner-friendly stitch follows an easy 2 row repeat. The chains create a fine ‘mesh’ look when the sweater is worn making it the perfect weight for any season.
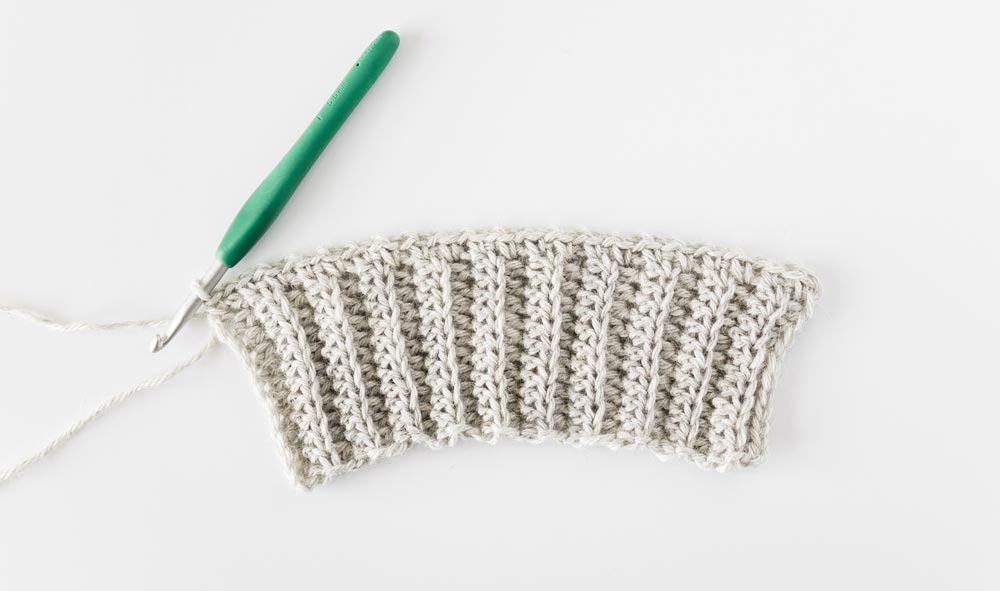
This sweater is crocheted in 5 pieces – front, back, 2 sleeves and neckline ribbing. The body panels and sleeves begin with the ribbing and are worked from the bottom up.
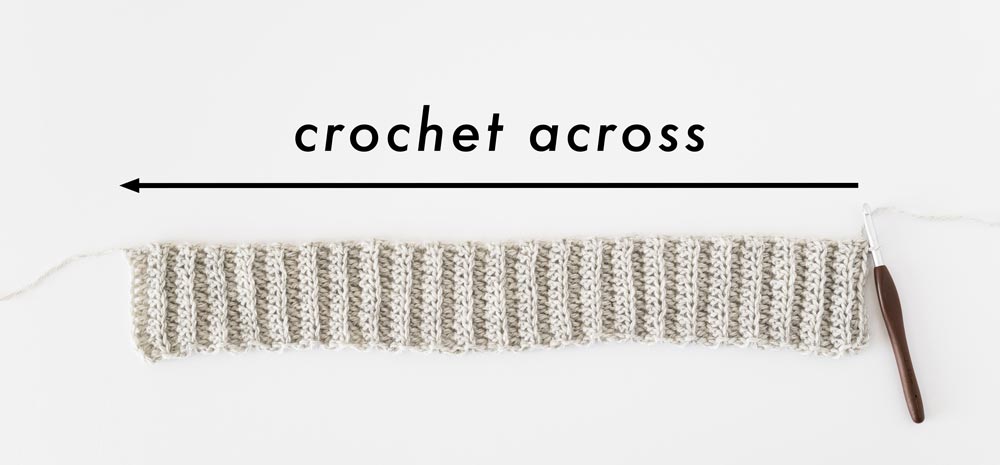
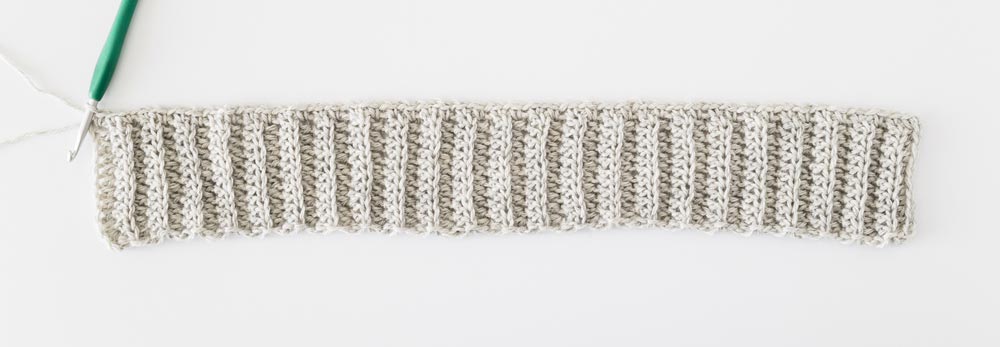
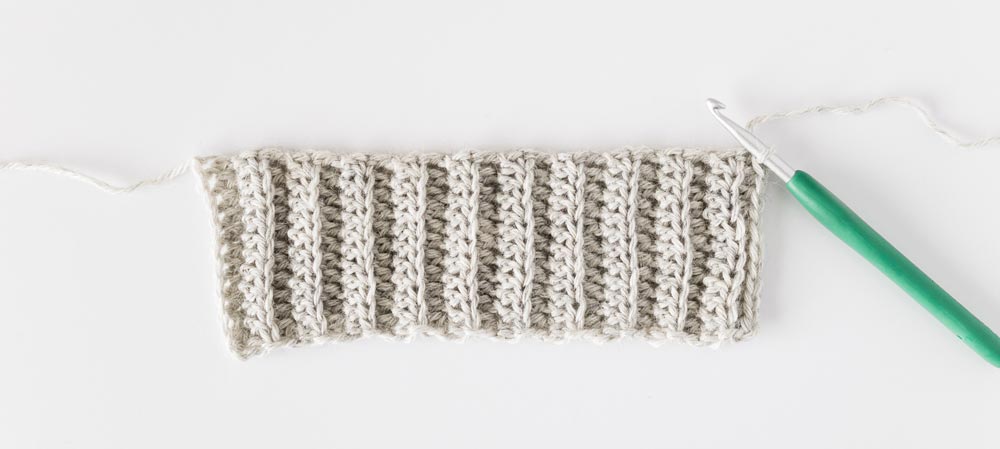
We’ll start by crocheting back loop half double crochet ribbing. Using the linen stitch, we’ll crochet along the long edge of the ribbing to create the body and sleeves.
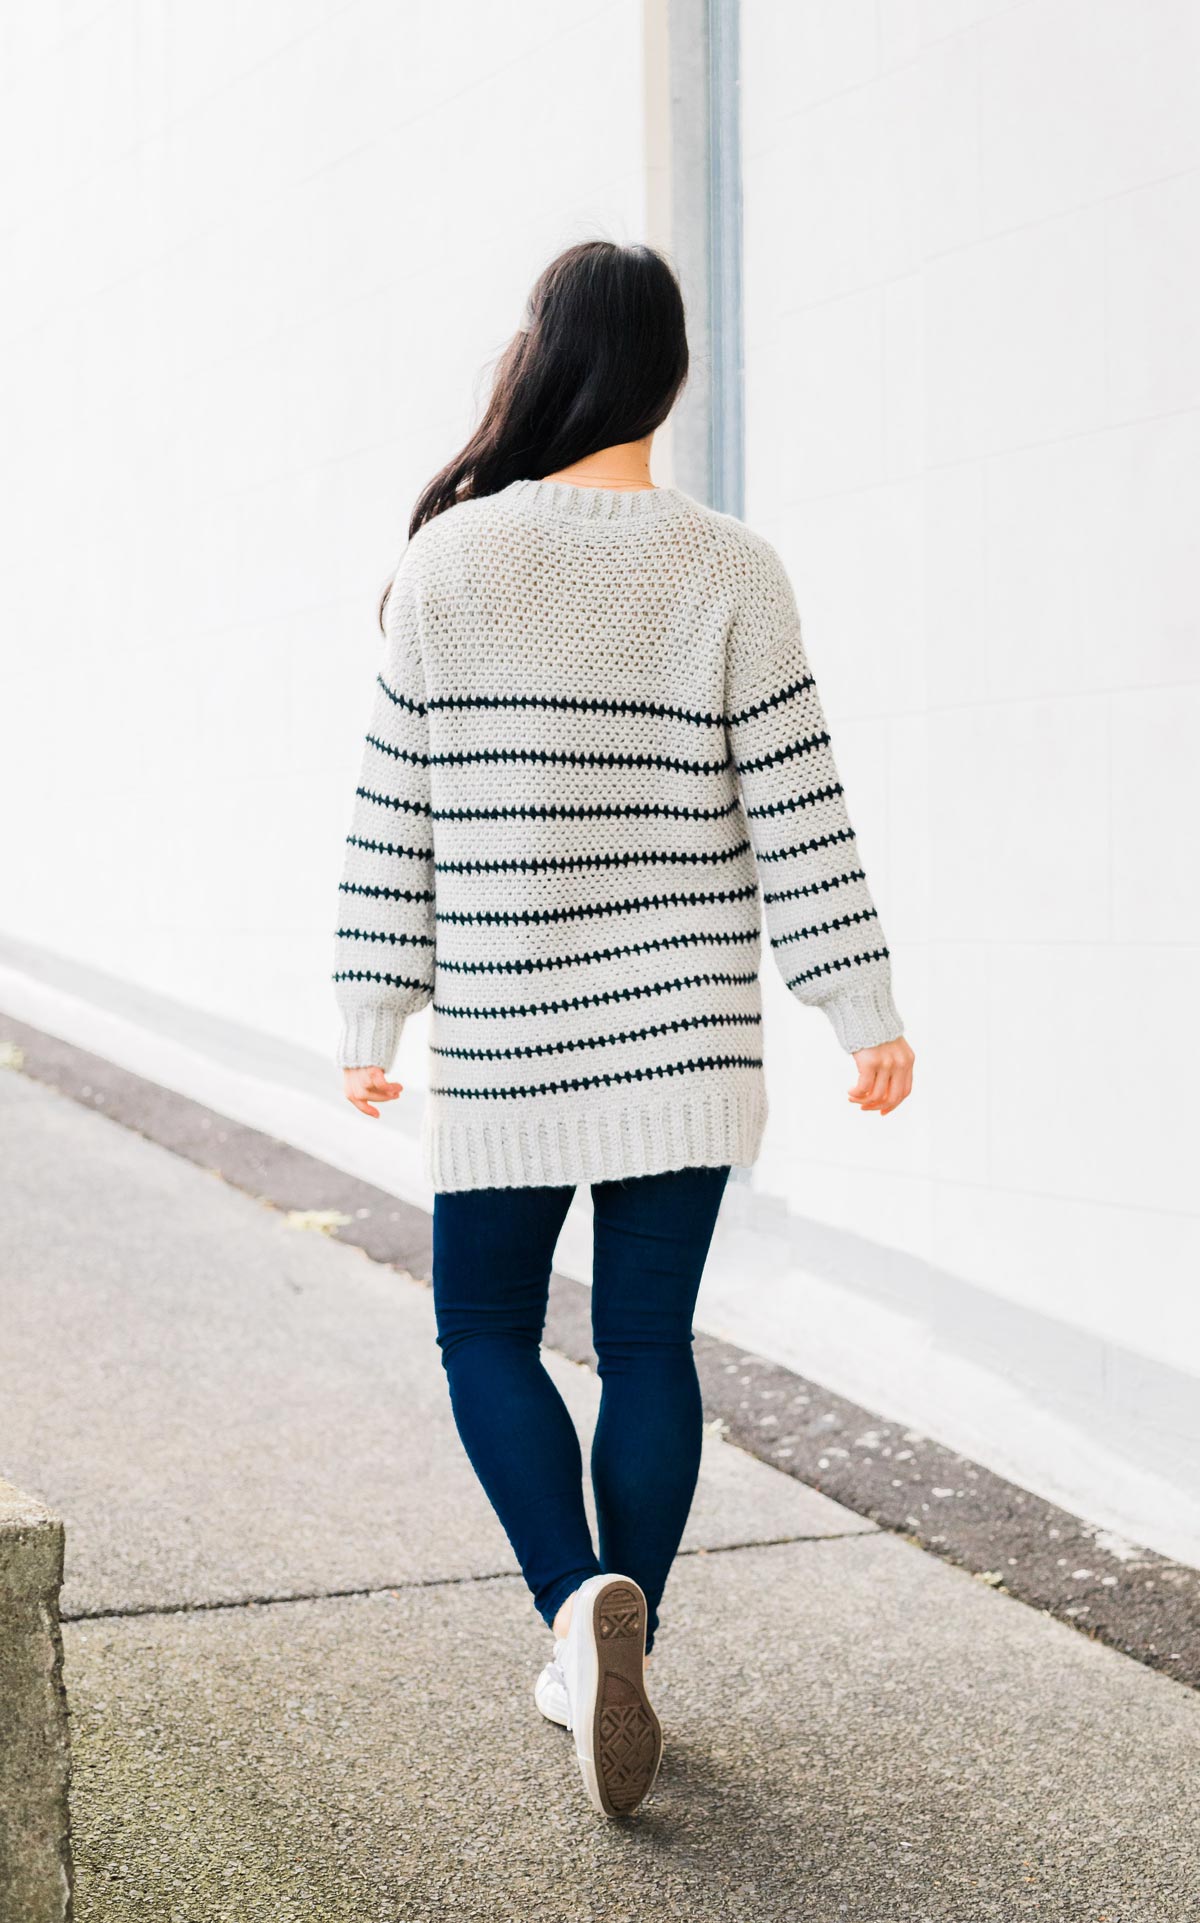
I decided to opt for very thin contrasting stripes for that French Bateau look, but you can choose any stripe combination you want! Once you’ve crocheted the main pieces, we’ll sew everything together then crochet the neckline ribbing at the end.
If find that crocheting the ribbing after you’ve assembled the sweater results in the neatest look! This way you can check that the ribbing is the correct length for your neckline opening which allows the ribbing to lay nicely when worn.
Since back loop half double crochet ribbing is very stretchy, it’s better for your ribbing to be slightly smaller than the opening as it will stretch to fit. If you have too much ribbing the opening will ruffle and the ribbing will stand up instead of lying flat.
Design Inspiration
September is my favourite month of the year for crochet! I’m in full fall + winter crochet prep but it’s still cold enough in enough to enjoy wearing all the things I’ve crocheted 🙂
I realised it’s been a while (more than a year!?) since I last crocheted a long pullover style sweater (for more long sweater patterns, check out the Ocean Breeze Sweater or Weekend Snuggle Sweater).
My last pattern was a long chunky cardigan, so I decided I wanted to crochet a long sweater but with a lighter yarn so it could easily be layered under heavier items.
If you’ve been following along for a while you’ll probably have noticed that most of my patterns tend to only use one colour. When it comes to designing, colour definitely isn’t my strong suit but I love this neutral combo of dark midnight navy and a soft dove grey 🙂
Looking for more free crochet patterns?
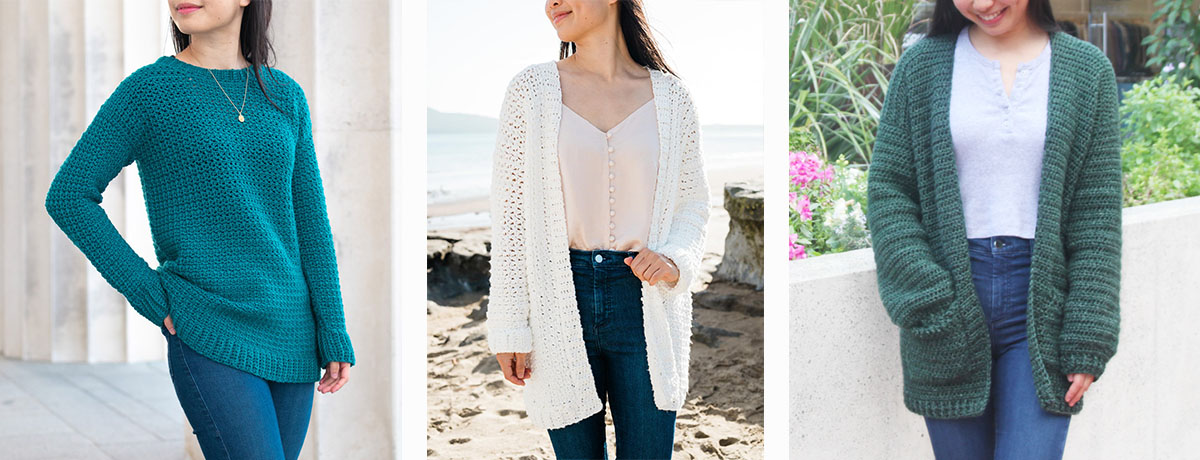
1. Weekend Snuggle Sweater / 2. In The Clouds Cardigan / 3. Briar Pocket Cardigan
Yarn
The Breton Sweater uses WeCrochet Andean Treasure which is 100% Baby Alpaca. I absolutely love this yarn (I used it for the Amalfi Sweater and Pompeii Cardigan) because of its incredible drape! When it comes to crocheting wearable, modern sweater the yarn you choose can make all the difference!
Since Andean Treasure is made up of baby alpaca this fibre is naturally so soft, light and fluffy but the key is that it has been spun to have an airy almost ‘hollowness’ in the yarn. If you use a stiff yarn that’s been spun very tightly, it you’ll end up with a very stiff and awkward looking sweater, regardless of the fibre content.
Andean Treasure comes in a wide range of shades but it’s classified as a sport/5ply/fine(2) yarn when I think has the same gauge as a DK yarn. As always, make sure to check your gauge before starting the pattern!
Pin me for later!
I love to see your finished projects! Use #forthefrills and tag me on Instagram @forthefrills !
Video Tutorial
Add the Breton Sweater your Ravelry queue!
Breton Stripe Sweater - Ad-free, printable pdf version here!
Pattern Notes:
*Sample is a size small shown on a 5’3” model with a 32” bust.
*The sizing guide follows size XS(S, M, L, XL)(2XL, 3XL, 4XL, 5XL). E.g. “SC 81(89, 97, 105, 113)(121, 129, 141, 149) means SC 81 for XS, SC 89 for Small, SC 97 for Medium, SC 105 for Large, SC 113 for XL, SC 121 for 2XL, SC 129 for 3XL, SC 141 for 4XL and SC 149 for 5XL.” If there is only one number, it applies to all sizes.
*"SC 10" means SC into the next 10 stitches.
*The turning chain, ch 1 does NOT count as a stitch. Otherwise ch 1 does count as a stitch.
*Total stitches are indicated between < >.
*This pattern uses US crochet terms.
*The sample sweater uses WeCrochet Andean Treasure which is classified as a Sport/Fine(2) yarn. However, if you want to substitute this yarn, it’s closer to a thick DK/Light(3) or a very thin Worsted/Medium(4).
*The majority of this crochet sweater is crocheted in the Linen Stitch (moss stitch) which follows a 2-row repeat comprising of 2 different types of rows which are referred to as LINEN A and LINEN B.
*This crochet sweater is constructed from 5 pieces – front, back, 2 sleeves and neckline ribbing.
*The body panel and sleeves are crocheted from the bottom up. The ribbing is crocheted lengthways and the body and sleeves are crocheted directly onto the long edge of the ribbing. The neckline ribbing is crocheted separately and sewn onto the sweater.
*All pieces are sewn together with the RS on the inside and the WS facing outwards.
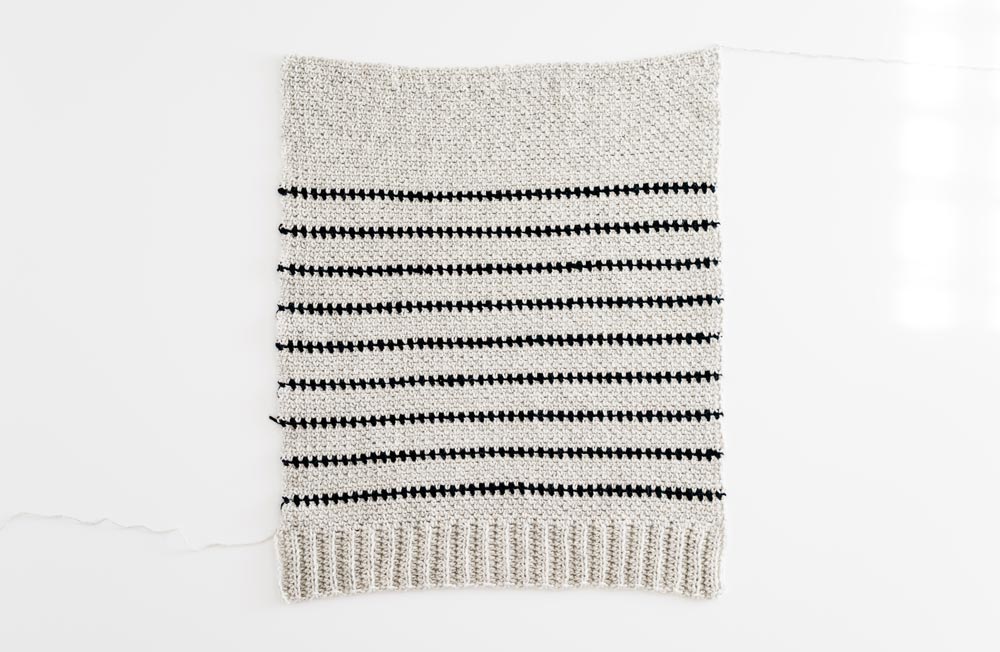
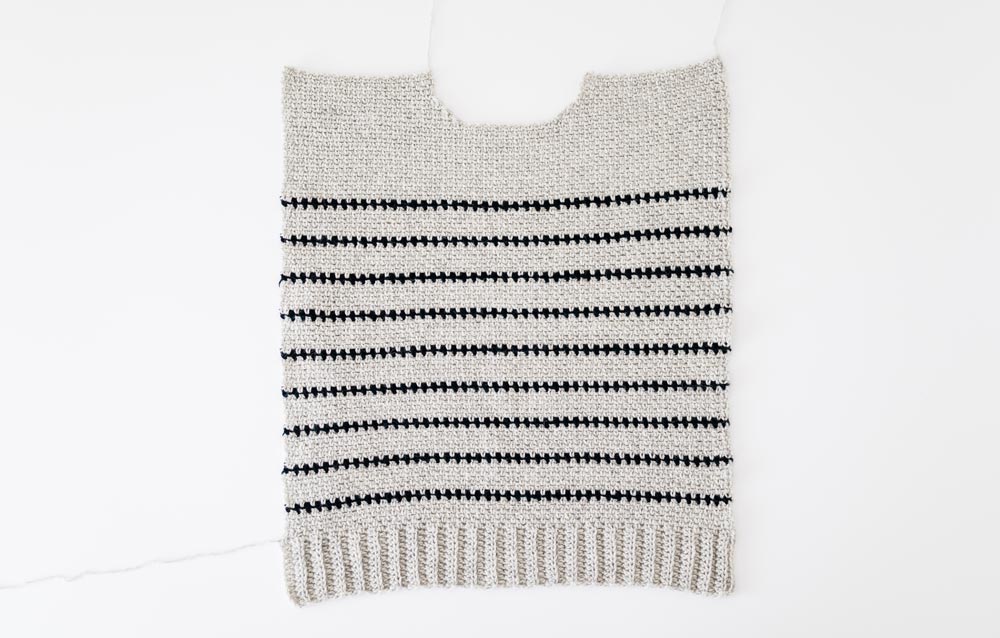
*The sample sweater has 9 thin stripes across the body and a solid grey portion at the tops of the shoulders. For the same look, follow the pattern instructions.
*You can alter the length of the sweater, stripe placement and thickness. Just keep in mind that if you want thicker stripes/more stripes, you’ll need more yardage in the CC and less in the MC.
LEVEL: Easy+
Materials
Yarn – WeCrochet Andean Treasure – Sport / Fine (2), 100m/50g, 110yds/1.75oz, 100% Baby Alpaca
MC (finley heather): approx. 495(545, 600, 665, 745)(810, 870, 980, 1035)g
CC (midnight heather): approx. 65(70, 70, 75, 80)(85, 90, 95, 100)g
total approx. 560(615, 670, 740, 820)(890, 960, 1075, 1135)g
5.5mm (US H) Crochet Hook
6mm (US J) Crochet Hook
Darning Needle
Scissors
2 Stitch Markers
Stitches & Abbreviations
Ch = Chain
SC = Single Crochet
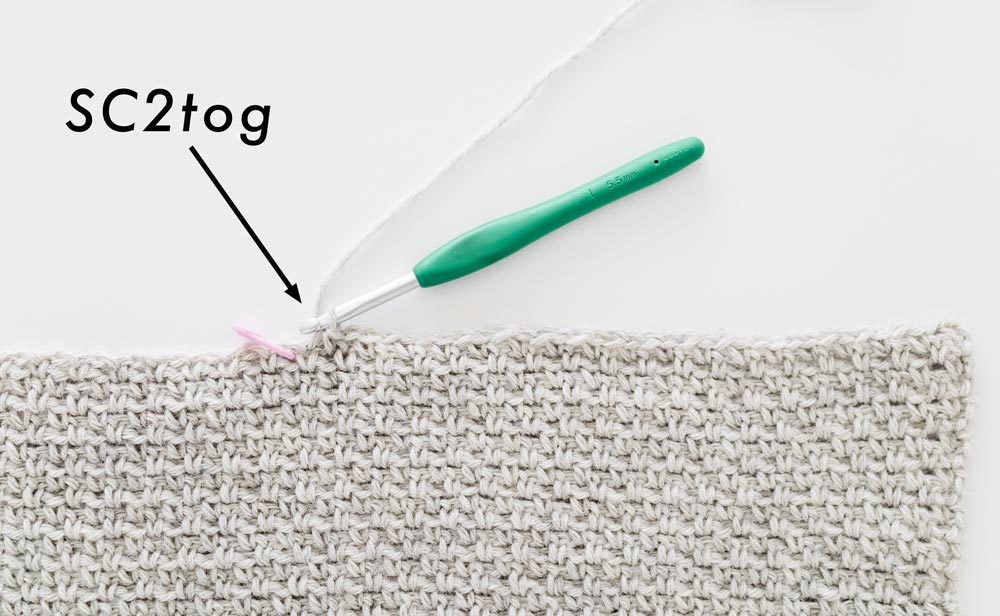
SC2tog = Single Crochet 2 Stitches Together
HDC = Half Double Crochet
BLO = Back Loop
ch-sp = Chain Space
St(s) = Stitch(es)
Rep = Repeat
Sk = Skip
RS = Right Side
WS = Wrong Side
MC = Main Colour
CC = Contrasting Colour (stripes)
Measurements cm:
To fit Bust: 76(86, 96, 106, 117)(127, 137, 147, 158)
Back Width: 45(50, 54, 58, 63)(68, 72, 78, 83)
Armhole: 14(15, 16, 18, 19)(20, 22, 23, 24)
Sleeve length: 37(38, 38, 38, 40)(40, 40, 42, 42)
Length: 59(59, 60, 62, 64)(66, 67, 69, 69)
Measurements inches:
To fit Bust: 30(34, 38, 42, 46)(50, 54, 58, 62)
Back Width: 17.5(19.5, 21, 23, 25)(27, 28.5, 30.5, 32.5)
Armhole: 5.5(6, 6.5, 7, 7.5)(8, 8.5, 9, 9.5)
Sleeve length: 14.5(15, 15, 15, 16)(16, 16, 16.5, 16.5)
Length: 23(23, 23.5, 24, 25)(26, 26.5, 27, 27)
GAUGE: 10cm/4” square = 18 stitches wide x 19 rows tall in linen stitch pattern with 5.5mm hook
Linen Crochet Stitch Pattern
FOUNDATION CHAIN: Chain an even number of chains.
ROW 1: SC in 2nd ch from hook, *ch 1, sk 1 ch, SC; rep from * until end, turn.
ROW 2 (LINEN A): Ch 1, SC in 1st st, SC in ch-sp, *ch 1, sk 1 st, SC in ch-sp; rep from * until last st, SC in last st, turn.
ROW 3 (LINEN B): Ch 1, SC in 1st st, *ch 1, sk 1 st, SC in ch-sp; rep from * until 2 sts left, ch 1, sk 1 st, SC in last st, turn.
Repeat ROWS 2 – 3 until you reach desired length.
Breton Stripe Sweater Pattern
Back Panel
Back Panel Ribbing
FOUNDATION CHAIN: With MC and 6mm(US J) hook, ch 12.
ROW 1: HDC in 2nd ch from hook, HDC in each st until end, turn.
<11>
ROW 2: Ch 1, BLO HDC 10, HDC in last st, turn.
<11>
Repeat ROW 2 until ROW 43(47, 51, 55, 59)(63, 67, 73, 77).
Do not fasten off! We will now work along the long edge of the ribbing.
Swap the 6mm(US J) hook for the 5.5mm(US H) hook.
ROW 1: Ch 1, SC in each of first 3 rows, *ch 1, SC in next row; rep from * until 2 rows left, SC in last 2 rows, turn.
<81(89, 97, 105, 113)(121, 129, 141, 149)>
ROW 2: Ch 1, SC 2, *ch 1, sk 1 st, SC in next st; rep from * until last st, SC in last st, turn.
<81(89, 97, 105, 113)(121, 129, 141, 149)>
ROW 3 (LINEN B): Ch 1, SC in 1st st, *ch 1, sk 1 st, SC in ch-sp; rep from * until 2 sts left, ch 1, sk 1 st, SC in last st, turn.
<81(89, 97, 105, 113)(121, 129, 141, 149)>
ROW 4 (LINEN A): Ch 1, SC in 1st st, SC in ch-sp, *ch 1, sk 1 st, SC in ch-sp; rep from * until last st, SC in last st, turn.
<81(89, 97, 105, 113)(121, 129, 141, 149)>
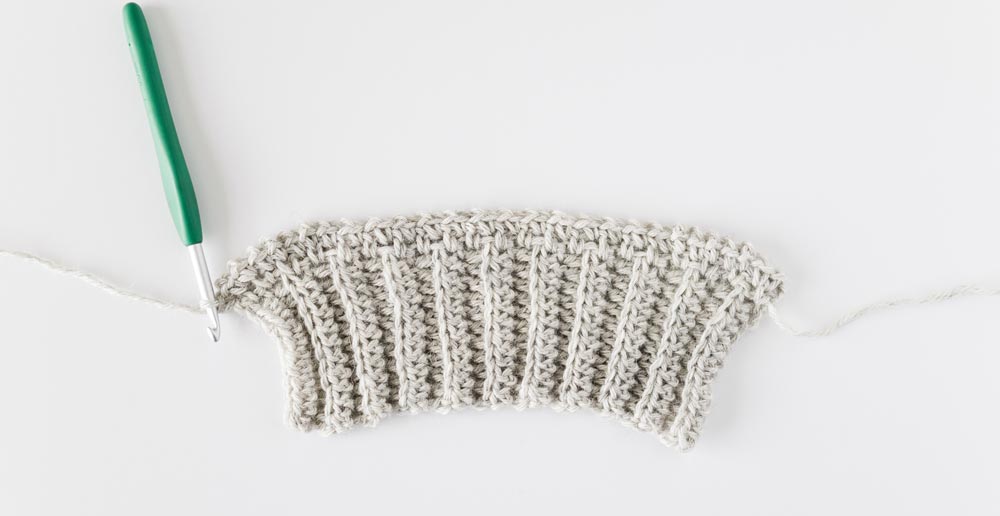
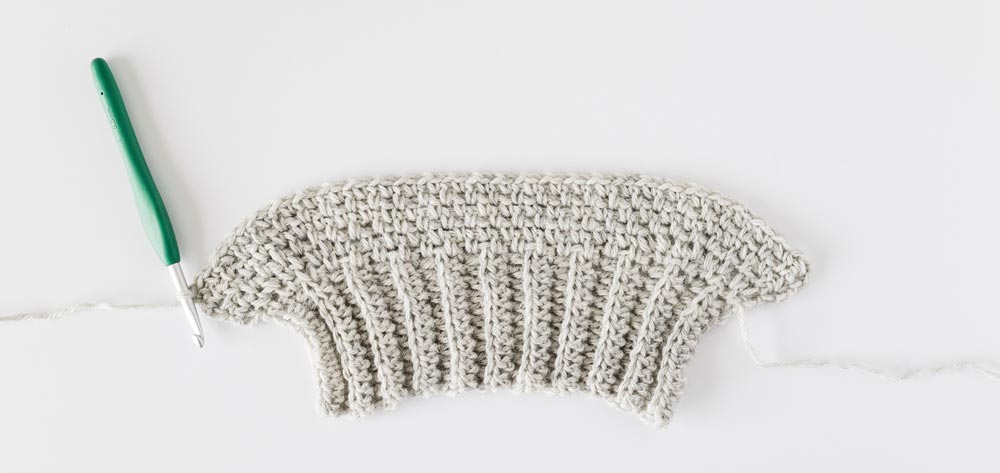
Solid Sweater Back Panel
Repeat rows LINEN B - A until ROW 100(100, 102, 106, 110)(112, 114, 118, 118).
<81(89, 97, 105, 113)(121, 129, 141, 149)>
*You can add/remove rows to make your sweater longer/shorter.
Fasten off.
Stripe Sweater Back Panel
*You can add/remove rows to make your sweater longer/shorter. Keep in mind that the stripe placement may change depending on the length of the sweater. E.g. if you decide to remove the solid colour portion at the top of the sweater, the stripes will start from the tops of the shoulders instead of across the chest.
ROW 5: As Linen B.
ROW 6: As Linen A.
ROW 7: With CC, rep Linen B.
ROW 8: As Linen A.
ROW 9: As Linen B.
ROW 10: As Linen A.
ROW 11: As Linen B.
ROW 12: As Linen A.
ROW 13: As Linen B.
ROW 14: As Linen A.
ROW 15: With CC, rep Linen B.
Repeat ROWS 8 – 15 until ROW 71.
<81(89, 97, 105, 113)(121, 129, 141, 149)>
Do not fasten off! With MC only, repeat Linen A – Linen B until ROW 100(100, 102, 106, 110)(112, 114, 118, 118).
Fasten off.
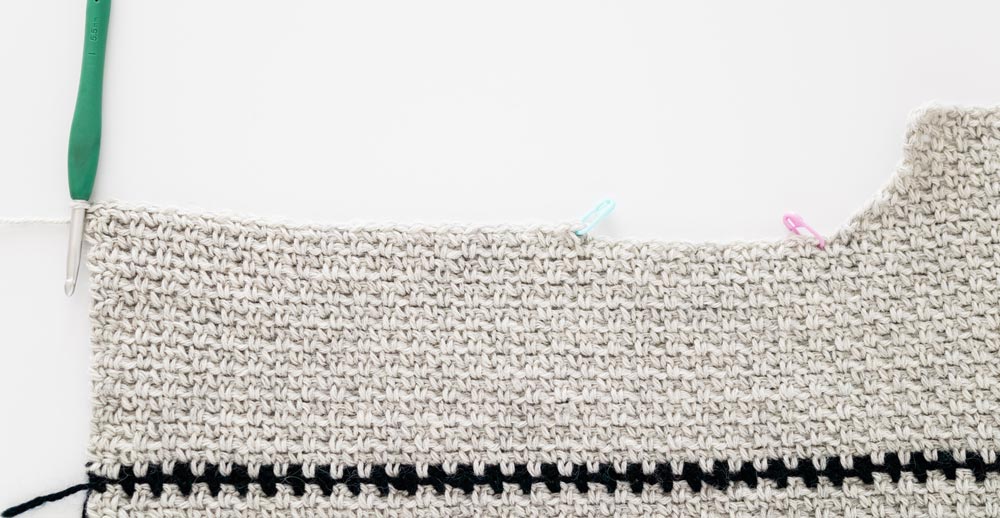
Front Panel
Repeat BACK PANEL instructions until ROW 90(90, 92, 96, 100)(102, 104, 108, 108).
<81(89, 97, 105, 113)(121, 129, 141, 149)>
*If you altered the length of the back panel, crochet until you are 10 rows short of the total rows in your back panel. E.g. if you crocheted 54 rows for the back panel, crochet 44 rows for the front panel.
Do not fasten off! We’ll now crochet the shoulder shaping.
Shoulder Shaping Side 1
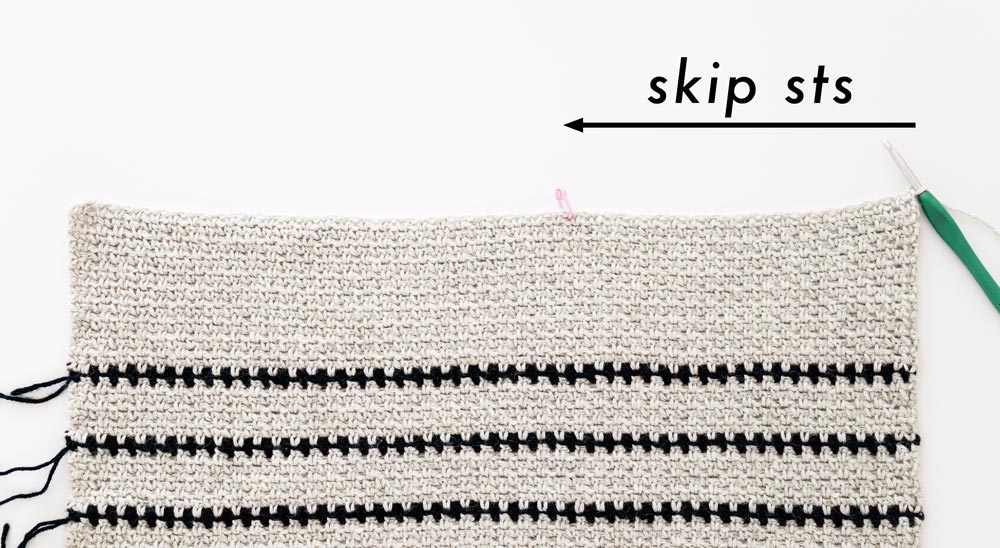
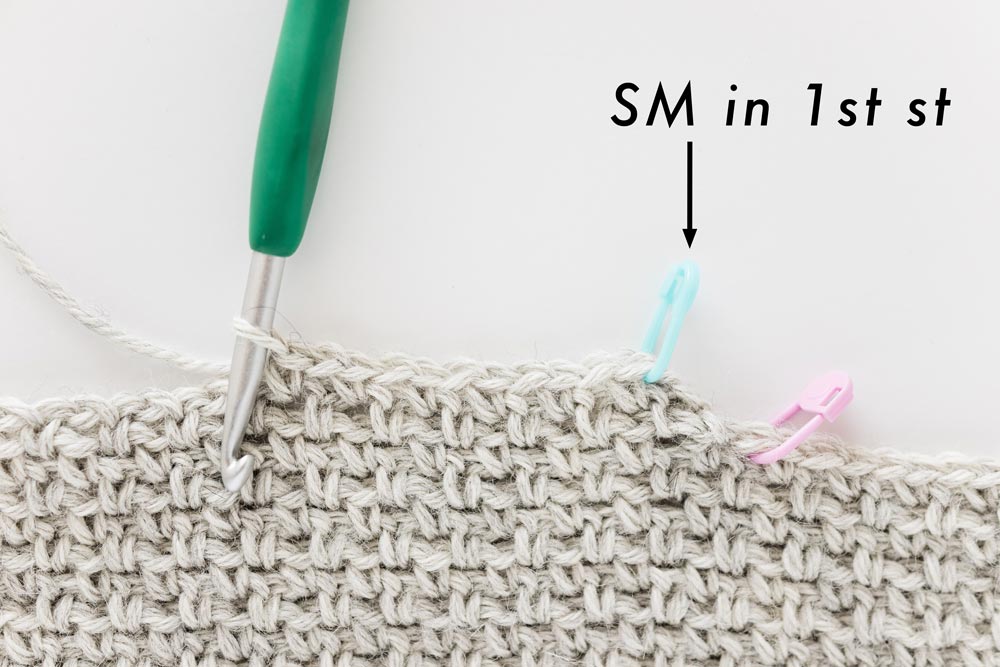
Counting from your crochet hook, skip 32(36, 40, 44, 48)(52, 56, 62, 66) sts, place SM in next st.
*The stitch marker should be in a ch-sp, not a SC.
ROW 1: Ch 1, SC in 1st st, ch 1, sk 1 st, *SC in ch-sp, ch 1, sk 1 st; rep from * until 2 sts from the st marker, SC2tog, turn.
<31(35, 39, 43, 47)(51, 55, 61, 65)>
ROW 2: Ch 1, sk 1st st, SC in ch-sp, *ch 1, sk 1 st, SC in ch-sp; rep from * until last st, SC in last st, turn.
<30(34, 38, 42, 46)(50, 54, 60, 64)>
*If you have trouble spotting the beginning/end of a row, you can place a SM in the first st.
ROW 3: Ch 1, SC in 1st st, ch 1, sk 1 st, *SC in ch-sp, ch 1, sk 1 st; rep from * until 2 sts left in row, SC2tog, turn.
<29(33, 37, 41, 45)(49, 53, 59, 63)>
ROW 4: As ROW 2.
<28(32, 36, 40, 44)(48, 52, 58, 62)>
ROW 5: As ROW 3.
<27(31, 35, 39, 43)(47, 51, 57, 61)>
ROW 6: As ROW 2.
<26(30, 34, 38, 42)(46, 50, 56, 60)>
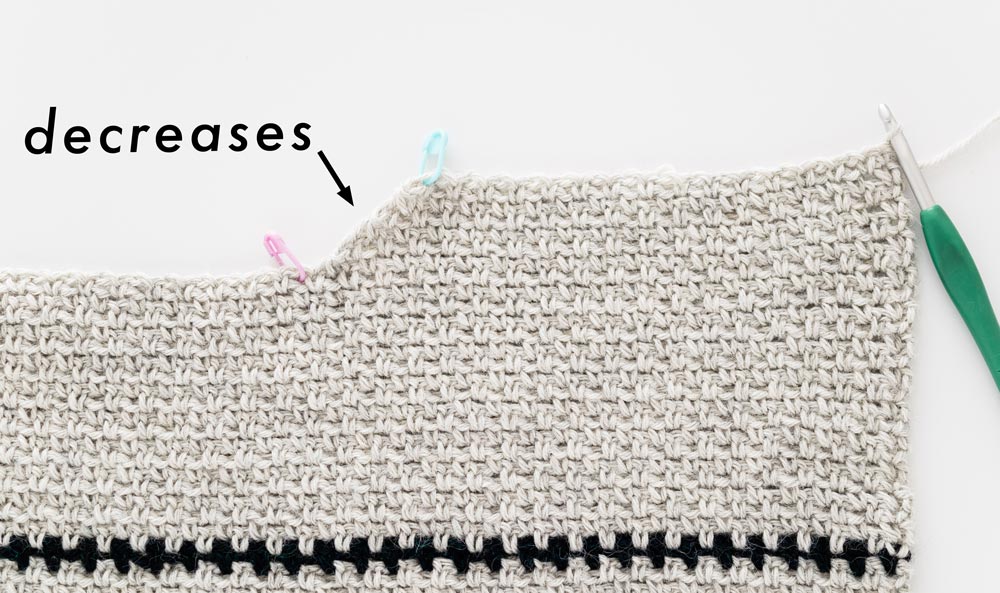
ROWS 7 - 10: Ch 1, SC, *ch 1, sk 1 st, SC in ch-sp; rep from * until last st, SC in last st, turn.
<26(30, 34, 38, 42)(46, 50, 56, 60)>
Fasten off.
Shoulder Shaping Side 2
Counting from the stitch marker, skip 16 sts, insert hook into next st (hook should be in a SC) and pull up a loop.

ROW 1: Ch 1, SC2tog, *ch 1, sk 1 st, SC in ch-sp; rep from * until 2 sts left, ch 1, sk 1 st, SC in last st, turn.
<31(35, 39, 43, 47)(51, 55, 61, 65)>
*If you have trouble spotting the beginning/end of a row, you can place a SM in the SC2tog.
ROW 2: Ch 1, SC 2, *ch 1, sk 1 st, SC in ch-sp; rep from * until last ch-sp, turn.
<30(34, 38, 42, 46)(50, 54, 60, 64)>
*Don’t crochet into the last st of the row (SC2tog).
ROW 3: As ROW 1.
<29(33, 37, 41, 45)(49, 53, 59, 63)>
ROW 4: As ROW 2.
<28(32, 36, 40, 44)(48, 52, 58, 62)>
ROW 5: As ROW 1.
<27(31, 35, 39, 43)(47, 51, 57, 61)>
ROW 6: As ROW 2.
<26(30, 34, 38, 42)(46, 50, 56, 60)>
ROWS 7 - 10: Ch 1, SC 2, *ch 1, sk 1 st, SC in ch-sp; rep from * until 2 sts left, ch 1, sk 1 st, SC in last st, turn.
<26(30, 34, 38, 42)(46, 50, 56, 60)>
Fasten off.
Sleeves
*Make 2
Sleeve Ribbing
FOUNDATION CHAIN: With MC and 5.5mm(US H) hook, ch 12.
ROW 1: HDC in 2nd ch from hook, HDC in each st until end, turn.
<11>
ROW 2: Ch 1, BLO HDC 10, HDC in last st, turn.
<11>
Repeat ROW 2 until ROW 21(21, 23, 23, 25)(25, 27, 27, 29).
Do not fasten off! We will now work along the long edge of the ribbing.
ROW 1: Ch 1, SC in 1st row, *ch 1, SC in next row; rep from * until end, turn.
<41(41, 45, 45, 49)(49, 53, 53, 57)>
ROW 2: Ch 1, SC in 1st st, rep [ch 1, SC in next st] 5(7, 7, 9, 11)(13, 13, 15, 15) times,
*ch 1, sk 1 st, SC in ch-sp; rep from * until 5(7, 7, 9, 11)(13, 13, 15, 15)sts left,
rep [ch 1, SC in next st] until last st, turn.
<51(55, 59, 63, 71)(75, 79, 83, 87)>
Solid Sweater Sleeve
Repeat rows Linen A – B until sleeve measures 37(38, 38, 38, 40)(40, 40, 42, 42)cm / 14.5(15, 15, 15, 16)(16, 16, 16.5, 16.5)”.
<51(55, 59, 63, 71)(75, 79, 83, 87)>
Fasten off.
Stripe Sweater Sleeve
ROW 3: As Linen A.
ROW 4: As Linen B.
ROW 5: As Linen A.
ROW 6: As Linen B.
ROW 7: With CC, rep Linen A.
ROW 8: As Linen B.
ROW 9: As Linen A.
ROW 10: As Linen B.
ROW 11: As Linen A.
ROW 12: As Linen B.
ROW 13: As Linen A.
ROW 14: As Linen B.
ROW 15: With CC, rep Linen A.
Repeat ROWS 8 – 15 until sleeve measures 37(38, 38, 38, 40)(40, 40, 42, 42)cm / 14.5(15, 15, 15, 16)(16, 16, 16.5, 16.5)”.
<51(55, 59, 63, 71)(75, 79, 83, 87)>
Fasten off.
Fold sleeve in half lengthways and whip stitch the long edge of the sleeve together.

Assembly
Lay the front panel on top of the back panel.
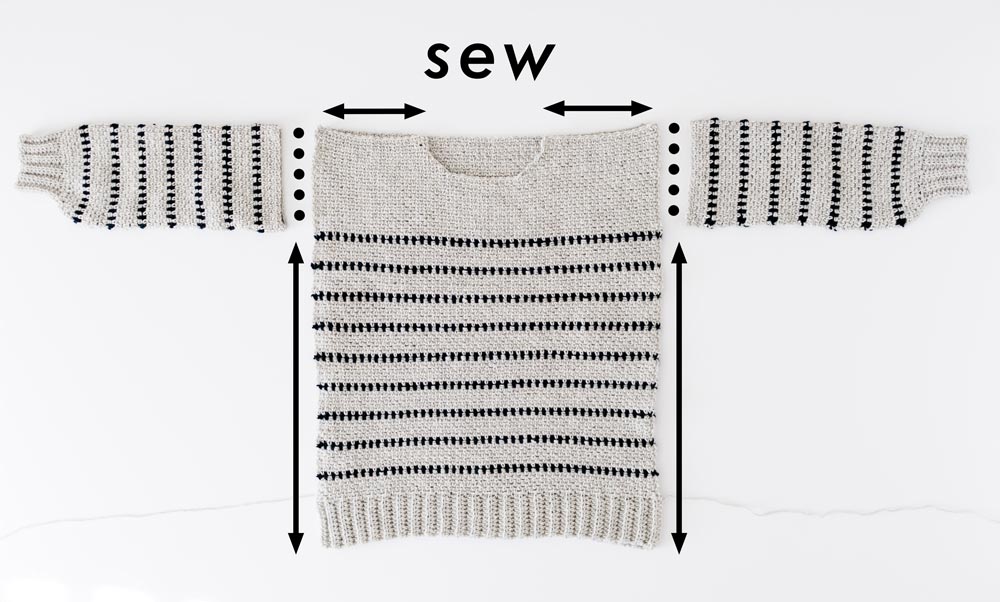
Whip stitch the shoulder seams together.
Whip stitch up the sides of body panels together, leaving a gap for the sleeves.
Whip stitch the top of the sleeves to the body.
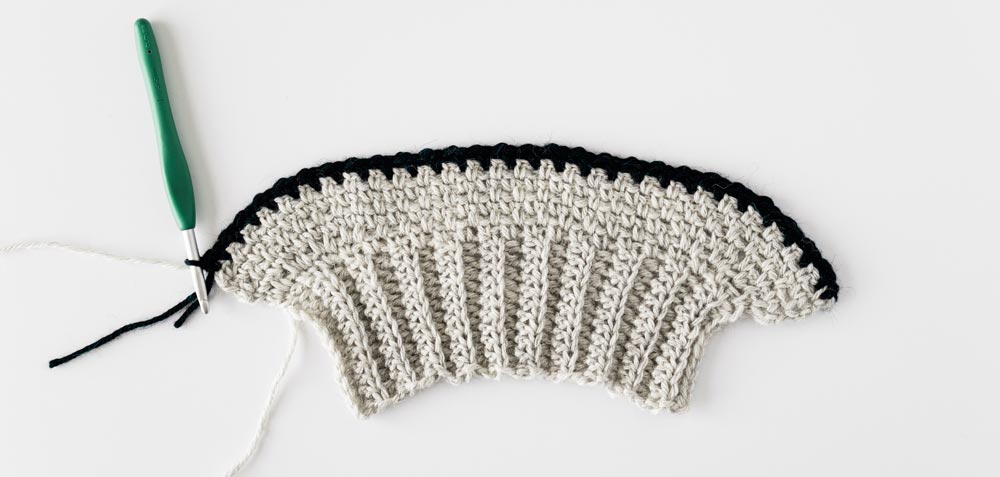
Neckline Ribbing
FOUNDATION CHAIN: With MC and 5.5mm(US H) hook, ch 7.
ROW 1: HDC in 2nd ch from hook, HDC in each st until end, turn.
<6>
ROW 2: Ch 1, BLO HDC 5, HDC in last st, turn.
<6>
Repeat ROW 2 until measures approx. 43cm/17”.
*You want the ribbing to be slightly smaller (1-2cm/0.5-1”) than the neck opening as it will stretch to fit and relax after you’ve worn the sweater a few times.
*If your ribbing is too long for the opening it will ruffle and there will be excess fabric around your neck. If the ribbing is too short, it will pucker and pull on the stitches along the neckline.
*I suggest pinning the ribbing to the neckline and trying on the sweater to see if you need to adjust the length, before sewing the ribbing into place.
Whip stitch the neckline ribbing evenly around the open edge of neckline.
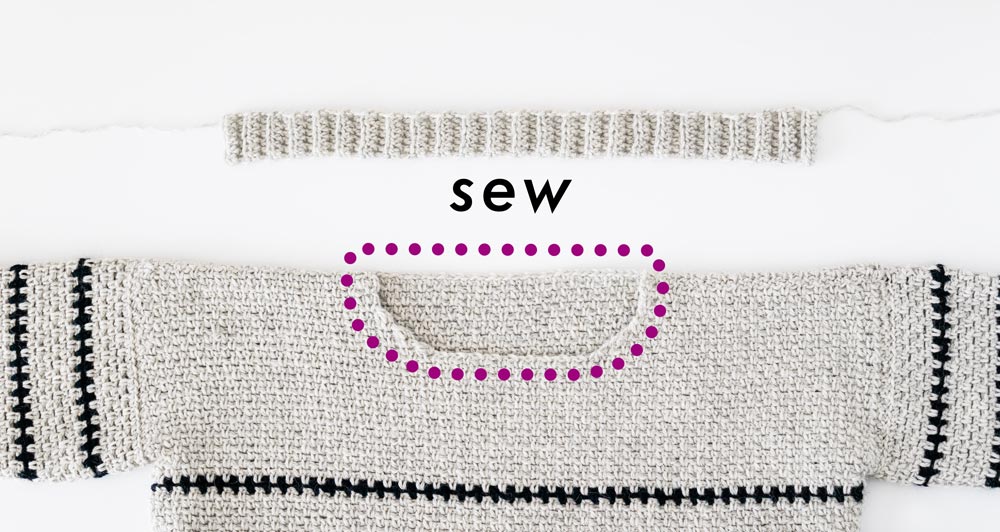
Sew the edges of the neckline ribbing together.
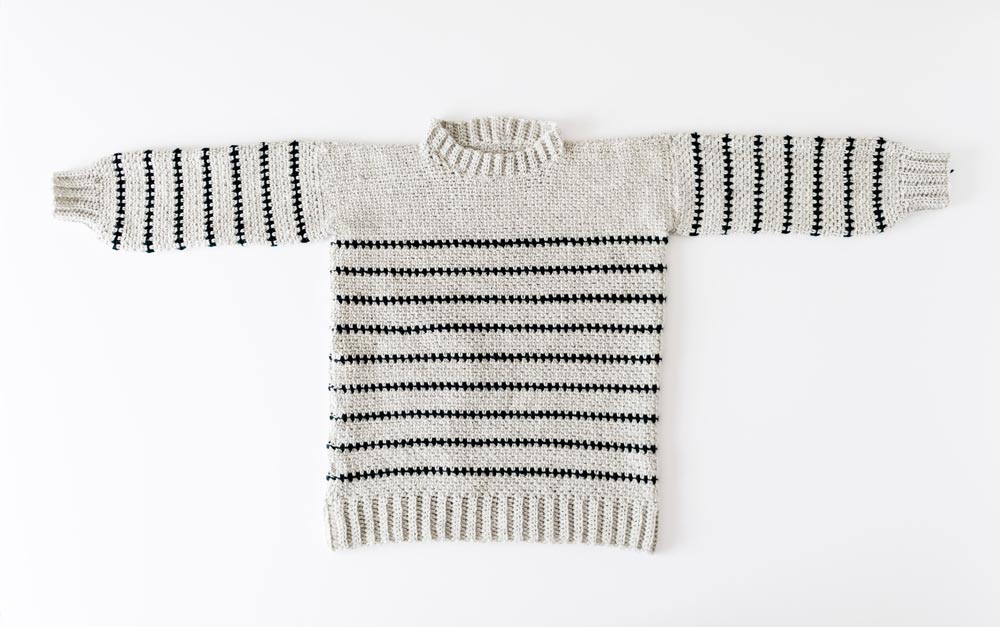
Weave in all of your ends.
Voilà! You’ve finished your Breton Stripe Sweater 🙂
Hi! I made your Briar Pocket Cardigan and absolutely love it! This sweater is also beautiful and a definite one for me to make as well. Thank you so much for sharing another fantastic pattern.
Hello Grace,
Hope you are doing well!
I absolutely love the project it’s very cute and looks cozy!
But I was wondering, how many yarn balls did you use for this sweater?
Wish you all the best...
I want to make this, but I don’t have access to wecrochet… is Drops Puna a good alternative? Will the end piece have the same drape etc? Or maybe a merino yarn?
Thank you and thanks for the lovely designs!!!
I tried using Drops Puna for this project and I found that it was too thin. I used Debbie Bliss Rialto DK (merino wool) and it worked perfectly!
Is the 15” sleeve length including or excluding the ribbed cuff? Thanks!
I am interested in trying this pattern out but as I was reading the directions it said to us a H 5.5 hook but H is normally 5 and I 5.5, just trying to make sure I have everything before I start
Hi Kelly, I noticed that too and commented, but did not get an answer. My I hook is a 5.25. I have 3 It’s none a 5.5. It resulted in my sweater being a bit smaller than her measurements. I used 11 bales of the main color and 1 and a smidge of the contrasting color. I’ll post comments on Ravelry.
I have made several of your patterns and some more than once with it ha I g to adapt my tension or use a different size hook to get the proper measurements. I love your patterns! I began this pattern’s back section with the H hook, which you posted in your pattern, but upon looking more closely I see you had written H5.5mm. An I hook is 5.5mm; an H hook is 5. Which hook size did you use?
I love the yarn I bought enough variations to make 3 sweaters. Thank you for the fun patterns and always good choice of yarn
I made this sweater in Aurora Heather Andean Treasure (dark green) and Finnley Heather Andean Treasure, and ordered too much yarn. I have a full skein left of the green and about a skein and a half of the gray if anyone wants it! I'm happy to ship for free.
I know this is an old post, but did you find a home for the yarn?
Hello I am trying to make this sweater I've only ever made blankets before. And I'm doing the xs. I did the ribbing for the back panel so 43 rows and am just confused how we go from 43 rows to 81 stitches across those rows? If were doing a sc in each row shouldn't the stitch count be 43?
You are doing A chain in between each sc.
I am crocheting the long striped sweater and I am onto 5he sleeves. I have completed the sleeve rib and increasing the stitches to 71 - I now have to continue in the A, B pattern until the sleeve 40 cm long. At the end of the sleeve your pattern says there should be 69 stitches, I cannot see any decreasing of the 2 stitches to get down to 69 stitches. Can you please help. Thank you