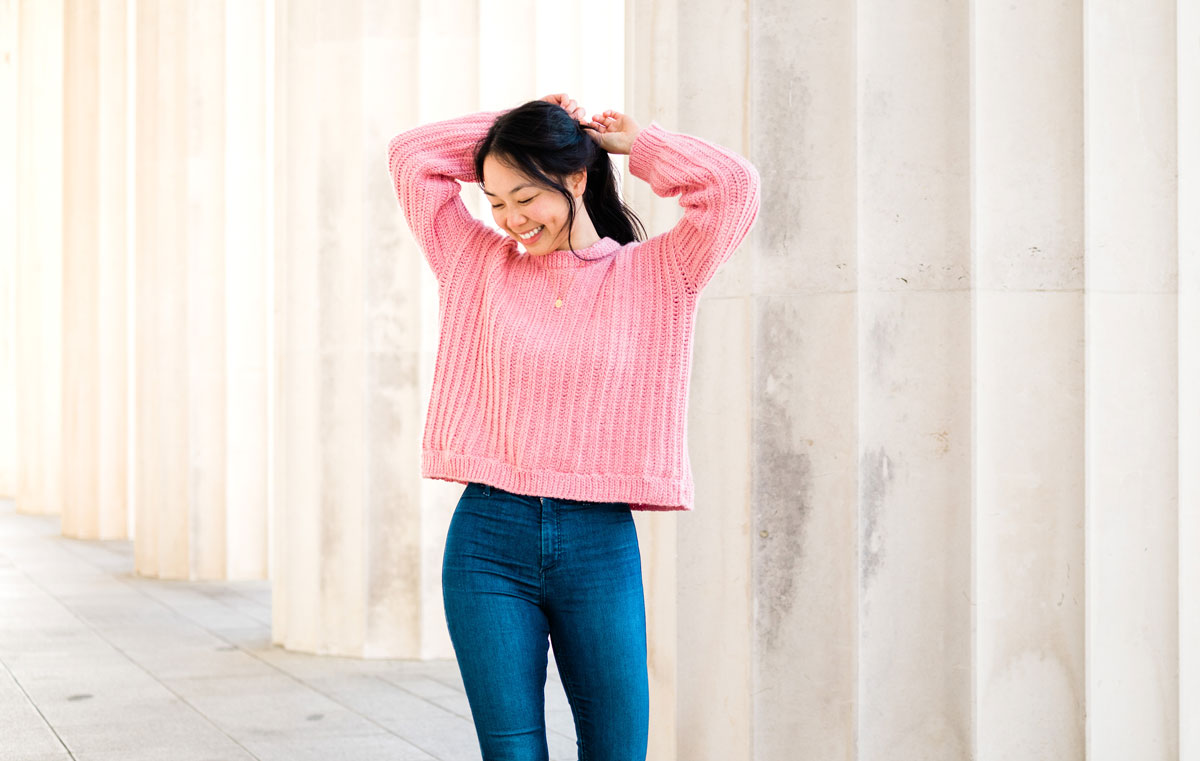
Oversized, ribbed and ridiculously cosy, the Amalfi Sweater is the modern crochet sweater of your dreams! Learn how to crochet a sweater with knit-look ribbing by following the step-by-step video tutorial and free pattern below!

This post may contain affiliate links, view our disclosure policy for details.
Thank you to WeCrochet for providing the yarn for this free crochet sweater pattern! As always all thoughts and opinions are 100% my own 🙂
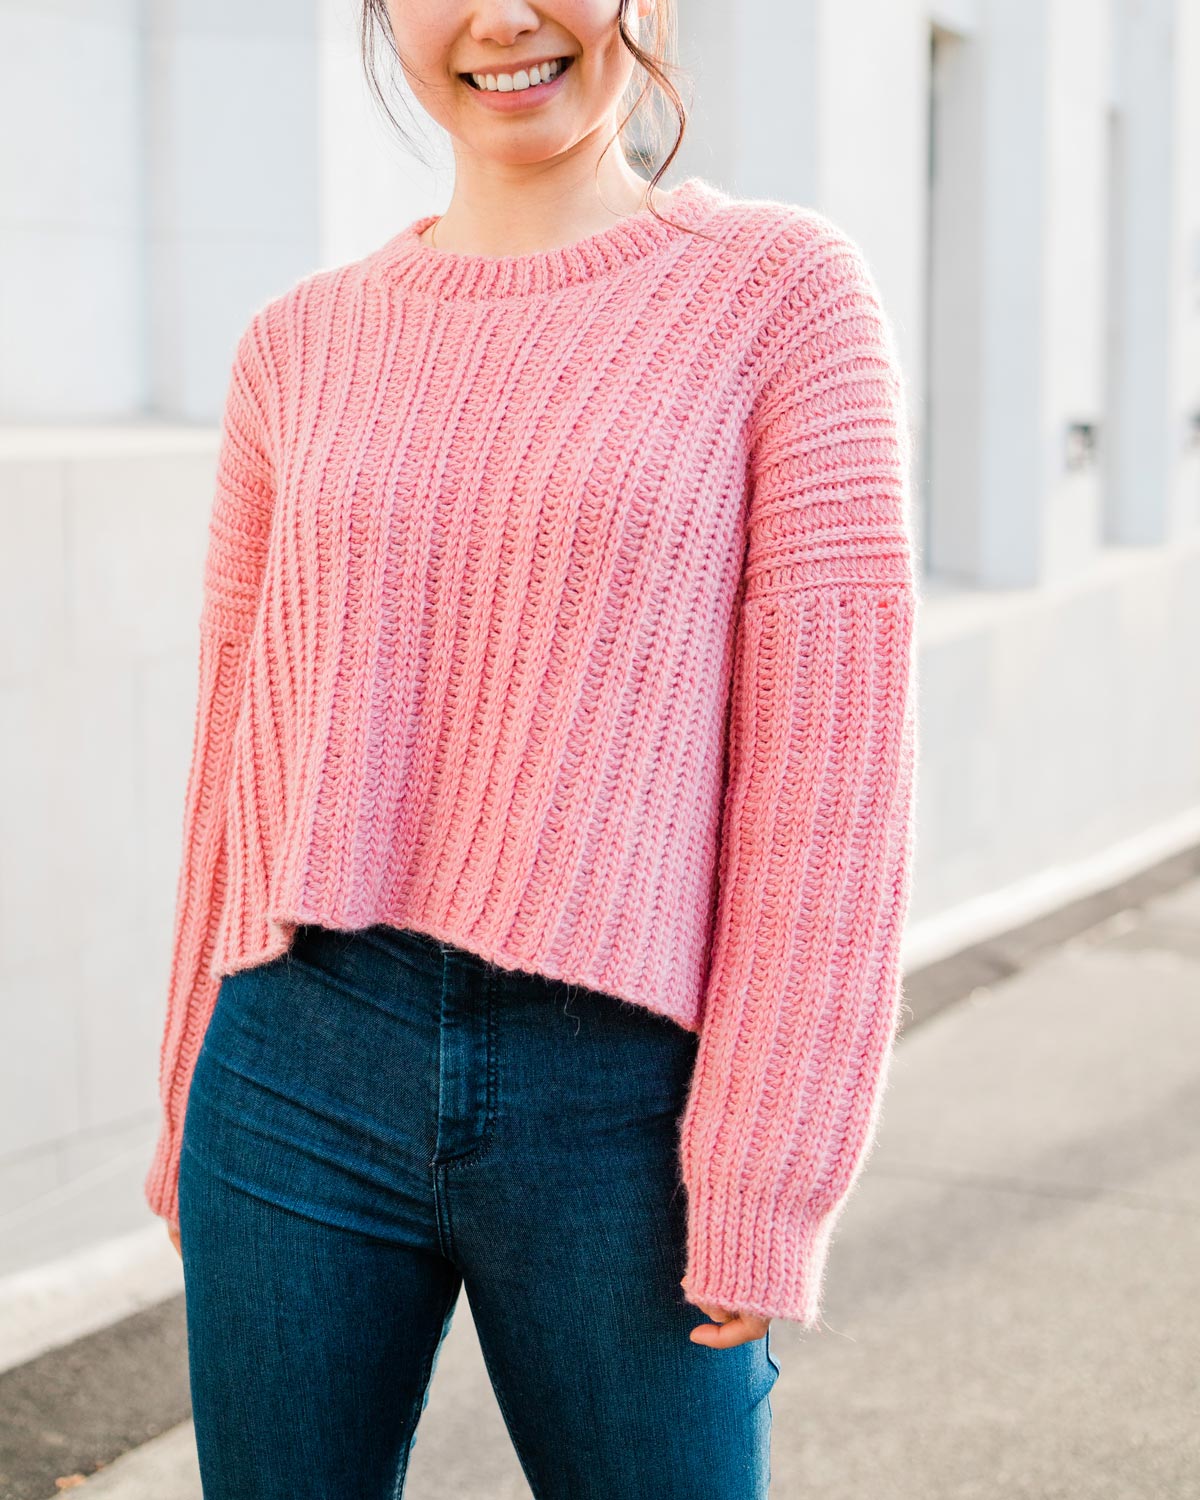
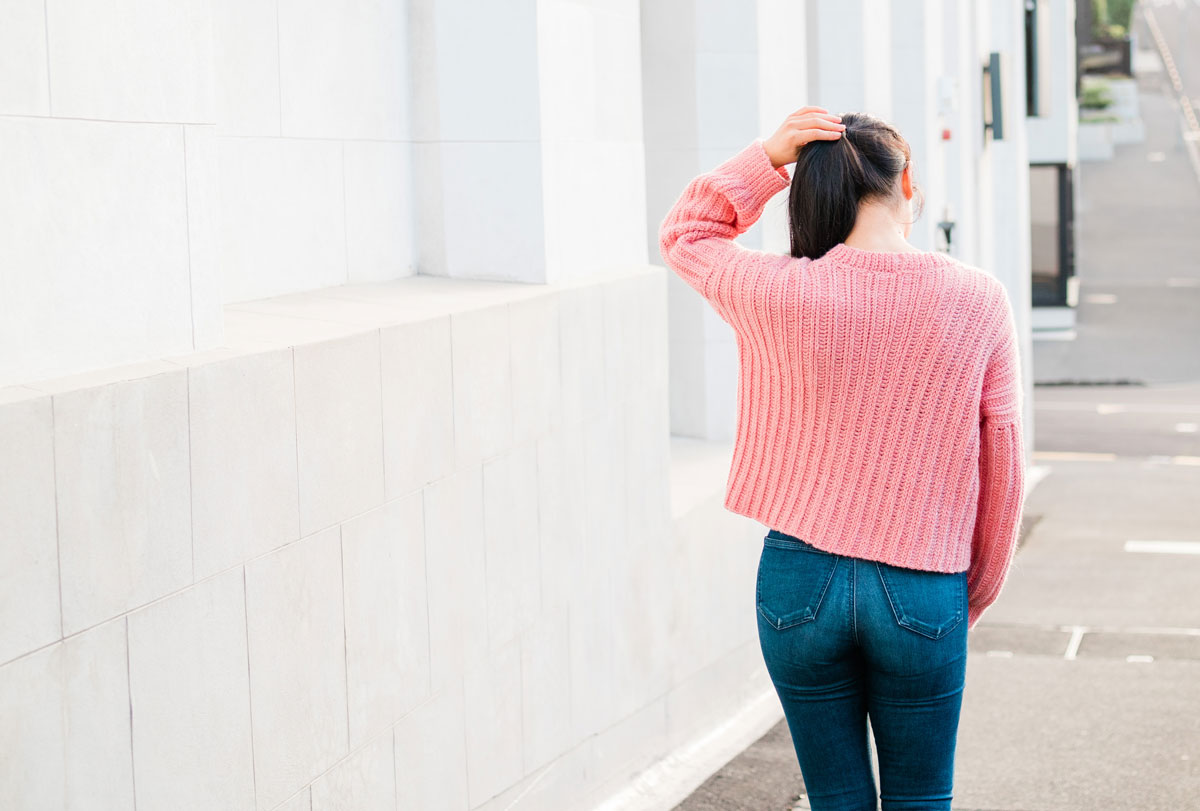
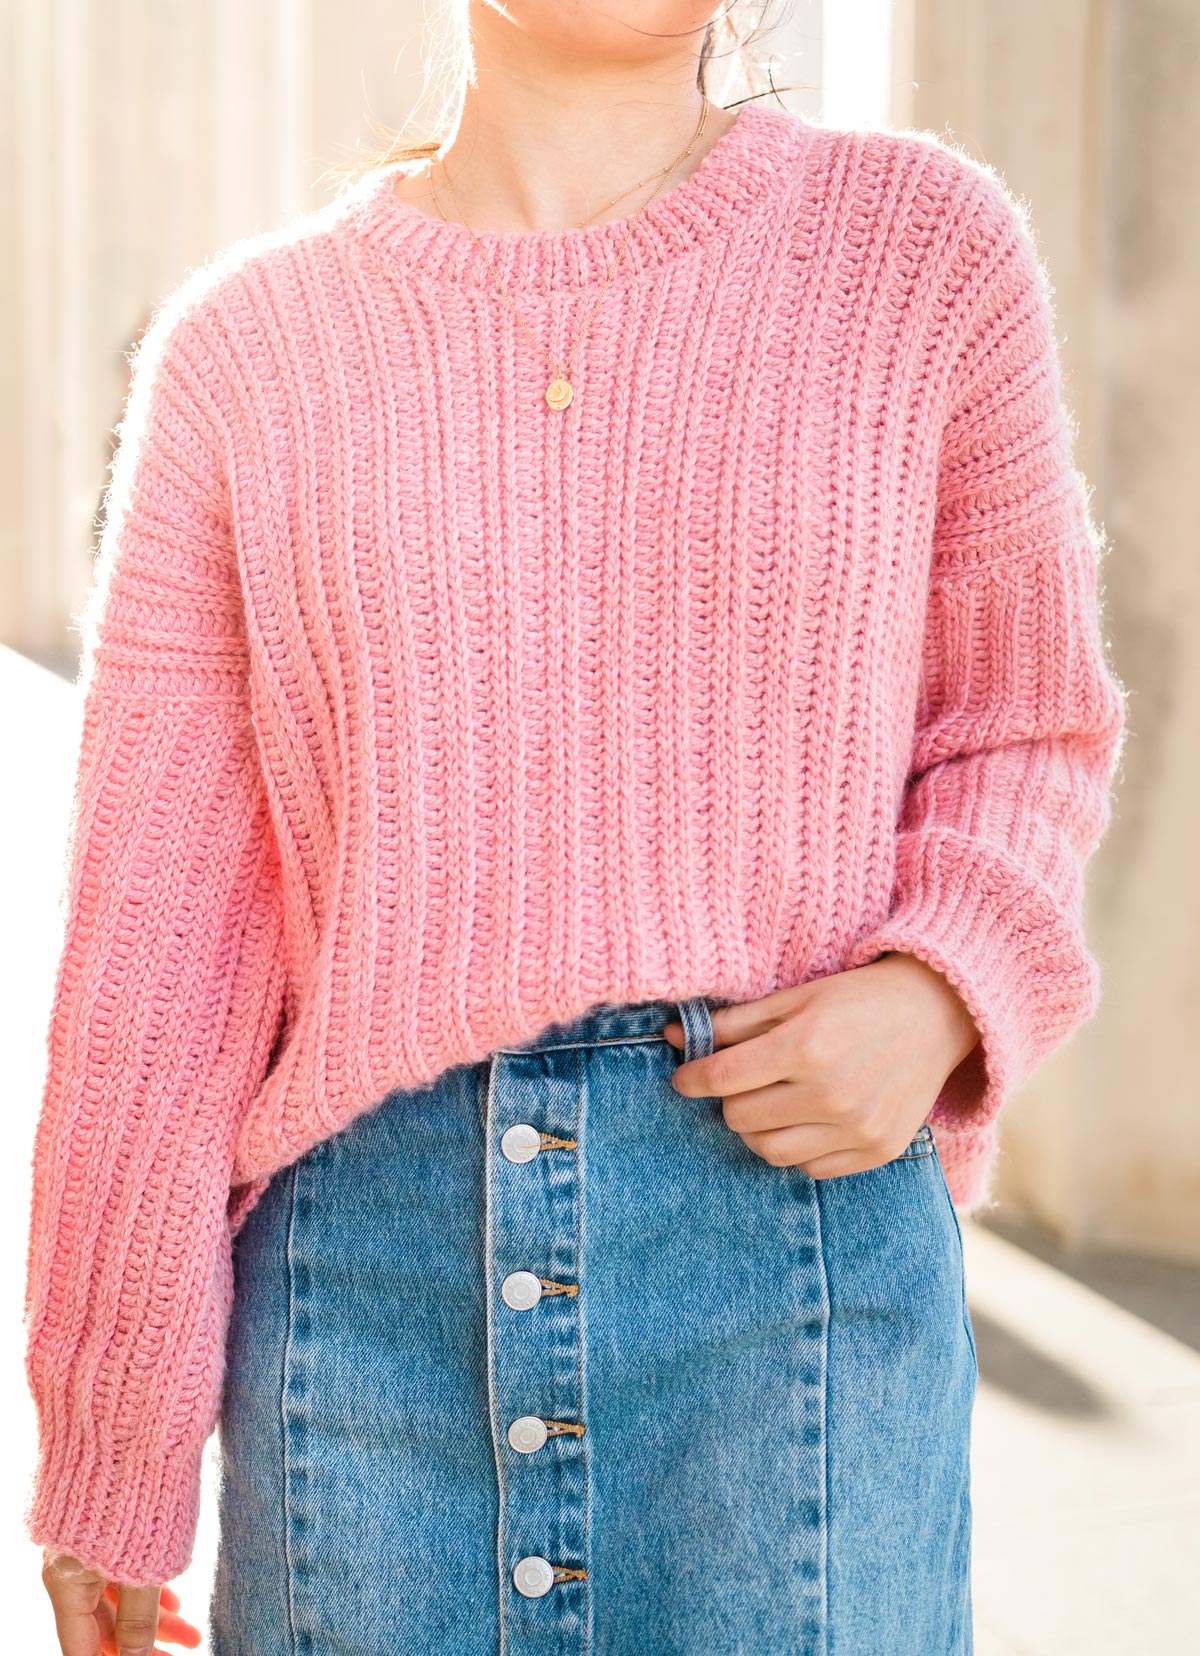
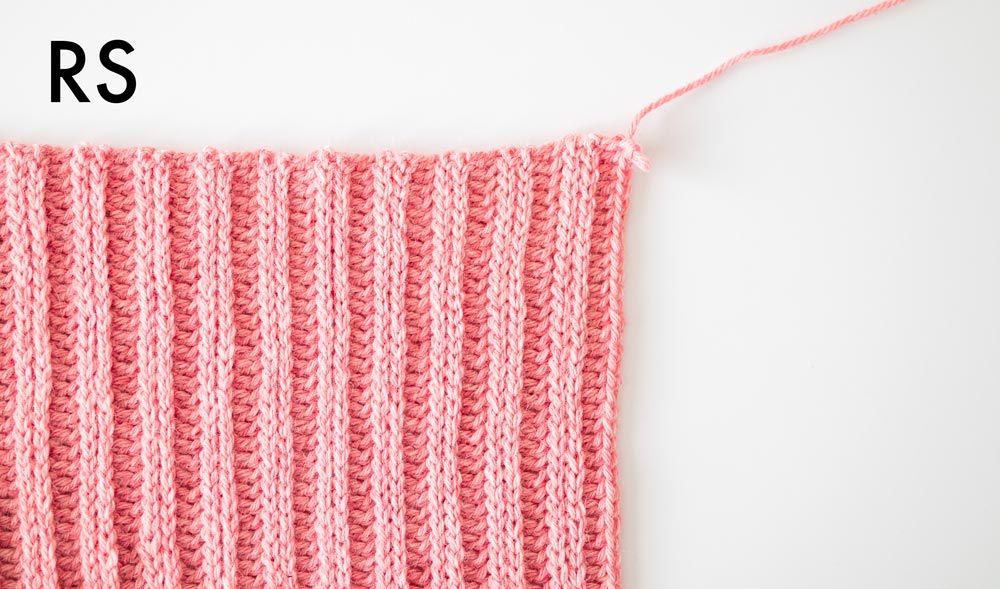
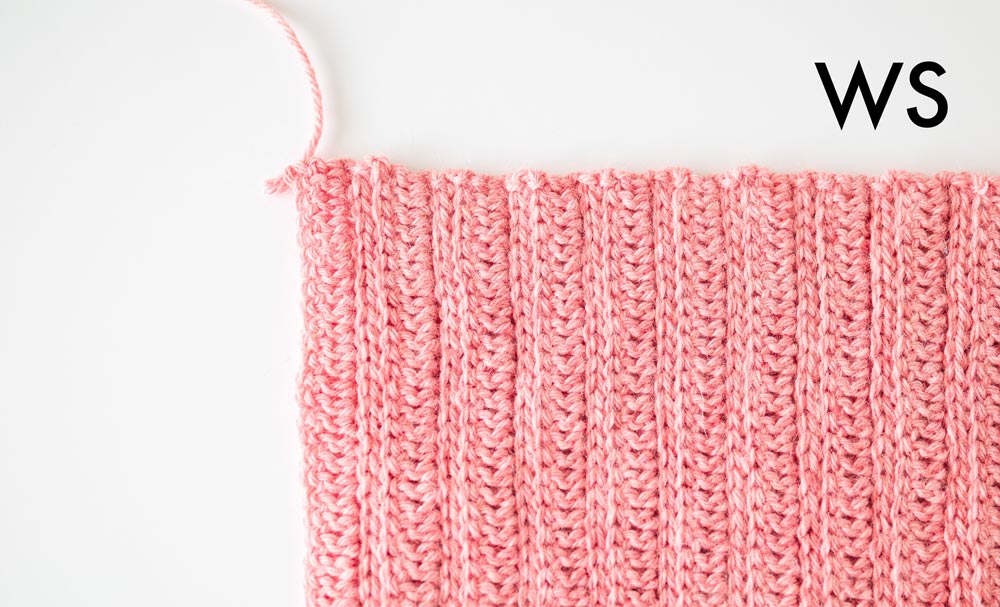
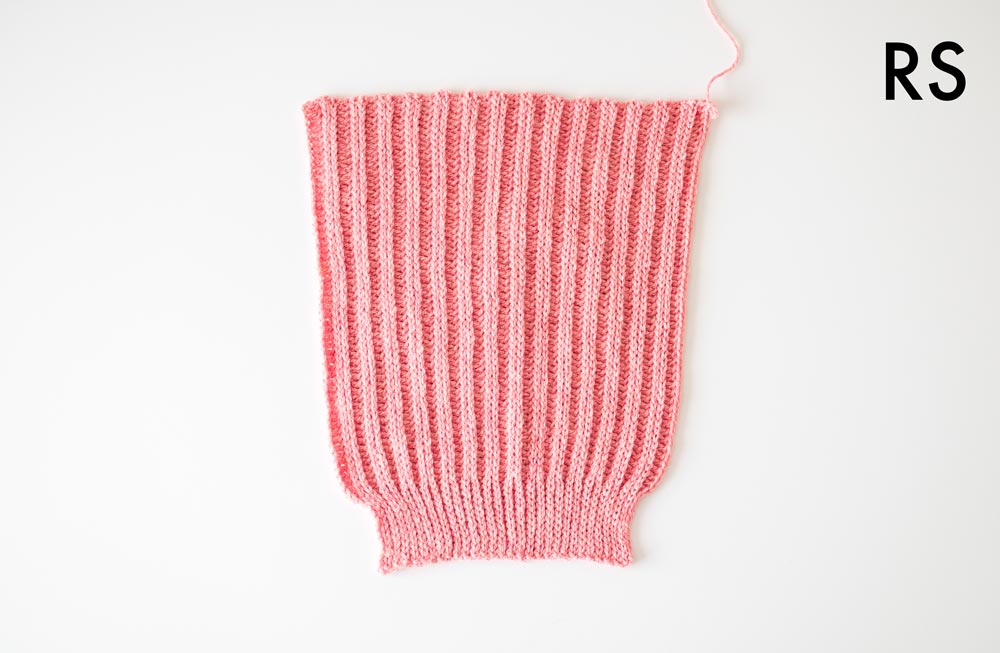
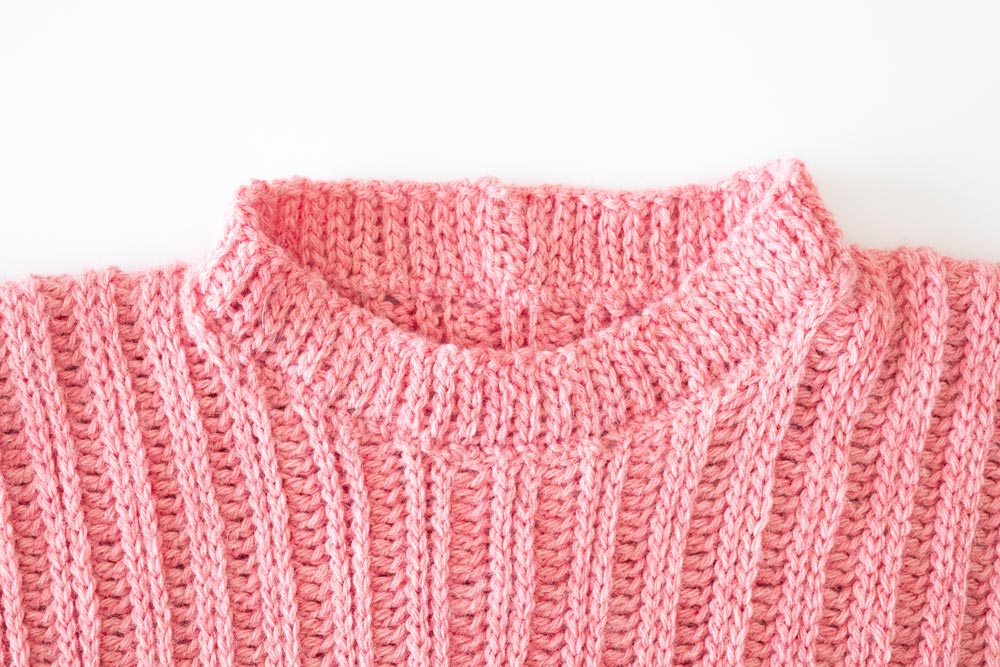
The Amalfi Sweater is everything you’d want a modern crochet pullover to be 🙂 This easy crochet sweater features loosely cuffed sleeves, an oversized body and a ribbed round neck while simple beginner stitches (slip stitches and double crochet) combine to create a chunky ribbed effect that looks like knit!
When I posted a sneak peek of this stitch variation on Instagram, I got so many comments, questions, dms asking for a tutorial for this stitch and you’ll be amazed that it’s so simple, you don’t even need a separate stitch tutorial.
The vast majority of this pattern is made up of two ‘base rows’ – one consisting of back loop slip stitches and the other uses back loop double crochets – that’s it! We’ll alternate between these two stitches to crochet this knit-look ribbing which makes up the majority of the sweater. After a couple of repeats, this crochet ribbing stitch will become mindless!
The Amalfi Ribbed Sweater is worked lengthways (meaning that the foundation chain runs the length of the sweater not the width) so the KEY to getting a sweater that sits nicely on the body is to pick a yarn that has good drape and to make sure that you match the gauge in the pattern.
To make sure that your sweater turns out the right size (and to maintain gauge throughout) the number 1 tip is to keep your slip stitches loose and relaxed. This makes working back into the slip stitches in the next row really easy and you’ll be able to crochet so much faster 🙂
Construction
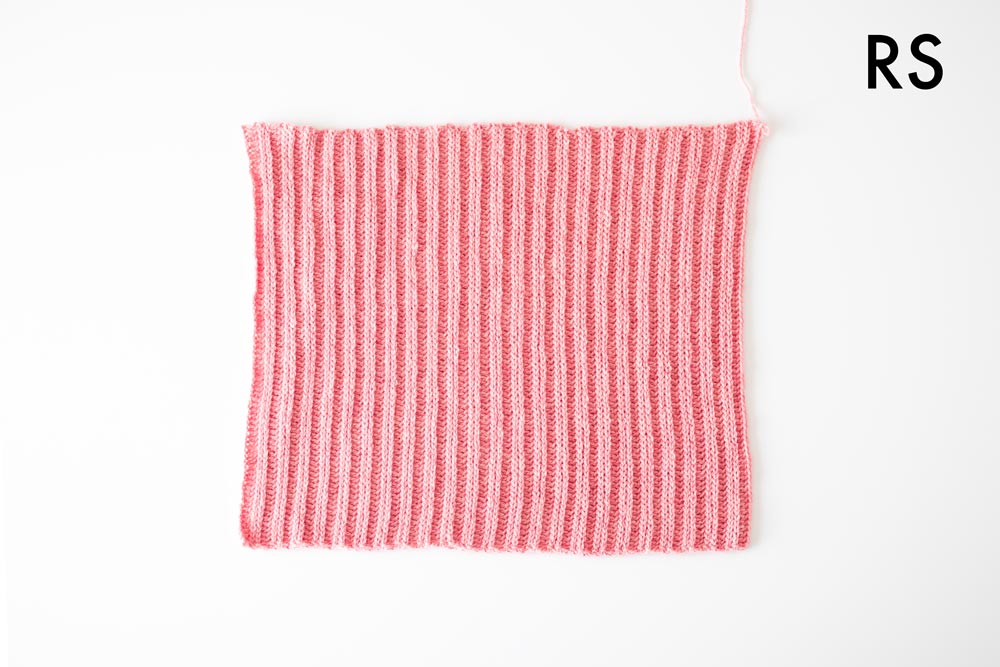
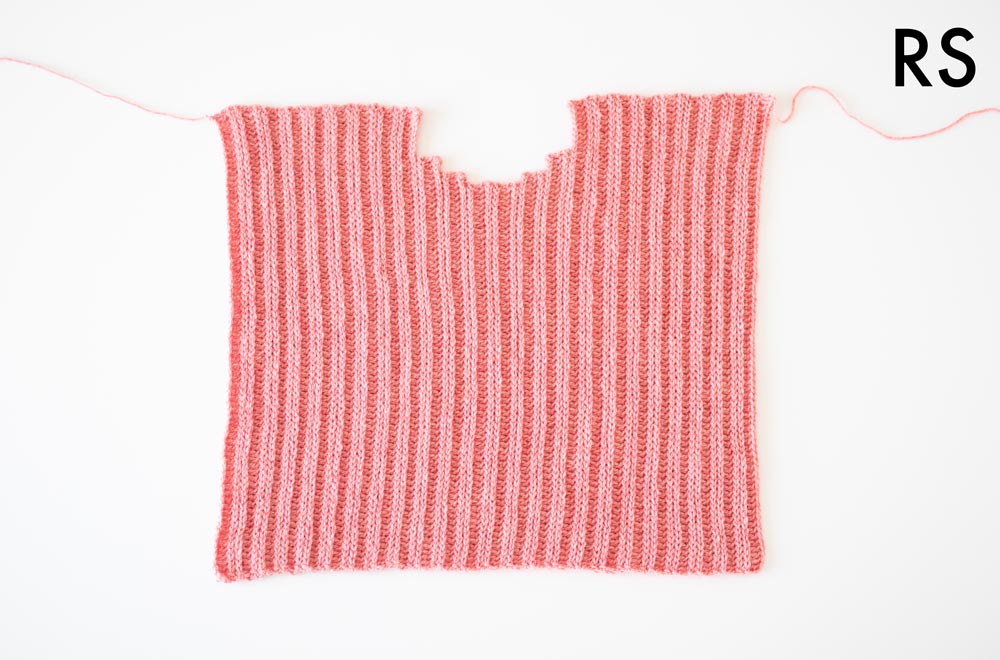
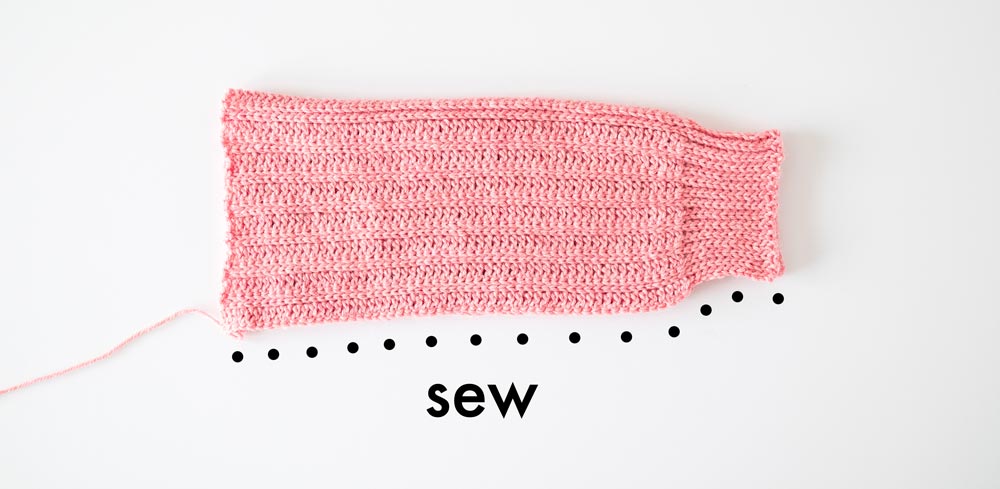
This ribbed sweater is crocheted in 4 panels – front, back and 2 sleeves and then the body and neckline ribbing are crocheted separately and sewn onto the sweater.
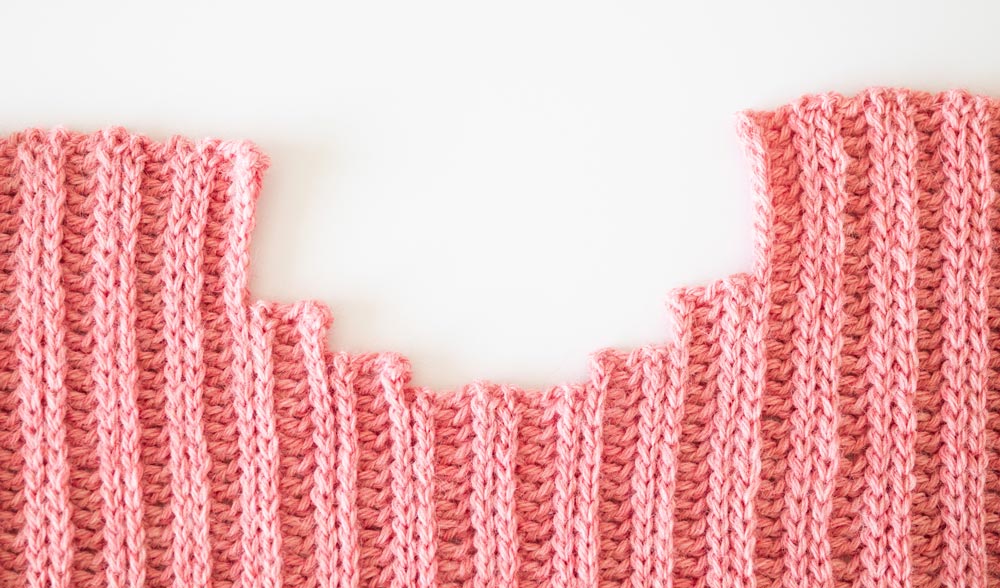
The sleeves and back panel all follow a simple 4 row repeat while the front panel has a few rows of shaping that will create the round neck. Since this crochet pullover is worked lengthways the neckline shaping will form ‘corners/bumps’ that look like steps (similar to the construction of the Sagebrush Tank Top) instead of forming a smooth ‘U’ shape.
It might seem a bit strange and look a bit funny but trust me! Once we sew on the neckline ribbing you won’t be able to see the bumps as they’ll be hidden on the inside of the sweater and you shouldn’t be able to feel them either 🙂
You’ll also notice in the photos some photos have the hemline ribbing while others don’t – I just wanted to show you how the sweater can look so different with or without the ribbing! Without the slip stitch ribbing, the Amalfi sweater is more cropped and the raw edge gives a more casual vibe. With the slip stitch ribbing, I think the sweater looks more ‘finished’ and cozy. It’s completely up to you to decide if you want to add the ribbing or not. 🙂
Looking for more free crochet patterns?
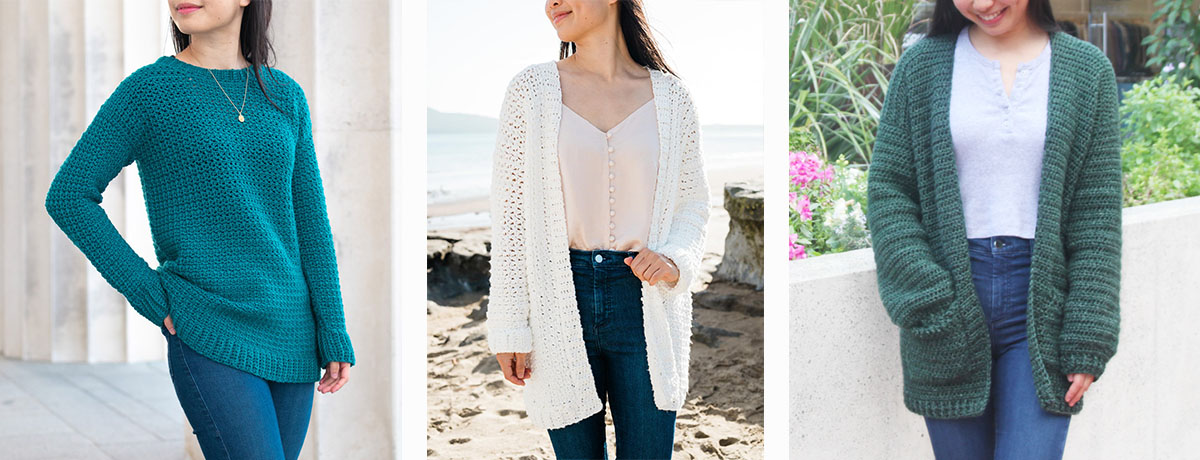
1. Weekend Snuggle Sweater / 2. In The Clouds Cardigan / 3. Briar Pocket Cardigan
Design Inspiration
The inspiration behind the Amalfi Sweater was simple – to create a ribbed sweater for fall that was super wearable and easy to layer! With crochet, we normally finished garments and hats off with back loop half double rochet ribbing or front and back post double crochet ribbing. While I absolutely love both of them, they both have very distinct looks and construction that didn’t quite match up with the look I was trying to create.
Back Loop Half Double Crochet is one of my all-time favourite stitches (For more projects with back loop HDC see the 1 Hour Beanie or Skylar Crop Top) and I love the modern knit-like look of it. However, with BLO HDC the stitch height is always the same so you can’t control the thickness of the ‘ribs’.
On the other hand, Front and Back Post Double Crochets (For projects that use post stitches check out the Brooklyn Sweater or Briar Cardigan!) can be worked widthways and you can create lots of different ribbing thicknesses and patterns! But post stitches can quickly become chunky (and use up a lot of yarn!) which isn’t ideal if you want to tuck in your sweater.
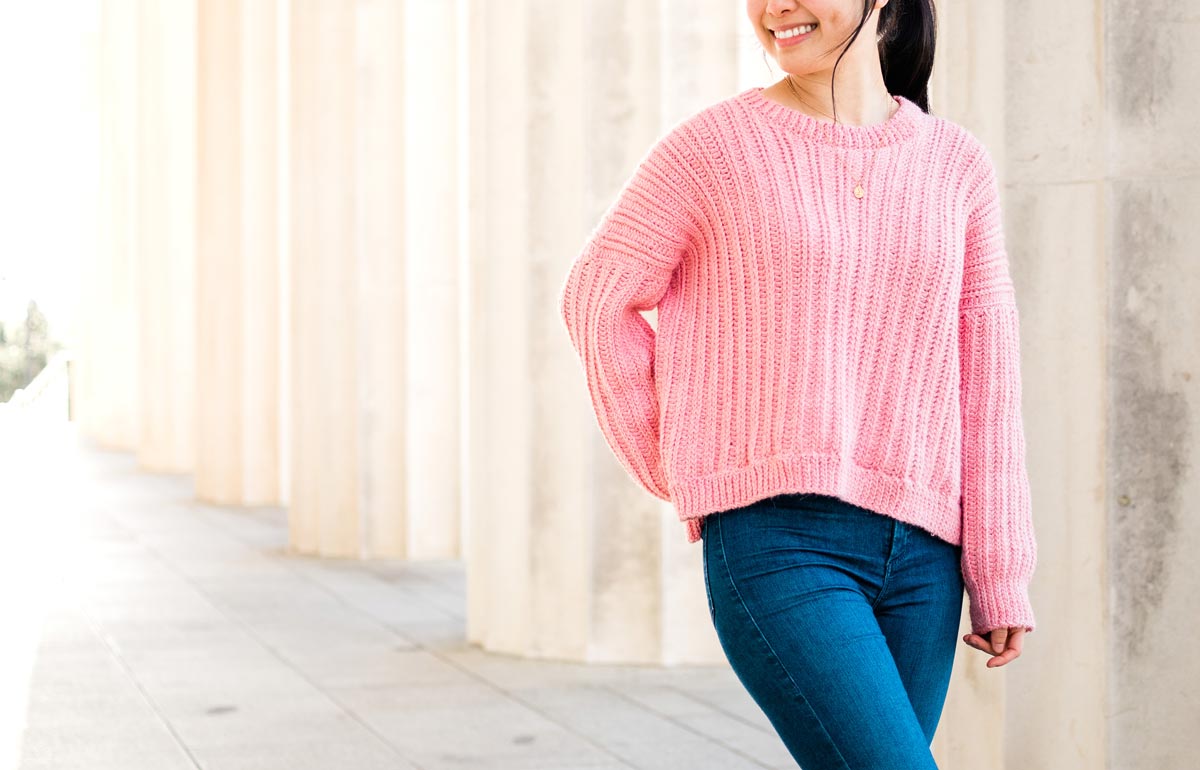
So, I put this idea on the back burner and until I discovered this combination of double crochets and slip stitches 🙂 The thick chunky ribs along with the boxy, oversized body and sleeves give off all the fall sweater vibes and I think this will be a sweater you can wear year after year – it will never go out of style!
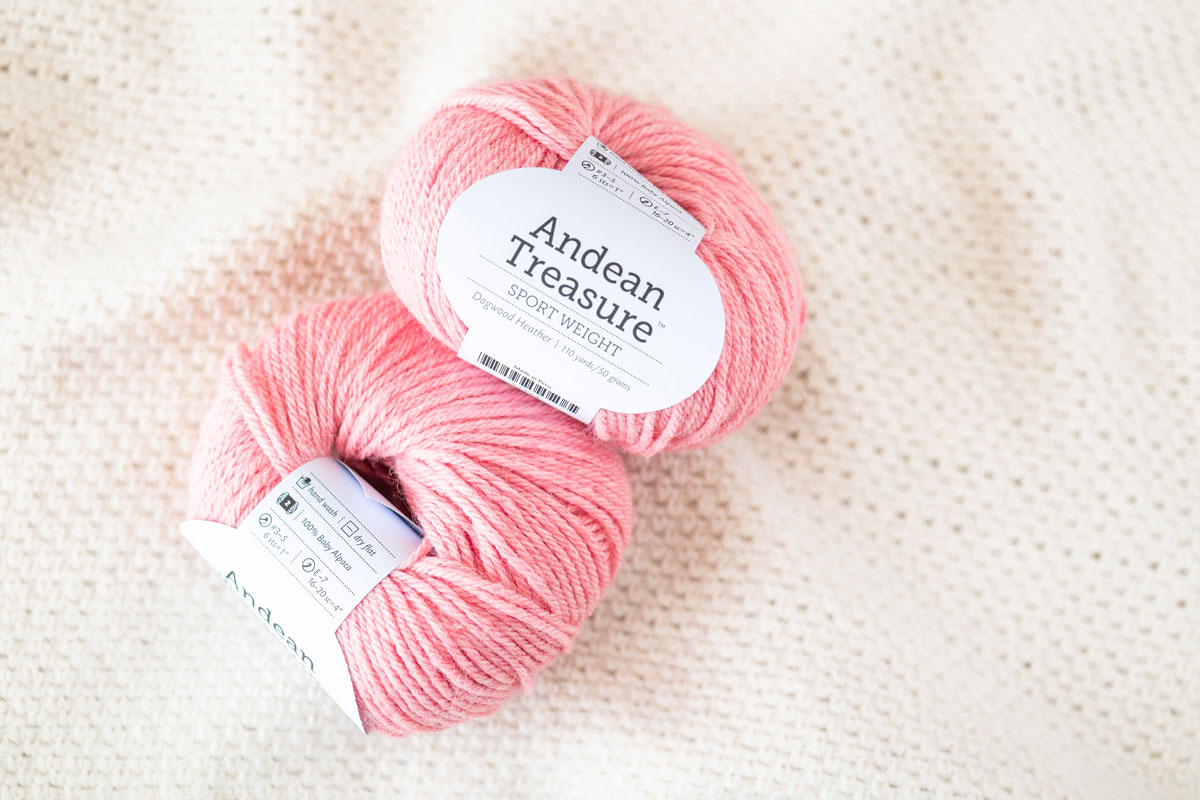
This bright coral pink shade of this sweater is quite different to my normal colour palette but I just fell in love with this yarn. It reminds me of Italy in the summer - it will be so wonderful when it’s safe to travel again! On the Amalfi Coast, during golden hour the sun shines on all of the pink bougainvillea and it’s like they are glowing from within. Normally I find naming patterns quite difficult but this name just popped to mind!
Yarn
The Amalfi Ribbed Sweater uses WeCrochet’s Andean Treasure which is a luscious 100% Baby Alpaca yarn that is so incredibly SOFT. It also has a loose-ish twist and is very squishy so it has incredible drape. There are over 20 shades and every colour is heathered meaning that the base coloured is mixed with another neutral yarn which creates subtle speckled effect in the yarn. The shade used in the sample sweater is Dogwood Heather which is a gorgeous blend of peach, pink, salmon and white!
However, this has the be the hardest colour I’ve ever photographed! You’ll notice in some photos it looks pinker while in others the sweater looks more coral and you might be wondering which is more accurate to real life but the answer is both!
This shade is one of those colours that looks different depending on what you’re wearing with it and weather. I’d say in person the colour looks more muted (it’s definitely still a bright, not a pastel shade though!) but once the sun shines on the yarn it looks more neon and bold like in the photos.
Also, Andean Heather is classified as a sport/fine(2) yarn but in my opinion it’s a lot thicker than a typical sport yarn. In fact, it’s thicker than WeCrochet’s Alpaca Cloud (used with the Aria Button cardigan) which is classified as a DK/Light (3)!
I’d say that Andean Heather is a thick DK yarn or very thin Worsted yarn. So if you’re looking for substitutes look for a DK yarn and make sure that you crochet a gauge swatch before you start your project!
Tips to crochet knit-look stitches
The secret to crocheting garments that look almost ✨store bought✨ is all in the stitch choice! For the Amalfi Sweater, the stitch texture is the hero of this design and it's what elevates this simple boxy silhouette.
To crochet the knit-look stitch we will be working lengthways - this means the foundation chain runs the length of your crochet project, not the width! The construction is very important because it means that you can't change the length of the project as you crochet. So make sure to crochet a gauge swatch beforehand and check your meeasurements!
To crochet this stitch easily (and quicker!) make sure that your slip stitches aren't too tight. In fact it's even better if they are on the loose side. This will make is so much each to work the next row of stitches into the back loops.
If your stitches are still too tight/difficult to work through you might need to change your hook size. Chances are your hook is too small for the thickness of your yarn so size up your crochet hook!
Crochet offline and print off your pattern!
Tired of squinting at a tiny mobile screen? Do you prefer reading crochet patterns on paper?
You can purchase the ad-free pdf that is perfectly formatted for printing! This 19 page pdf contains all the step-by-step photos, video link and written instructions. It's also great option if you like taking notes or crossing out rows as you crochet so you don't loose your place 🙂

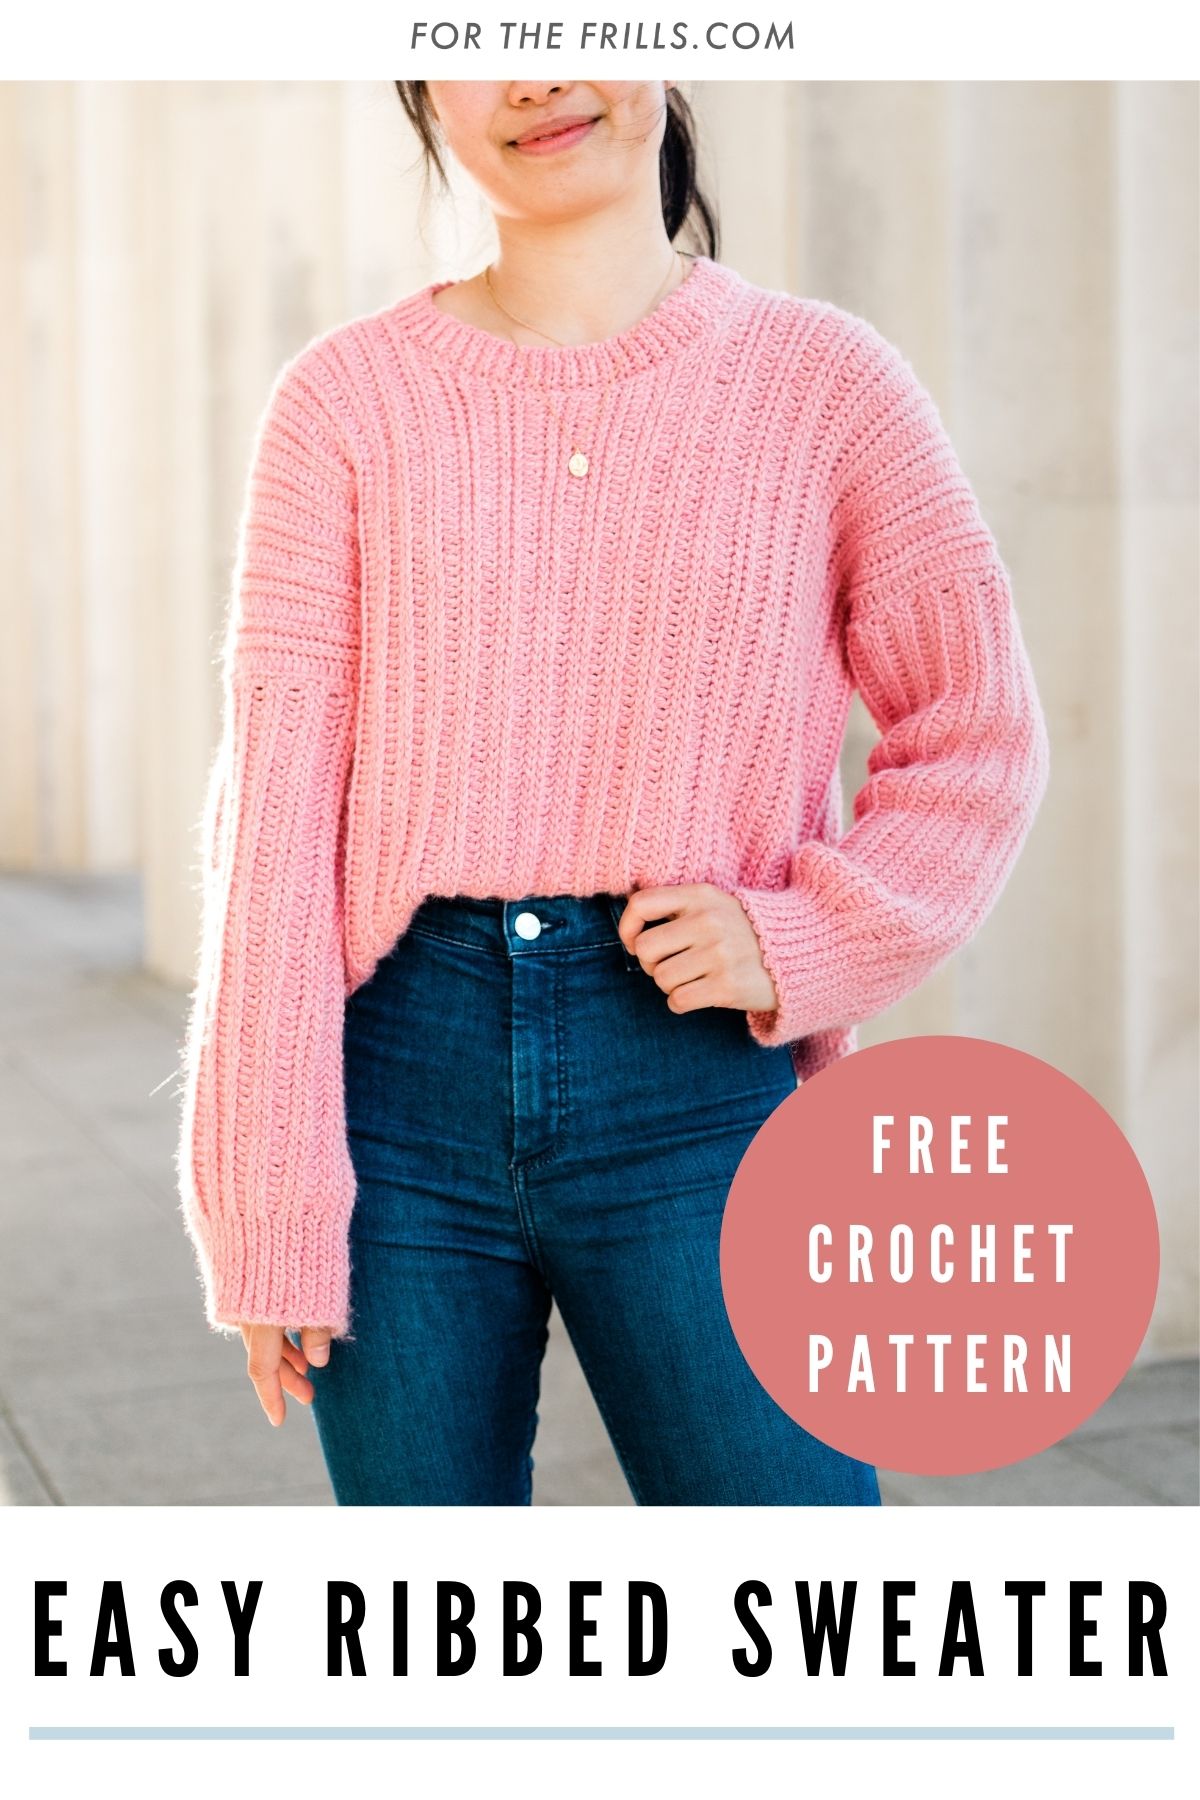
Pin me for later!
Video Tutorial
Ad-free, printable version of the Amalfi Sweater!
Add the Amalfi Sweater to your Ravelry queue!
*Sample is a size small shown on a 5’3” model with a 32” bust.
*The sizing guide follows size XS(S, M, L, XL)(2XL, 3XL, 4XL, 5XL). E.g. “Ch 78(78, 82, 82, 86)(86, 90, 90, 94) means Ch 78 for XS, Ch 78 for Small, Ch 82 for Medium, Ch 82 for Large, Ch 86 for XL, Ch 86 for 2XL, Ch 90 for 3XL, Ch 90 for 4XL and Ch 94 for 5XL.” If there is only one number, it applies to all sizes.
*”DC 10” means DC into the next 10 stitches.
*The turning chains, ch 1 and ch 2 do NOT count as a stitch.
*Total stitches are indicated between < >.
*This pattern uses US crochet terms.
*The sample sweater uses WeCrochet Andean Treasure which is classified as a Sport/Fine(2) yarn. However, if you want to substitute this yarn, it’s closer to a thick DK/Light(3) or a very thin Worsted/Medium(4).
*The majority of this crochet sweater follows a 4-row repeat comprising of 2 different types of rows which are referred to as BASE DC row and BASE SL ST row.
*The sleeves, back and front panels are worked from side to side, so the foundation chain runs the length of the sleeve/sweater. To make your sweater shorter/longer, remove/add chains just keep in mind you’ll require less/more yarn.
*All pieces are sewn together with the RS on the inside and the WS facing outwards.
*Yarn amounts and measurements include the sweater + hemline ribbing.
LEVEL: Easy

Materials
Yarn – WeCrochet Andean Treasure – Sport / Fine (2), 100m/50g, 110yds/1.75oz, 100% Baby Alpaca, Dogwood Heather
approx. 535(585, 635, 695, 765)(820, 900, 960, 1005)g
Stitches & Abbreviations
Ch = Chain
Sl st = Slip Stitch
DC = Double Crochet
BLO = Back Loop
St(s) = Stitch(es)
Rep = Repeat
Sk = Skip
RS = Right Side
WS = Wrong Side
Measurements
*Measurements taken from the garment lying flat. This sweater is oversized and VERY stretchy. Choose your normal t-shirt size for an oversized fit (as pictured). If you are in between sizes, size down.
*Sweater width will stretch out by 3-5cm / 1-2” after being worn a few times.
Measurements cm:
To fit Bust: 71(81, 91, 101, 112)(122, 132, 142, 152)
Back Width: 48(52, 57, 61, 66)(70, 75, 79, 83)
Armhole: 15(16, 16, 18, 19)(20, 21, 23, 24)
Sleeve length: 38(39, 39, 40, 40)(42, 42, 43, 43)
Length(with ribbing): 51(51, 53, 53, 56)(56, 58, 58, 61)
Measurements inches:
To fit Bust: 28(32, 36, 40, 44)(48, 52, 56, 60)
Back Width: 19(20.5, 22.5, 24, 26)(27.5, 29.5, 31, 33)
Armhole: 6(6.5, 6.5, 7, 7.5)(8, 8.5, 9, 9.5)
Sleeve length: 15(15.5, 15.5, 16, 16)(16.5, 16.5, 17, 17)
Length(with ribbing): 20(20, 21, 21, 22)(22, 23, 23, 24)
GAUGE: 10cm/4” square = 16.5 stitches wide x 21 rows tall (5 DC rows + 16 sl sts rows) in Knit-Look Rib Stitch pattern
Knit-Look Rib Crochet Stitch Pattern
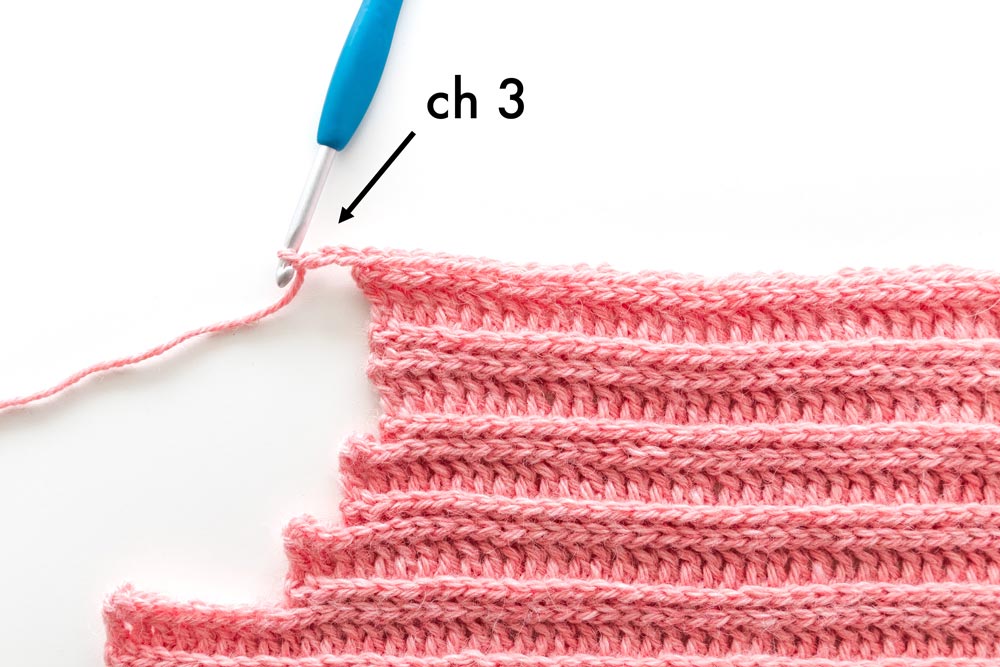
FOUNDATION CHAIN: Ch any number of stitches.
ROW 1(RS): DC into 3rd ch from hook, DC in each st until end, turn.
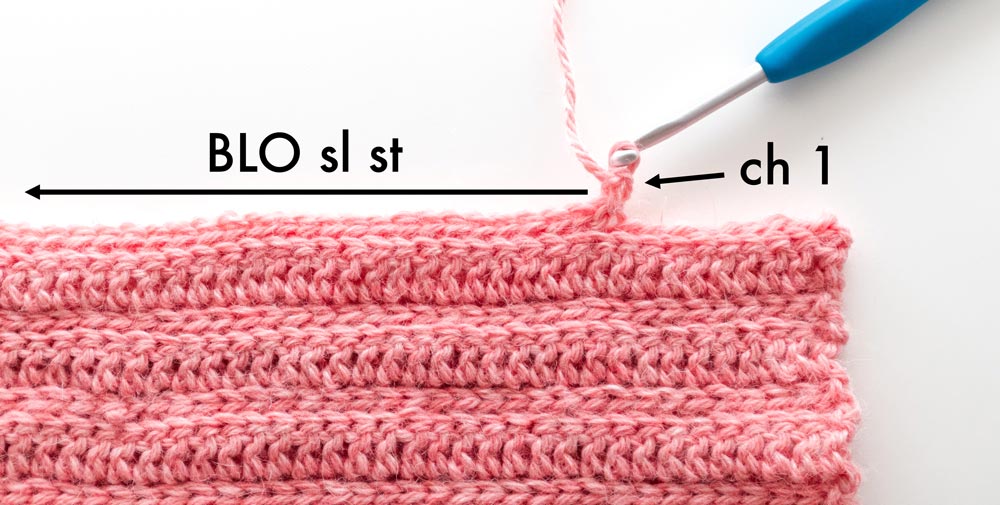
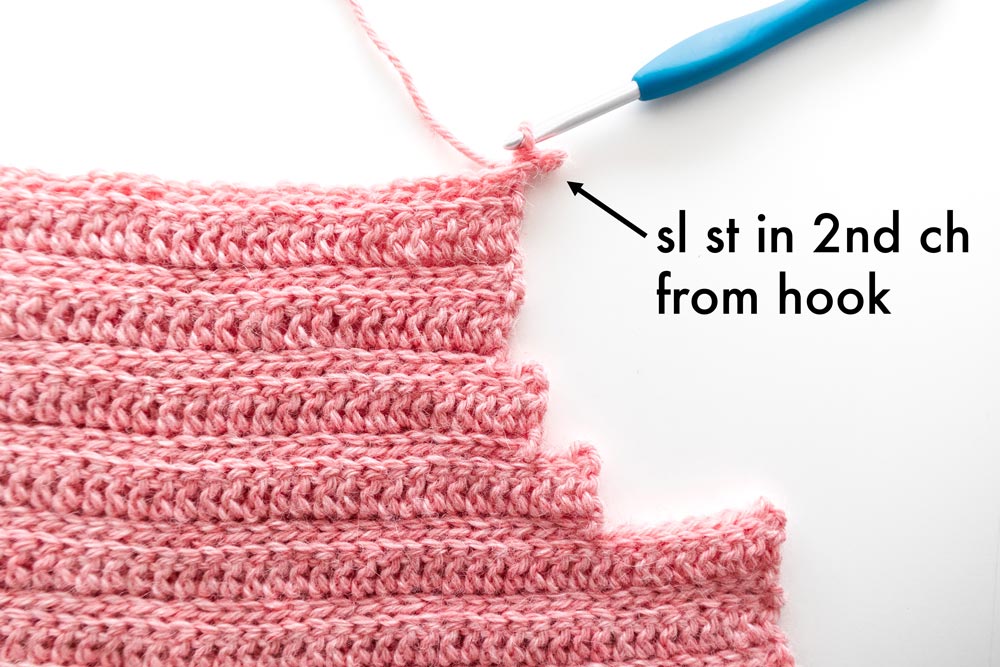
ROWS 2 – 4 (BASE SL ST ROW): Ch 1, BLO sl st across, sl st in last st, turn.
ROW 5 (BASE DC ROW): Ch 2, BLO DC across, DC in last st, turn.
Repeat ROWS 2 – 5 until you reach your desired length.
Amalfi Ribbed Sweater Crochet Pattern
Back Panel
FOUNDATION CHAIN: Ch 78(78, 82, 82, 86)(86, 90, 90, 94).
ROW 1 (RS): DC into 3rd ch from hook, DC in each st until end, turn.
<76(76, 80, 80, 84)(84, 88, 88, 92)>
ROWS 2 – 4 (BASE SL ST ROW): Ch 1, BLO sl st across, sl st in last st, turn.
<76(76, 80, 80, 84)(84, 88, 88, 92)>
ROW 5 (BASE DC ROW): Ch 2, BLO DC across, DC in last st, turn.
<76(76, 80, 80, 84)(84, 88, 88, 92)>
Repeat ROWS 2 – 5 until ROW 85(93, 101, 109, 117)(125, 133, 141, 149).<76(76, 80, 80, 84)(84, 88, 88, 92)>
Fasten off.
Front Panel
FOUNDATION CHAIN: Ch 78(78, 82, 82, 86)(86, 90, 90, 94).
ROW 1 (RS): DC into 3rd ch from hook, DC in each st until end, turn.
<76(76, 80, 80, 84)(84, 88, 88, 92)>
ROWS 2 – 4: As BASE SL ST row.
ROW 5: As BASE DC row.
Repeat ROWS 2 – 5 until ROW 30(34, 38, 42, 46)(50, 54, 58, 62).
*Final row should be a BASE SL ST ROW.
Don’t fasten off! Proceed directly to ‘NECKLINE SHAPING INSTRUCTIONS’.
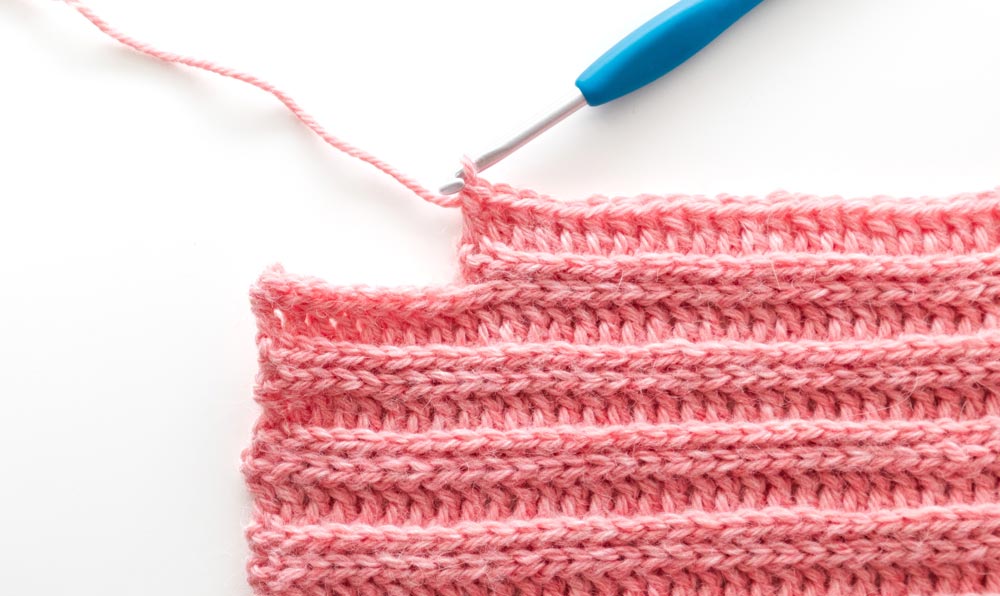
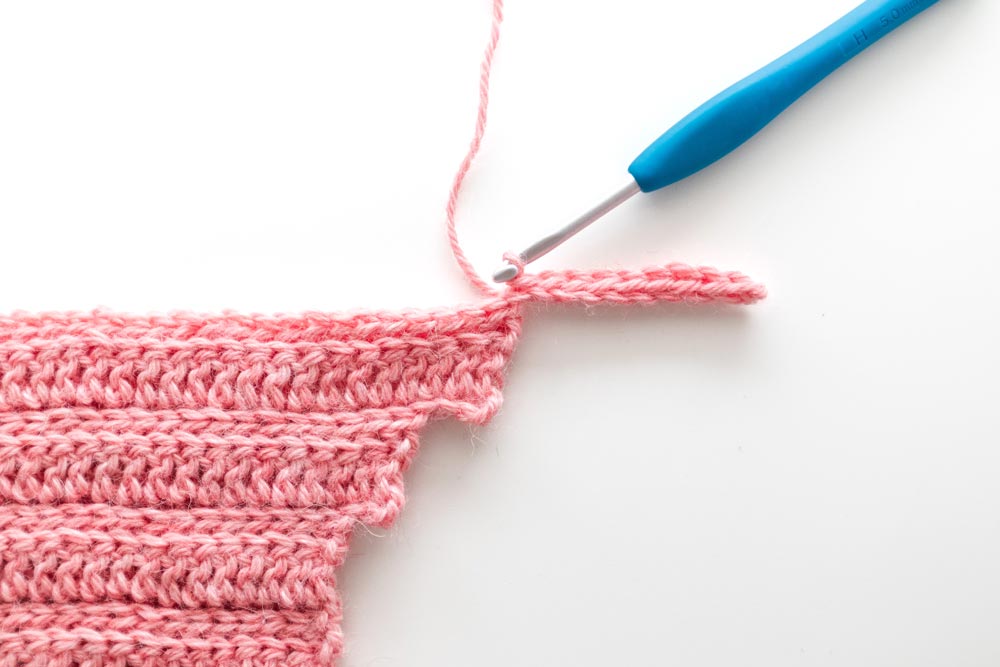
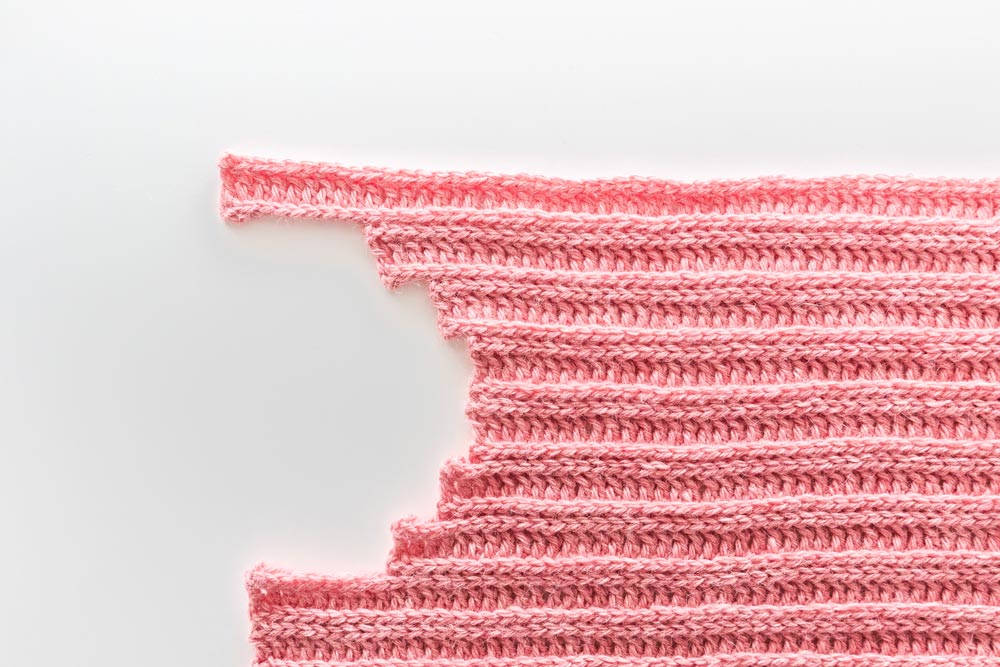
NECKLINE SHAPING
*Decreasing and increasing the neckline will create ‘steps’ along the edge of the sweater. The corners will be hidden once we sew on the neckline ribbing.
NECKLINE DECREASE
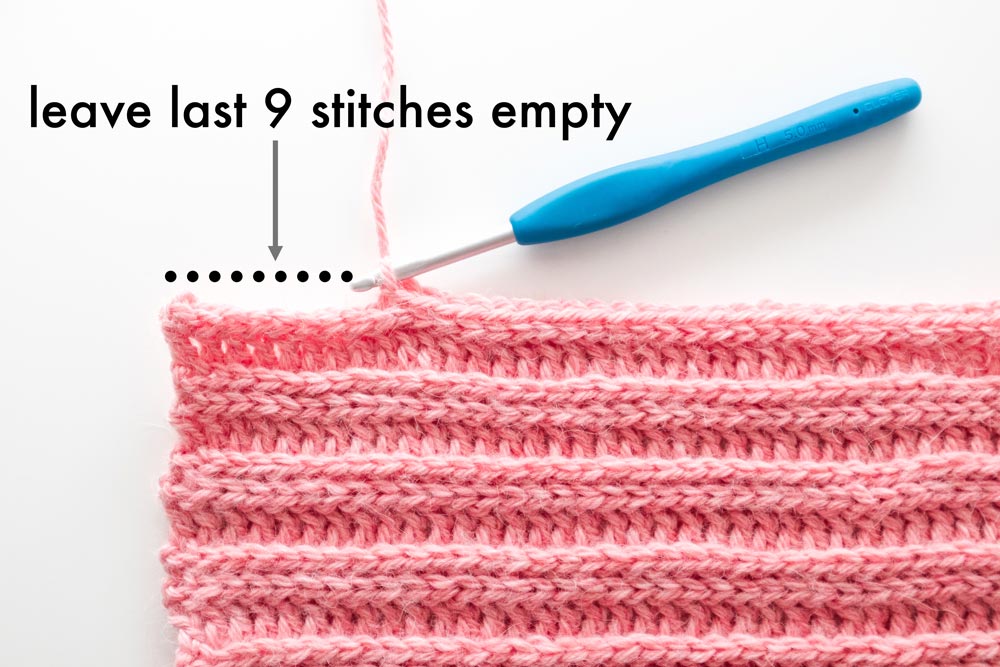
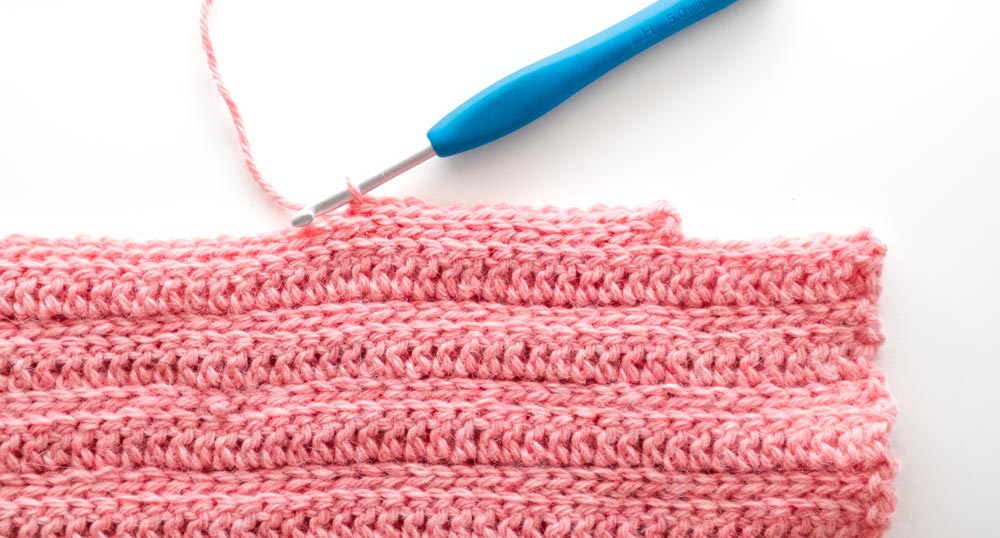
ROW 1: Ch 1, BLO sl st until you have 9 sts left, turn.
<67(67, 71, 71, 75)(75, 79, 79, 83)>
<Total Rows: 31(35, 39, 43, 47)(51, 55, 59, 63)>
ROW 2: As BASE SL ST row.
<Total Rows: 32(36, 40, 44, 48)(52, 56, 60, 64)>
ROW 3: As BASE DC row.
<Total Rows: 33(37, 41, 45, 49)(53, 57, 61, 65)>
ROW 4: As BASE SL ST row.
<Total Rows: 34(38, 42, 46, 50)(54, 58, 62, 66)>
ROW 5: Ch 1, BLO sl st until you have 3 sts left, turn.
<64(64, 68, 68, 72)(72, 76, 76, 80)>
<Total Rows: 35(39, 43, 47, 51)(55, 59, 63, 67)>
ROW 6: As BASE SL ST row.
<Total Rows: 36(40, 44, 48, 52)(56, 60, 64, 68)>
ROW 7: As BASE DC row.
<Total Rows: 37(41, 45, 49, 53)(57, 61, 65, 69)>
ROW 8: As BASE SL ST row.
<Total Rows: 38(42, 46, 50, 54)(58, 62, 66, 70)>
ROW 9: Ch 1, BLO sl st until you have 2 sts left, turn.
<62(62, 66, 66, 70)(70, 74, 74, 78)>
<Total Rows: 39(43, 47, 51, 55)(59, 63, 67, 71)>
ROW 10: As BASE SL ST row.
<Total Rows: 40(44, 48, 52, 56)(60, 64, 68, 72)>
ROW 11: As BASE DC row.
<Total Rows: 41(45, 49, 53, 57)(61, 65, 69, 73)>
ROWS 12 - 14: As BASE SL ST row.
<62(62, 66, 66, 70)(70, 74, 74, 78)>
<Total Rows: 42-44(46-48, 50-52, 54-56, 58-60)(62-64, 66-68, 70-72, 74-76)>
ROW 15: As BASE DC row.
<62(62, 66, 66, 70)(70, 74, 74, 78)>
<Total Rows: 45(49, 53, 57, 61)(65, 69, 73, 77)>

ROW 16: As BASE SL ST row.
<62(62, 66, 66, 70)(70, 74, 74, 78)>
<Total Rows: 46(50, 54, 58, 62)(66, 70, 74, 78)>
NECKLINE INCREASE
ROW 17: Ch 1, BLO sl st across, sl st in last st, ch 3, turn.
<62(62, 66, 66, 70)(70, 74, 74, 78) + 3 chs>
<Total Rows: 47(51, 55, 59, 63)(67, 71, 75, 79)>
ROW 18: Sl st into 2nd ch from hook, sl st in next ch, BLO sl st in each st until last st, sl st in last st, turn.
<64(64, 68, 68, 72)(72, 76, 76, 80)>
<Total Rows: 48(52, 56, 60, 64)(68, 72, 76, 80)>
ROW 19: As BASE DC row.
<Total Rows: 49(53, 57, 61, 65)(69, 73, 77, 81)>
ROW 20: As BASE SL ST row.
<Total Rows: 50(54, 58, 62, 66)(70, 74, 78, 82)>
ROW 21: Ch 1, BLO sl st across, sl st in last st, ch 4, turn.
<64(64, 68, 68, 72)(72, 76, 76, 80) + 4 chs>
<Total Rows: 51(55, 59, 63, 67)(71, 75, 79, 83)>
ROW 22: Sl st into 2nd ch from hook, sl st in each ch, BLO sl st in each st until last st, sl st in last st, turn.
<67(67, 71, 71, 75)(75, 79, 79, 83)>
<Total Rows: 52(56, 60, 64, 68)(72, 76, 80, 84)>
ROW 23: As BASE DC row.
<Total Rows: 53(57, 61, 65, 69)(73, 77, 81, 85)>
ROW 24: As BASE SL ST row.
<Total Rows: 54(58, 62, 66, 70)(74, 78, 82, 86)>
ROW 25: Ch 1, BLO sl st across, sl st in last st, ch 10, turn.
<67(67, 71, 71, 75)(75, 79, 79, 83) + 10 chs>
<Total Rows: 55(59, 63, 67, 71)(75, 79, 83, 87)>
ROW 26: Sl st into 2nd ch from hook, sl st in each ch, BLO sl st in each st until last st, sl st in last st, turn.
<76(76, 80, 80, 84)(84, 88, 88, 92)>
<Total Rows: 56(60, 64, 68, 72)(76, 80, 84, 88)>
ROW 27: As BASE DC row.
<Total Rows: 57(61, 65, 69, 73)(77, 81, 85, 89)>
Don’t fasten off! Proceed to ‘FRONT PANEL CONTINUED’ instructions.
Front Panel Continued.
Repeat FRONT PANEL ROWS 2 – 5 until ROW 85(93, 101, 109, 117)(125, 133, 141, 149).
<76(76, 80, 80, 84)(84, 88, 88, 92)>
Fasten off.
Sleeves
*Make 2
FOUNDATION CHAIN: Ch 67(69, 69, 71, 71)(73, 73, 75, 75).
*The foundation chain runs the length of the sleeve, not the width.
ROW 1 (RS): Sl st into 2nd ch from hook, sl st 11, DC in each ch until end, turn.
<66(68, 68, 70, 70)(72, 72, 74, 74)>
ROWS 2 – 4: As BASE SL ST row.
<66(68, 68, 70, 70)(72, 72, 74, 74)>
ROW 5: Ch 1, BLO sl st 12, BLO DC across, DC in last st, turn.
<66(68, 68, 70, 70)(72, 72, 74, 74)>
Repeat ROWS 2 – 5 until ROW 53(57, 57, 61, 65)(69, 73, 77, 81).
<66(68, 68, 70, 70)(72, 72, 74, 74)>
Fasten off.
Fold sleeve in half lengthways. Whip stitch the edges of the sleeve together.
Assembly
Lay the front panel on top of the back panel.
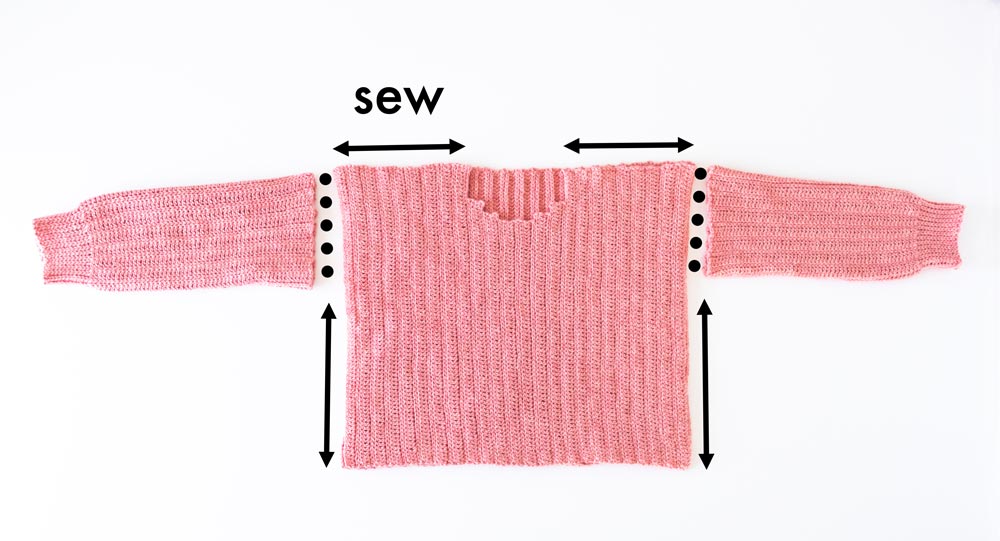
Whip stitch the shoulder seams together.
*For a neat finish and smooth seams, make sure that the ribbing matches on the RS of the sweater and place whip stitches into the centre of the DCs, rather than wrapping around the entire stitch.

Whip stitch up the sides of body panels together, leaving a gap for the sleeves.
*When sewing along the body portion, I find that picking up the back loops of the stitches give a more ‘seamless’ look.
Whip stitch top of sleeves to arm holes.
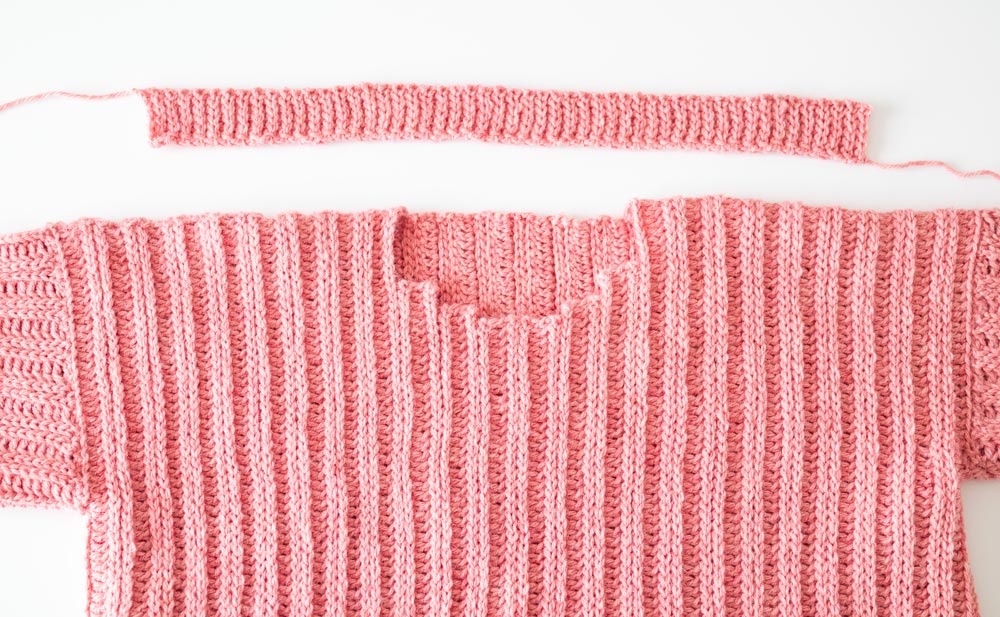
Neckline Ribbing
FOUNDATION CHAIN: Ch 7.
*The foundation chain runs the length of the ribbing, not the width.
ROW 1: Sl st into 2nd ch from hook, sl st in each ch until end, turn.
<6>
ROW 2: Ch 1, BLO sl st across, sl st in last st, turn.
<6>
Repeat ROW 2 until ribbing can fit around the head opening (approx. 41cm / 16”).
*The ribbing is EXTREMELY stretchy so it’s better to crochet ribbing that is a bit smaller (approx. 1-2cm /0.5-1”) than the head opening. The ribbing will stretch to fit and lay flat after you’ve worn it a few times. If you have too much ribbing, the neckline will ruffle and not lay flat.
Fasten off.
Body Ribbing
FOUNDATION CHAIN: Ch 9.
*The foundation chain runs the length of the ribbing, not the width.
ROW 1: Sl st into 2nd ch from hook, sl st in each ch until end, turn.
<8>
ROW 2: Ch 1, BLO sl st across, sl st in last st, turn.
<8>
Repeat ROW 2 until ribbing equals the width of the back and front panel.
Fasten off.
Finishing
Pin neckline ribbing to neckline opening, focusing on creating a smooth curve / round neckline.
*The corners of the ‘steps’ will protrude from the edge of the ribbing, this is ok as we’ll sew over them.
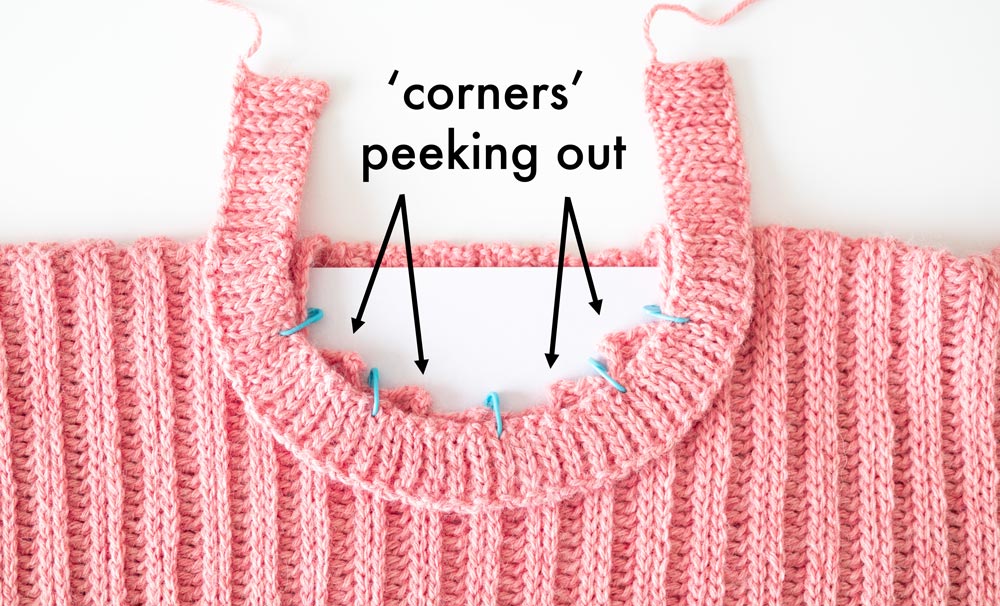
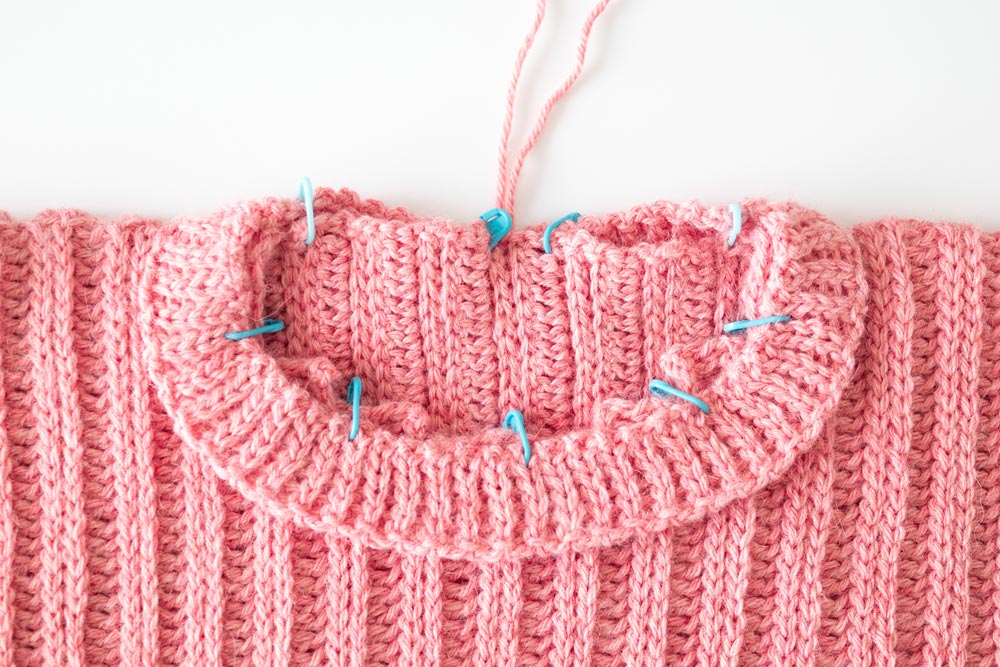
Whip stitch neckline ribbing to head opening, taking care to sew over the ‘corners’.
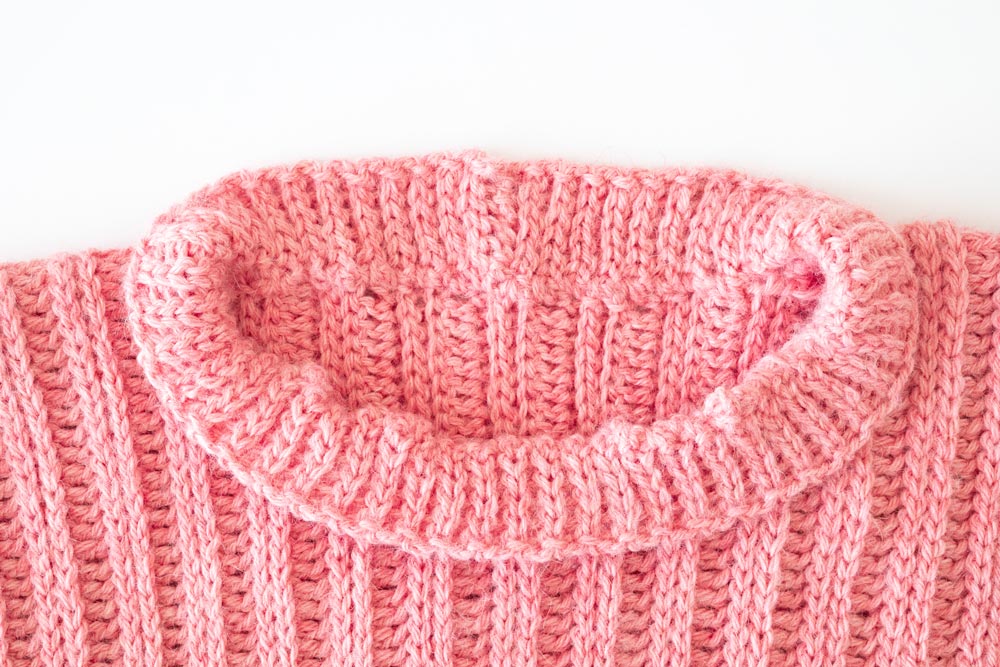
*After you’ve sewn over the corners they should resemble small ‘bumps’.
*The bumps will not be visible when wearing the sweater nor should you be able to feel them 🙂
Sew edges of neckline ribbing together.

Whip stitch hemline ribbing to hem of body and sew the edges of the ribbing together.
Weave in all of your ends.
Voilà! You’ve finished your Amalfi Ribbed Sweater 🙂
Beautiful!
Grace it looks fantastic on you! After I’m done with Christmas presents I’ll give it a try.
What loop(s) do you go into for your DC?
Both of the top loops or just one?
Hi Jessica,
As stated in the pattern, I'm working in the back loops (apart from the last stitch of each row).
Grace 🙂
Omg I misread and Back looped double crochet the last stitch instead of regular double crochet on the last stitches of the rows. Already finished the back panel doing this, will this affect my ability to finish? Thanks for your amazing patterns!
Hi Becky,
Your edges will just be looser and not as neat as the sample sweater but it you're adding the ribbing it shouldn't be a problem!
Grace
Thanks so much Grace! Appreciate you for responding, can’t wait to see the finished product! Thanks for this pattern 🙂
Hi! Thanks so much for all your great patterns, I really like this one.
I’m working on the back panel and for some reason, my crochets are taller - I have 16 rows (4 dc rows and 12 sl st rows) on 10 cm. The width is the same as your pattern. Just finished row 73 and it measures 49 cm in width. I want to make a size small, so I’m supposed to crochet 85 rows. But then the sweater will be too big. I figure I’ll just make fewer rows and make it fit with the measurements? But I’m not sure how to make the front panel with the neckline de- and increase? I will make 77 rows in total. Should I then still use 23 rows for the neckline? And then make 26 rows before starting the neckline? Row 26 will be a sl st row, as it says the last row should be. And then make 29 rows after the neckline so I will end front panel with a dc row? That will be 78 rows in total for front panel though. I’m so confused😅 hope you can give me a bit of guidance.
Hi Mette,
It sounds like you don't quite have the same gauge as the pattern? For this pattern it's really important to meet gauge so you can follow the pattern as is! Unfortunately if your gauge is off you'd need to completely rewrite the pattern as the neckline needs an exact number of rows (the amount the in the pattern) to work and sit properly on the body! For this pattern, I'd recommend re-starting this pattern with the correct gauge sorry!
Grace
Hi Grace,
I tried making the gauge swatch with 3 different types of yarn with different hook sizes and still cannot seem to get the row gauge. The Andean Treasure yarn is beautiful but out of my budget 🙁 Do you have a yarn substitute you think would work well for this pattern?
Thank you,
Wendy
Hi Wendy,
A yarn like Lion Brand Jeans would probably work well with this pattern 🙂
Grace
Hi Grace,
This is a beautiful pattern! I am thinking of making it using Caron Simply soft , which feels like a thinner worsted yarn, but I'm still new to crochet so I am not 100% sure. Do you think it would be a good substitute for the yarn used here? If not, could you suggest if I can modify the pattern to work with this yarn.
Thanks,
Nitya .
Hi Nitya,
Sorry I've never used Caron Simply Soft but as long as your meet gauge you should be fine - so size up a hook if you need looser stitches or size down a hook size if you need tighter stitches.
Grace
May I know how many skeins you used ?
Hi Divya,
You can find all the yarn amounts under the 'materials' section.
Grace 🙂
Hello,
I didn´t understand very well how many yarns I need.
If you are using one of 50 and it says that you need aprox 535, that means I need 10 yarns?
Please could clarify this?
Thank you in advance
Hi Nathalie,
535/50 = 10.7, so you'd round up and get 11 skeins of yarn.
Grace
Thank you Grace!
if you're confused as to why there are multiple grams written- they correspond to the sizes above! there are nine sizes and nine different weights and they match together. if you have just enough yarn I would recommend to get extra as a precaution!
Hey there, thanks so much for this free pattern, I really appreciate it! Can you tell me how many yards of yarn I will need to purchase? I can’t figure that part out... Thanks!!
Hi Meg,
All the yarn amounts are under the 'Materials' section.
Grace 🙂
Thank you so much for this beautiful pattern! I just finished it, an adapted version for my 5 month old nephew for Christmas. My sister loves it and it came out great! I shared it with a crochet group I’m a part of and it got over 500 likes too! This was my first crocheted sweater ever and your pattern made it easily accessible. 🙂
Hi Angelissa,
Thank you for your kind words and I'm so glad you enjoyed the pattern 🙂 Congrats on finishing your first sweater!
Grace 🙂
Hello, Grace.
Thank you for sharing this beautiful pattern.
I'm almost done with my sweater but my neckline ribbing doesn't sit quite as nicely as the one in your pictures; it's standing up almost like a high-neck collar. Can it become normal after washing it or it's unfixable?
Thank you
Hi Maha,
The ribbing standing up is probably due to either 1. When sewing the collar to neckline your stitches were too tight but there isn't any space for the collar to 'relax' or 2. Your collar ribbing is too long and there's too much fabric for your neck opening. If you're using a yarn with a lot of drape and slouchiness you should be able to block your sweater and the collar should relax a bit if you're using a stiff yarn the only way to fix the collar would be to remove it and re sew or adjust the ribbing elngth.
I hope this helps,
Grace
The only way I can get gauge is with an 8 mm crochet hook is that normal? Because even though I got the gauge it looks a bit more“holey”than yours.
Hi Mariel,
It sounds like your yarn might be a bit too thin for this project! As stated in the pattern notes even though the sample yarn is classified as a sport/fine (2) it's really more of a thick DK/Light(3) or thin Worsted/ Medium (3) yarn.
I hope this helps,
Grace 🙂
Hi, I don't have access to the yarn you used, is there another brand of yarn that you think would be good for this sweater?
Hi,
As long as you meet gauge with a thick DK/Light (3) yarn you should be fine!
Grace 🙂
Oooh, this might be my next project. Do you think Feels Like Butta could work? I've never worked with the Andean Dream, is Feels Like Butta much bigger?
Hi Larsen,
Andean Dream is actually really thick for a fine (2) and feels like butta is really thin for a medium (4) so if you can meet gauge sure! Your sweater will look different to the sample though, since Andean Dream is 100% baby alpaca and Feels Like butta is polyester. With feels like butta, your sweater will probably have more structure and cleaner stitch definition - it wont be as slouchy as a baby alpaca sweater.
I hope this helps,
Grace 🙂
Hey! I was looking to make this but I am needing to find a cheaper yarn substitute. Do you think that drops baby alpaca silk or drops alpaca would work for this project? Any other yarn substitute suggestions are also welcome :3
Hi Rebecca,
As stated in the pattern even though Andean Dream is classified as a sport/fine (2) yarn - it is a lot thicker than that, closer to a thick DK or thin aran. I've used both of those drops yarns before so I think both would be too thin. If you're looking for a drops yarn I think Drops Puna will be the closet match and drops cotton merino has really great drape as well. Drops Lima or Drops Merino Extra Fine probably could also work, but they are more tightly spun so your sweater will have more structure and be less drapey the sample version.
I hope this helps,
Grace
Hi!
Great pattern, i'm currently working on the sleeves and i am so excited to see the finished work.
I have to ask you about the sizing, though.. I am usually a size M, but in front and back panel i have made XL (and its still a bit small for me) and for the sleeves i'm having 100 chains... So perhaps i'm making it tighter than you, but i'm trying my best to make them loose, so i don't quite understand.
kind regards
Sahra
I'm having this issue as well! It was way too small, and I'm using a 5mm hook with a worsted weight yarn. Should I go up a hook size? I'm also confused as to how you measured the gauge. Which way is the length and width, and how do you count the dc and sl st rib rows in that?
Hi Grace.
Thank you for this amazing pattern! This will be my first sweater, i am excited!
I am currently working in the sleeves, but i have 2 questions.
First i am confused about the sizing. I am usually a size M, but for the front and back panel i have made an XL, because it would be too small otherwise and it's still too short for me. Hopefully it will help when i make the bottom piece. But for the sleeves i have had to go completely outside the pattern and make 97 chains for the length to fit me. It might be because i am crocheting tighter than you, but i am really trying to make it as loose as possible.. So i am just wondering about your sizing?
And second, i can't seem to figure out how to make the whip stitch? Do you stitch through both loops or just one? And is it back loop or front loop, if just the one?
Thanks so much 😀
Sincerely Sahra
Hi Sahra,
It sounds like your gauge (how many stitches per 10cm/4") doesn't match the gauge listed in the pattern. If your gauge doesn't match the pattern you need to change either your yarn or hook size, otherwise your sweater won't match the pattern's measurements. For this sweater I whip stitched the sides of the sweater through the back loops (for a neater edge). Otherwise I inserted my needle in the middle of the stitches. You can watch the video tutorial for an in depth look at how I sew pieces together.
Grace
Hello Grace,
I was wondering if you can recommend some substitutes to 100% baby alpaca yarn since I can't find some around. Thanks!
Hi,
As long as you're using a yarn with a good amount of drape (so not too tightly spun and has a bit of stretch to it) and you can meet gauge you should be fine 🙂
Grace
Hi Grace! This pattern is absolutely gorgeous, and I’m already working on one for me and a gift for a family member 🙂 I wanted to ask what your policy on people selling completed sweaters made with your patterns is (with a link to your page of course!). This is by far my favorite sweater pattern I’ve encountered and it’s a lot of fun to work on!! Thank you so much!
Hi Em,
Sure you can sell finished handmade items from my patterns just please use your own photos and credit me (@forthefrills). Lovely to hear you're enjoying the pattern - isn't just so satisfying when you love the final result too? 🙂
Happy crocheting,
Grace 🙂
Hi Grace!
On the pattern for size small, it says I only need 585 grams of yarn, however, I'm still working on the back panel and I've already used 200 grams :/ I'm not using Andean Treasure because it's out of my price range, but I matched the gauge with Jubilee Bamboo worsted yarn which is 100 g per skein measuring out to around 98 m each, I'm not sure if I missed something and I'm worried I'll have to buy a ton of yarn and end up with a very heavy sweater...
Hi Emily,
If you use a different yarn (especially a different fibre) the amounts listed are just approximate! The body panels do use up a lot of yarn (almost twice the amount of the sleeves) but since you're using bamboo the sweater shouldn't be too heavy. I'd suggest crocheting the back panel and 1 sleeve, weigh them and then times that amount by about 2.25x that will give you the approximate amount you'll need with the yarn you're using.
I hope this helps,
Grace
Hi Grace -
I recently got this GORGEOUS yarn and was trying to find a pattern I could use it for. I saw this and it's so cute - but I'm not sure I have enough skeins (I'm pretty new and I admittedly was a little confused by the g/yd measurements when I looked at the materials section). My yarn is 150 g / 230 yd per skein (80% polymid and 20% viscose) and I have 2 (there's no way to get more of this specific yarn). I'd probs be a M or L - can you please help me figure out if I'd need to get more yarn somehow? Or tell me if it won't work and I should find something else? This pattern is just so cute...and I believe it should be the same gage (it says its a US#8 knitting needle and I found a conversion chart and it's 5mm needle exactly).
Thanks,
Olivia
Hi Grace!
I actually lost my yarn needle and haven't gotten to replacing it, would slip stitching the seams together well?
*work well
Can I use 3ply yarns .?????
I going to make size m and I have yarnthe grams of one skien is 100gm and 133m
Pls tell me what skiens should I have
From france
I want to do it XXS but don't know what to do. May I ask for a little help please?
Hi! Im having a small problem. It seems to be more cropped than i would have liked. Is there a way to make it longer without it looking weird?
Same here.. maybe we need to just make a bunch of sc rows to add onto the bottom. —could look artsy & not weird?
Hi Grace,
thank you so much for this amazing pattern! I am working on the sweater as a christmas gift but am still struggling with the gauge. Starting the first row with DC, then continuing with 3 rows of SL ST it is never possible to achieve 5 rows of DC and 16 rows SL ST (as stated in the guage), as the DC would make the 1st, 5th, 9th, 13th and 17th row and the last SL ST row would be row 20 (with a total of 15 SL ST). Did I not understand the gauge correctly or might there be a typo?
Thank you very much for your clarification.
Best,
Melanie
Hi! I was wondering if you block your projects before taking final measurements? Thanks so much! I'm making my sweater with hobbii Divina!
hi,
I will try to make this jumper but I've question abourt yarns.
You say Drops Lima could work but for this yarn a hook 4 is recommanded and the gauge is not the same that yours.
If I choose this one will I have to make adjustments?
Best
I just finished mine! The pattern is so cute! I redid the bottom about 3 times and finally just settled on slip stitching all the way across and it came out amazing! I am going to wear it to my first date tomorrow and it is the perfect outfit. Thank you so much for the pattern!
Hi! Do you have any good recommendations for some sort of a cotton BLEND yarn I could use for this sweater? Of course I still want it to be somewhat drapey! Thanks!
Hi Grace,
I am planning on making this sweater with some of the yarn in my stash, and I was wondering if Lion Brand 24/7 yarn might be a good substitute for the Andean treasure yarn. I know the drape and feel won’t be as good, but I’m wondering if they are around the same weight. The 24/7 cotton yarn is 100% cotton weight 4 yarn, but it’s a lot lighter than some other worsted weights I have worked with. Thanks,
Muriel
Hi! I love this pattern but I want to widen the neckline. Would I just start the decreases earlier and then do extra rows in the middle? And then make a longer neck ribbing piece?
Thanks!
The explanation under Gauge, is it how I should crochet to measure my swatch?
I am using Caron Cotton Cakes.
Gauge problem: my dc count of 16.5 stitches is shorter, but my pattern rows are longer, & it seems whichever hook I use, this occurs. Currently I’m using side H crochet hook, & my 16.5 dcs are only 3” long, not 4”. & my 21 rows are 4.5” inches tall/wide. If I decrease my hook size, the (16.5) stitches will be even smaller/shorter. If I increase the hook, my rows would be wider/taller than they already are. What should I do to make this work?
Hello, this is a lovely pattern but for some reason my back panel is slanting. I have the correct number of stitches but it seems to be shifting as I continue with rows instead of the top and bottom remaining straight. Any ideas why this is happening and how to fix it?
This pattern is so lovely, and I'm excited to start it! I'm making this for a friend who wears an XL normally and wants this to be a little tighter/more cropped. Is there an easy conversion between oversize/to size? Like should I use the Large or Medium size pattern so that it fits her "to size"?
Finished this pattern! I used Big Twist yarn. It turned out great, but had to make some changes to the pattern, I used half double stitch instead out double stitch. I ended up using 1200 yards of yarn.
How can I achieve 38" to fit bust while having 19" back width?