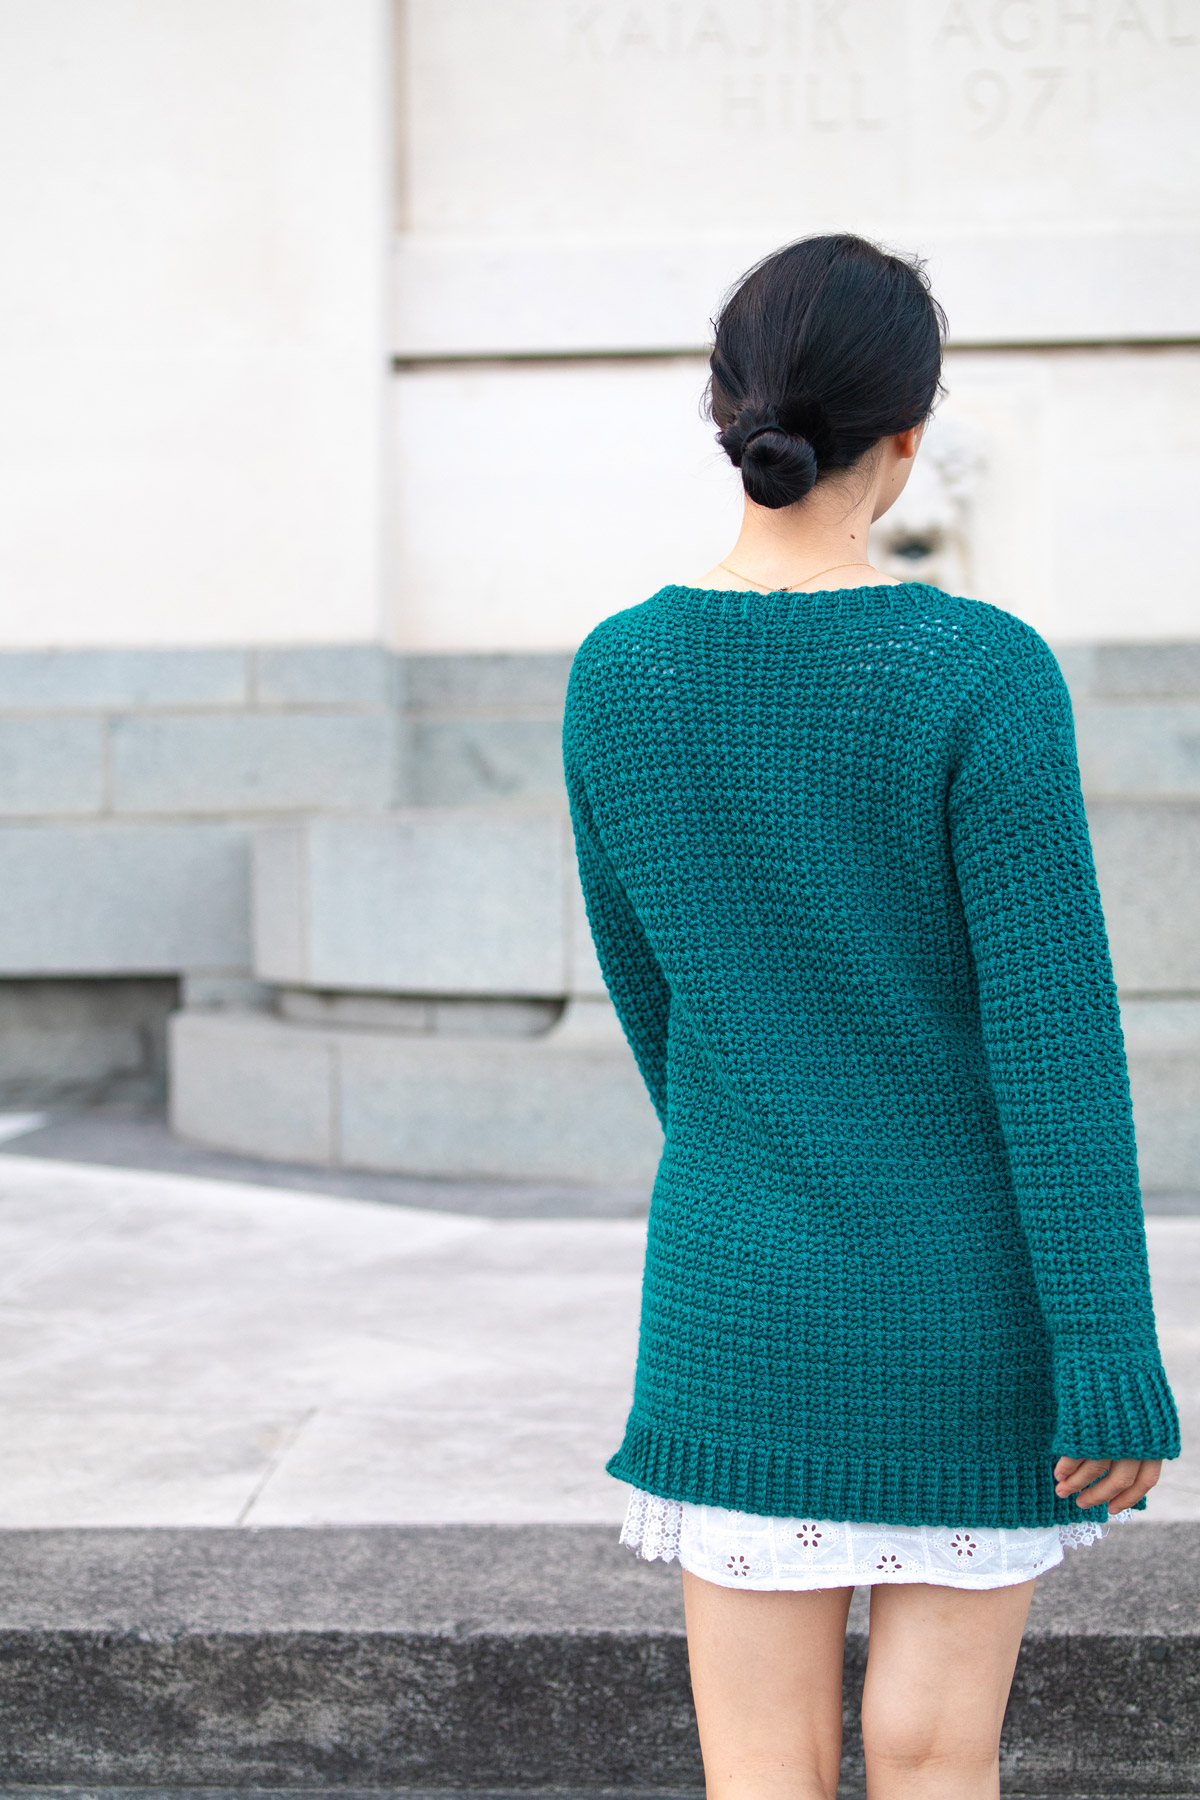
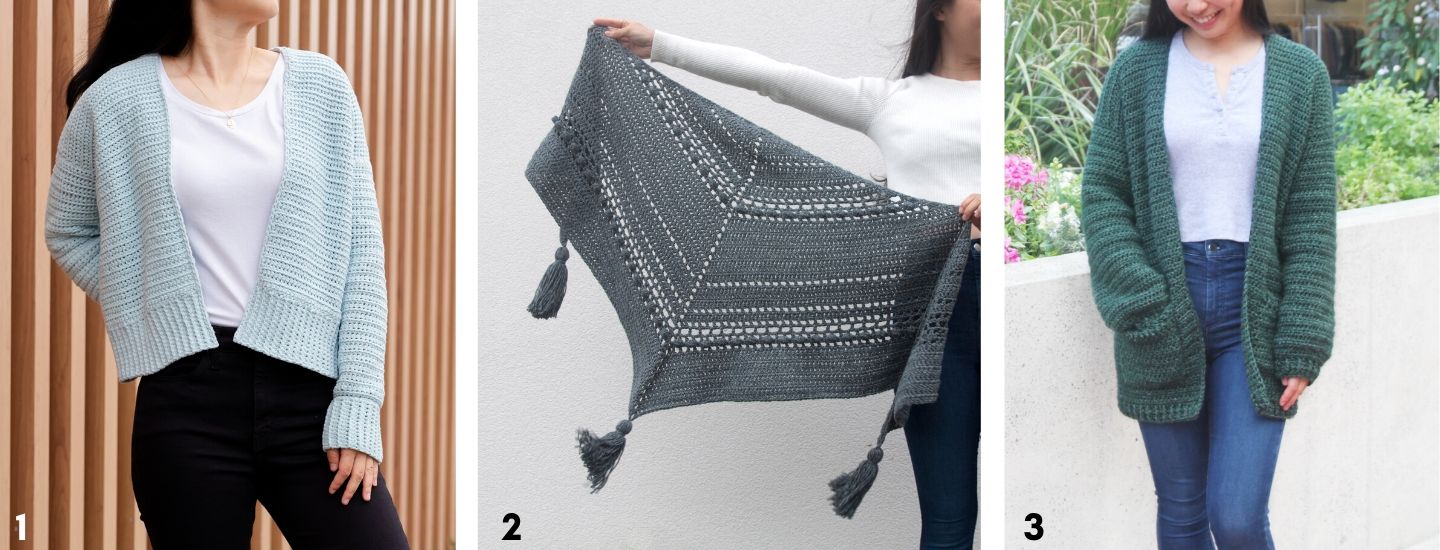
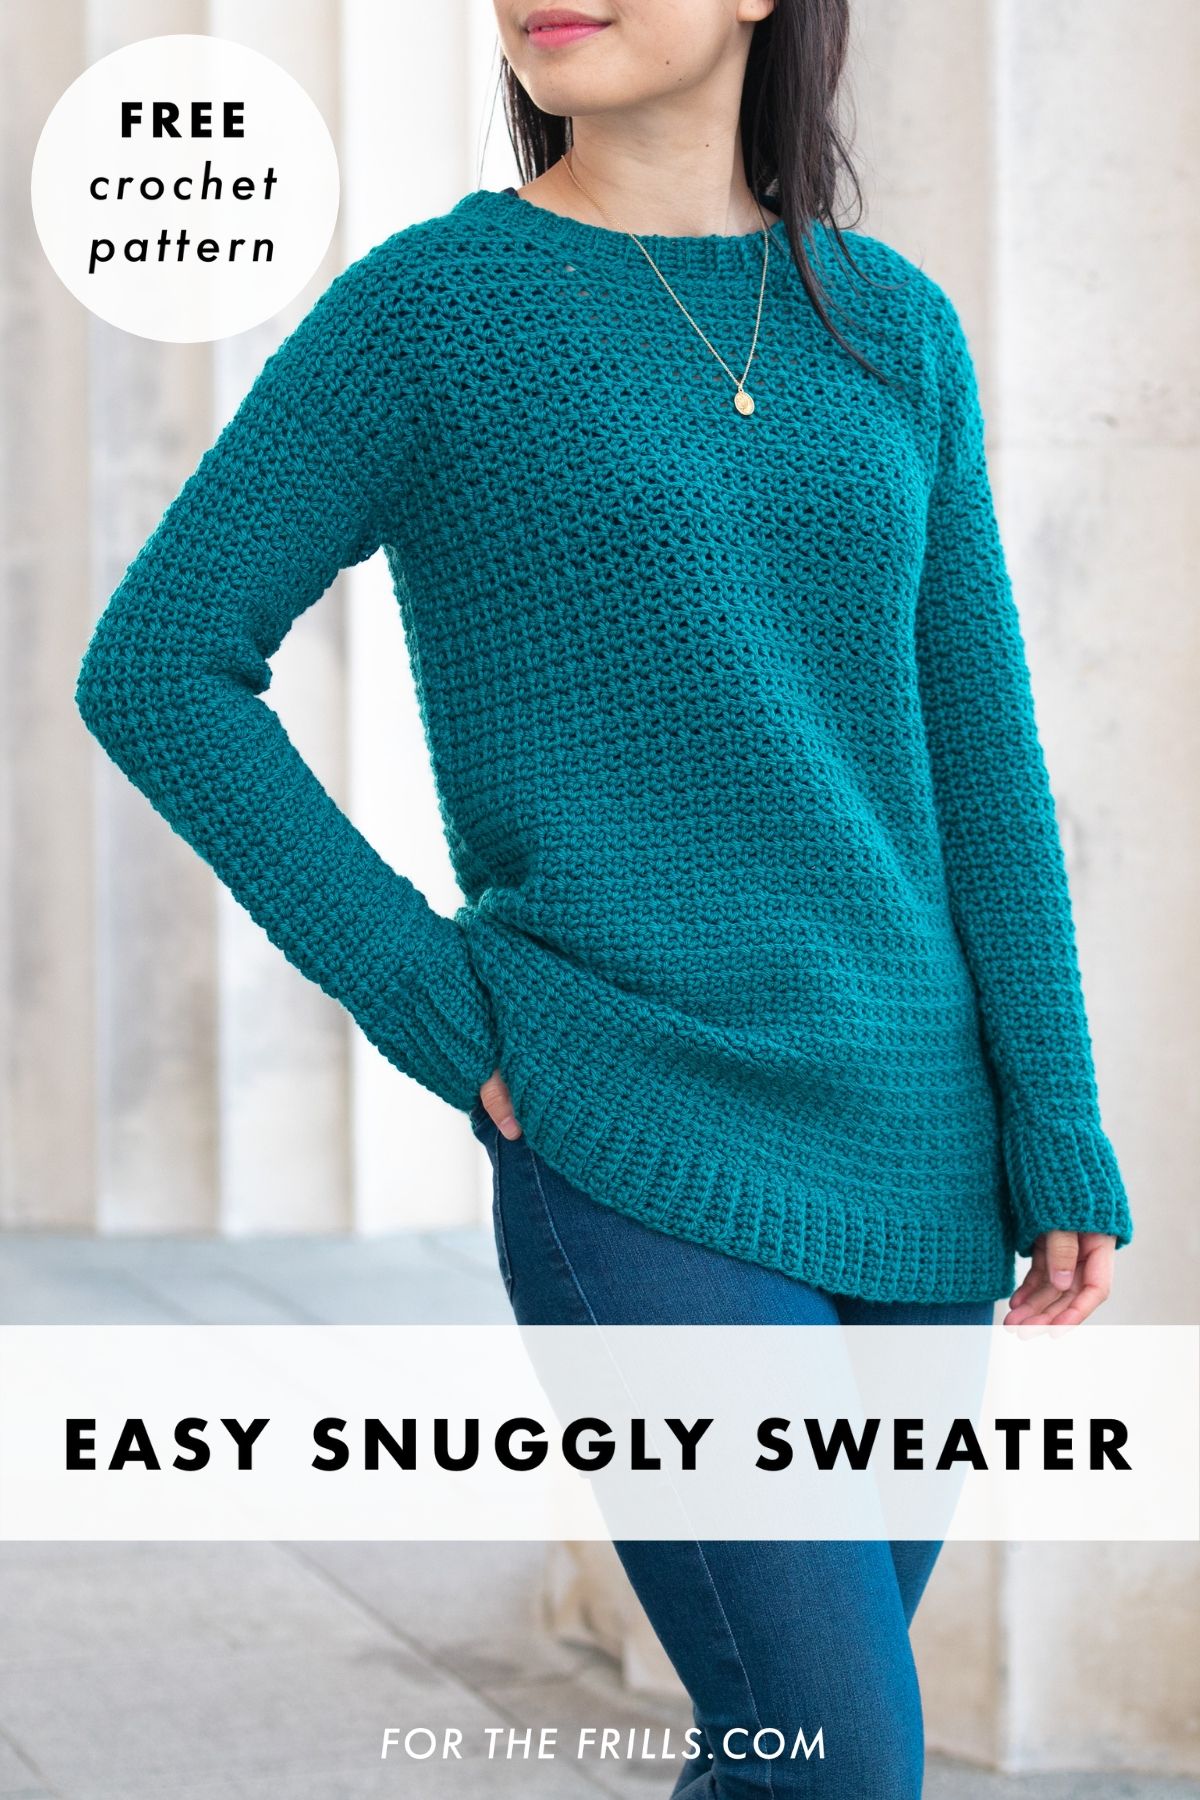
The Weekend Snuggle Sweater is the ultimate lounge sweater! Cosy, slouchy and oh so comfy, this easy crochet pullover is perfect for lazy weekends and long enough to wear over leggings!

This free crochet sweater pattern is accompanied by a step-by-step video tutorial.
This post may contain affiliate links, view our disclosure policy for details.
Thank you to WeCrochet for sponsoring this free crochet sweater pattern!
As always, all thoughts and opinions are 100% my own 🙂
The Weekend Snuggle Sweater is the ultimate lounge sweater! Crocheted with WeCrochet's Gloss DK, this easy crochet pullover is perfect for lazy weekends and long enough to wear over leggings!
For this design, I used the stitch pattern of Single Crochet Columns (also called the crochet mesh stitch) which comprises of only single crochets and chains. It’s nice and simple stitch combination that’s beginner friendly! No need for complicated stitch charts yay!
I love how Single Crochet Columns give the overall appearance of a dense crochet fabric but when you look closer you’ll notice that the chains create an airy and open fabric.
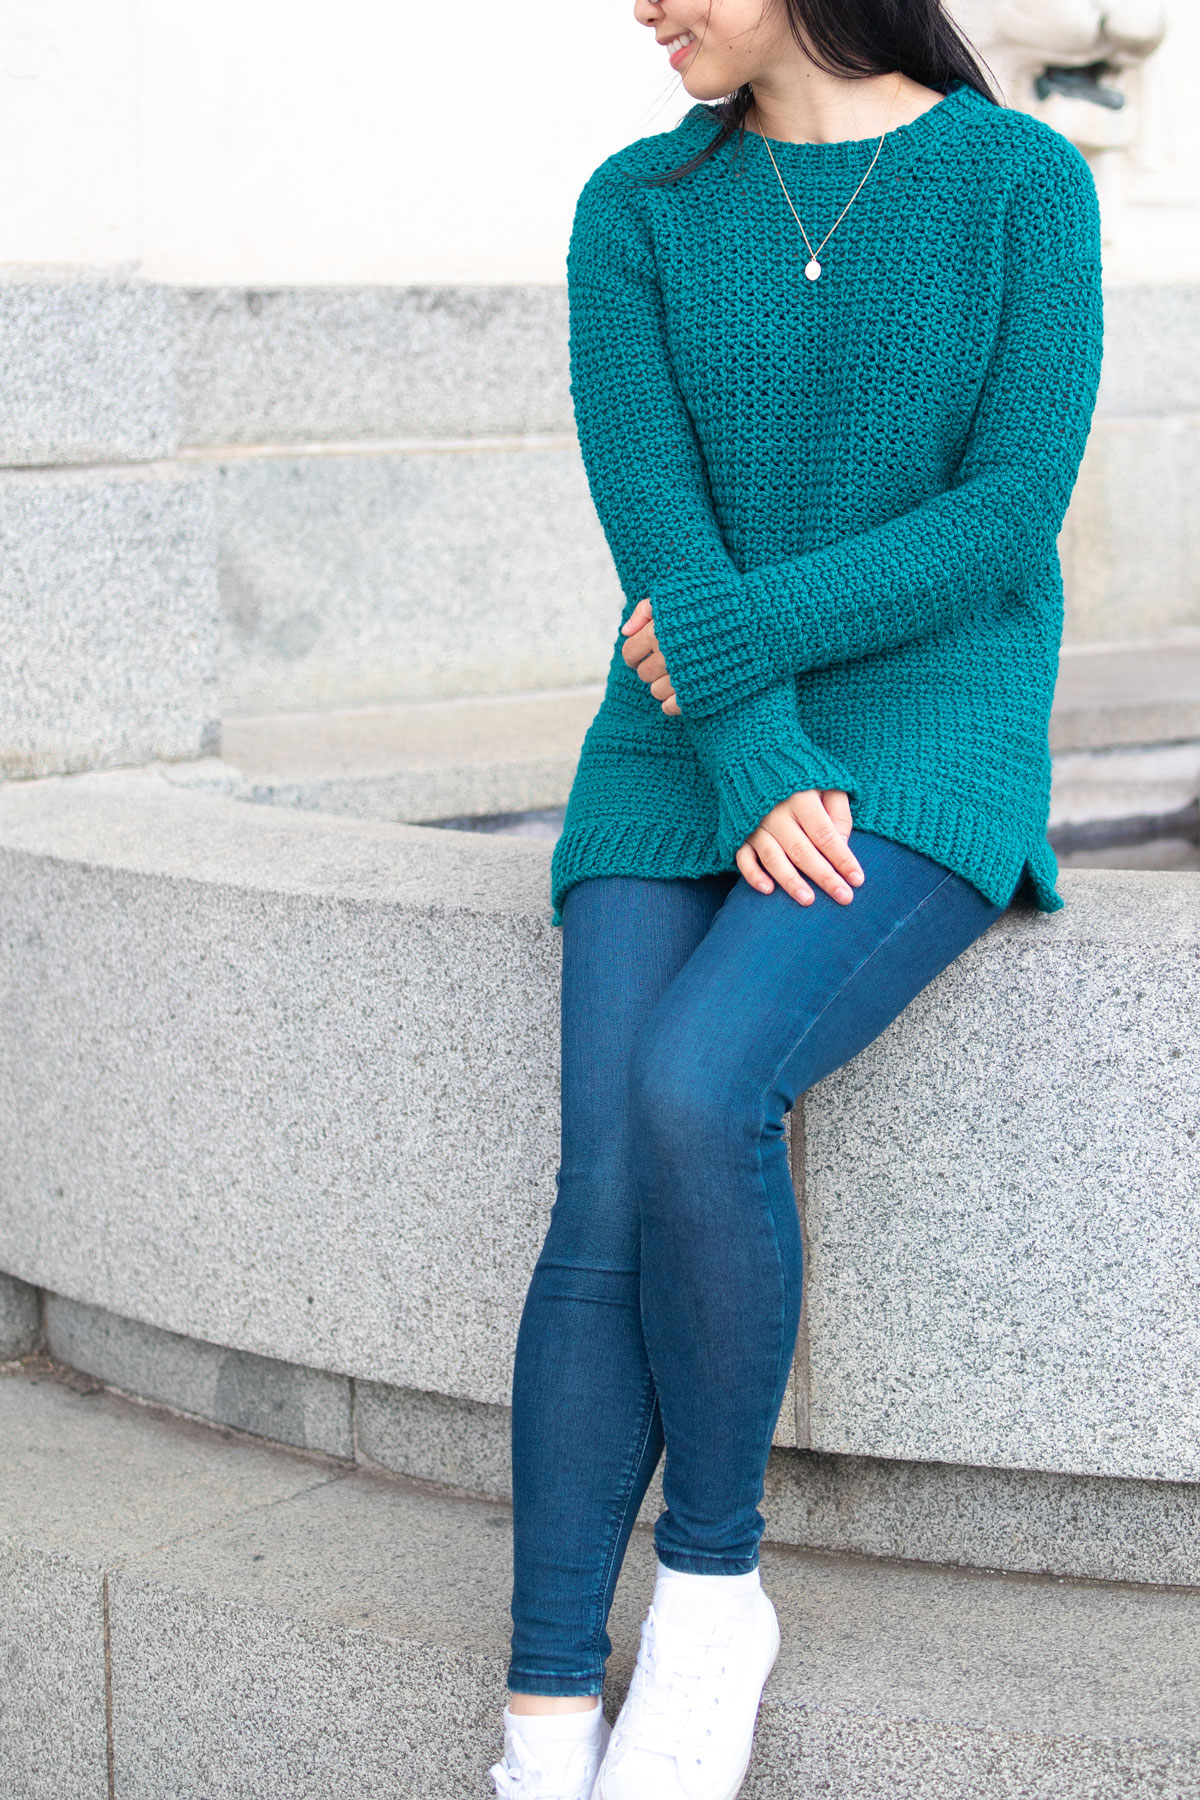
The Single Crochet Column stitch has incredible drape (check out the pocket cardigan version - In the Clouds Cardigan!) and is the key to creating the slouchy look! The Weekend Snuggle Sweater is a great seasonal transition pullover for any season (I’ve worn this crochet sweater in spring, fall and winter and it would be great for chilly summer nights!) as this stitch texture will keep your warm without making you overheat.
Sweater Construction
This sweater is crocheted in 4 panels – front, back and 2 sleeves and only uses 2 different stitches throughout the entire pattern – single crochet and single crochet two together!
For both the sleeves and the body are worked from the bottom up. First, we’ll crochet the ribbing and the extend the body and sleeves to your desired length. The written pattern also includes alteration notes if you’d like to make your Weekend Snuggle Sweater shorter or longer!
Once we have all 4 pieces, we’ll crochet the neckline ribbing and then sew everything together. When sewing crochet pieces together to key to getting a clean and neat ‘finish’ is to make sure your stitches have the right tension. Too tight and your seams will pucker, too loose and you’ll have holes in between your stitches! I recommend sewing your pieces together on a flat surface to make it easier to sew even stitches and I always use a bent tip tapestry needle.
If you’ve never tried a bent tip tapestry needle it will change your crochet life! The end of the needle has a bend in it so the tip of the needle flicks up where most tapestry needles are straight. The bend in the needle makes it super easy to pick up strands of yarn and I can sew so much faster with them! Seriously, it takes me half the time to sew crochet pieces together with a bent tip tapestry needle compared to a straight one!
Design Inspiration
We’ve been having a strangely cold summer in New Zealand so I’ve been feeling all the cosy vibes! I really wanted to design a long sweater that was perfect for snuggling on the couch or you can pair it with jeans and ankle boots for an easy weekend look.
I also wanted the sweater to look modern and be super wearable to the point where people would be surprised to learn that it was handmade! I think crochet often has the reputation of looking ‘crafty’ or ‘dated’ but this sweater proves that you can wear crochet at any age!
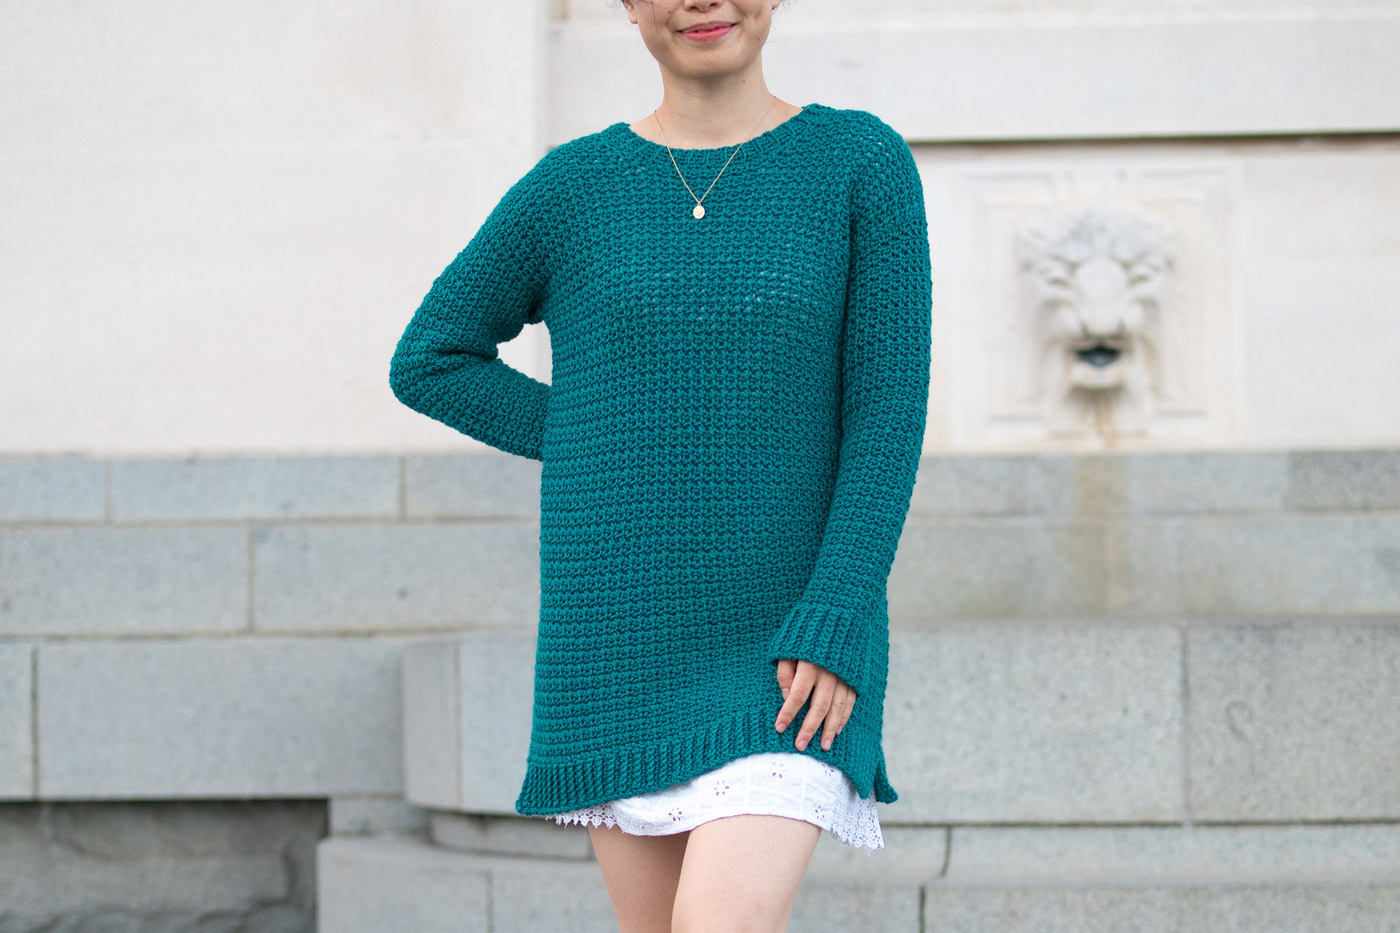
There are also added alteration instructions to make this sweater as long or as cropped as you want. This crochet pullover would make such a cute sweater dress or use a cotton yarn for a light cropped summer sweater. There’s also a split hem as an added fun detail but you can sew all the down the ribbing for a normal sweater!
YARN
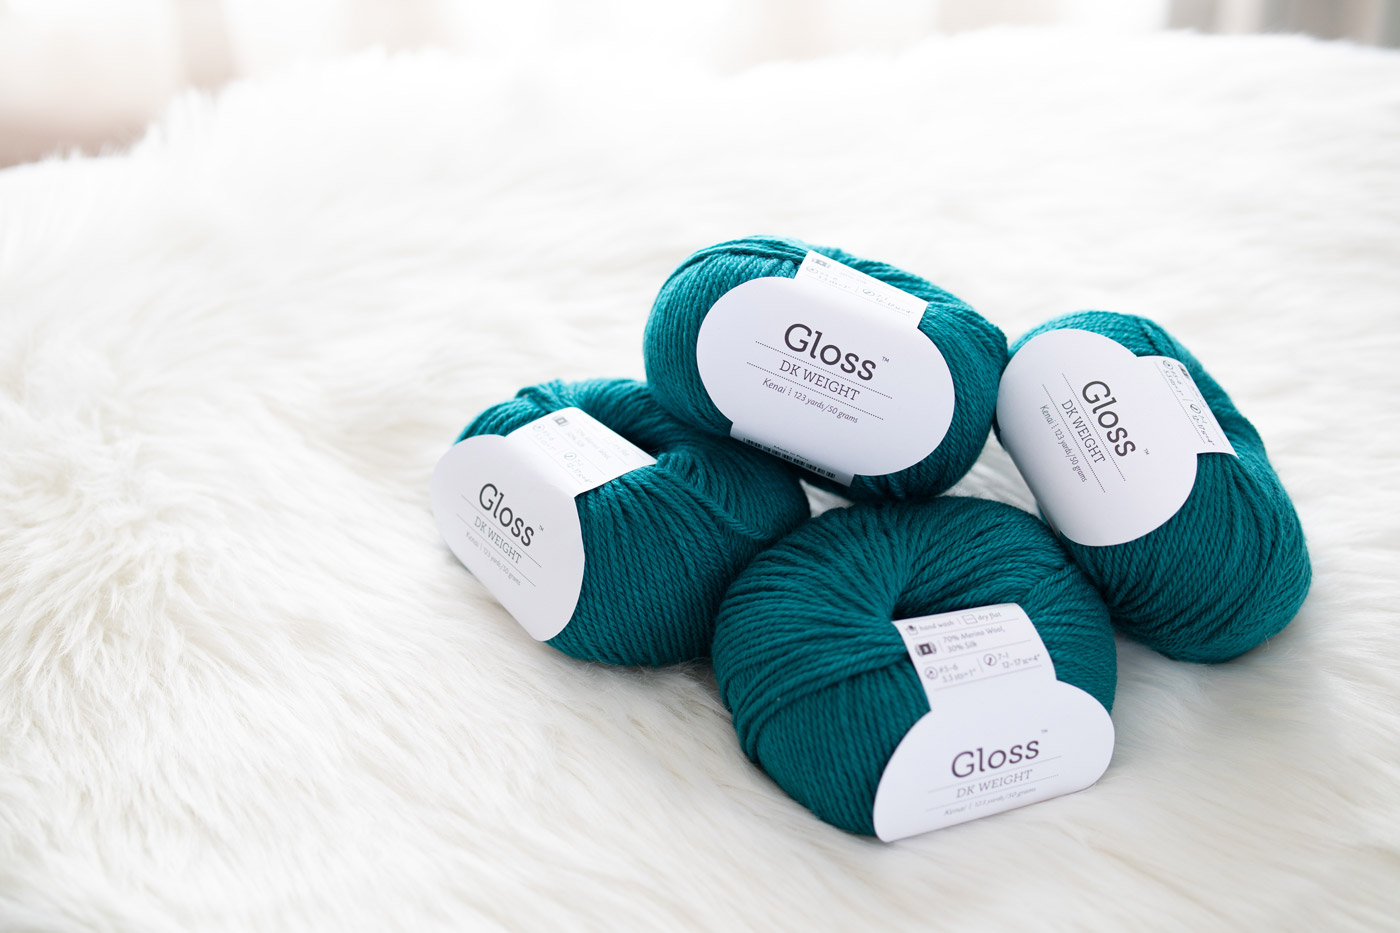
This project uses the yarn Gloss DK from WeCrochet which is a 30% Silk + 70% Merino Wool blend. WeCrochet is KnitPicks new sister site that’s designed specifically for crocheters! It’s such a wonderful resource full of free crochet patterns, hooks and kits and the best part they provide crochet swatches of all the yarn! I’ve never seen any other site with this feature and its honestly so helpful for all of us crocheters when shopping for yarn online.
Gloss DK is a luxurious blend of silk and merino with a soft, pillowy feel and a slight sheen. I used the colour Kenai which is a gorgeously vibrant green-teal which is one of my favourite colours! There’s a range of 10 colours and you can also get the bare hanks of this yarn and dye your very own colour way.
Since this is a silk yarn and I used such a vibrant colour, there was a bit of colour transfer on my hands as I was crocheting but it washes right off! I find that silk yarns tend to bleed (due to the nature of the fibre) but after I steamed and blocked the sweater there wasn’t any colour transfer at all 🙂 When using natural fibres I always recommend hand washing with a good quality wool wash so that your garment lasts as long as possible.
If you’d like an easy to care for machine-washable sweater, Swish DK is a great superwash merino substitute or you could use CotLin (cotton and linen blend) for a cool and airy summer sweater!
One thing to note, is that Gloss DK is quite thick for a DK / Light (3) yarn. It’s not quite a worsted weight yarn but it’s very, very, VERY close. So when looking for substitutes make sure to pick a thicker DK yarn so you can easily meet gauge 🙂
Pin me for later!
Weekend Snuggle Crochet Sweater Video Tutorial
Add to your Ravelry queue here!
Ad-free, printable version here!
*Sample is a size small shown on a 5’3” model with a 32” bust.
*The sizing guide follows size XS(S, M, L, XL, 2XL, 3XL). E.g. “Ch 71(79, 87, 95, 103, 111, 119) means Ch 71 for XS, Ch 79 for Small, Ch 87 for Medium, Ch 95 for Large, Ch 103 for XL, Ch 111 for 2XL and Ch 119 for 3XL.” If there is only one number, it applies to all sizes.
*"SC 10" means SC into the next 10 stitches.
*"2SC" means place 2 SC into the same stitch.
*The turning chain ch 1 does NOT count as a stitch, otherwise ch 1 does count as a stitch.
*Total stitches are indicated between < >.
*This pattern uses US crochet terms.
LEVEL: Easy
MATERIALS
Yarn – WeCrochet Gloss - DK/Light (3), 113m/123 yards/50g, 70% Merino Wool + 30% Silk, Kenai
9(9, 10, 11, 11, 12, 13) skeins
approx. 415(435, 455, 510, 550, 585, 640)g
Measurements cm:
Bust: 92(96, 102, 112, 122, 132, 142)
Length: 56(56, 56, 58, 58, 58, 61)
Armhole: 16(16, 18, 18, 19, 19, 20)
Sleeve length: 41(41, 41, 41, 41, 41, 41)
Measurements inches:
Bust: 36(38, 40, 44, 48, 52, 56)
Length: 22(22, 22, 23, 23, 23, 24)
Armhole: 6.5(6.5, 7, 7, 7.5, 7.5, 8)
Sleeve length: 16(16, 16, 16, 16, 16, 16)
*Measurements are taken from the sweater lying flat.
The body length will stretch out approx. 5-8cm/2-3” (depending on yarn) once the sweater has been worn.
STITCHES & ABBREVIATIONS
Ch = Chain
Sl st = Slip Stitch
SC = Single Crochet
SC2tog = Single Crochet 2 stitches together
BLO = Back Loop
St(s) = Stitch(es)
Rep = Repeat
Sk = Skip
GAUGE: 10cm/4” square = 15 stitches wide x 16 rows tall in single crochet column stitch
Single Crochet Columns:
Chain an even number of chains.
ROW 1: SC in 2nd ch from hook, *ch 1, sk 1, SC; rep from * until end, turn.
ROW 2: Ch 1, SC in 1st st, *ch 1, sk 1, SC; rep from * until end, turn.
Repeat ROW 2 until you reach desired length.
Weekend Snuggle Sweater Crochet Pattern
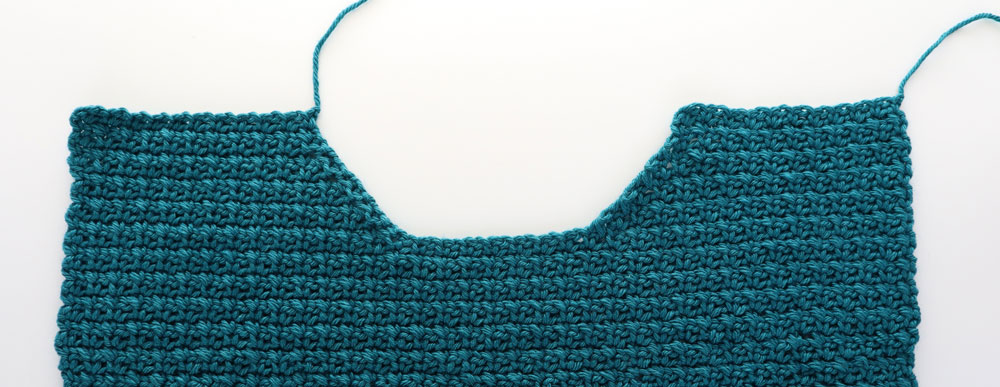
BACK PANEL
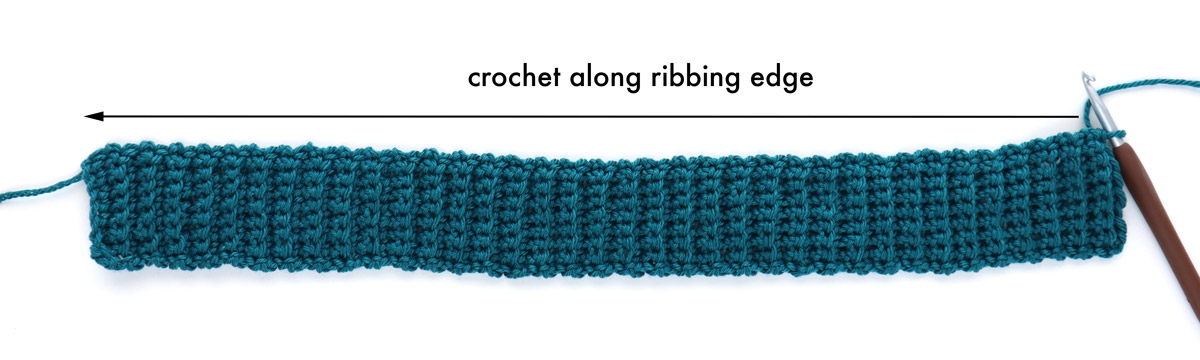
*The body panels are crocheted from the bottom up. The ribbing is worked vertically, and then we crochet along the long edge of the ribbing to create the back panel.
BACK RIBBING
FOUNDATION CHAIN: Ch 9.
ROW 1: SC into 2nd ch from hook, SC in each st until end, turn.
<8>
ROW 2: Ch 1, BLO SC 7, SC in last st, turn.
<8>
Repeat ROW 2 until ROW 69(73, 77, 85, 93, 101, 109).
Do not fasten off! We will now work along the long edge of the band. Each row equals 1 stitch.
BACK
ROW 1: Ch 1, SC in 1st row, *ch 1, sk 1 row, SC in next row; rep from * until end, turn.
<69(73, 77, 85, 93, 101, 109)>
ROW 2: Ch 1, SC in 1st st, *ch 1, sk 1 st, SC; rep from * until end, turn.
<69(73, 77, 85, 93, 101, 109)>
Repeat ROW 2 until ROW 80(80, 80, 84, 84, 84, 88)
*ALTERATION NOTE: You can add or remove rows to make your sweater longer or shorter.

FRONT PANEL
Repeat ‘BACK PANEL’ instructions until ROW 70(70, 70, 74, 74, 74, 78).
*ALTERATION NOTE: If you altered the length of the back panel, crochet until you are 10 rows short of the total rows in your back panel. E.g. if you crocheted 54 rows for the back panel, crochet 44 rows for the front panel.
Do not fasten off! We’ll now crochet the shoulder shaping.
SHOULDER SHAPING
Counting from your crochet hook, place a stitch marker in the 28th(30th, 32nd, 36th, 40th, 44th, 48th) st.
*The stitch marker should be in a chain space, not a SC.

ROW 1: Ch 1, SC in 1st st, *ch 1, sk 1 st, SC; rep from * until 2 sts from the st marker, SC2tog, turn.
<26(28, 30, 34, 38, 42, 46)>
ROW 2: Ch 1, SC2tog, *ch 1, sk 1 st, SC; rep from * until end, turn.
<25(27, 29, 33, 37, 41, 45)>
ROW 3: Ch 1, SC in 1st st, *ch 1, sk 1 st, SC; rep from * until 2 sts left, SC2tog, turn.
<24(26, 28, 32, 36, 40, 44)>
ROW 4: Rep Row 2.
<23(25, 27, 31, 35, 39, 43)>
ROW 5: Rep Row 3.
<22(24, 26, 30, 34, 38, 42)>
ROW 6: Rep Row 2.
<21(23, 25, 29, 33, 37, 41)>
ROW 7: Rep Row 3.
<20(22, 24, 28, 32, 36, 40)>
ROW 8: Rep Row 2.
<19(21, 23, 27, 31, 35, 39)>
ROW 9: Ch 1, SC, *ch 1, sk 1 st, SC; rep from * until end, (last SC should be on top of the SC2tog) turn.
<19(21, 23, 27, 31, 35, 39)>
ROW 10: Ch 1, SC, *ch 1, sk 1 st, SC; rep from * until end. Fasten off, turn.
<19(21, 23, 27, 31, 35, 39)>
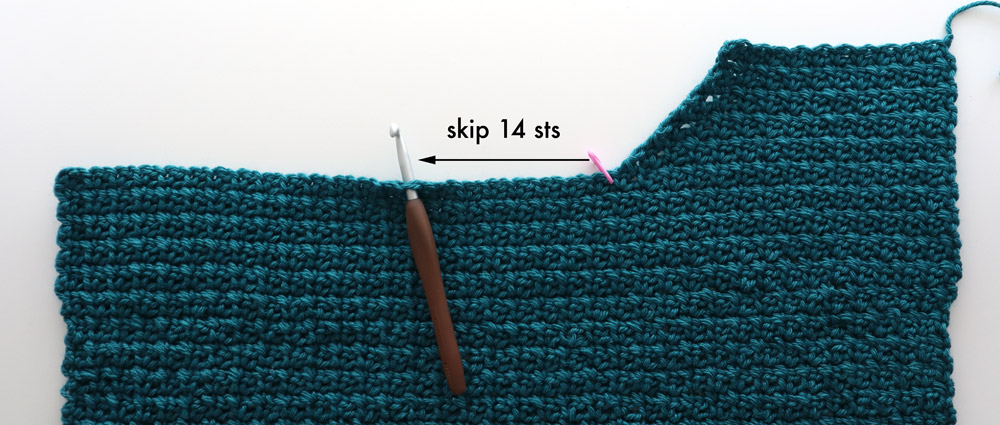
Counting from the stitch marker, skip 14 sts, insert hook into next st (hook should be in a SC) and pull up a loop.
ROW 1: Ch 1, SC2tog, SC, *ch 1, sk 1 st, SC; rep from * until end, turn.
<26(28, 30, 34, 38, 42, 46)>
*You can place a st marker into the SC2tog to make it easier to find. In Row 2, the SC2tog is the ‘last’ st of the row.
ROW 2: Ch 1, *SC, ch 1, sk 1 st; rep from * until 2 sts left, SC2tog, turn.
<25(27, 29, 33, 37, 41, 45)>
ROW 3: Ch 1, SC2tog, SC, *ch 1, sk 1 st, SC; rep from * until end, turn.
<24(26, 28, 32, 36, 40, 44)>
*If using the st marker, place it in the SC2tog.
ROW 4: Rep Row 2.
<23(25, 27, 31, 35, 39, 43)>
ROW 5: Rep Row 3.
<22(24, 26, 30, 34, 38, 42)>
ROW 6: Rep Row 2.
<21(23, 25, 29, 33, 37, 41)>
ROW 7: Rep Row 3.
<20(22, 24, 28, 32, 36, 40)>
ROW 8: Rep Row 2.
<19(21, 23, 27, 31, 35, 39)>
ROW 9: Ch 1, SC (first SC should be on top of the SC2tog), *ch 1, sk 1 st, SC; rep from * until end, turn.
<19(21, 23, 27, 31, 35, 39)>
ROW 10: Ch 1, SC, *ch 1, sk 1 st, SC; rep from * until end. Fasten off.
<19(21, 23, 27, 31, 35, 39)>
SLEEVES
(make 2)
*The sleeves are worked from the cuff up. Like the body panels, we’ll crochet the ribbing vertically and then crochet the sleeve directly on to the edge of the ribbing.
SLEEVE RIBBING
FOUNDATION CHAIN: Ch 11.
ROW 1: SC into 2nd ch from hook, SC in each st until end, turn.
<10>
ROW 2: Ch 1, BLO SC 9, SC in last st, turn.
<10>
Repeat ROW 2 until ROW 31(31, 35, 35, 39, 39, 43).
Do not fasten off! We will now crochet along the long edge of the band.
SLEEVE
ROW 1: Ch 1, SC in 1st row, *ch 1, sk 1 row, SC in next row; rep from * until end, turn.
<31(31, 35, 35, 39, 39, 43)>
ROWS 2 – 4: Ch 1, SC in 1st st, *ch 1, sk 1 st, SC; rep from * until end, turn.
<31(31, 35, 35, 39, 39, 43)>
ROW 5: Ch 1, 2SC in 1st st, ch 1, sk 1 st, *SC, ch 1, sk 1 st; rep from * until last st, 2SC in last st, turn.
<33(33, 37, 37, 41, 41, 45)>
ROWS 6 – 8: Ch 1, SC 2, *ch 1, sk 1 st, SC; rep from * until last st, SC in last st, turn.
<33(33, 37, 37, 41, 41, 45)>
ROW 9: Ch 1, SC in 1st st, ch 1, SC in next st, *ch 1, sk 1 st, SC; rep from * until last st, ch 1, SC in last st, turn.
<35(35, 39, 39, 43, 43, 47)>
ROWS 10 - 13: Rep Rows 2 – 4.
<35(35, 39, 39, 43, 43, 47)>
ROW 14: Rep Row 5.
<37(37, 41, 41, 45, 45, 49)>
ROWS 15 – 17: Rep Rows 6 – 8.
<37(37, 41, 41, 45, 45, 49)>
ROW 18: Rep Row 9.
<39(39, 43, 43, 47, 47, 51)>
ROWS 19 – 22: Rep Rows 2 – 4.
<39(39, 43, 43, 47, 47, 51)>
ROW 23: Rep Row 5.
<41(41, 45, 45, 49, 49, 53)>
ROWS 24 – 26: Rep Rows 6 – 8.
<41(41, 45, 45, 49, 49, 53)>
ROW 27: Rep Row 9.
<43(43, 47, 47, 51, 51, 55)>
ROWS 28 – 31: Rep Rows 2 – 4.
<43(43, 47, 47, 51, 51, 55)>
ROW 32: Rep Row 5.
<45(45, 49, 49, 53, 53, 57)>
ROWS 33 – 35: Rep Rows 6 – 8.
<45(45, 49, 49, 53, 53, 57)>
ROW 36: Rep Row 9.
<47(47, 51, 51, 55, 55, 59)>
ROWS 37 – 40: Rep Rows 2 – 4.
<47(47, 51, 51, 55, 55, 59)>
ROW 41: Rep Row 5.
<49(49, 53, 53, 57, 57, 61)>
ROWS 42 – 44: Rep Rows 6 – 8.
<49(49, 53, 53, 57, 57, 61)>
ROW 45: Rep Row 9.
<51(51, 55, 55, 59, 59, 63)>
ROWS 46 – 49: Rep Rows 2 – 4.
<51(51, 55, 55, 59, 59, 63)>
ROW 50: Rep Row 5.
<53(53, 57, 57, 61, 61, 65)>
ROWS 51 – 53: Rep Rows 6 – 8.
<53(53, 57, 57, 61, 61, 65)>
ROW 54: Rep Row 9.
<55(55, 59, 59, 63, 63, 67)>
Fasten off.
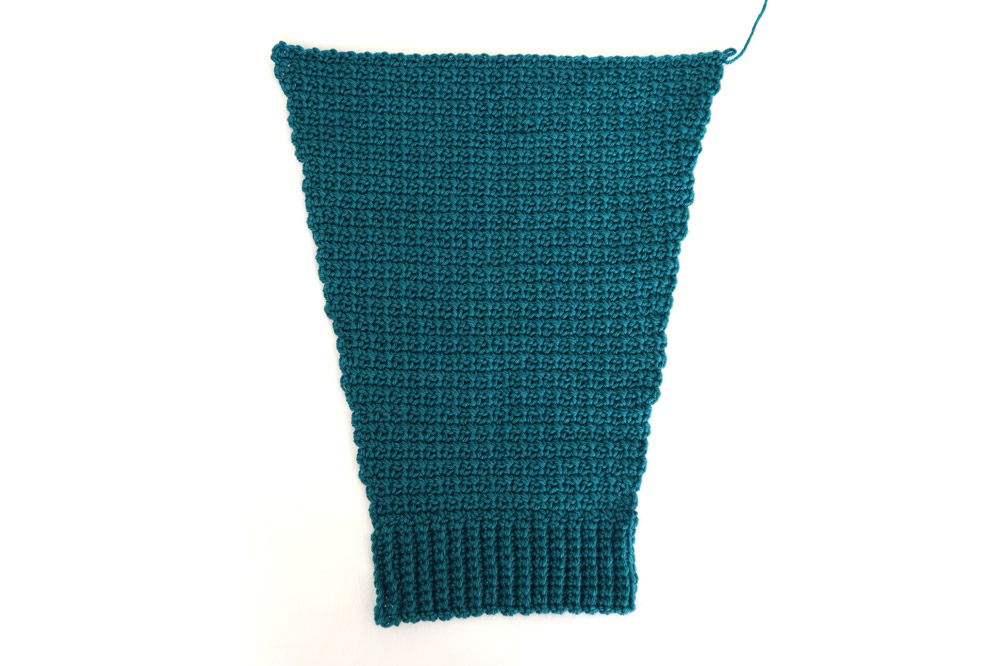
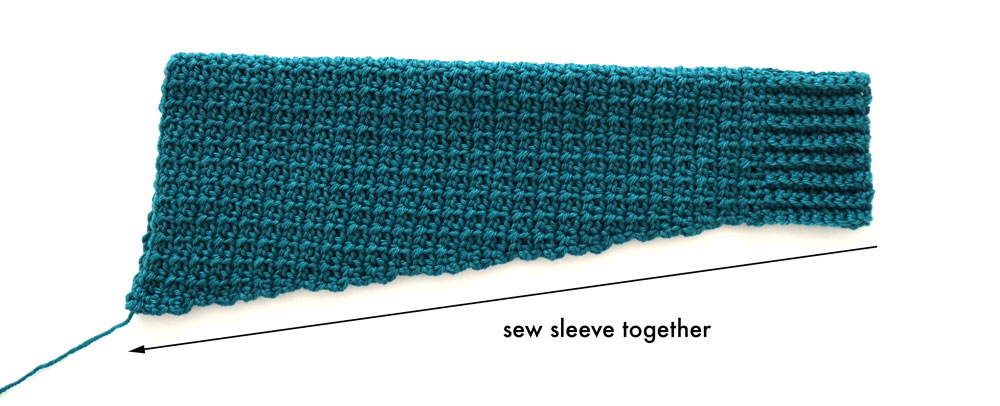
Fold sleeve in half lengthways and whip stitch sides together.
NECKLINE RIBBING
FOUNDATION CHAIN: Ch 6.
ROW 1: SC into 2nd ch from hook, SC in each st until end, turn.
<5>
ROW 2: Ch 1, BLO SC 4, SC in last st, turn.
<5>
Repeat ROW 2 until ribbing measures 46cm/18” (approx. ROW 66)
ASSEMBLY
Lay the front panel on top of the back panel.
Whip stitch the shoulder seams together.
Whip stitch up the sides of body panels together, leaving a 16(16, 18, 18, 19, 19, 20)cm/ 6.5(6.5, 7, 7, 7.5, 7.5, 8)” gap for the sleeves.
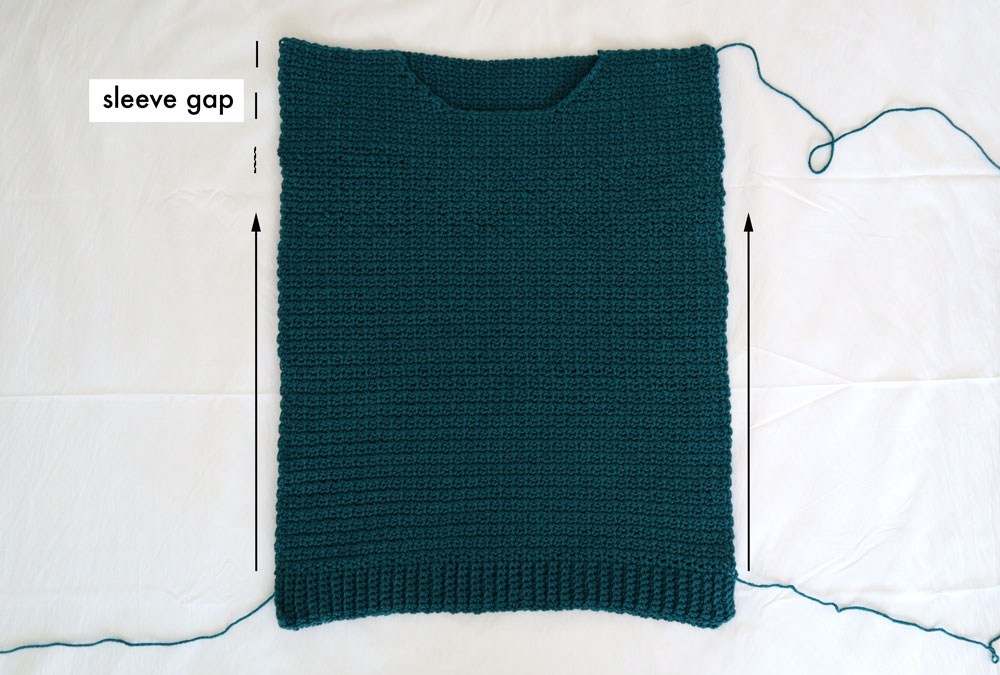
*If you want a split at the side seam (as pictured) sew from the top of the ribbing. If you don’t want a split, sew from the bottom of the ribbing.
Whip stitch the top of the sleeves to the body.
Whip stitch the neckline ribbing evenly around the open edge of neckline.
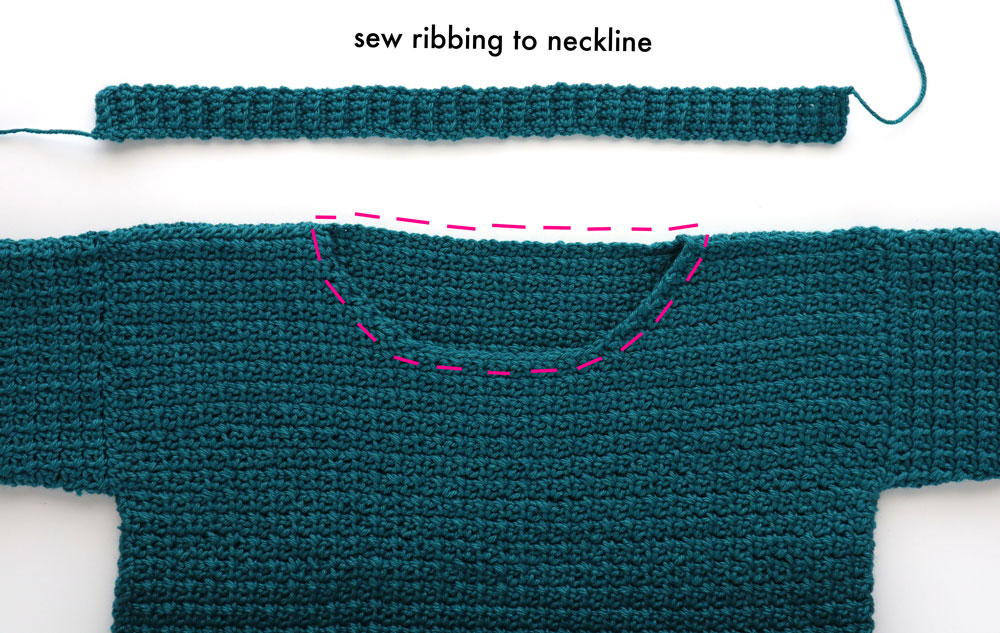
Sew the edges of the neckline ribbing together.
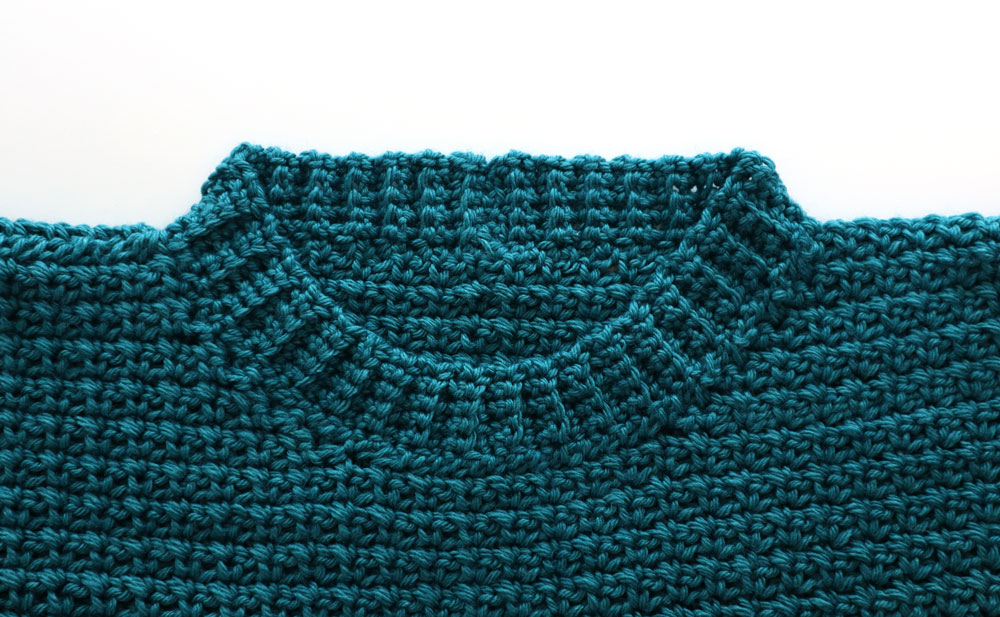
Weave in all of your ends.
Steam and block your sweater.
Voilà! You’ve finished your Weekend Snuggle Sweater 🙂
can you use any DK weight yarn? I have a closet full of yarn, but every time I see a pattern I have to buy new yarn and I am going broke! I love the sweater and have two granddaughters I would love to make it for.
Hi Lillian, I'd suggest swatching your yarn to see if you meet gauge but any DK yarn should work 🙂 Grace
I don't see anywhere on the pattern where you tell us how much yarn will be needed to complete the sweater.
Hi Heather, the yarn amounts are listed under 'Materials' Grace 🙂
Can I buy a sweater from you?? I'd love one in ivory, but I don't have time to make one. :'( I love this pattern!
I can´t find the video... where can i watch it?
Hi Ana,
The video tutorial is right on the page under the title 'Video Tutorial'.
Grace 🙂
the video is gone all that is there is a like to an ad free pdf file and a link to Raverly . but my question does the sc go in the ch sp or on top of sc
Hi Grace!
I just finished my sweater and I absolutely love it. I wish I could attach a picture here. Thank you so much.
Love, Maria
Hi Maria,
I'm so glad you like your sweater! Feel free to share photos on Instagram - just tag me @forthefrills or use #forthefrills 🙂
Grace
hola, me podrías ayudar con el punto del cuerpo del sueter, no logro entenderlo ni las disminuciones que hace
soy principiante
Hi Grace.
I an struggling with the second shoulder section - when I get to the end of row 2 there are 3 stitches left. I start in a SC with an even number of stitches. Can you please help - I tried numerous times and can’t get it right.
Regards,
Rujeanne
Hi Rujeanne, It sounds like you might be counting the ch 1 as a stitch. At the end of Row 2 the last st is the SC2tog from Row 1 - not the ch 1. It might look like you've left a stitch empty but as long as your last st is in the SC2tog and you have the right number of total stitches for your size you're on the right track 🙂 Once we attach the collar all of the edges will 'smooth' out.
I hope this helps,
Grace
Love the pattern but could you help me out. I'm puzzled with the two different number of stitches for sizing -first at the top of page when explaining how the sizing works you have eg. M 87 ch and then down to the actual pattern you have M 77. Perhaps I'm missing something. Thankyou
Hi Barbara, the notes just describe how to read the pattern - they aren't the actual stitch counts. You'll notice that since the body of the pattern is crocheted onto the ribbing there isn't a foundation chain for the body portion.
I hope this helps,
Grace 🙂
Thankyou for your reply Grace. I did think that may have been the situation but needed confirmation. I love the pattern - so simple. So far I've made two for myself and am in the process of making one for my daughter. I've just taken up crocheting again because of co-vid after twenty years and I can tell you this beats crocheted squares. 😃.
Hi Barbara, so glad you're enjoying crochet again 🙂 Haha yes I find crocheting garments a lot more satisfying! It's the best feeling to wear something you've made with your own two hands!
Grace
Hi Grace
Loving this pattern! I’m doing the sleeves now and wondered where the pattern says something like Row 19-22 (which is 4 rows) and says rep rows 2-4, does it mean do 3 or 4 rows? Eg 2,3,4,2? I’m confused.
Hi Bridget, when the pattern says from Row 19-22: rep rows 2-4, rows 2-4 have the exact same stitch pattern. You follow the stitch the pattern that's used in rows 2-4, 4 times for rows 19-22. e.g. In your example of 2,3,4,2 - remember that since they have the same stitch pattern row 2=3=4 so essentially you are just repeating row 2, 4 times.
I hope this helps,
Grace
Hi Grace, I'm going to attempt your pattern, as your instructions look fantastic. Just a quick question about the sleeves... when do you sew the sleeve to the opening? That step seems to be missing.
Many thanks
Debra
Hi Debra, after you've sewn the body together, ship stitch the sleeves to the body (as stated in the assembly instructions).
Grace 🙂
Hi
Am making the 36 inch size, but am finding the sleeves too narrow for my arms, do I use a 6.5 hook or crochet a larger size eg 48 inch
Thanks
Hi Jacqueline, the easiest way would be to crochet a larger size sleeve 🙂 I'd recommend checking the armhole measurements and pick the size that best suits you.
Grace
Hi! The sweater looks great! I was wondering if the 46 cm measurement for the neckline ribbing is the same regardless of the sweater size (I'm making an XL). Thanks!
Hi Cordelia, yes all sizes have the same ribbing length as this neckline is really stretchy!
Grace 🙂
Hi Grace,
Thank you for sharing this pattern. This will be the first sweater I make and I can't wait to start! I was wondering if it would be possible to make slits in the sleeves for your thumbs? If so how would I go about doing this?
Thanks,
Rachel
Hi Rachel,
For this pattern you can simply leave a gap when sewing the cuff ribbing together 🙂
Grace
My sleeves seem really short - only about mid-upper arm. Is this right?
Hi Jordyn,
The sleeves for this pattern should be full length - it sounds like you might not have the same gauge as the pattern! If not you'll need to alter the pattern (probably through adding more rows) but if you have different gauge I can't guarantee that your sweater will look like the sample!
Grace
Hi I'm making this sweater in the size 2XL and I'm working on the shoulder shaping and noticed for the neckline you say to count 14 stitches and than start the opposite shoulder but my numbers aren't matching I have the 42 stitches for the one shoulder and when I count over 14 stitches from the stitch marker and do my first shoulder shaping row I get 53 stitches. Since this isn't my first sweater I know I would just add more stitches to the 14 count till I got the 42 stitches for the shoulder shaping but since this pattern is stated to be easy and seen as beginner friendly a beginner may not know to adjust the neckline so some more notes on the neckline count might be a nice addition.
I love this pattern so much!I just completed one with camo yarn. It looks so great and professional. I will def be using this pattern again and again!! Beautiful work, girl!
Hi I was hoping you could help me... I'm on the sleeve section of the pattern at rows 6-8 it says that I should end with 37 stitches , but with 2 SC and then a ch sk st sc repeat the row does not end with 1 sc. I have 2 stitches left Am I supposed to do sc in the last 2 stitches?
Hi Britt,
For Rows 6-8 say you want to SC 2 (so SC into the next 2 stitches), not 2SC (you shouldn't be placing 2SCs into the first st) so you'll have one stitch left at the end of the row.
Grace
How many rows in do I sew on the sleeves? I’m doing a color change and want to change 1 or 2 rows before the sleeves are so they match. I am crocheting a size XS. Thanks!
I need help please. I'm almost finished with the sweater and decided that I would like longer sleeves. I finished up to row 54, size large.
How would I proceed from here??
Hi Cris,
I'd just continue to follow the same stitch pattern of rows 2-9 until you reach your desired length.
Grace
Thank you
Hey! How are you?
I've just bought the pattern of this beautiful sweater, and the pattern of the ruffle sleeve top! I'm a beginner in the world of crochet, and definitely looking forward to make as soon as possible those tops.
But, I'd like to know... how many balls yarn did you use in each project? How many grams and stuff like that...?
Thank you!
Hi Ana Carolina,
All yarn amounts for the different sizes are listed under the 'Materials' section of the pattern.
Grace 🙂
Sorry, this may be a dumb question. But, is this inside out when sewing together? I was just going to watch the video, but I couldn't find the link. Checked in video tutorials but it just took me back to the written pattern.
Hi Beth,
The stitch used in this sweater is reversible so either side can be the 'right side'. Just pick whichever side you prefer and then be consistent when sewing your pieces together.
Grace 🙂
Hi! Do you have any tips on how to calculate decreases in the front and back panels in order to add shaping to it? My bust is larger than my lower body, so if I make this as-is I'm worried about tenting.
Thank you so much, and love all your patterns!
Hi,
The main two things to take into account are 1. How many stitches wide you will increase of your increase and 2. Over how many rows you will increase. Since this pattern is worked from the bottom up you'll be increasing the width of your panels as you get closer to the bust portion. E.g. If you want to increase by 40 stitches over 20 rows you'll need to add 2 stitches in every row (40/20 = 2).
I hope this helps,
Grace 🙂
Thank you so much, Grace, for this beautiful pattern! The poster of this question asked exactly the question I wanted to ask, so thank you for that answer, too.
I do have an additional question regarding increasing to accommodate a large bust. I guess this also applies to shoulders, as I have wide shoulders. Would I ease just the front section for the bust? Or should I ease both front and back sections?
Hi Shannon,
If you have wider shoulders you can always just size up in the body and the crochet the sleeves a bit shorter (probably 1 - 2", but I'd just measure yourself and crochet sleeves that length to be sure). That way the drop shoulder seams will be further apart and you should have more room across your back/shoulders.
I hope this helps,
Grace
I love this pattern! I'm working on my first one right now, and I'm super excited to see how it turns out. My little sister would really like one, but the XS would still be too big for her. Would you be able to suggest an amount of stitches that would work for a child size? (roughly 10-12 size)
Hi,
Sorry but I've never crocheted child size garments before! I'd recommend measuring a sweater of sister's that is a similar style, and then use the gauge provided in the pattern to figure out how many stitches and rows you'll need!
I hope this helps,
Grace
I finally found the perfect pattern! But I want a wider open neck, so it can almost hang off my shoulder. How do you suggest doing this? Big thanks!!!
Hi Morgan,
On the neckline shaping rows I'd crochet fewer stitches and skip more stitches in between the shoulder shaping sections. You'll need to experiment a bit to see how large you want to gap to be.
I hope this helps,
Grace 🙂
Hi there
please save me, i have frogged my piece 3 times already and im just 3.35 mins into your video. I cannot seem to end up with 73 stitches after the Ch1 sk1 row SC 1 ROW 1 basically after 73 rows of ribbing. My first attempt i ended up with over 100 stitches, second attempt 77 stitches, i dont know where to place my stitches and how to recognise each row in the horizontal ribbing. This is my first project and i am making a small. How do i carry on? Thank you
Hi Amelia,
You can recognise each row from the ridges running along the ribbing - in between 2 ridges you should have 2 rows. If you've never crocheted BLO SC before I'd suggest watching some in depth stitch tutorials on YouTube so you can learn how to count rows.
I hope this helps,
Grace
Thank you Grace, i just really want to make it perfect and end up with 73 stitches. I can recognise the rows and ridges, but i just dont know which hole in the ribbing to put it through. Like there are several holes, to the left or to the right of the holes in between each ridge? Thank you so much for replying <3
Hi Amelia,
As long as you are picking up 2 strands of yarn along the edge of the ribbing, your stitches should be secure. You don't need to worry about finding the perfect hole - as long as your stitches are spaced out evenly it will look nice and neat.
Grace
Hi! I love this pattern, it’s so beautiful.
I’m just starting the rows, but I can’t quite make out on row 2 of the back, when you ch1, skip 1 stitch and sc in the next stitch, am I meant to be sc into another sc stitch, or in a ch space?
I’d really hate to get this wrong!
Hi Kelly,
Yes along the back panel you always place a SC in a SC.
Grace 🙂
Love the pattern but one question can I use red heart super saver yarn instead
Hi I was just wondering where you got your yarn from so I can crochet the sweater
I am using caron's one pound yarn (weight is 4) and it is working very well. it is a little less drapey than the picture but it is still super stretchy and will be very good. I think that using Red heart would be okay, it just might not be as soft as using another kind of yarn.
Thank you so much for sharing this wonderful pattern. I am making them for Christmas gifts for my Sister and my three daughters. The pattern was very easy to follow and grasp and works lovely as it is. I did adjust the neck opening to make it a little larger as my daughters don't like anything up close to their necks. I did this by stopping 10 rows sooner on the front before neck shaping. I shaped the neck and then did another 10 rows of 2-9, it worked fabulously 🙂
Thanks again. I will try more of your patterns.
Hi Grace
I have completed only 50 rows for the bottom rib band and it is huge, if I continue to 93 rows for my preferred size it would wrap around me twice. Please help me as I don't understand what I have done wrong. Thanking you in advance.
Jo
Hi Grace, I am in the UK and I can not find the link for the video tutorial, I did the 1st part of the pattern but am lost as to why, do i start the pattern from Back panel, if not what is the first part for please ??? Jill
Hi grace i am having trouble in the first row (back of the sweater) i can't get 73 stitches i only got 50.should i just repeat it or cjange anything
Hi grace I am very new to crochet I have a question, in the instruction it said ribbing for 73 row my question is I did that for everytime I turn my work is counted as one, but it doesn't had up. My ribbing only give me 43 straight across. What am I doing wrong
Hi. I really need some help. I'm working on the sleeve on Row 6 , I have 33 stitches from Row 5 but everytime i do row 6 i always end up with 34 stitches instead of 33. I have tried it 6 or 7 times now and it's always 34 stitches . Please advise me on this. I really want to finish this sweater 🙁 it's my first time working on a sweater as well:(
P.S. Do you have a pattern for the gorgeous top you are wearing in your picture?
Hello can anyone give me some gauge advice! Lol haven't even begun the Jersey and need help!
Must admit i don't usually do gauge's but really I should be!
Ive crocheted 20 chain, then do i keep going until have 16 rows? And should that measure 10/10 cm square with 15 stitches across?
What if I over 15st or under 15st?
Do i go down or up Hook size?
Thanks
Any gauge advice helpful!
Hello, wondering if possible to make this into a cardy? could i just divide the front into 2 parts, crochet to the top with no neck shaping and attach together? Maybe make a ribbed neck band that extends down both (inner) side of front where the buttons go, with button hole too??!!
have just finished the back, and am now thinking i like a cardy instead!
So for the front (doing size small)instead of chain 73 across, should i split it to about 36 for both front panels of cardy?
Any advice appreciated!
Hello! I was hoping to receive some clarification if possible. The pattern says to use whip stitch seams, but I am wondering whether those seams are made with the right or wrong sides facing. I would also love to know which loops you seamed through for the tops of the rows. I know these are nitpicky details but I'd really appreciate any help you can provide. Thanks so much for the pattern and your help!
So I just started making this sweater and have completed the ribbing and am working up the back panel, might be a dumb question but it says "ch1, sk 1, sc" at the beginning of each row and repeat, im noticing that as I am doing that it's starting to taper almost like a decrease. Was this just a typo amd I shouldn't be skipping the first stitch in each row?
Hi, I’m trying to do a medium 87 rows and the first shoulder I crochet 34 and back to 21, when I start on the other shoulder, I’m not getting 14 in the middle for the neck line, what am I doing wrong
Does this pattern use moss stitch? It seems like you skip each chain and sc in each sc. Is that right? I'm a little confused
I need help! I am working on the front panel, I am doing 69 across on the back panel and I think I’m supposed to be doing 70 across on the front panel. If so my numbers aren’t adding up, I can’t seem to get the stitches to line up. I go through the steps, ch 1, sc in first st, ch 1, sk st, sc in next st…I go all the way across and I can only get to stitch 69 which is a sc then I have 1 stitch left which I’m supposed to skip but I can’t. I’m very confused help please.
I want to make the appropriate size sweater. Can you also include the hip dimensions for each size. Would you also be able to include the finished size of the crochet pieces
Thank you
Hi! I used the CotLin yarn that you put a link to and the back ended up being too short and too wide. Do you have any suggestions? Thank you!!
Your video and your written instructions do not say the same thing on the sleeves. On the video, you say after row 9 go back and repeat 1 through 9 again until you have the desired length. On the written instructions you say after row 9 repeat 2 thru 4. I have done the sleeves 2 times now and they never look quite right. I am having to do some adding to get the right stitch count. I have noticed other people being confused with the pattern and have asked questions but I don't see any response from you. I bought this pattern on Etsy. If I don't get a response from you here, I will go and leave you a review on Etsy.
Row 10 is equivalent to Row 1 for the sleeves
Hi grace.. its quite late comment and my English is so poor.sorry for that,but i need your help.your pattern is so nice that i could not resist myself to make a sweater. In my country sellers are selling 3ply , 4ply milk cotton yarn. Instead of Dk light yarn can I use 3ply?