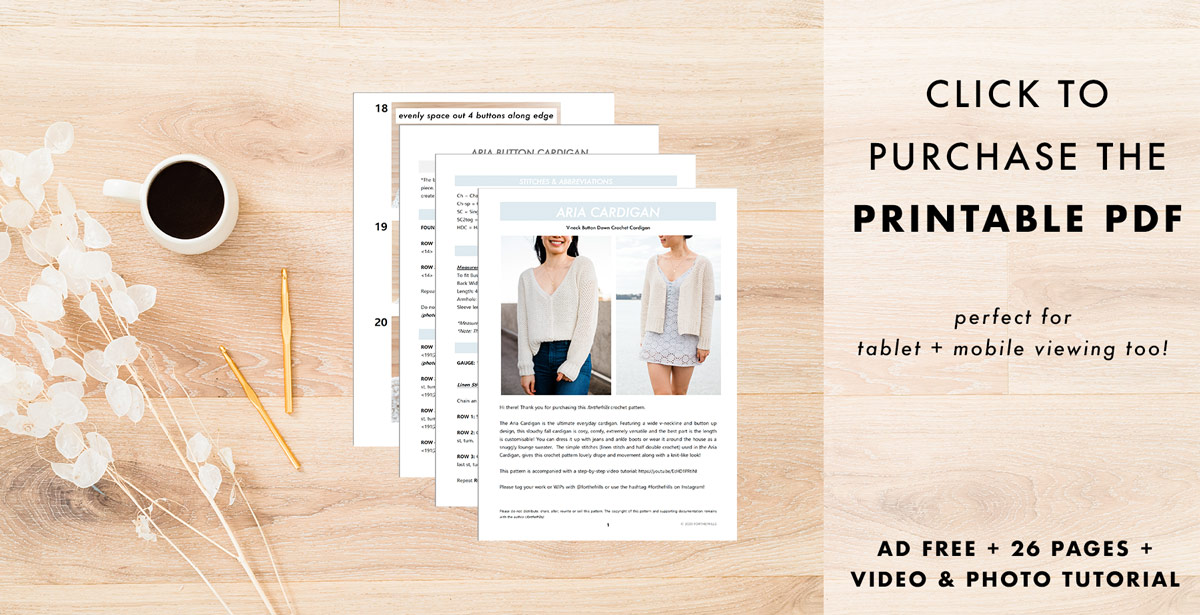
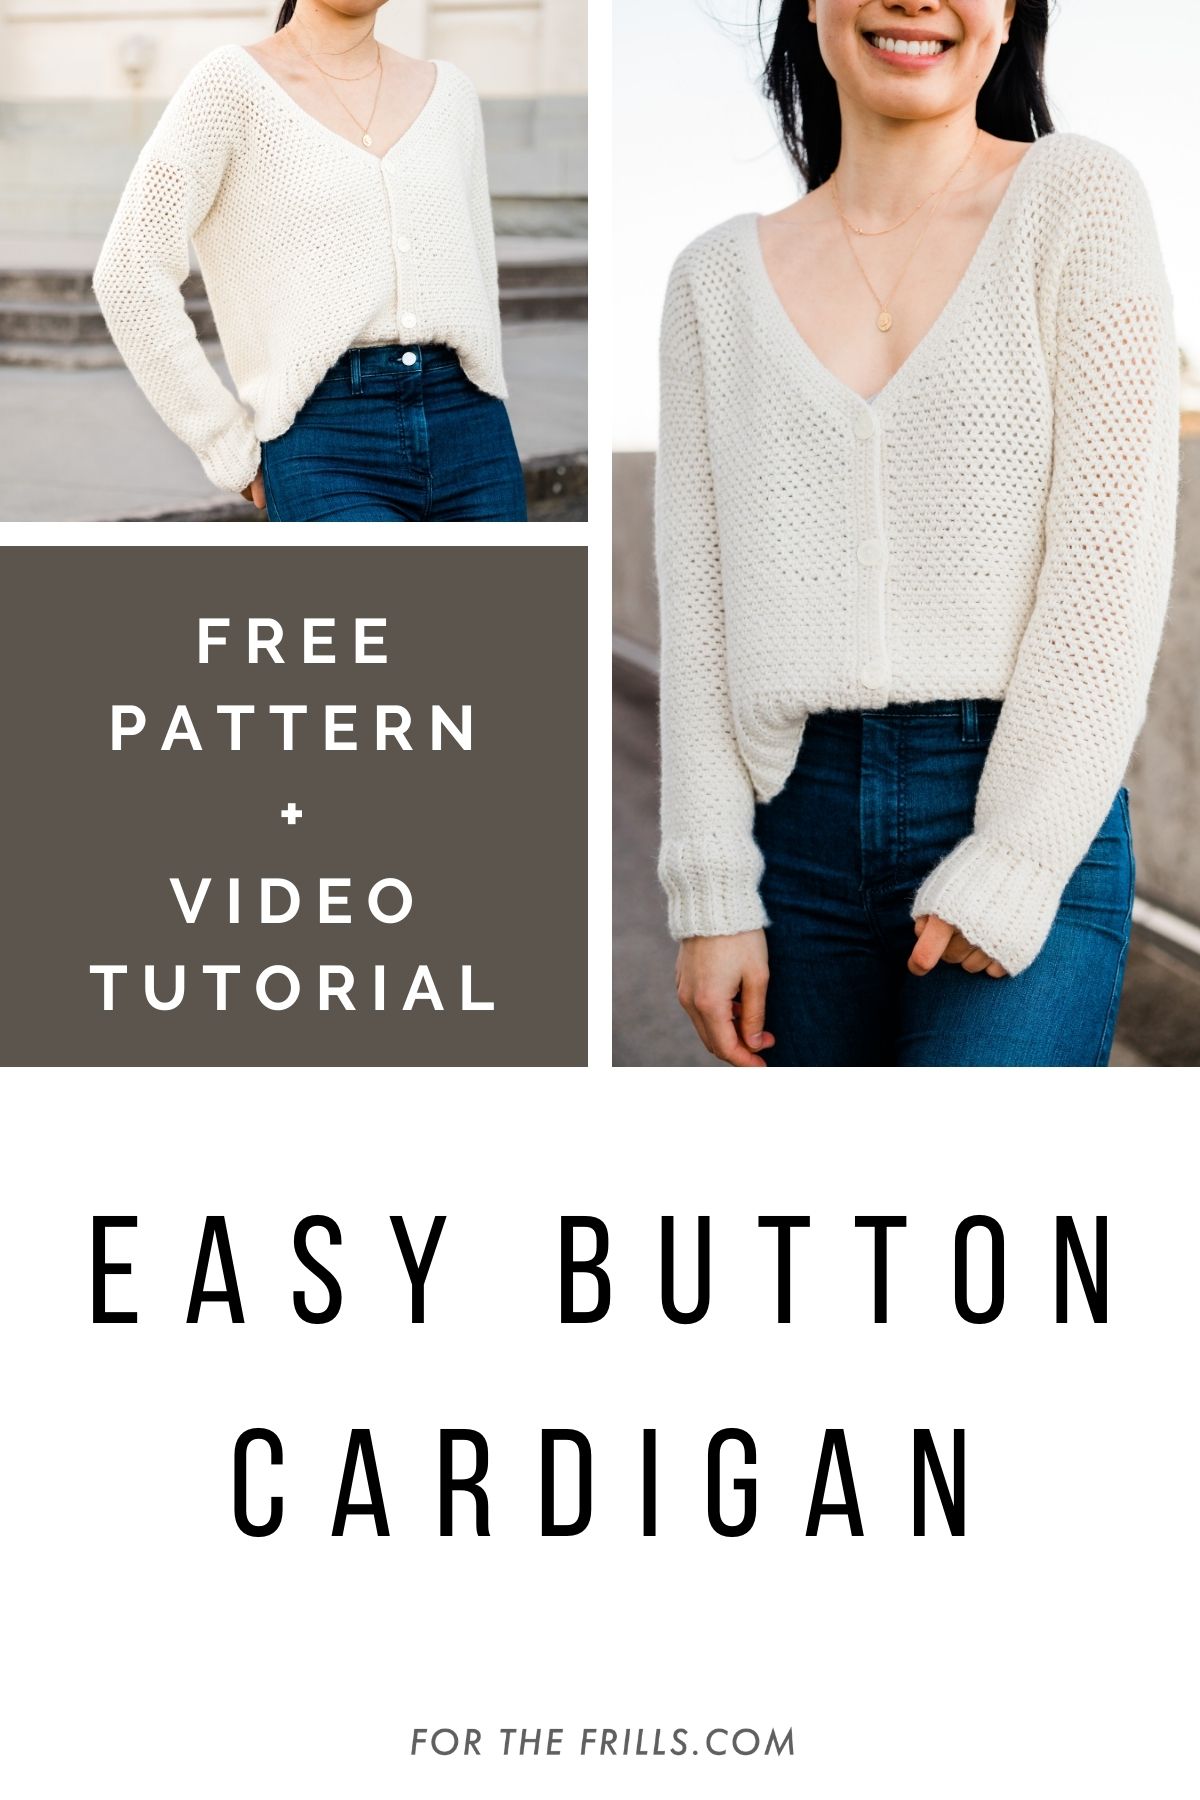
Scroll down for this free crochet cardigan pattern and step-by-step video tutorial, or purchase the ad-free, printable PDF here. Simple stitches and a timeless silhouette combine for the perfect everyday button down cardigan!
Learn how to crochet a cardigan with buttons! Featuring a wide v-neckline and button up design, the Aria Cardigan features easy stitches and knit-look ribbing. If you’ve never crocheted button holes before, don’t worry! There’s detailed photo and video tutorials to guide you along the way.
This post may contain affiliate links, view our disclosure policy for details.
Thank you to WeCrochet for sponsoring this free crochet sweater pattern! As always, all thoughts and opinions are 100% my own 🙂
This slouchy fall sweater is the ultimate everyday crochet cardigan! In the past few months it has leapfrogged over the Briar Pocket Cardigan and Weekend Snuggle Sweater to become my most worn crochet item 🙂
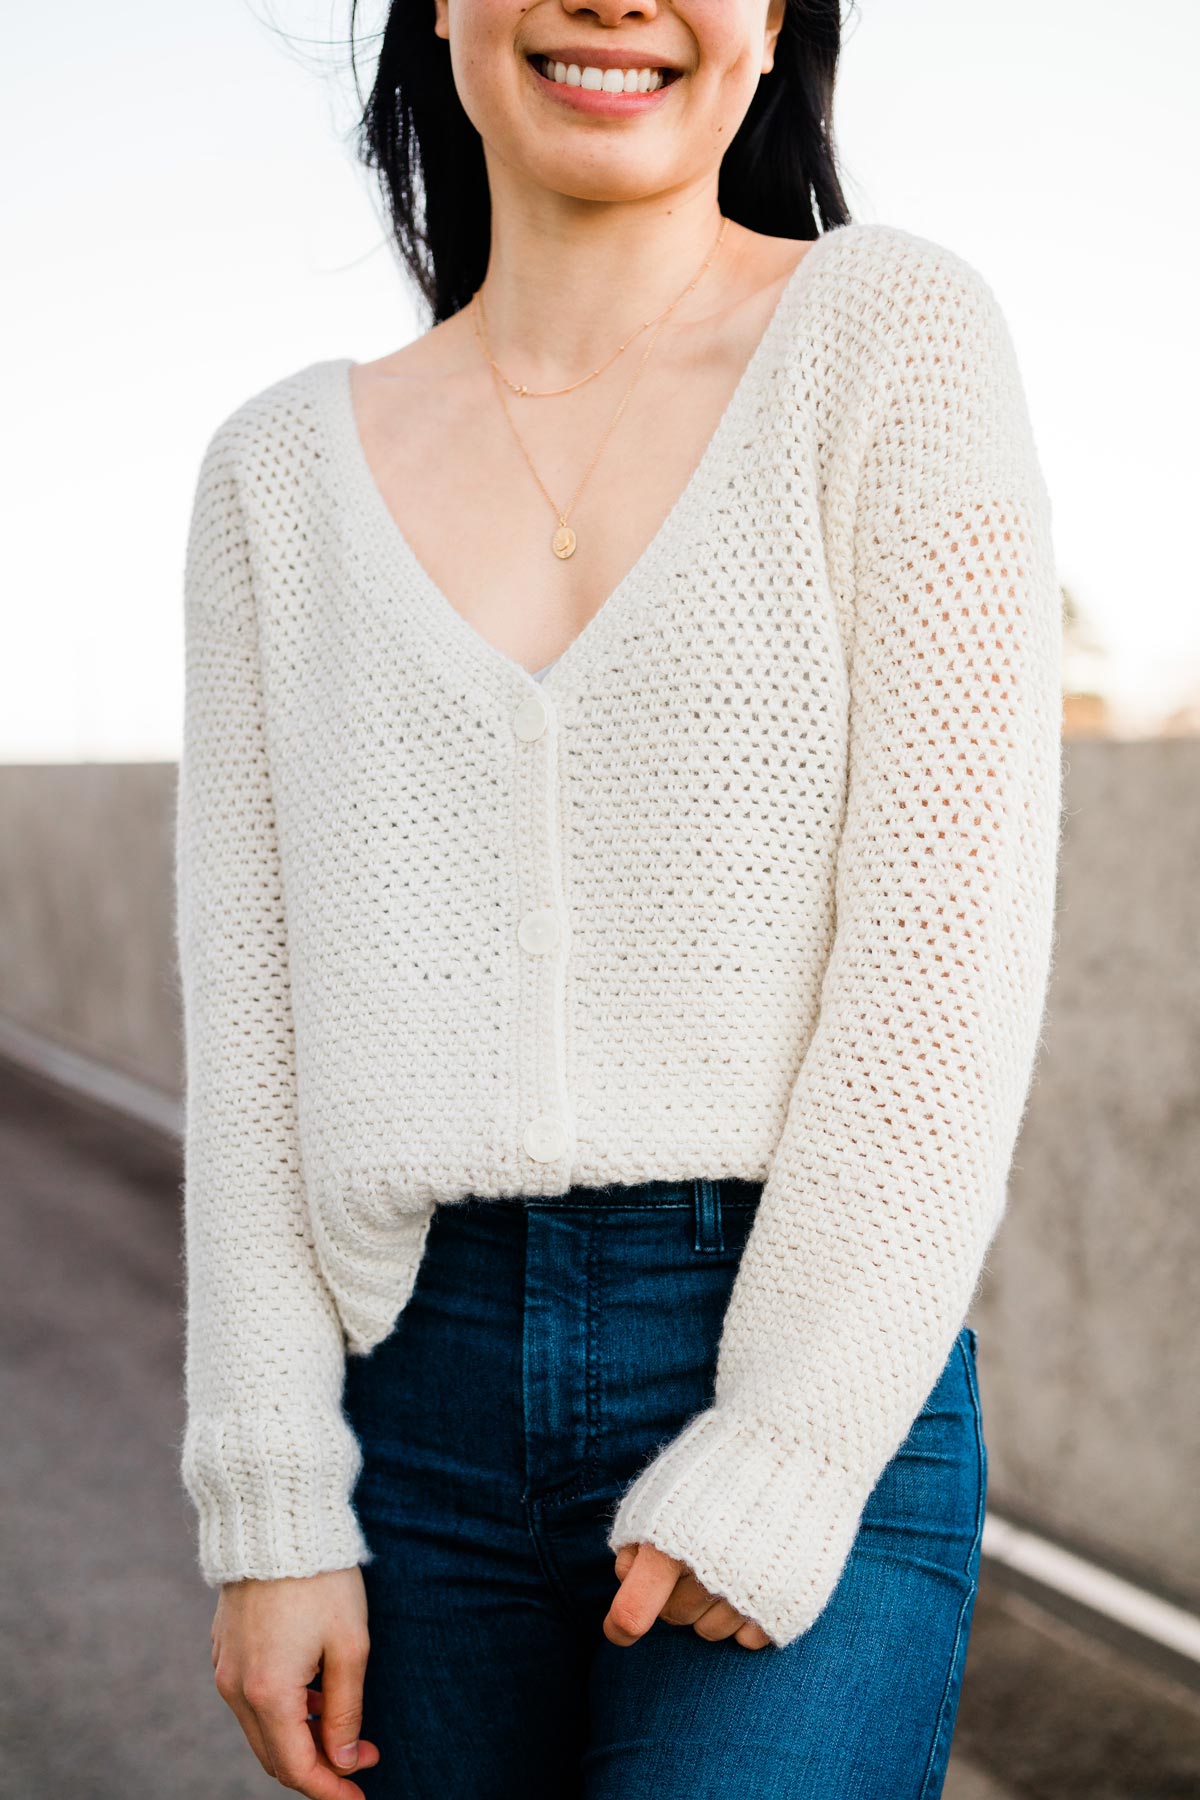
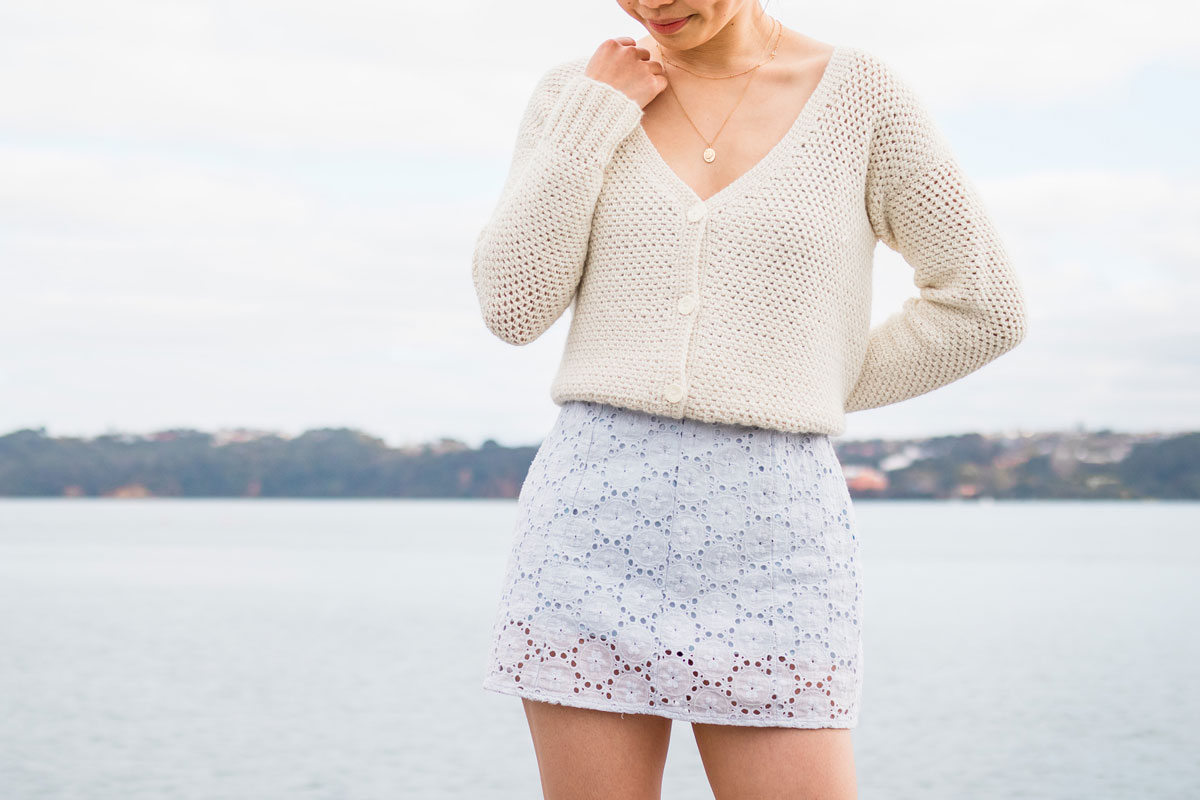
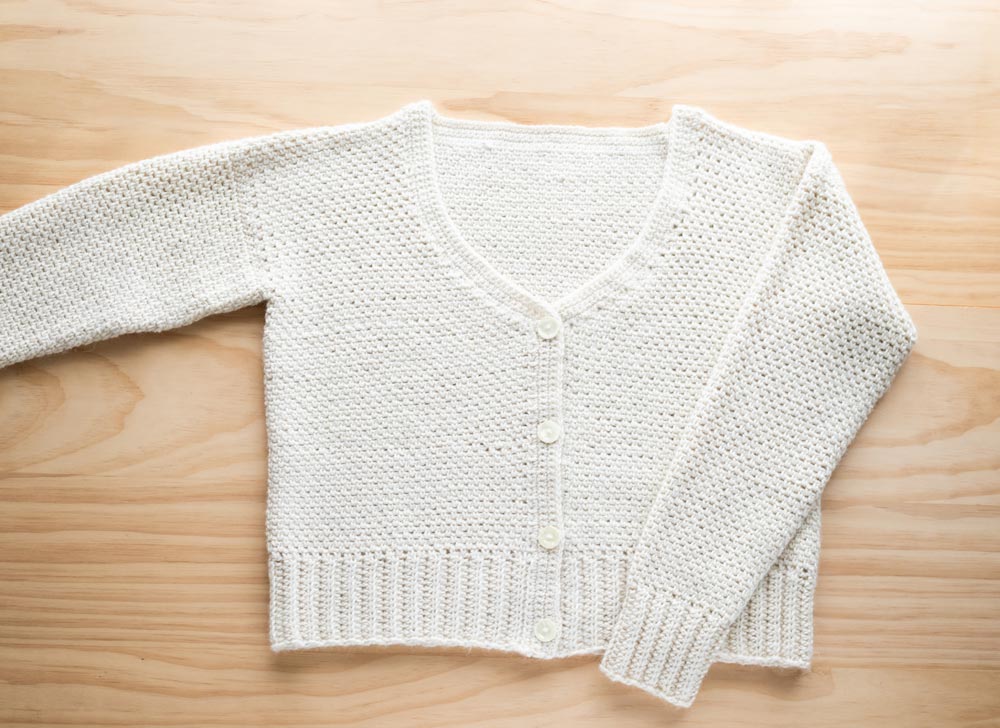
With a flattering v-neck, slouchy body and loosely tapered sleeves, this cardigan is cosy, comfy, extremely versatile and the best part is the length is customisable (long cropped cardigan version is featured the pictures)! You can dress this modern crochet cardigan up with jeans and ankle boots or wear it around the house as a snuggly lounge sweater.
Linen Stitch a.k.a Moss Stitch
This v-neck button down cardigan uses a stitch pattern called the Linen Stitch (a.k.a the Moss Stitch) which is made up of only single crochets and chains. The simple stitch combination is very easy to get the hang of after a few rows of repeats. It has a solid look to it but upon closer inspection you’ll notice that the chains create a very subtle mesh effect.
The linen stitch makes up the bulk of the cardigan while back loop half double crochets form the body and sleeve ribbing. Combined together, these stitches give the Aria Cardigan lovely drape and movement which gives this design a knit-like look!

I love how the stitch texture is so subtle and this v-neck crochet cardigan almost looks store-bought – but in the best way possible! I think that the best crochet garments are designs where you’re not sure if they are made by machine or handmade because they are just so modern and wearable!
You could easily wear this button-up cardigan in fall, winter, spring or even on chilly summer nights! The pattern uses WeCrochet’s Alpaca Cloud DK which is DK/Light (3) and the thickness of this yarn is the perfect weight to wear in any season. It’s light enough to be worn as a layering piece underneath coats, jackets etc. but at the same time this cardigan will keep you warm by itself. The Aria Cardigan is the perfect transitional sweater for in between seasons!
Construction
This simple crochet cardigan is crocheted in 3 panels – 1 body panel and 2 sleeves and only uses 3 different stitches – single crochet, single crochet 2 stitches together and half double crochet!
To begin the Aria Button Cardigan, both the body panels and sleeves are crocheted from the bottom up. We’ll start with crocheting the ribbing using back loop half double crochets. Then, we’ll crochet the Linen Stitch along the long edge of the ribbing and extend the body and sleeves.
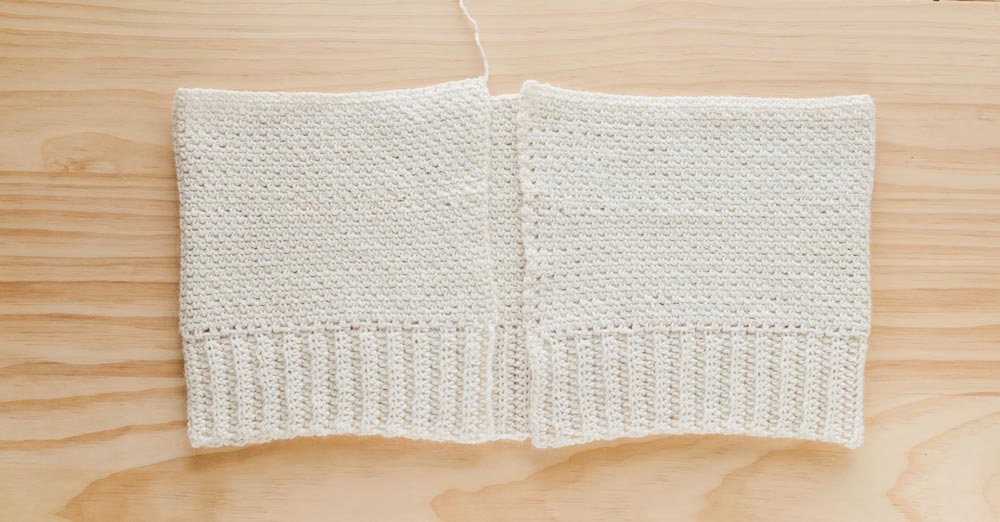
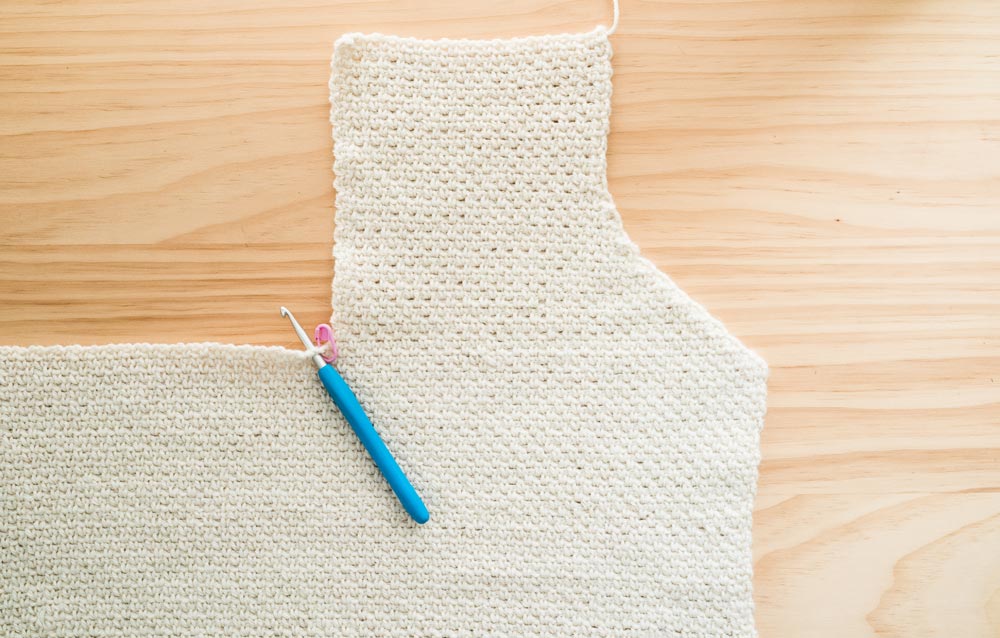
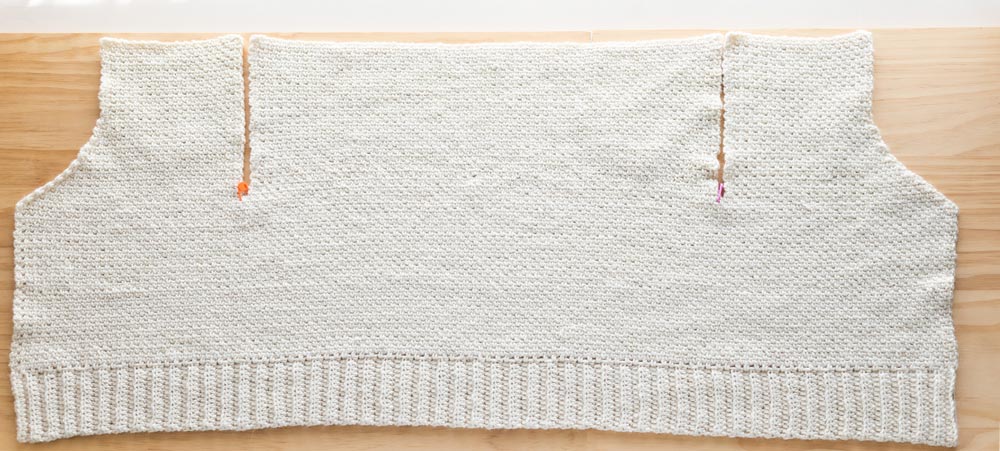
Since the body panel is worked in one piece, we’ll crochet the first front panel with neckline shaping, fasten off, re-insert your hook along the body panel, crochet the back panel, fasten off, re-insert your hook along the body panel and then the second front panel with neckline shaping.
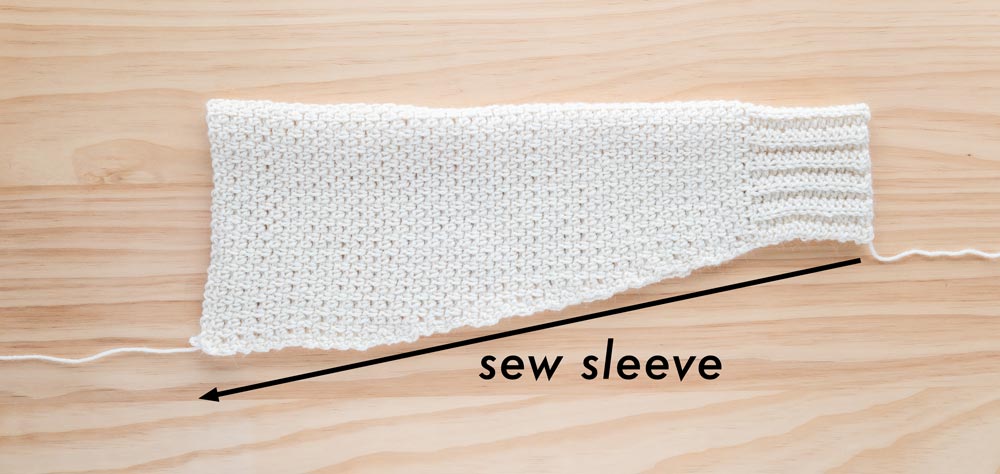
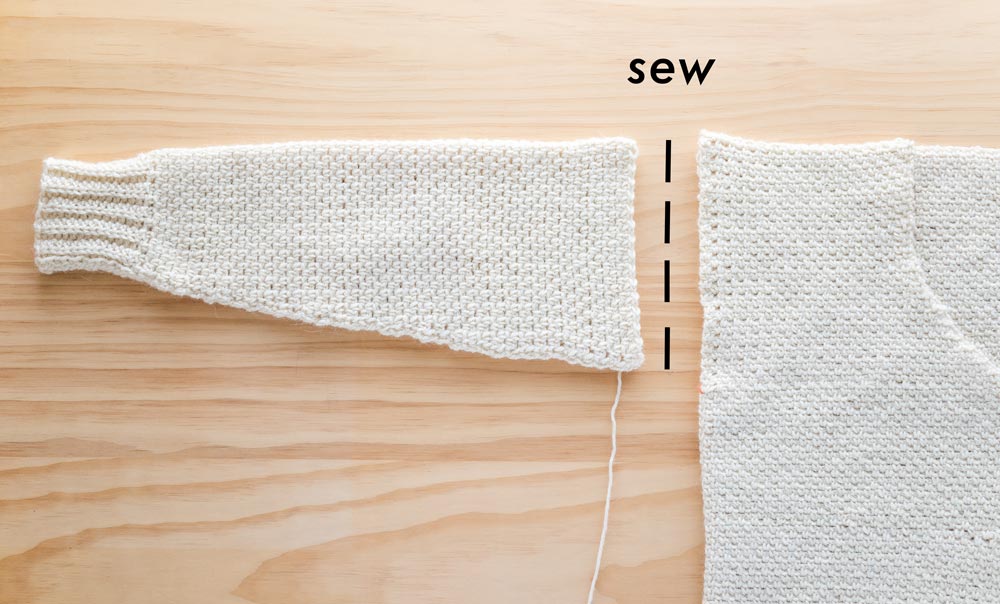
This way the body panel has very minimal seaming – you only need to sew the tops of the shoulders together. The sleeves are sewn together along the long edge and then to assemble simply sew the sleeves to the armholes.
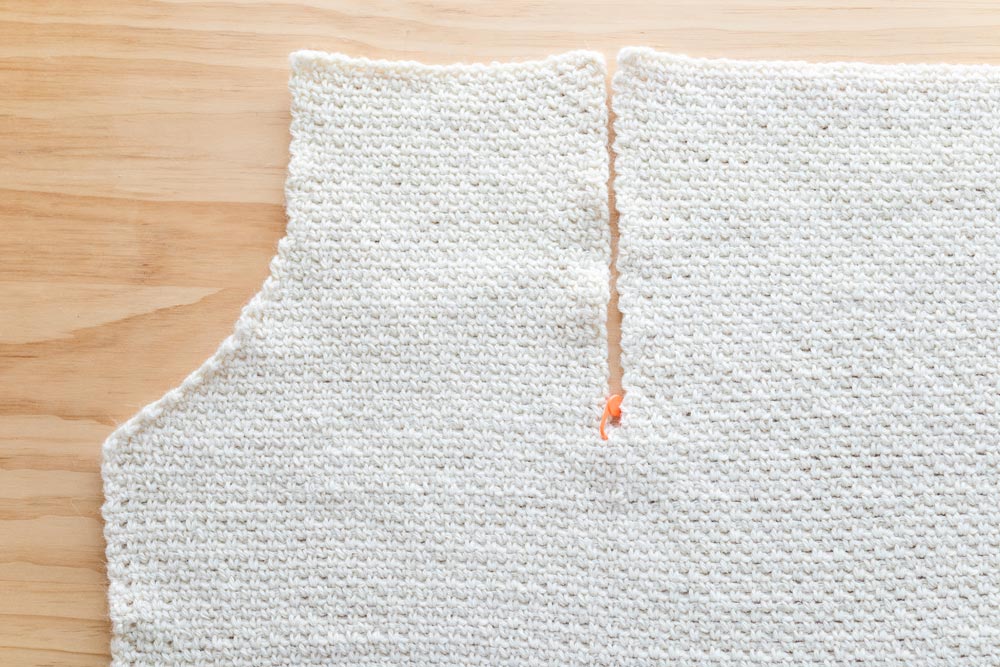
Note: At this point I decided to steam the block the corner edges of my cardigan so that they would lay flat but this step is completely optional! Blocking at the end will also produce the same result.
After assembly you’ll add a single crochet border to your v-neck cardigan, crochet the button holes and then sew the buttons to your cardigan. Weave in your ends, steam your cardigan and you’ll be all done!

How to crochet a button hole?
I’ve classified this pattern as an Easy+ pattern because if you’ve never crocheted button holes before learning this new technique might seem a bit daunting (or at least it was to me haha). But the button hole technique used in this crochet cardigan pattern is seriously SO RIDICULOUSLY EASY!
All you need to do is chain 2, skip 2 stitches, single crochet in the next stitch and then you have a button hole. That’s it! I can’t believe it took me so long to dive into the world of buttons on crochet garments but now that I’ve gotten a hang of it you’ll probably be seeing a lot more button designs in the future.
Crocheters' Top Tip - Stitch Markers
Crocheting the button holes is a breeze so the (relatively) trickiest part of this slouchy cardigan pattern is the v-neck shaping. However, if you can spot the last stitch of every row while decreasing you’ll find that this is an easy crochet sweater pattern (I just added the ‘+’ as beginners might not be familiar with decreasing stitches).
If you’re an adventurous beginner and you’d like to give this pattern a go, just place a stitch marker in the first stitch at the beginning of the row along the decreases (the pattern instructions let you know which rows to place the stitch marker in). That way you’ll know which stitch is the last stitch of the next row – it’s that simple to create a v-neck cardigan!
You can also use the stitch markers to mark out the placement for your button holes. This way your buttons will always match the button holes and fit through the gaps. If you don’t have any stitch markers just use what’s handy. Safety pins, bobby pins, even a paper clip can help in a pinch!
Print + Crochet With Ease
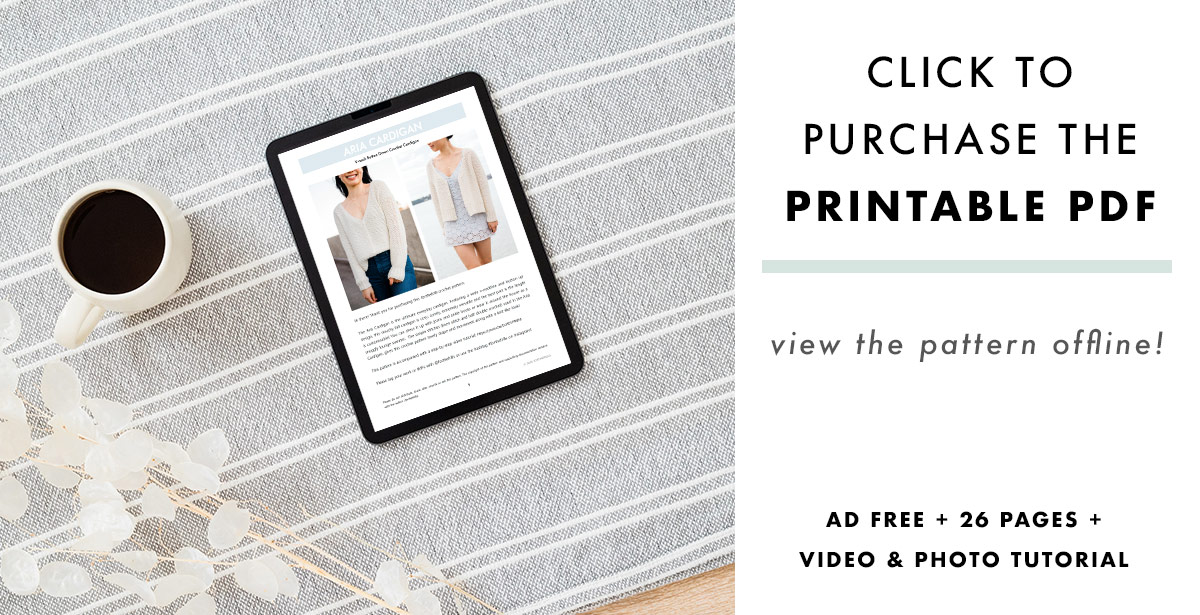
If you love to crochet on your couch, there is always a low-cost, ad-free printable pdf of the free pattern. The easy-to-read print-out is an easy way to view the pattern without having to use a laptop, phone or tablet and it has all photo tutorials and a link to the video.
Since the Aria Cardigan has a lot of detailed photos and explanations, the printed pattern lets you view multiple photos at the same time. If you like to make notes and easily keep track of your project progress, the PDF really makes life easier!
Design Inspiration
My most worn item in my wardrobe is a cashmere cropped button-down cardigan and I’ve been determined to crochet my own for years! However, as time passed it kept getting pushed to the bottom of my to-design list as I now have that cardigan in 5 different colours hehe.
Since I didn’t want to re-create the *exact* same cardigan and my love for cropped button-down cardigans has only grown, I decided I wanted to crochet a button-up cardigan that had the drape and look of a knit cardigan! It needed to be a ‘throw on and go’ sweater that you could wear with anything and I’m so happy with how to Aria Cardigan turned out!
You can wear it out, you can wear it at home and you could probably even wear this crochet cardigan to work (I think the sweater’s silhouette would pair so well with pencil skirts!)
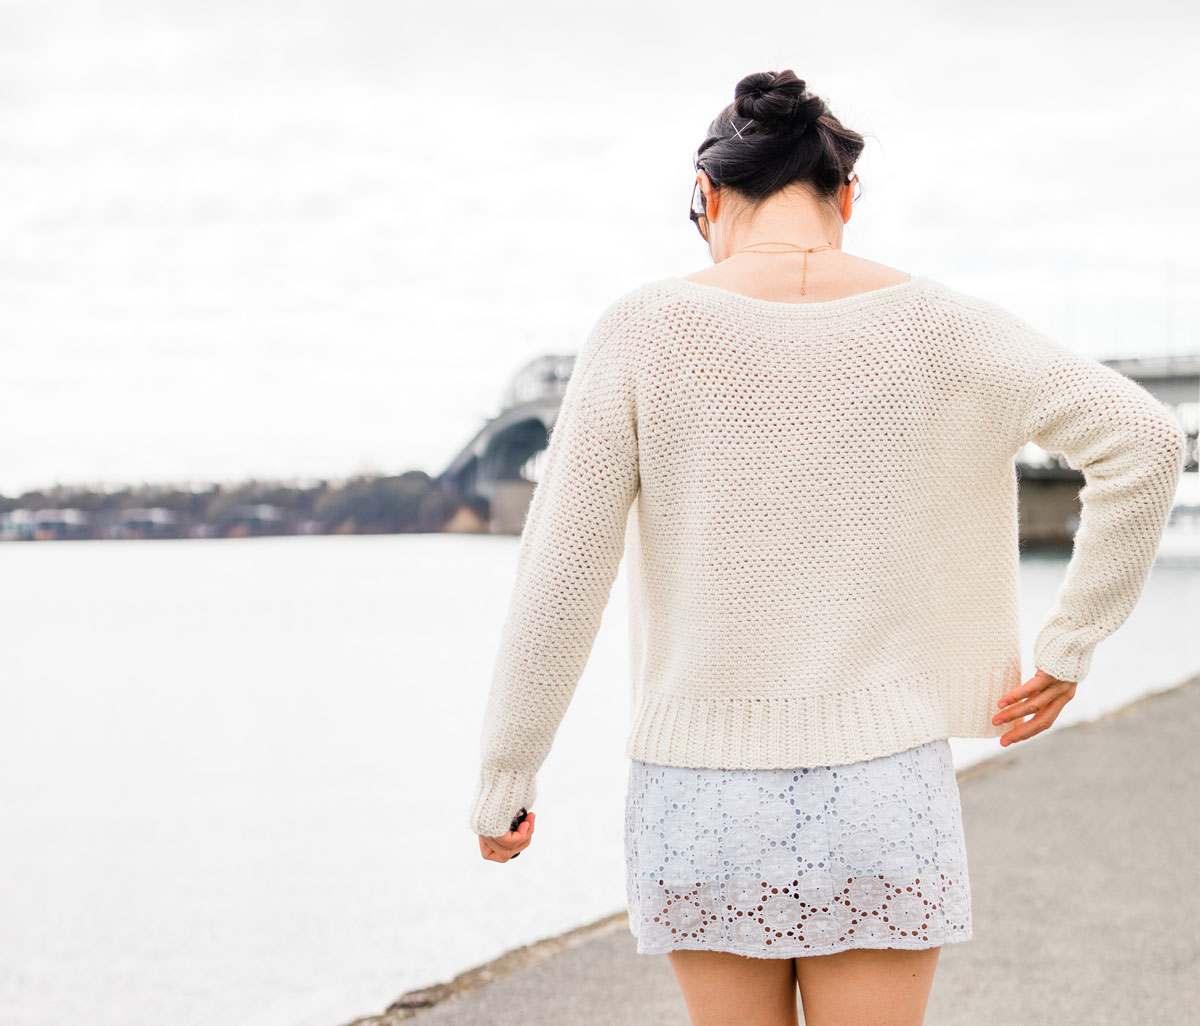
The shape of this cardigan is very loose and boxy while the sleeves are generous enough to wear a long-sleeved shirt underneath. The v-neck is wide so that the cardigan has a slouchy and relaxed fit. I think this cardigan looks just as good tucked into pants or skirts as it does when hanging ‘freely’.
When wearing this v-neck button cardigan over a dress, you can also achieve the ‘tucked’ look but simply wearing a thin belt around your waist (as seen in some of the pictures). Tuck the sweater into the belt and then pull it out slightly so that the cardigan drapes over the belt and hides it from view 🙂
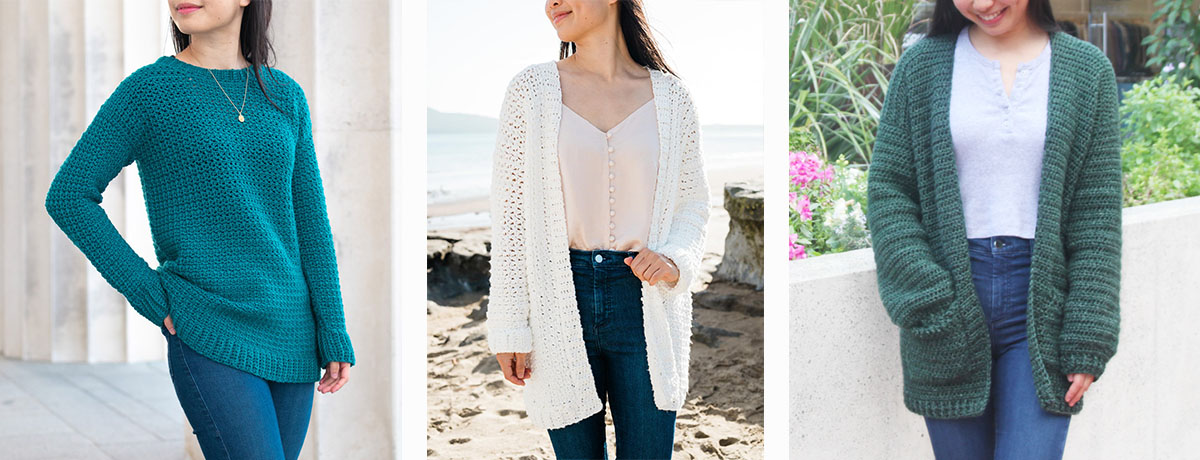
Check out more free cardigan patterns!

1. Twilight Button Cardigan / 2. In The Clouds Pocket Cardigan / 3. Pompeii Button Cardigan
What yarn do I need?
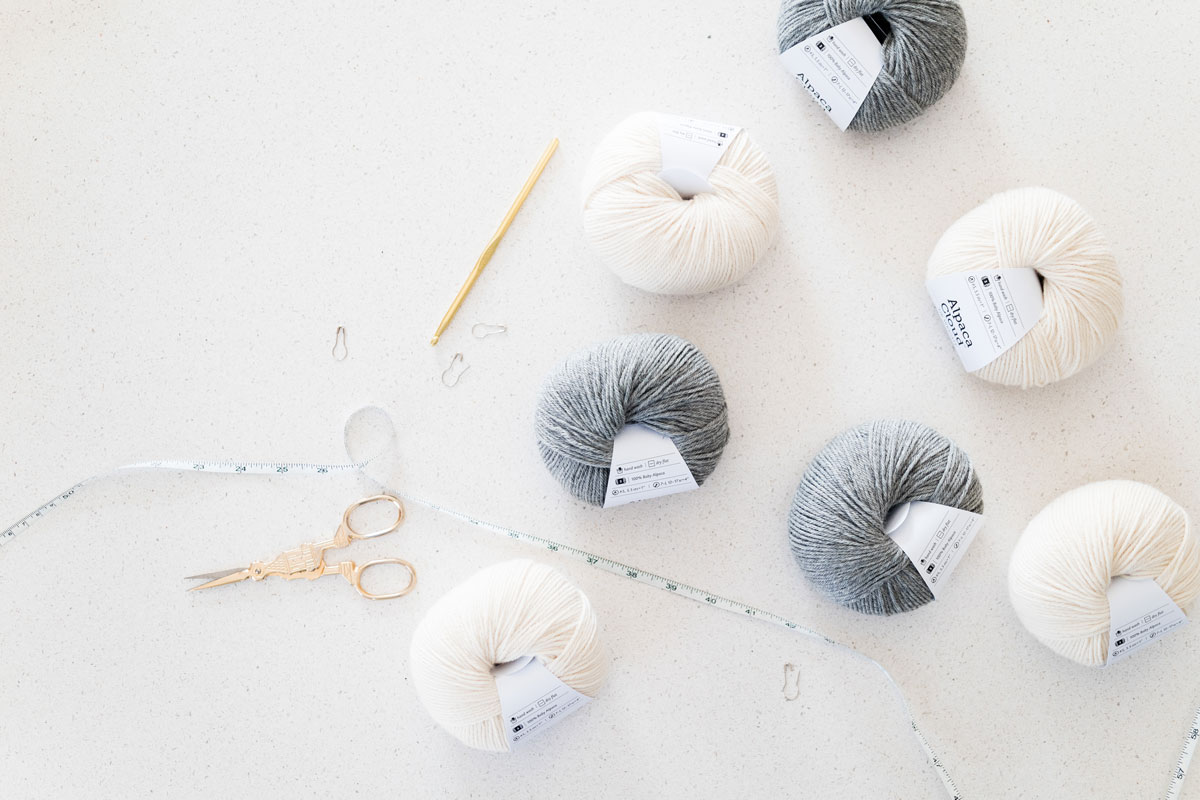
This crochet cardigan pattern uses Alpaca Cloud DK from WeCrochet which is a 100% Baby Alpaca yarn. This yarn literally feels like a cloud – it’s ridiculously soft, fluffy with a loose-ish spin to give it an airy feel with incredible drape.
Since this yarn is so incredibly soft, light and airy (rather than a bouncy and marshmallowy feel) it will stretch out after you’ve worn your crochet cardigan a few times which is great if you like the slouchy look! But just take this into account when picking your size and if you’re in between sizes you’re probably better off sizing down.
There are over 20 shades of which half are neutrals (a good array of creams, beiges, browns and greys) while the other half are what I would call ‘muted brights’. This is because most of the colour ways have a mix of a few different colours to give off a subtle heather effect which is just gorgeous! I chose the shade ‘Sophia’ which is a perfect cream shade – not too yellow and not too white, a perfect neutral!
How to substitute this yarn?
Alpaca Cloud DK is a true DK weight yarn so you can easily substitute it with WeCrochet's Swish DK for a machine-washable version. Most DK/Light (3) yarns will work with this pattern (since the linen stitch has really good drape) but for your cardigan to be as comfy as possible try to choose a soft yarn that has a loose spin.
For a quick test, you can hold a strand of yarn about 5cm/2” long. Hold onto the end of yarn and if the tip droops to touch your fingers it should have a lot of drape. This is perfect for slouchy garments. If the piece of yarn falls to a 90-degree angle, it’s a good for more structured garments that you want to keep their shape e.g. crop tops, boxy sweaters etc. If the yarn is really stiff, it’ll stand up straight or only tilt slightly. These types of yarn are great for structured projects, bags, homewares, coasters etc.
Leftover DK / Light (3) yarn? You can find DK / Light (3) yarn projects here!
Click to pin me for later!
Video Tutorial
If you’re new to crocheting button holes or a visual learner, the video tutorial will help you learn all the techniques needed to crochet this cardigan. Once you’ve completed the Aria Cardigan, you’ll want to check out the Twilight Cardigan – a super chunky button cardigan that works up quickly!
I love to see your finished projects! Use #forthefrills and tag me on Instagram @forthefrills for a chance to be featured 🙂
Add the Aria Button Cardigan to your Ravelry queue!
Get the ad-free, printable pdf version of the Aria Button Cardigan!
Find the step-by-step video tutorial here!
MINI EXPLANATION:
Love the look and function of button cardigans but don’t know where to start? This timeless crochet cardigan is the perfect introduction to the world of crochet buttonholes. Using simple stitches – comprising of single crochet, half double crochet and chains, the body is worked flat in one piece and then two sleeves are sewn on. The button hole ribbing is crocheted directly onto the cardigan and with stitch markers to guide the way, it’s never been easier to crochet with buttons!
Notes:
*Sample is a size small shown on a 5’3” model with a 32” bust.
*The sizing guide follows size XS(S, M, L, XL, 2XL, 3XL). E.g. “Ch 71(79, 87, 95, 103, 111, 119) means Ch 71 for XS, Ch 79 for Small, Ch 87 for Medium, Ch 95 for Large, Ch 103 for XL, Ch 111 for 2XL and Ch 119 for 3XL.” If there is only one number, it applies to all sizes.
*”SC 10” means SC into the next 10 stitches.
*The turning chain ch 1 does NOT count as a stitch, otherwise ch 1 counts as a stitch.
*Total stitches are indicated between < >.
*This pattern uses US crochet terms.
*It is very important to maintain gauge and to check gauge regularly throughout this pattern. Linen Stitch / Moss Stitch can become tighter as you crochet more rows.
*This crochet cardigan is constructed from 3 pieces – 1 body panel and 2 sleeves. The body panel and sleeves are crocheted from the bottom up. The ribbing is crocheted lengthways and the body and sleeves are crocheted directly onto the long edge of the ribbing. For the body panel, we’ll then separate the two front panels and back panel to create armhole openings.
*To assemble, fold the sleeves in half lengthways and sew the long edge together. Sew the shoulder seams together and then sew the sleeves to the armholes. Sew all pieces together with the wrong side facing outwards. With this pattern either side of the stitches can be the ‘right side’. Pick whichever side you prefer, just be consistent when sewing your pieces together. The button hole edging is crocheted directly onto the neckline and then sew the buttons onto the ribbing.
*The length of this cardigan is customisable (alteration instructions provided).
Add approx. 9(10, 10, 12, 12, 13, 14)g of yarn for every additional 2.5cm/1” of length.
Add 1 extra button for every additional 10cm/4” of length.
LEVEL: Easy+
Materials
Yarn – WeCrochet Alpaca Cloud DK – 8ply / DK / Light (3), 112m/50g, 123yds/1.75oz, 100% Baby Alpaca, Sophia
approx. 455(480, 560, 650, 735, 845, 940)g
4 Buttons – 2cm / 0.75” diameter
Stitches & Abbreviations
Ch = Chain
Ch-sp = Chain Space
Sl st = Slip Stitch
SC = Single Crochet
SC2tog = Single Crochet 2 Stitches Together
HDC = Half Double Crochet
BLO = Back Loop
St(s) = Stitch(es)
Rep = Repeat
Sk = Skip
Measurements cm:
To fit Bust: 76(81, 91, 101, 112, 122, 132)
Back Width: 44(48, 53, 58, 62, 68, 73)
Length: 43(45, 49, 52, 55, 60, 64)
Armhole: 15(15, 17, 19, 20, 21.5, 23)
Sleeve length: 41(41, 42, 43, 45, 46, 47)
Measurements inches:
To fit Bust: 30(32, 36, 40, 44, 48, 52)
Back Width: 17.5(19, 21, 23, 24.5, 27, 29)
Length: 17(18, 19, 20.5, 21.5, 23.5, 25)
Armhole: 6(6, 6.5, 7.5, 8, 8.5, 9)
Sleeve length: 16(16, 16.5, 17, 17.5, 18, 18.5)
*Measurements taken from the garment lying flat.
*Note: The length of my cardigan stretched out by 3cm/1.5” after being worn a few times.
GAUGE: 10cm/4” square = 22 stitches wide x 21 rows tall in linen stitch / moss stitch
OR 19 stitches wide x 11 rows tall in back loop half double crochet
Linen Stitch / Moss Stitch:
Chain an even number of chains.
ROW 1: SC in 2nd ch from hook, *ch 1, sk 1 ch, SC; rep from * until end, turn.
ROW 2: Ch 1, SC in 1st st, SC in ch-sp, *ch 1, sk 1 st, SC in ch-sp; rep from * until last st, SC in last st, turn.
ROW 3: Ch 1, SC in 1st st, *ch 1, sk 1 st, SC in ch-sp; rep from * until 2 sts left, ch 1, sk 1 st, SC in last st, turn.
Repeat ROWS 2 – 3 until you reach desired length.
Aria Button Down Cardigan Pattern
Body Panel
*The body panel is crocheted from the bottom up and includes the front and back panels in one piece. The ribbing is worked vertically, and then we crochet along the long edge of the ribbing to create the body panel.
Body Panel Ribbing
FOUNDATION CHAIN: Ch 15.
ROW 1: HDC into 2nd ch from hook, HDC in each st until end, turn.
<14>
ROW 2: Ch 1, BLO HDC 13, HDC in last st, turn.
<14>
Repeat ROW 2 until ROW 96(104, 116, 128, 136, 148, 160).
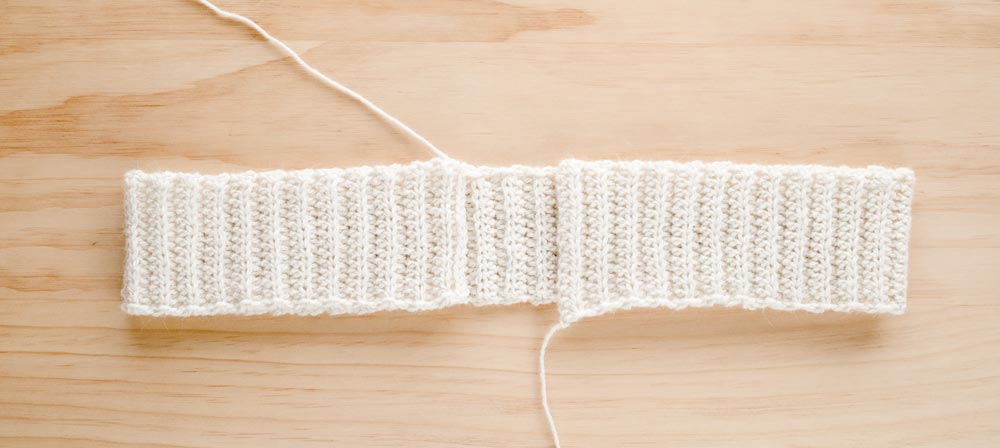
Do not fasten off! We will now work along the long edge of the ribbing.
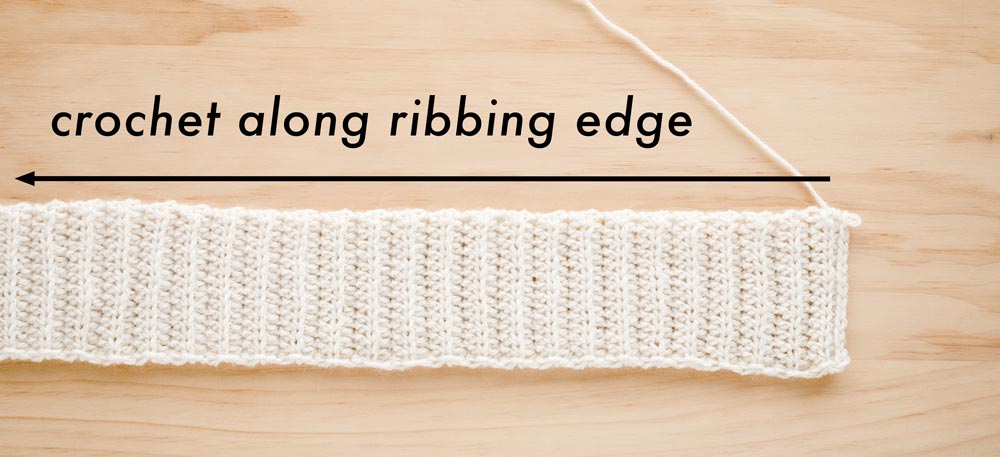
Body
ROW 1: Ch 1, SC in 1st row, *ch 1, SC in next row; rep from * until end, turn.
<191(207, 231, 255, 271, 295, 319)>

ROW 2: Ch 1, SC in 1st st, SC in ch-sp, *ch 1, sk 1 st, SC in ch-sp; rep from * until last st, SC in last st, turn.
<191(207, 231, 255, 271, 295, 319)>
ROW 3: Ch 1, SC in 1st st, *ch 1, sk 1 st, SC in ch-sp; rep from * until 2 sts left, ch 1, sk 1, SC in last st, turn.
<191(207, 231, 255, 271, 295, 319)>
ROW 4: Rep Row 2.
<191(207, 231, 255, 271, 295, 319)>
Repeat ROWS 3 – 4 until ROW 38(38, 40, 44, 48, 52, 56).
<191(207, 231, 255, 271, 295, 319)>
*You can remove/add repeats of Rows 3 – 4 to shorten/lengthen your cardigan.
Keep in mind that the neckline shaping + panel rows add approx. 18(20, 20, 21, 23, 24, 25)cm / 7(8, 8, 8.5, 9, 9.5, 10)” to the current length of your cardigan.
Do not fasten off! Proceed directly to ‘NECKLINE SHAPING’ instructions.
Neckline Shaping
ROW 1: Ch 1, SC2tog, SC in ch-sp, *ch 1, sk 1 st, SC in ch-sp; rep from * until 2 sts left, SC2tog, turn.
<189(205, 229, 253, 269, 293, 317)>
ROW 2: Ch 1, sk 1st st, SC in next st, SC in ch-sp, *ch 1, sk 1 st, SC in ch-sp; rep from * until 2 sts left, SC2tog, turn.
<187(203, 227, 251, 267, 291, 315)>
ROW 3: Ch 1, sk 1st st, SC in next st, SC in ch-sp, *ch 1, sk 1 st, SC in ch-sp; rep from * until 2 sts left, SC2tog, turn.
<185(201, 225, 249, 265, 289, 313)>
Do not fasten off! Proceed directly to ‘FIRST FRONT PANEL’ instructions.
First Front Panel
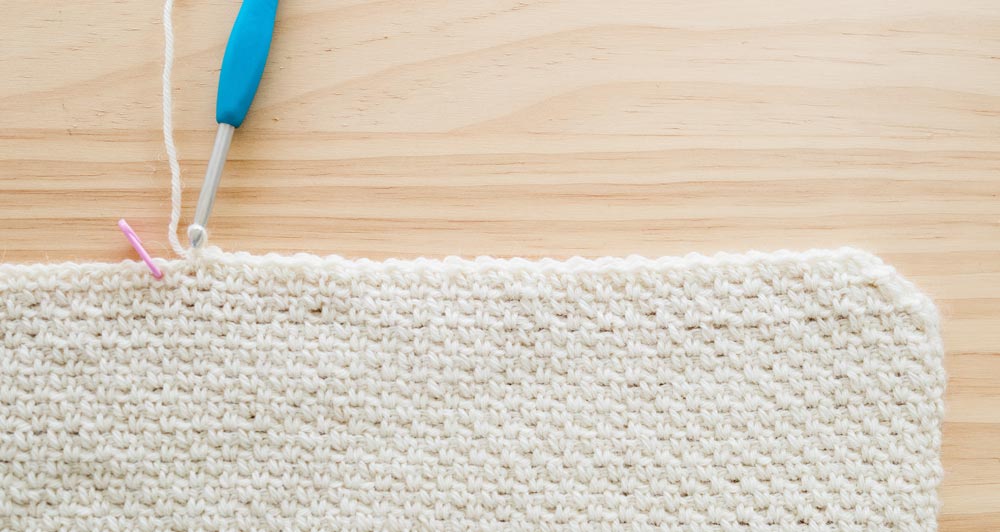
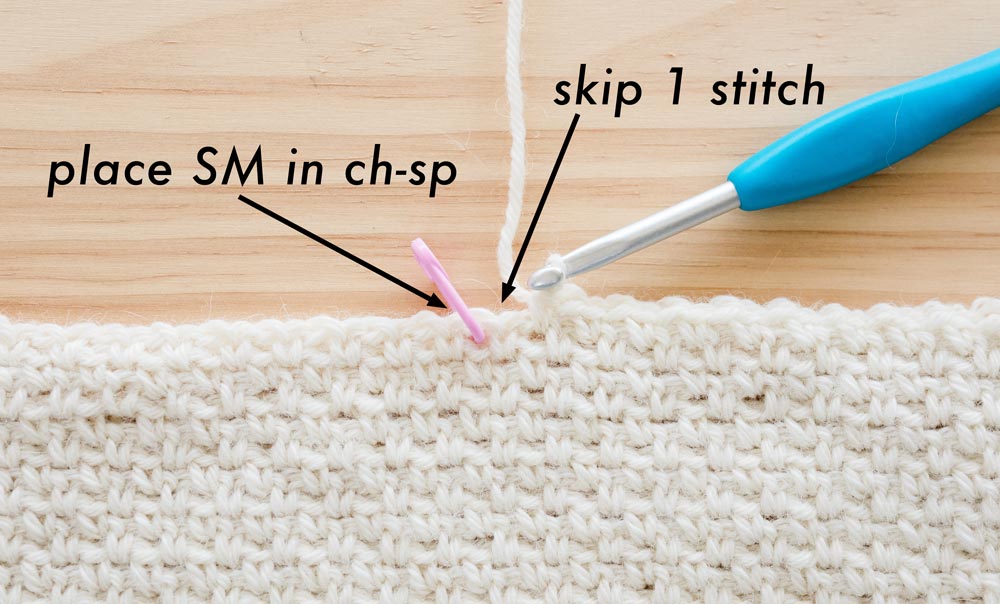
ROW 1: Ch 1, sk 1st st, SC in next st, SC in ch-sp, *ch 1, sk 1 st, SC in ch-sp; rep from * until you have 42(46, 52, 58, 62, 68, 74) sts in the row, sk 1 st, place SM in next st, turn.
<42(46, 52, 58, 62, 68, 74)>
*The SM should be placed in a ch-sp, not a SC.
ROW 2: Ch 1, SC in 1st st, SC in ch-sp, *ch 1, sk 1 st, SC in ch-sp; rep from * until 2 sts left, SC2tog, turn.
<41(45, 51, 57, 61, 67, 73)>
ROW 3: Ch 1, sk 1st st, SC in next st, SC in ch-sp, *ch 1, sk 1 st, SC in ch-sp; rep from * until 2 sts left, ch 1, sk 1 st, SC in last st, turn.
<40(44, 50, 56, 60, 66, 72)>
*If you have trouble recognising the last st of the row, after you skip the 1st st, place a SM in the first SC of the row to make it easier to find.
Repeat ROWS 2 – 3 until ROW 11.
<32(36, 42, 48, 52, 58, 64)>

Row – by – Row Stitch Count:
ROW 4: Rep Row 2.
<39(43, 49, 55, 59, 65, 71)>
ROW 5: Rep Row 3.
<38(42, 48, 54, 58, 64, 70)>
ROW 6: Rep Row 2.
<37(41, 47, 53, 57, 63, 69)>
ROW 7: Rep Row 3.
<36(40, 46, 52, 56, 62, 68)>
ROW 8: Rep Row 2.
<35(39, 45, 51, 55, 61, 67)>
ROW 9: Rep Row 3.
<34(38, 44, 50, 54, 60, 66)>
ROW 10: Rep Row 2.
<33(37, 43, 49, 53, 59, 65)>
ROW 11: Rep Row 3.
<32(36, 42, 48, 52, 58, 64)>
ROW 12: Ch 1, SC in 1st st, SC in ch-sp, *ch 1, sk 1 st, SC in ch-sp; rep * until 2 sts left, ch 1, sk 1 st, SC in last st, turn.
<32(36, 42, 48, 52, 58, 64)>
ROW 13: Ch 1, sk 1 st, SC in ch-sp, *ch 1, sk 1 st, SC in ch-sp; rep from * until 2 sts left, ch 1, sk 1 st, SC in last st, turn.
<31(35, 41, 47, 51, 57, 63)>
ROW 14: Ch 1, SC in 1st st, *SC in ch-sp, ch 1, sk 1 st; rep from * until 2 sts left, SC2tog, turn.
<30(34, 40, 46, 50, 56, 62)>
ROW 15: Ch 1, SC in 1st st, SC in ch-sp, *ch 1, sk 1 st, SC in ch-sp; rep from * until 2 sts left, ch 1, sk 1 st, SC in last st, turn.
<30(34, 40, 46, 50, 56, 62)>
ROW 16: Ch 1, SC in 1st st, SC in ch-sp, *ch 1, sk 1 st, SC in ch-sp; rep from * until 2 sts left, SC2tog, turn.
<29(33, 39, 45, 49, 55, 61)>
ROW 17: Ch 1, SC in 1st st, *ch 1, sk 1 st, SC in ch-sp; rep from * until 2 sts left, ch 1, sk 1 st, SC in last st, turn.
<29(33, 39, 45, 49, 55, 61)>
Repeat ROWS 14 – 17 until ROW 21(21, 21, 21, 25, 25, 25).
<27(31, 37, 43, 45, 51, 57)>
Row – by – Row Stitch Count:
ROW 18: Rep Row 14.
<28(32, 38, 44, 48, 54, 60)>
ROW 19: Rep Row 15.
<28(32, 38, 44, 48, 54, 60)>
ROW 20: Rep Row 16.
<27(31, 37, 43, 47, 53, 59)>
ROW 21: Rep Row 17.
<27(31, 37, 43, 47, 53, 59)>
Sizes XS(S, M, L) only
ROW 22: Ch 1, SC in 1st st, SC in ch-sp, *ch 1, sk 1 st, SC in ch-sp; rep from * until last st, SC in last st, turn.
<27(31, 37, 43)>
ROW 23: Ch 1, SC in 1st st, *ch 1, sk 1 st, SC in ch-sp; rep from * until last 2 sts, ch 1, sk 1 st, SC in last st, turn.
<27(31, 37, 43)>
ROW 24: Rep Row 22.
<27(31, 37, 43)>
Repeat ROWS 23 – 24 until ROW 34(38, 38, 40).
<27(31, 37, 43)>
Fasten off. Proceed to ‘BACK PANEL’ instructions.
Sizes (XL, 2XL, 3XL) only
ROW 22: Rep Row 14.
<(46, 52, 58)>
ROW 23: Rep Row 15.
<(46, 52, 58)>
ROW 24: Rep Row 16.
<(45, 51, 57)>
ROW 25: Rep Row 17.
<(45, 51, 57)>
ROW 26: Ch 1, SC in 1st st, SC in ch-sp, *ch 1, sk 1 st, SC in ch-sp; rep from * until last st, SC in last st, turn.
<(45, 51, 57)>
ROW 27: Ch 1, SC in 1st st, *ch 1, sk 1 st, SC in ch-sp; rep from * until last 2 sts, ch 1, sk 1 st, SC in last st, turn.
<(45, 51, 57)>
ROW 28: Rep Row 26.
<(45, 51, 57)>
Repeat ROWS 27 – 28 until ROW (44, 48, 50).
<(45, 51, 57)>
Fasten off. Proceed to ‘BACK PANEL’ instructions.
Back Panel
Insert crochet hook into st with SM. Secure yarn and pull up a loop.
ROW 1: Ch 1, SC in 1st ch-sp, *ch 1, sk 1 st, SC in ch-sp; rep from * until you have 97(105, 117, 129, 137, 149, 161) sts in the row, sk 1 st, place SM in next st, turn.
<97(105, 117, 129, 137, 149, 161)>
*The SM should be placed in a ch-sp, not a SC.
ROW 2: Ch 1, SC in 1st st, SC in ch-sp, *ch 1, sk 1 st, SC in ch-sp; rep from * until last st, SC in last st, turn.
<97(105, 117, 129, 137, 149, 161)>
ROW 3: Ch 1, SC in 1st st, *ch 1, sk 1 st, SC in ch-sp; rep from * until 2 sts left, ch 1, sk 1, SC in last st, turn.
<97(105, 117, 129, 137, 149, 161)>
ROW 4: Rep Row 2.
<97(105, 117, 129, 137, 149, 161)>
Repeat ROWS 3 – 4 until ROW 34(38, 38, 40, 44, 48, 50).
Fasten off. Proceed to ‘SECOND FRONT PANEL’ instructions.
Second Front Panel
Insert crochet hook into st with SM. Secure yarn and pull up a loop.
ROW 1: Ch 1, SC in 1st ch-sp, *ch 1, sk 1 st, SC in ch-sp; rep from * until 2 sts left, SC2tog, turn.
<42(46, 52, 58, 62, 68, 74)>
ROW 2: Ch 1, sk 1st st, SC in next st, SC in ch-sp, *ch 1, sk 1 st, SC in ch-sp; rep from * until last st, SC in last st, turn.
<41(45, 51, 57, 61, 67, 73)>
*If you have trouble recognising the last st of the row, after you skip the 1st st, place a SM in the first SC of the row to make it easier to find.
ROW 3: Ch 1, SC in 1st st, *ch 1, sk 1 st, SC in ch-sp; rep from * until 2 sts left, SC2tog, turn.
<40(44, 50, 56, 60, 66, 72)>
Repeat ROWS 2 – 3 until ROW 11.
<32(36, 42, 48, 52, 58, 64)>
Row – by – Row Stitch Count:
ROW 4: Rep Row 2.
<39(43, 49, 55, 59, 65, 71)>
ROW 5: Rep Row 3.
<38(42, 48, 54, 58, 64, 70)>
ROW 6: Rep Row 2.
<37(41, 47, 53, 57, 63, 69)>
ROW 7: Rep Row 3.
<36(40, 46, 52, 56, 62, 68)>
ROW 8: Rep Row 2.
<35(39, 45, 51, 55, 61, 67)>
ROW 9: Rep Row 3.
<34(38, 44, 50, 54, 60, 66)>
ROW 10: Rep Row 2.
<33(37, 43, 49, 53, 59, 65)>
ROW 11: Rep Row 3.
<32(36, 42, 48, 52, 58, 64)>
ROW 12: Ch 1, SC in 1st st, *ch 1, sk 1 st, SC in ch-sp; rep from * until last st, SC in last st, turn.
<32(36, 42, 48, 52, 58, 64)>
ROW 13: Ch 1, SC in 1st st, ch 1, sk 1 st, *SC in ch-sp, ch 1, sk 1 st; rep from * until 2 sts left, SC2tog, turn.
<31(35, 41, 47, 51, 57, 63)>
ROW 14: Ch 1, sk 1st st, SC in ch-sp, *ch 1, sk 1 st, SC in ch-sp; rep from * until last st, SC in last st, turn.
<30(34, 40, 46, 50, 56, 62)>
ROW 15: Ch 1, SC in 1st st, *ch 1, sk 1 st, SC in ch-sp; rep from * until last st, SC in last st turn.
<30(34, 40, 46, 50, 56, 62)>
ROW 16: Ch 1, sk 1st st, SC in next st, SC in ch-sp, *ch 1, sk 1 st, SC in ch-sp; rep from * until last st, SC in last st, turn.
<29(33, 39, 45, 49, 55, 61)>
ROW 17: Ch 1, SC in 1st st, *ch 1, sk 1 st, SC in ch-sp; rep from * until 2 sts left, ch 1, sk 1 st, SC in last st, turn.
<29(33, 39, 45, 49, 55, 61)>
Repeat ROWS 14 – 17 until ROW 21(21, 21, 21, 25, 25, 25).
<27(31, 37, 43, 45, 51, 57)>
Row – by – Row Stitch Count:
ROW 18: Rep Row 14.
<28(32, 38, 44, 48, 54, 60)>
ROW 19: Rep Row 15.
<28(32, 38, 44, 48, 54, 60)>
ROW 20: Rep Row 16.
<27(31, 37, 43, 47, 53, 59)>
ROW 21: Rep Row 17.
<27(31, 37, 43, 47, 53, 59)>
Sizes XS(S, M, L) only
ROW 22: Ch 1, SC in 1st st, SC in ch-sp, *ch 1, sk 1 st, SC in ch-sp; rep from * until last st, SC in last st, turn.
<27(31, 37, 43)>
ROW 23: Ch 1, SC in 1st st, *ch 1, sk 1 st, SC in ch-sp; rep from * until last 2 sts, ch 1, sk 1 st, SC in last st, turn.
<27(31, 37, 43)>
ROW 24: Rep Row 22.
<27(31, 37, 43)>
Repeat ROWS 23 – 24 until ROW 34(38, 38, 40).
<27(31, 37, 43)>
Fasten off. Proceed to ‘SLEEVES’ instructions.
Sizes (XL, 2XL, 3XL) only
ROW 22: Rep Row 14.
<(46, 52, 58)>
ROW 23: Rep Row 15.
<(46, 52, 58)>
ROW 24: Rep Row 16.
<(45, 51, 57)>
ROW 25: Rep Row 17.
<(45, 51, 57)>
ROW 26: Ch 1, SC in 1st st, SC in ch-sp, *ch 1, sk 1 st, SC in ch-sp; rep from * until last st, SC in last st, turn.
<(45, 51, 57)>
ROW 27: Ch 1, SC in 1st st, *ch 1, sk 1 st, SC in ch-sp; rep from * until last 2 sts, ch 1, sk 1 st, SC in last st, turn.
<(45, 51, 57)>
ROW 28: Rep Row 26.
<(45, 51, 57)>
Repeat ROWS 27 – 28 until ROW (44, 48, 50).
<(45, 51, 57)>
Fasten off. Proceed to ‘SLEEVES’ instructions.
Sleeves
(make 2)
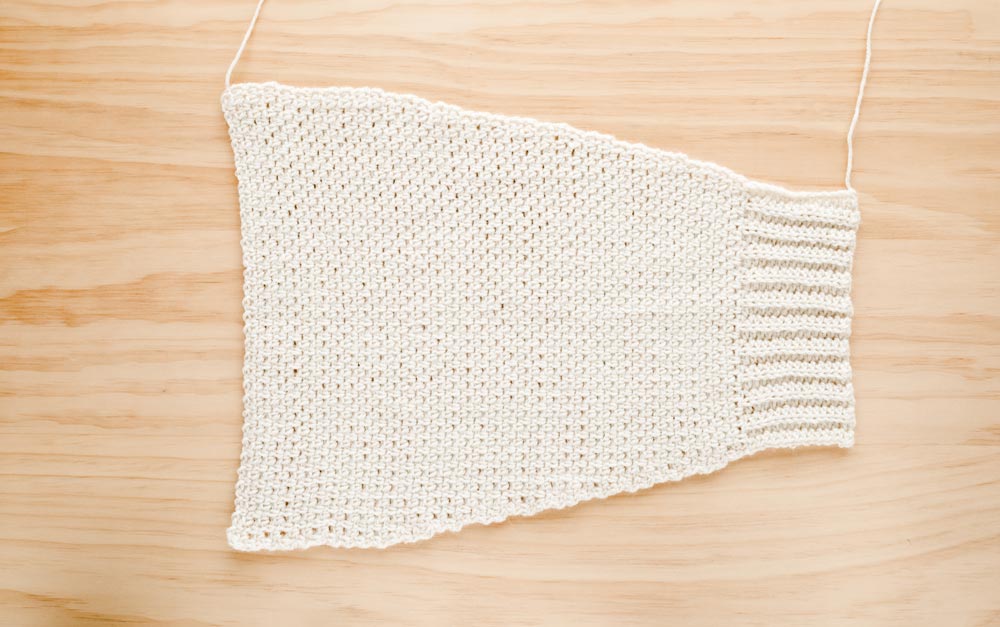
*The sleeves are worked from the cuff up. As with the body panel, we’ll crochet the ribbing vertically and then crochet the sleeve directly on to the edge of the ribbing.
Sleeve Ribbing
FOUNDATION CHAIN: Ch 15.
ROW 1: HDC into 2nd ch from hook, HDC in each ch until end, turn.
<14>
ROW 2: Ch 1, BLO HDC 13, HDC in last st, turn.
<14>
Repeat ROW 2 until ROW 22(22, 24, 26, 28, 30, 32).
Do not fasten off! We will now work along the long edge of the ribbing.
SLEEVE
ROW 1: Ch 1, SC in 1st row, *ch 1, SC in next row; rep from * until end, turn.
<43(43, 47, 51, 55, 59, 63)>
ROW 2: Ch 1, SC in 1st st, SC in ch-sp, *ch 1, sk 1 st, SC in ch-sp; rep from * until last st, SC in last st, turn.
<43(43, 47, 51, 55, 59, 63)>
ROW 3: Ch 1, SC in 1st st, *ch 1, sk 1 st, SC in ch-sp; rep from * until last 2 sts, ch 1, sk 1 st, SC in last st, turn.
<43(43, 47, 51, 55, 59, 63)>
ROW 4: Ch 1, SC in 1st st, ch 1, SC in ch-sp, *ch 1, sk 1 st, SC in ch-sp; rep from * until last st, ch 1, SC in last st, turn.
<45(45, 49, 53, 57, 61, 65)>
ROW 5: Rep Row 2.
<45(45, 49, 53, 57, 61, 65)>
ROW 6: Rep Row 3.
<45(45, 49, 53, 57, 61, 65)>
Repeat ROWS 2 – 6 until ROW 54(54, 64, 39, 39, 39, 39).
<65(65, 73, 67, 71, 75, 79)>
Row-by-Row Stitch Count:
ROWS 7 – 8: Rep Rows 2 – 3.
<45(45, 49, 53, 57, 61, 65)>
ROW 9: Rep Row 4.
<47(47, 51, 55, 59, 63, 67)>
ROWS 10 – 13: Rep Rows 2 – 3 two times.
<47(47, 51, 55, 59, 63, 67)>
ROW 14: Rep Row 4.
<49(49, 53, 57, 61, 65, 69)>
ROWS 15 – 18: Rep Rows 2 – 3 two times.
<49(49, 53, 57, 61, 65, 69)>
ROW 19: Rep Row 4.
<51(51, 55, 59, 63, 67, 71)>
ROWS 20 – 23: Rep Rows 2 – 3 two times.
<51(51, 55, 59, 63, 67, 71)>
ROW 24: Rep Row 4.
<53(53, 57, 61, 65, 69, 73)>
ROWS 25 – 28: Rep Rows 2 – 3 two times.
<53(53, 57, 61, 65, 69, 73)>
ROW 29: Rep Row 4.
<55(55, 59, 63, 67, 71, 75)>
ROWS 30 – 33: Rep Rows 2 – 3 two times.
<55(55, 59, 63, 67, 71, 75)>
ROW 34: Rep Row 4.
<57(57, 61, 65, 69, 73, 77)>
ROWS 35 – 38: Rep Rows 2 – 3 two times.
<57(57, 61, 65, 69, 73, 77)>
ROW 39: Rep Row 4.
<59(59, 63, 67, 71, 75, 79)>
Sizes (L, XL, 2XL, 3XL) only – proceed to ‘Sizes (L, XL, 2XL, 3XL) - SLEEVE INCREASE’
Sizes XS(S, M) only
ROWS 40 – 43: Rep Rows 2 – 3 two times.
<59(59, 63)>
ROW 44: Rep Row 4.
<61(61, 65)>
ROWS 45 – 48: Rep Rows 2 – 3 two times.
<61(61, 65)>
ROW 49: Rep Row 4.
<63(63, 67)>
ROWS 50 – 53: Rep Rows 2 – 3 two times.
<63(63, 67)>
ROW 54: Rep Row 4.
<65(65, 69)>
Sizes XS & S only – proceed to ‘FINAL SLEEVE ROWS’
Size M only
ROWS 55 – 58: Rep Rows 2 – 3 two times.
<(69)>
ROW 59: Rep Row 4.
<(71)>
ROWS 60 – 63: Rep Rows 2 – 3 two times.
<(71)>
ROW 64: Rep Row 4.
<(73)>
Size M only –proceed to ‘FINAL SLEEVE ROWS’
Sizes (L, XL, 2XL, 3XL) – SLEEVE INCREASE
After ROW 39, rep ROWS 2 – 4 until ROW (66, 66, 69, 72).
Row-by-Row Stitch Count:
ROWS 40 – 41: Rep Rows 2 – 3.
<(67, 71, 75, 79)>
ROW 42: Rep Row 4.
<(69, 73, 77, 81)>
ROWS 43 – 44: Rep Rows 2 – 3.
<(69, 73, 77, 81)>
ROW 45: Rep Row 4.
<(71, 75, 79, 83)>
ROWS 46 – 47: Rep Rows 2 – 3.
<(71, 75, 79, 83)>
ROW 48: Rep Row 4.
<(73, 77, 81, 85)>
ROWS 49 – 50: Rep Rows 2 – 3.
<(73, 77, 81, 85)>
ROW 51: Rep Row 4.
<(75, 79, 83, 87)>
ROWS 52 – 53: Rep Rows 2 – 3.
<(75, 79, 83, 87)>
ROW 54: Rep Row 4.
<(77, 81, 85, 89)>
ROWS 55 – 56: Rep Rows 2 – 3.
<(77, 81, 85, 89)>
ROW 57: Rep Row 4.
<(79, 83, 87, 91)>
ROWS 58 – 59: Rep Rows 2 – 3.
<(79, 83, 87, 91)>
ROW 60: Rep Row 4.
<(81, 85, 89, 93)>
ROWS 61 – 62: Rep Rows 2 – 3.
<(81, 85, 89, 93)>
ROW 63: Rep Row 4.
<(83, 87, 91, 95)>
ROWS 64 – 65: Rep Rows 2 – 3.
<(83, 87, 91, 95)>
ROW 66: Rep Row 4.
<(85, 89, 93, 97)>
Sizes L & XL only – proceed to ‘FINAL SLEEVE ROWS’
Sizes 2XL & 3XL only
ROWS 67 – 68: Rep Rows 2 – 3.
<(93, 97)>
ROW 69: Rep Row 4.
<(95, 99)>
Size 2XL only – proceed to ‘FINAL SLEEVE ROWS’
Size 3XL only
ROWS 70 – 71: Rep Rows 2 – 3.
<(99)>
ROW 72: Rep Row 4.
<(101)>
Size 3XL – proceed to ‘FINAL SLEEVE ROWS’
Final Sleeve Rows
Rep ROWS 2 – 3 until sleeve measures 41(41, 42, 43, 45, 46, 47)cm / 16(16, 16.5, 17, 17.5, 18, 18.5)” long.
approx. ROW 69(69, 71, 73, 77, 79, 81)
<65(65, 73, 85, 89, 95, 101)>
Fasten off.
Fold sleeve in half lengthways and whip stitch the long edge of the sleeve together.
Assembly
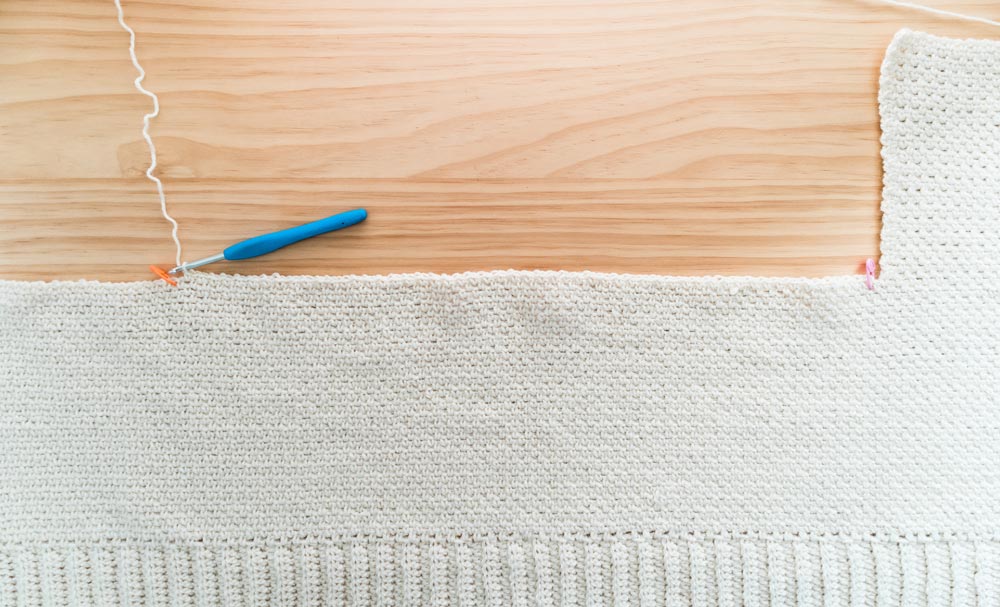
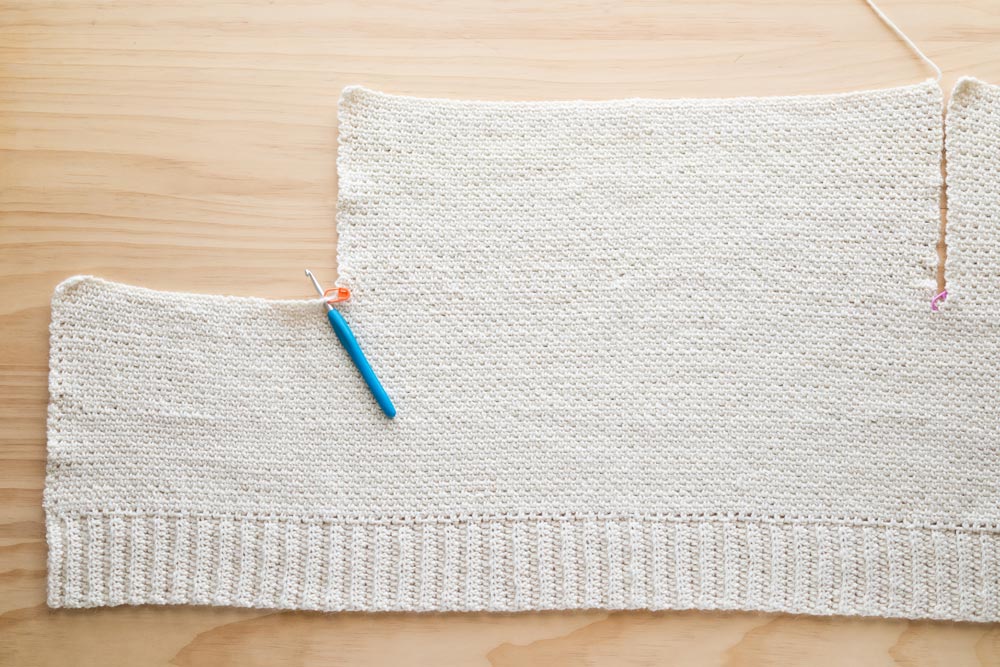
Fold the front panels inwards, whip stitch the shoulder seams together.
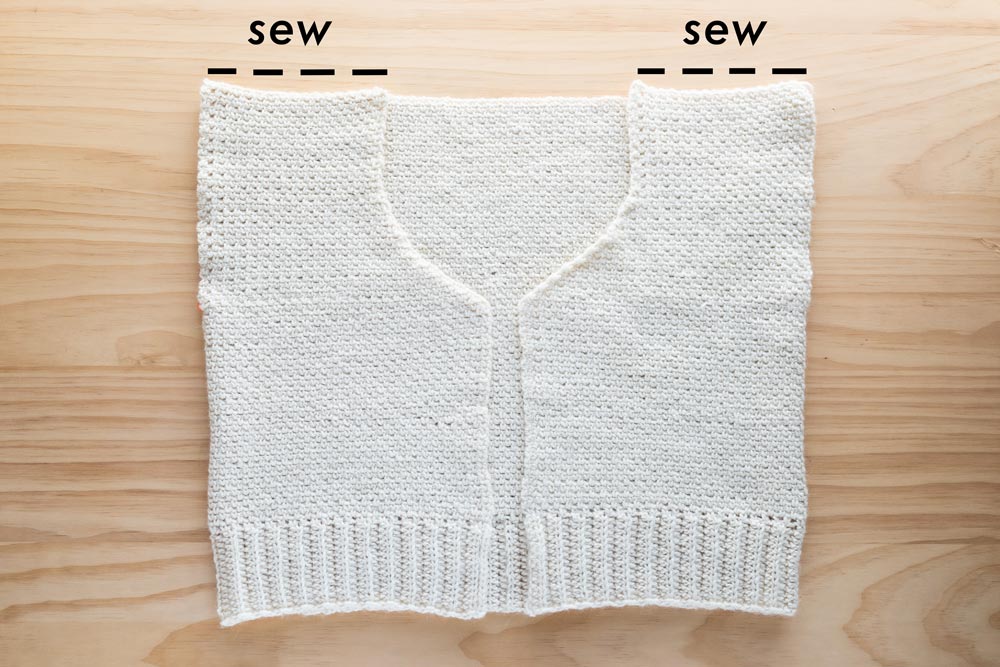
Line up the fold of the sleeve with the shoulder seam. Whip stitch top of sleeves to the arm holes.
Finishing + Button Hole Tutorial
*If the edges of the body ribbing are curled / uneven, steam block the edges so they lay flat before crocheting the edging.
With the right side facing you, insert your crochet hook along the corner of the front panel. Secure your yarn and pull up a loop.
ROW 1: Ch 1, SC evenly along the neckline edge of the cardigan, placing 3 SCs at each point of the ‘V’, turn.
*The exact number of stitches doesn’t matter, rather focus on spacing out your stitches evenly. If your neckline is ruffling you have too many stitches and if your neckline is puckering you have too few stitches.
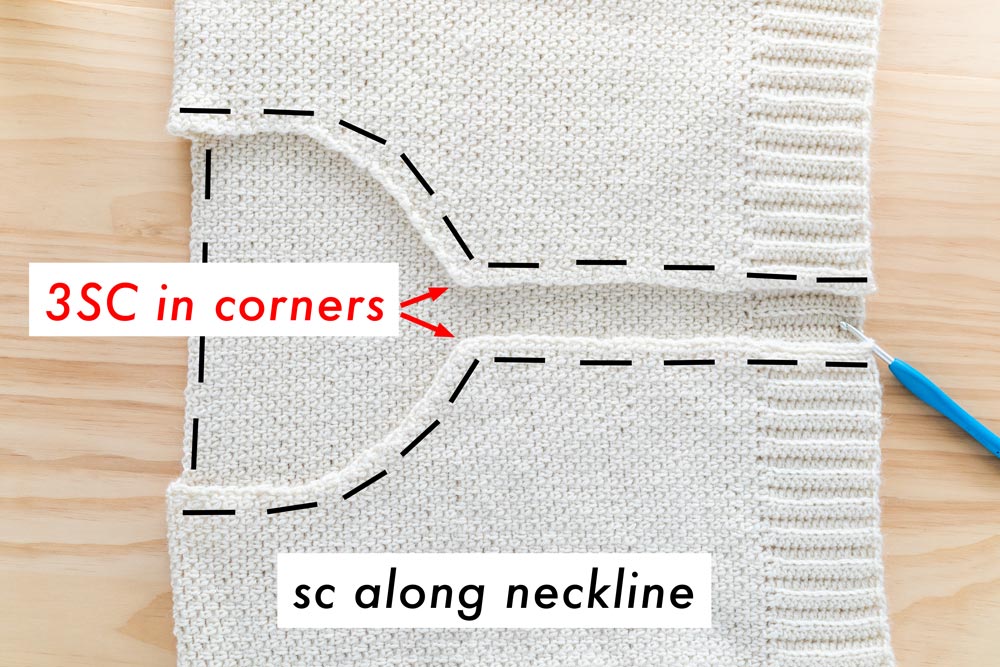
ROW 2: Ch 1, SC in each st until end, turn.
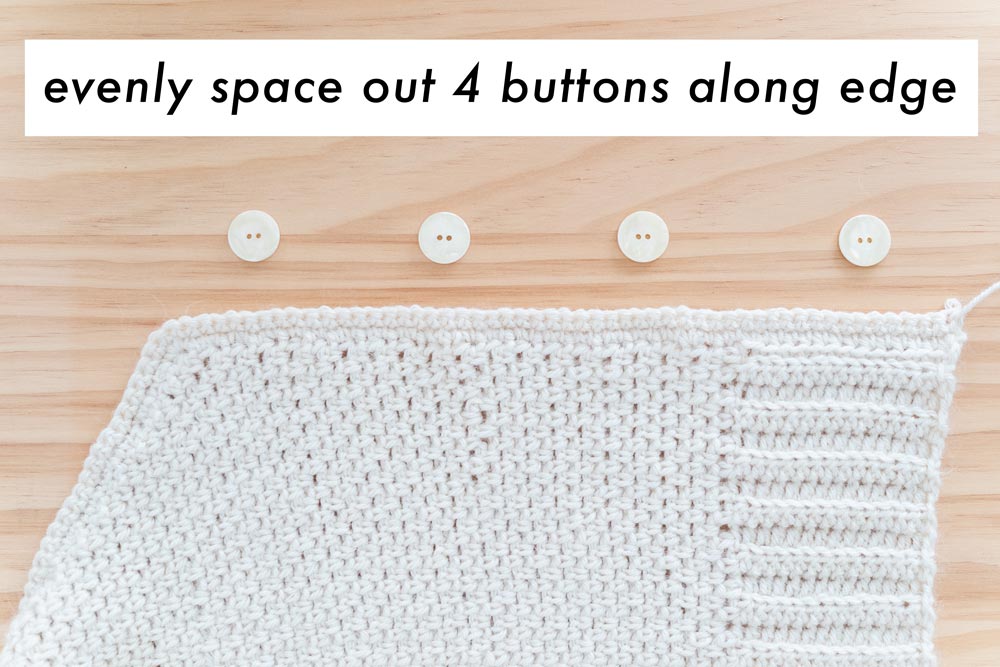
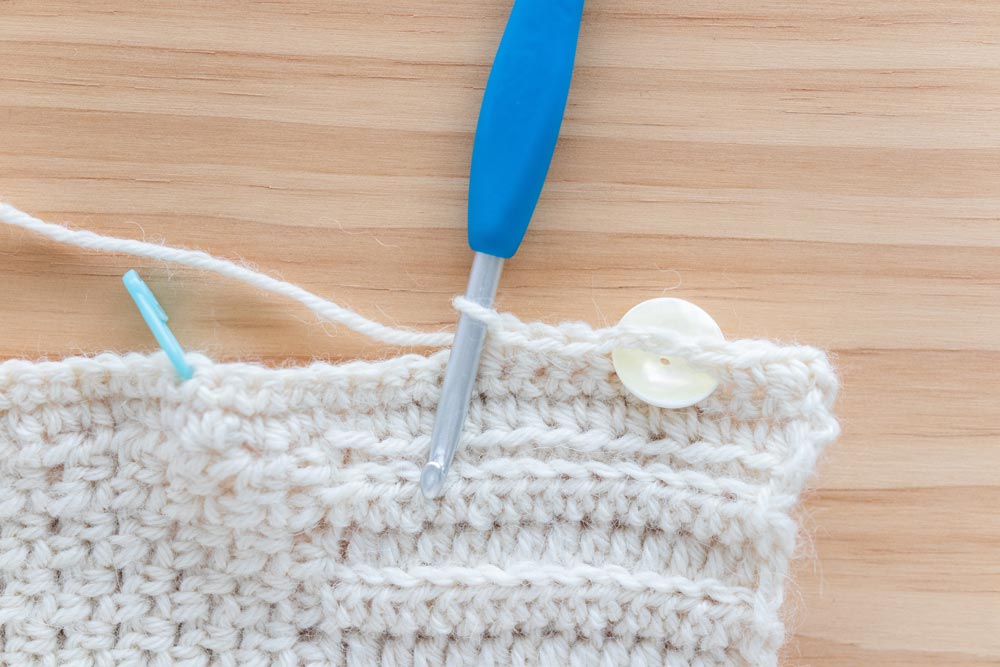
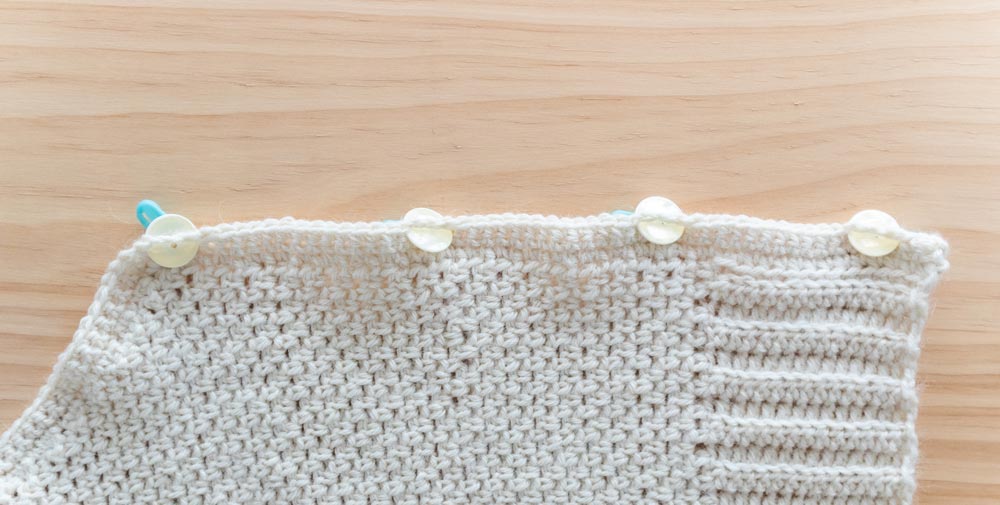
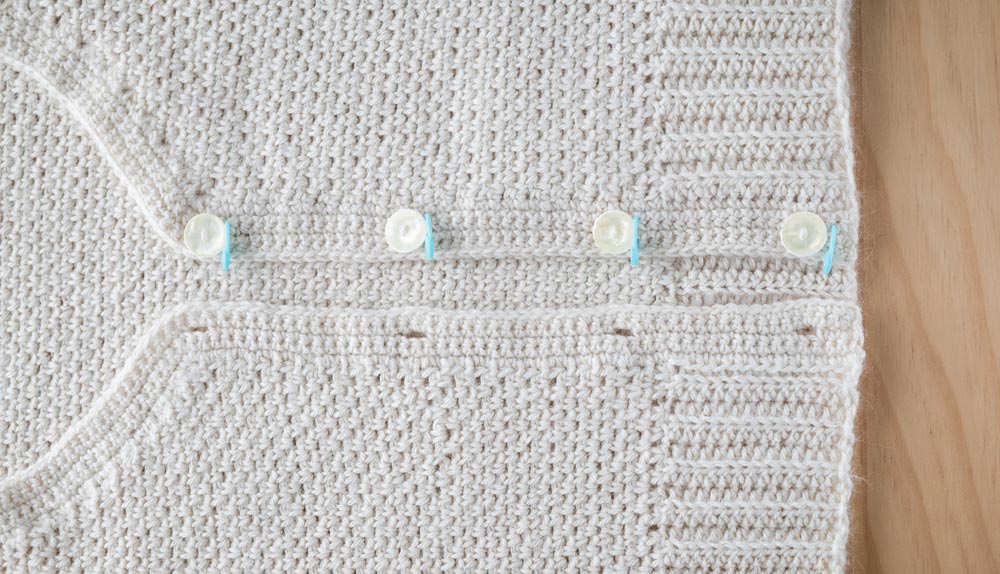
Space out the 4 buttons evenly along the opening edge of the neckline.
*As a point of reference, I placed the 1st (top) button - 1 stitch below the point of the V and the 4th (bottom) button - 3 stitches from the edge of the cardigan. The middle 2 buttons were spaced out evenly in between the 1st and 4th buttons.
Line up a SM with the bottom of each button and place SM in corresponding st.
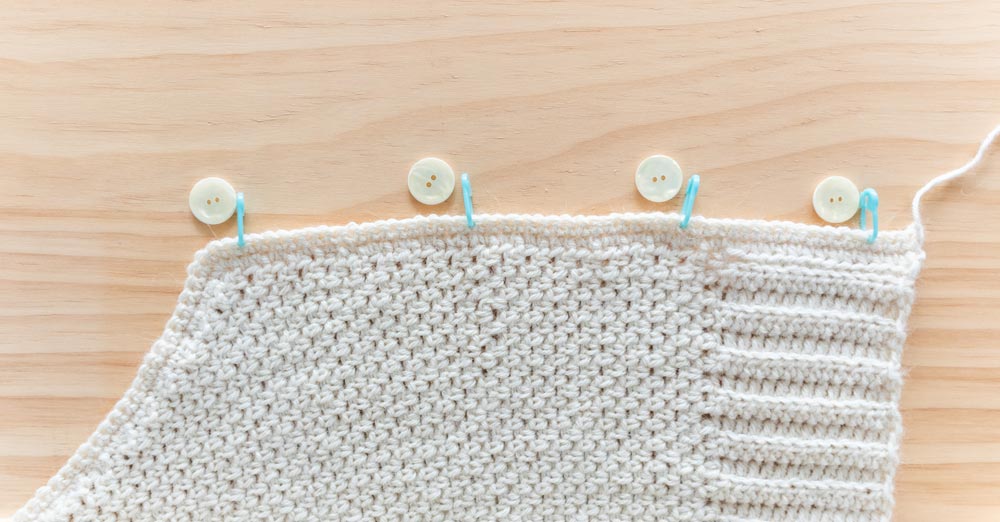
ROW 3: Ch 1, *SC in each st until a SM, ch 2, sk 2 sts, SC in next st;
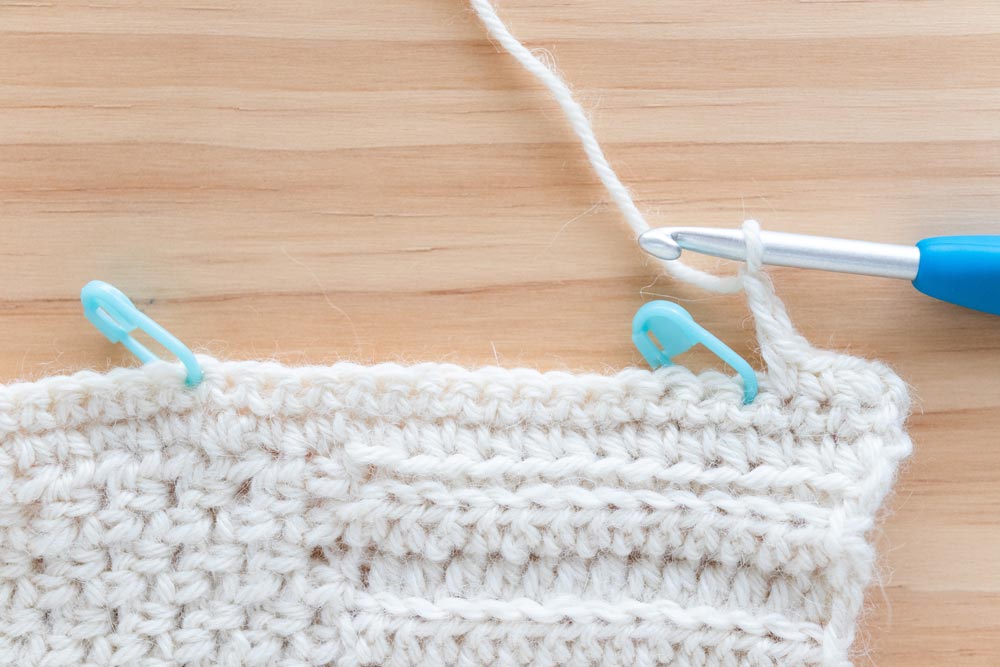
Rep from * until last SM, SC in each st until end, turn.
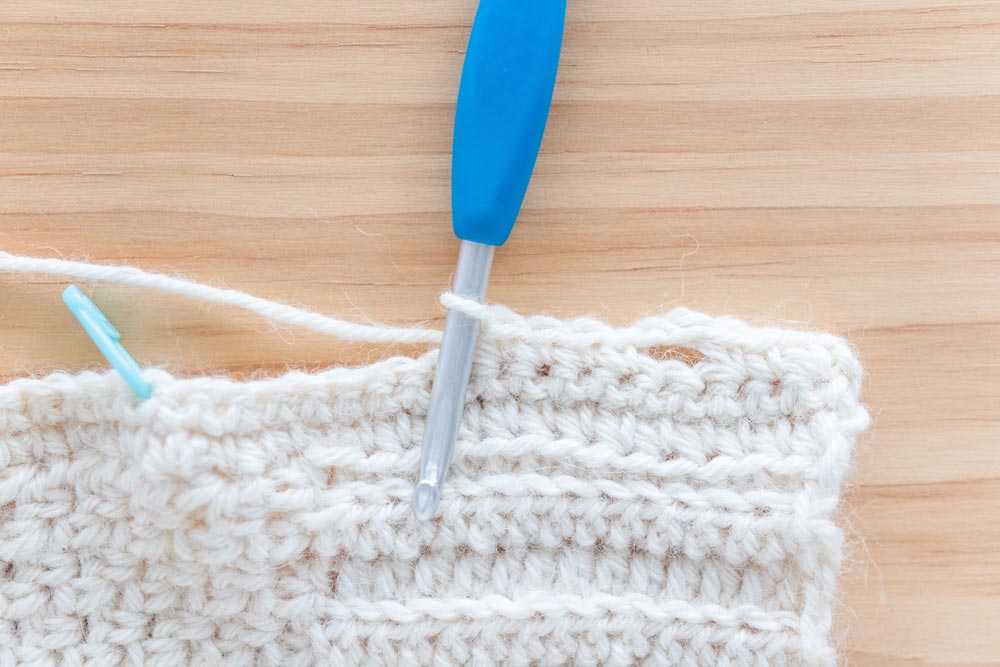
*Make sure your buttons fit in the button holes. If the hole is too small, enlarge the gap by *ch 3, sk 3 sts* and if the buttonhole is too large, *ch 1, sk 1 st*.
ROW 4: Ch 1, SC in each st until end, turn.
*Remember that each ch counts as 1 st – e.g. place 2 SC in each ch-2-sp.
ROW 5: Ch 1, SC in each st until end, turn.
Fasten off.
Sew buttons on the other side of the neckline opening, taking care to match buttons to button holes.
*You can use SMs to mark the button placement.
*If the neckline is ruffling – you’ve placed the button too close together and if the neckline is pulling/puckering – you’ve placed the buttons too far apart.
Weave in all of your ends. Steam block your cardigan.
Voilà! You’ve finished your Aria Button Cardigan 🙂
Looking for you next project?
Check out more free crochet sweater patterns here!
1. Weekend Snuggle Sweater / 2. In The Clouds Cardigan / 3. Briar Pocket Cardigan
You can also find 20+ sweater and cardigan patterns on the blog! As well as fall crochet projects!
at the top it says it's made from 3 stitches - sc, sc2tog and dc but you use hdc in the pattern.
Oops sorry that's just a typo! I've fixed it thanks. The pattern uses sc, sc2tog and hdc 🙂
Absolutely love everything about the Aria V neck Cardigan and will crochet one for my niece.
However I would also love one but the V neck is too low or open for an older woman. Can you give me a tip on how to reduce the opening?
Thank you!
Hi Karen, in the neckline decrease rows I wouldn't decrease (just follow the basic linen/ moss stich row patterns) and then when I started the front front panel rows I wouldn't decrease right away I'd probably crochet about 10 rows with the basic linen stitch pattern and then start to follow the decrease patterns. However, just keep in mind that this is just a guess - I have no way of knowing if it'll give a flattering v-neck since I haven't tried it! Also all of your stitch counts will change so note down the difference so when you crochet the second front panel, the two front panels are identical.
I hope this helps,
Grace
Hi grace!
Love the pattern - I agree, I’m more on the busty side and need the coverage. Any tips for a higher neckline?
U have a very clear and very easy explained pattern. The pictures are very explicit showing exactly where details and arrows are placed in the correct stitches!
Thanks
CW
Hi Cathrin, so glad you find the pattern and photos helpful! Grace 🙂
Just finished this pattern today. The third of your patterns I've made. Super simple and true to size. Love it!
Thank you so much for your comment Jasmine! It makes my day to hear you're enjoying the patterns 🙂
Grace
I'm really struggling with this, I've used the correct size hook and wool to correspond with it however the gauge is completely off. I've nearly finished the first front panel but it's so big I'm thinking of starting again!! For future reference, how would I get the correct gauge? I love this pattern and design so so much but I think it'll look a bit too oversized as I was trying to make an extra small but the measurements are nearly as big as a medium!
Hi Lucy, before starting your project I always recommend making a gauge swatch. Even if you're using the same hook everyone crochets with different tension and even if a yarn is labelled as the same weight they can vary greatly in thickness! Generally to get more stitches per 10cm/4" size down your hook size and to get fewer stitches per 10cm/4" size up your hook size. Also if you search on youtube 'crochet gauge' there are a lot of useful tutorials with detailed instructions.
I hope this helps,
Grace 🙂
Hi: I love this sweater and just bought the pattern, but I want to do it in a cotton yarn of the same weight. I live in egypt and can find a lovely cotton yarn, but no wool. Will this work? Yarn info is: 100 grams - 3.53 oz, 255 m - 278 yds. Thank you!
How many skeins for an xs?
Hi Rachel, all yarn amounts are provided in the 'materials' section of the pattern.
Grace
If you had to choose a yarn from Michael’s to use for this project, what would you choose? I’m leaning towards Lion Brand® Truboo Yarn and wondering if you think that yarn would work well for this cardigan.
Thanks
Hi Emma, I'm from New Zealand so I have no idea what types of yarn are available at Michael's 🙂 In general I'd recommend a Light(3) yarn that has good drape so you're looking for something with a relatively loose twist and a nice amount of stretch - acrylic and merino would work well. Truboo is a bamboo yarn so it's not really stretchy but it will have amazing drape so I think it could work but as always crochet a swatch to make sure you can match gauge.
Grace 🙂
Hi Grace, thank you for making this beautiful pattern! I've only just started crocheting (your beginner's crop top being the first one!) so I'm a bit lost on yarn substitutes. I wanted a yarn that I could put in the washing machine and buy in the UK so I ordered some King Cole Merino Blend DK yarn. This yarn is 100% wool and apparently a good substitute for the Swish DK yarn you recommended but I'm not loving the colour. I'm now considering the Drops cotton merino which is 50% cotton and 50% merino wool. Would this be suitable for this project? I'm not too sure on what the difference is between merino wool and cotton so I'd really appreciate your recommendation!
Thank you so much!
Sophia 🙂
Hi Sophia, so glad you're enjoying crocheting! Oh I have Drops Cotton Merino in my stash and it's a lovely yarn. It should still work for this pattern (but as always crochet a swatch to make sure your cardigan will turn out the right size!), I think it will just be *slightly* less drapey and slouchy as the sample cardigan as that yarn is a bit more 'bouncy'. But overall your cardigan should still look great!
I hope this helps, Grace 🙂
Hi Grace, firstly thank you for this lovely pattern and all the hard work you've put into it!
I'm at the body panel ribbing stage but I think I've accidentally used slightly thicker wool, so that I'm up to 73 rows and it already fits loosely around me, so 96 will be too big. I don't suppose you could advise me on reducing the pattern so that I can keep what I've done rather than starting again? I'd be really grateful!
Hi Louise, since this pattern has a v-neck and the body is worked in one piece it's quite a tricky one to alter if your gauge doesn't match the pattern. If you're willing to experiment, I'd start off by crocheting the ribbing until it's double the back width measurement for your size and then following the measurements provided in the pattern as a guide. Since I haven't tried it out I can't guarantee that your cardigan will look like the sample sorry!
Grace
Hey Grace! Such a lovely cardigan! I would love to give this a try, but unfortunately I only came across a 3 ply / 3mm diameter alpaca yarn. Would this work too? And if so, what would be the right crochet hook size? I'm quite a beginner (and currently working on the Skylar Crop top) , so I would like to receive advice from you 😊
Hi Nat,
So glad you've discovered crochet! One of the most important tips for crocheting garments is too make sure that you meet the gauge stated in the pattern. Some patterns like the Skylar Crop Top are really easy to alter, but the majority won't work out properly if you don't meet gauge! Since this pattern has a complicated v-neck construction I'd highly recommend finding a DK yarn (with good drape) and crocheting a swatch to make sure you meet gauge and then start the pattern.
I hope this helps,
Grace 🙂
Hi,
lovely pattern, but how should you proceed if I am hoping to make a cropped cardigan? Should I begin working on the front panels earlier? Thanks in advance.
Hi Daniella,
Yes exactly! Crochet fewer rows for the body panel. The pattern includes alteration instructions so just make sure to check the measurements of your cardigan when altering.
Grace 🙂
Me encantó, aunque tuve que modificar un poco el tamaño, pero me resultó fácil seguir el punto y el patrón 😃
Muchas felicidades 🎊 muy lindo tus trabajos.
De seguro haré otros de tus proyectos.
Hi grace!
Love the pattern - I was wondering if it would be possible to make the neckline slightly less low? I’m a bit more on the busty side and need more coverage. Any ideas on how to do this?
Thanks so much!
Hi,
I'd recommend replacing the 'Neckline Shaping Rows' with 3 extra rows of the 'Body Panel'. For the front panels, as a starting point I wouldn't decrease as early or as rapidly but this will drastically change the shape of the v and the way the cardigan sits on your body. So if you're willing to experiment with the decreases feel free to try it out 🙂 but I have no way of guaranteeing if the cardigan will look like the sample sorry!
I hope this helps,
Grace
Hi, I just learnt to crochet and even though I am a beginner your videos and blogs are really easy to understand. I had a question regarding this particular V - neck cardigan. I am a size XS on my waist but medium around my bust area what should I do? Please help. ❤️
Hi Tashi,
This pattern is designed to fit loose and slouchy so always pick your size to match the 'To fit bust' measurement. The construction of this pattern doesn't work well for a fitted look so you'd need to create an entirely different pattern if you want a fitted cardigan, sorry!
Grace
Hiii! I love the pattern, do you have any recommendations on how to transition between the ribbing and the moss stitch? I keep ending up with way less stitch count 😬
Hi Sasha,
Treat each row as 1 stitch - so you need to SC, ch 1 before you insert your hook into the next row.
I hope this helps,
Grace
Any way we can get a child sizes for this! Love this pattern and would live to make a mommy and daughter pair!
Do you think I can use Stylecraft Special DK or Paintbox simply DK for this? And how do you steam block your garments?
Hi, I had issues with the sleeves for some reason even if I followed the video and the pattern closely, it didn't increase to create a triangular shape, it made a straight pattern. I'm not sure what I am doing wrong. Thank you!
I'm having the same issue!
Hi, your pattern is amazing and so easy to follow, thank you so much! I really want to try and follow your pattern as I love the style, but I want to use an Aran yarn rather than DK. Is there a simple math equation to amend the measurements? I understand I need to match the gauge but have no idea where to start!
Hello,
Thank you so much for the beautiful patterns you have created.
I have almost finished the body panel ribbing - I am at about 93 stitches and working towards the 104 stitches to make a size small. But it just feels extremely big already. Is it meant to feel quite large at this stage?
Hope you have a lovely day
Thank you
Hi Monique,
The body panel is worked in one piece - so the ribbing equals the back panel + 2 front panels. If your ribbing measures approx 2x the back width you should on the right track. Otherwise your gauge might be too large!
Grace
Hey Grace,
Thank you for all the work you put into these patterns. I've just almost finished the body ribbing part and have been following the measurements for a small and are almost at a 104 rows. But it just seems abnormally big. Is it normal for it to be quite big.
Thank you x
Hello!
I love this pattern!! I’m having trouble with my gauge though...my HDC gauge square is a gauge rectangle!!! It came out 4x3”. It’s an issue because when i do the bottom ribbing and turn, the linen stitch is too big. I’m thinking about just starting directly with the linen stitch part and making and attaching the ribbing after the fact. What do you think?
Hi Mary,
To make your linen stitch tighter, crochet tighter chains so you can meet gauge. If you still can't meet gauge then sure crochet your ribbing separately and then sew it onto the cardigan.
Grace 🙂
Hi,
I am now working on the second front panel. According to the pattern I should have 46 stitches, but I count only 43. I can't find a counting mistake anywhere and the other two panels are correct. I have no idea what I should do now. Pulling out would be a shame. do you have any tips?
Love Celine
Oh I want to add something else,
When I lay the panels on top of each other, they are the same size. Funny, because I've counted everything at least three times.
Hi Celine,
If it doesn't bother you visually and you really don't want to undo your work you can continue with the pattern. Just keep in mind that both sides might not be *perfectly* symmetrical. Otherwise you might have skipped an extra stitch here or there? To fix it you'd have to undo your cardigan I'm afraid!
Grace
Hi Grace!
Thank you so much for such a wonderful design! I'm finally getting the time to try this one out and I cant wait to see the outcome.
I do have a couple questions......I planned on using coboo yarn (3) light weight and it says to use a 4mm hook. Im very petite, 5'0/ bust 32/ and about 96 lbs. I dont know if this is a silly question but would I be better off using the 4mm hook or stick with the 5mm hook for this pattern and is coboo yarn a good alternative?
Hi Michelle,
The most important thing is that you meet the gauge stated in the pattern - then your cardigan will turn out the same size as the suggested measurements 🙂 Every yarn, hook and crocheter has different tension (even if they are labelled as the same yarn category or hook size), so I always recommend crocheting a gauge swatch and then adjusting your hook size if necessary.
Grace 🙂
Thank you! I did do a gauge swatch and that helped answer my questions. the cardigan is coming along very nice. This is probably going to be one of the nicest wearable garments I've crocheted. Thank you again for the sweet pattern. your explanations are very detailed, well explained and simple!
Hi! I ordered some DK yarn and its on it´s way but i have some weight 2 or sport yarn and I don´t know if this project would work with it, or can ypu please recommend one of your projects that uses weight 2 yarn please! I love your work!
Hi Elena,
For crochets patterns with (2) yarn I'd suggest the Seascape Scallop Tank/Dress - https://forthefrills.com/scallop-v-neck-tank-top-free-crochet-pattern or the Summer Stream Tee - https://forthefrills.com/crochet-summer-mesh-top-free-pattern
Grace 🙂
Hi Grace! Thank you for designing and sharing such a lovely pattern! Just to clarify, does the very first Ch 1 on the first row of the body count as a stitch?
Hi Amanda,
The first ch 1 doesn't count as a stitch.
Grace 🙂
Hi Grace,
I came to realise that my total stitches are 191, middle back panel is 97 stictches, however front panel is 42 stitches each? It makes the number a bit off: 97 + 42 + 42= 181 stitches only. I wonder where the other 10 stitches go? My second front panel now is 51 stitches instead!
Thank you.
Hi Andrea,
It's because we've decreased along the neckline edges after 3 neckline shaping rows you'll have 185 stitches for size XS. We'll also decrease along the neckline edge of the 1st row of the front panels and skip a stitch in between each section so that's how you go from 185 to 181. I think you might have accidentally skipped the neckline decrease rows!
Grace
Grace, I absolutely love this pattern!! I just finished my first sweater and it’s perfect. I increased the rows in the body so the sweater isn’t so short but otherwise I made a medium size and it fits just right. Thank you, Chris
Hi Chris,
So glad you enjoyed this pattern!
Happy crocheting,
Grace 🙂
Can I use 100% merino yarn as substitute? How many grams or yardage would I need?
Thanks!
As long as it's a DK yarn sure! Merino is such a lovely fibre with great drape but as always crochet a gauge swatch to see if you need to make any hook size adjustments. The yarn amounts are listed under the 'Materials' section.
Grace 🙂
Hi! I was making this and are there supposed to be more increases for the sleeves? I finished my first sleeve and it has the correct amount of stitches, but it is still missing 4 inches in width. Am I supposed to increase the stitches every 3 rows instead of every 5? Otherwise the pattern has been lovely, thank you!
-Lydia
Hi Lydia,
It sounds like your gauge might be off and not match the pattern's gauge? It's likely due to your chains being too tight and over dozens of rows, your sleeve hasn't increased as much as it should. If your sleeve is the correct length you'll probably need to undo your rows and re crochet them sorry! If your sleeve is also too short (by at least 4-5") you could repeat rows 2 - 4 until you reach your desired length but just make sure to measure as you go, so you dont increase too rapidly.
I hope this helps,
Grace
Hi, Grace I have a question. I've started to make second front panel and I've lost 2 stitches. I can't find where I made mistake. I don't know what I should do now. Is it very important to have exact number of stitches or maybe I could ignore it and the cardigan won't look bad? Thanks a lot for help!
Hi Emilia,
If your lost stitches are only in the 2nd front panel both panels won't be identical but it shouldn't be too noticeable. As long as it doesn't bother you should be ok.
Grace 🙂
Dear Grace,
I’ve just started this cardigan and after the 116 row of the ribbed part I just realized that i wasn’t doing the last loop in each stitch so I believe my ribbed part is smaller. Can you please tell me which length should I have for a m size?
Thank you in advance!
This is a lovely pattern
Hi Sara,
Since you haven't followed the pattern I have no way of knowing what your ribbing looks like? If you've only dropped 1 stitch, it shouldn't be a huge difference, less than 1cm so I wouldn't worry about it 🙂 If you've been dropping stitches consistently throughout the ribbing, your ribbing won't be straight and I'd highly recommend that you start again.
Grace 🙂
Hi Grace ... I am Grace as well 🤗
I simply wanted to ask if i could possibly
reduce the size beyond XS since I am using quite a chunky yarn and I am also really small and still get a great result.
Hi Grace! Haha there's quite a lot of us 🙂
It sounds like you're using a different yarn weight/thickness than what's listed in the pattern. This means you'll have a different gauge (the number of stitches per 10cm/4") so I can't guarantee that your cardigan will look like the sample. If you're willing to alter the pattern and experiment, give it a try! I'd suggest crocheting to the measurements (not following the stitch and row counts) but you'll need to make drastic alterations (if you're using a thicker yarn you'll probably need to reduce the number of stitches and rows) to the v-neck for it to work!
I hope this helps,
Grace
Hi! I love this pattern and I can't wait to try it. I'm just wondering if the link to the video is broken? I can't find anywhere to actually watch the video on this page... Thanks!
Hi Bek,
The video tutorial is right here on the page under the title 'Video Tutorial' if you have an ad blocker or pop ups blocked you won't be able to see the video but all my tutorials are available on YouTube - just search 'For The Frills'
Grace
Hey Grace,
I love your design and was fired up to try it myself. I'm already done with the ribbed piece and wanted to get to the big part now (first row), where you work along the long edge of the ribbing. Maybe it's my beginner status, or that I'm left handed - but I'm totally on the fence here. I somehow can't quite figure out exactly WHERE the stitches are for me to slip in? Unfortunately, I recognize it neither from your photos, nor from the video.
I don't know if my explanation makes sense, but I'll give it a try: If I look at the back, there are two stitches between each of the two ribs, then something like a knot. So do I always pierce the stitches and skip the knot? By knot I mean the place where visually the right stitches form the rib. In general, the stitches for piercing are not as obviously recognizable as in the ribbed part - at least not for me.
Any tip is helpful. Thank you so much!
Hi Hannah,
The most important thing to recognise is how to count each row. Along the edge of the ribbing it isn't super important exactly where you insert your hook stitch, you just want to place 1 SC in each row. (the SC essentially covers up any holes/knots so that's why 'exact' placement isn't necessary). I'd recommend watching a few YouTube tutorials on how to count rows - there are heaps! Once you can 'see' the rows you'll be able to easily insert your hook along the edge of each row.
I hope this helps,
Grace
Hi Grace,
I've just finished this beautiful cardigan! I really love it.
The pattern is so well structered and it all worked out easily.
Since crochetting is not a very common (or young) hobby in Germany, where I come from, I am extremely glad I found your patterns.
They are modern (unlike most of the German patterns, haha) and it was so much fun. Thanks a lot! I will now try another pattern of yours.
Hi Frederike,
So glad you're enjoying the patterns all the way in Germany! Haha I completely agree, there aren't that many modern crochet patterns that young people want to wear 🙂 It is slowly changing though!
Happy crocheting,
Grace 🙂
Hi Grace,
I have just finished this beautiful cardigan. Thank you so much for the pattern.
It ist so well structered and worked out so easily.
Since crochetting is not the most common (and young) hobby in Germany, where I am from, it is difficult to find a modern pattern in German.
So I thought: I could try it in English too. And so I found your patterns and I am just soooo happy, that they exist, It was so much fun and so well explained.
Thanks a lot! I will try some more of your patterns! 🙂
Hi Grace,
I'm working on row 2 for the body of the cardigan. My problem is is that when I reached the end of the row, I was not able to chain one and skip one stitch to the very last one in the row but to the second to last one. I'm not really sure where I might have gone wrong. Please help.
Hi Grace!
I just finished this cardigan and it was beautiful! it's the first time I'm doing moss stitch and I love how it looks so much
it's currently summer in my country, so I thought of starting this project now so I can finish it around autumn, but the pattern turned out to be super easy and quick, I finished it in less than a week haha xD
anyway, thank you so much for the pattern!
ps. there's a counting mistake on row 1 of the Back Panel for size XS, It should be 103 sts, not 97
very nice pattern! had no problem following, even though english isn't my first language. it's exactly as lightweight and breezy as i wanted it! 🙂
Hi Grace!
Thank you for this pattern, I love how the cardigan looks.
I am struggling a bit with the pattern though, as I am not getting the same amount of rows as the pattern. I am using a different yarn, and with single crochet the cardigan becomes very dense. I wanted a lighter cardigan with more "holes" so I am using half double crochets instead of single crochets. This makes each row "taller" than in the pattern, so working according to rows is difficult. If the pattern said how many centimeters (or inches) the different panels should be, it would be easier to adjust it so that the end product fits.. 🙂
Hi Grace
As I am based in UK, I cldnt find the yarn recommended by you. I have instead bought the Drops Puna 100% Alpaca which is one of the recommended alternatives when I searched for substitute yarn. My daughter is in between XS and S. I was planning to do a XS since this yarn will stretch. However after completing the ribbing at 96 rows, it is too short ( abt 3-4 inches short ) just below her waist. I did the gauge and it measures the same using size 4 hook. The gauge turns out bigger using a 4.5 hook. Now I am think whether I shd increase the ribbing to a S which is 104 rows or should I redo using a 4.5 hook? Any suggestions from you wld be much appreciated. Thanks.
My daughter loved the white top I made and have asked for this cardigan. As we are based in UK, I cld only find substitute yarn to the one you recommended. I am using the Drops Puna 100% Alpaca. The gauge I made using size 4 hook came out ok. Also did one using size 4.5 which came out bigger. Having done the ribbing, it is short when I tested it on my daughter just below her waist. I was planning to make XS for her as she btw an XS and S. Even if I made 104 rows it wld still be short as the front does not meet by about 3-4 inches. I am deciding whether I should change to size 4.5 hook or increase rows. How will that affect the rest of the instructions if I just increase rows?
Wondering if I can get a few more measurements that will allow for a successful product with a different yarn. I.e- what should the height of the body be before starting neckline? Stuff like that. Thanks!
Sarah
I'd like try this but make it 3/4 sleeve instead of full. Which row should I start for the sleeves? 🙂
Hi there,
For row 1 of the first front panel, I should have 46 stitches and end on a single crochet, but I am ending on a chain…
Am I counting wrong? I have three stitches, the first chain, the single c in stitch and the single c in chain space before I start the familiar pattern.
Help would be so so so appreciated!
Hi Grace,
My niece loves this pattern, can you confirm that her size which is small needs 480 grams of wool as it doesn’t seem very much.
Thank you Ellie
Just finished my cardigan and I LOVE it. It came out just the way I imagined. I added a few rows to the sleeves though, cause I have pretty long arms, they're now perfect length. Thanks for this amazing free pattern!
Hello Grace!
Would this pattern work well with Drops Cotton Light? It is a half cotton half polyester yarn. If not, what would yarn would you recommend that I use? I am still quite new to crocheting and still learning about the different types of yarn. I hope you will answer my question. Thank you 🙂 <3
Just finished this cardigan! Turned out beautiful. I did lengthen the body a few more rows to make it a little longer and the sleeves seemed a little short too so I lengthened those (I'm 5ft 8 in). Size wise I'm a small and this turned out well, though if I do it again I'd make the sleeves a tad looser, especially when I wear long-sleeves under the cardigan, I want it to fit a little more comfortably. Otherwise great!
Hello Grace,
the pattern is beautiful and I started crocheting with a slightly thinner wool.
I finished the back and the two front pieces in size S and exactly the same number of stitches. Now it’s pretty big and much too big for me, although I usually wear size M.
Can you give me some advice as to why and what I can do?
Greetings, Julia
Hi Grace! Thank you so much for the detailed pattern! I’m a little confused on creating the front/back panels. I’m not sure how you’re able to end up with 48 stitches for each of the front panels and 105 stitches for the back panel if we have to skip the sc stitches and put the stick markers in the chain spaces. Shouldn’t it be 103 stitches then? Thank you!
Hello Grace! First of all thank you for your amazing patterns and tutorials, I'm learning tons. I'm stuck in row 13 of the first front panel. I have 35 stitches, but the instructions for row 14 ask me to leave 2 stitches to SC two together, ( ROW 14: Ch 1, SC in 1st st, *SC in ch-sp, ch 1, sk 1 st; rep from * until 2 sts left, SC2tog, turn.) No matter how many times I count, I end up with 3 stitches in the end.
Please help
Greetings from Mexico!
I ended up doing a SC in the 3rd-to-last stitch and a SC2tog on the remaining two, successfully achieving 34 stitches for ROW 14. (I hope my workaround is legit). Thanks!
Hi Grace! Lovely pattern, I'm a twelve year old and began to crochet a year ago, and could very easily understand the pattern, as well as the measurements. A question arose as it always does when a pattern requires buttons: which buttons do you use and/or recommend?
Hi Grace,
I am loving this pattern however I am having some troubles I am trying to make the size XS and I made sure to do my 96 rows for the ribbing section however I am not sure where I am going wrong with the next part as I am not getting 191 stitches after the first row of the body panel.
Hi!! I have loved this pattern so far. Works up quickly and is pretty easy to understand! But I’m stuck. The arm holes for size small work up to be 76 stitches around. The sleeves work up to 65 stitches around. So there’s 11 stitches extra on the arm holes…. Did I do something wrong? I double checked the pattern stitch counts and they seem to be correct. Do I just sew the arm holes up until they reach the sleeves? Thanks!!!