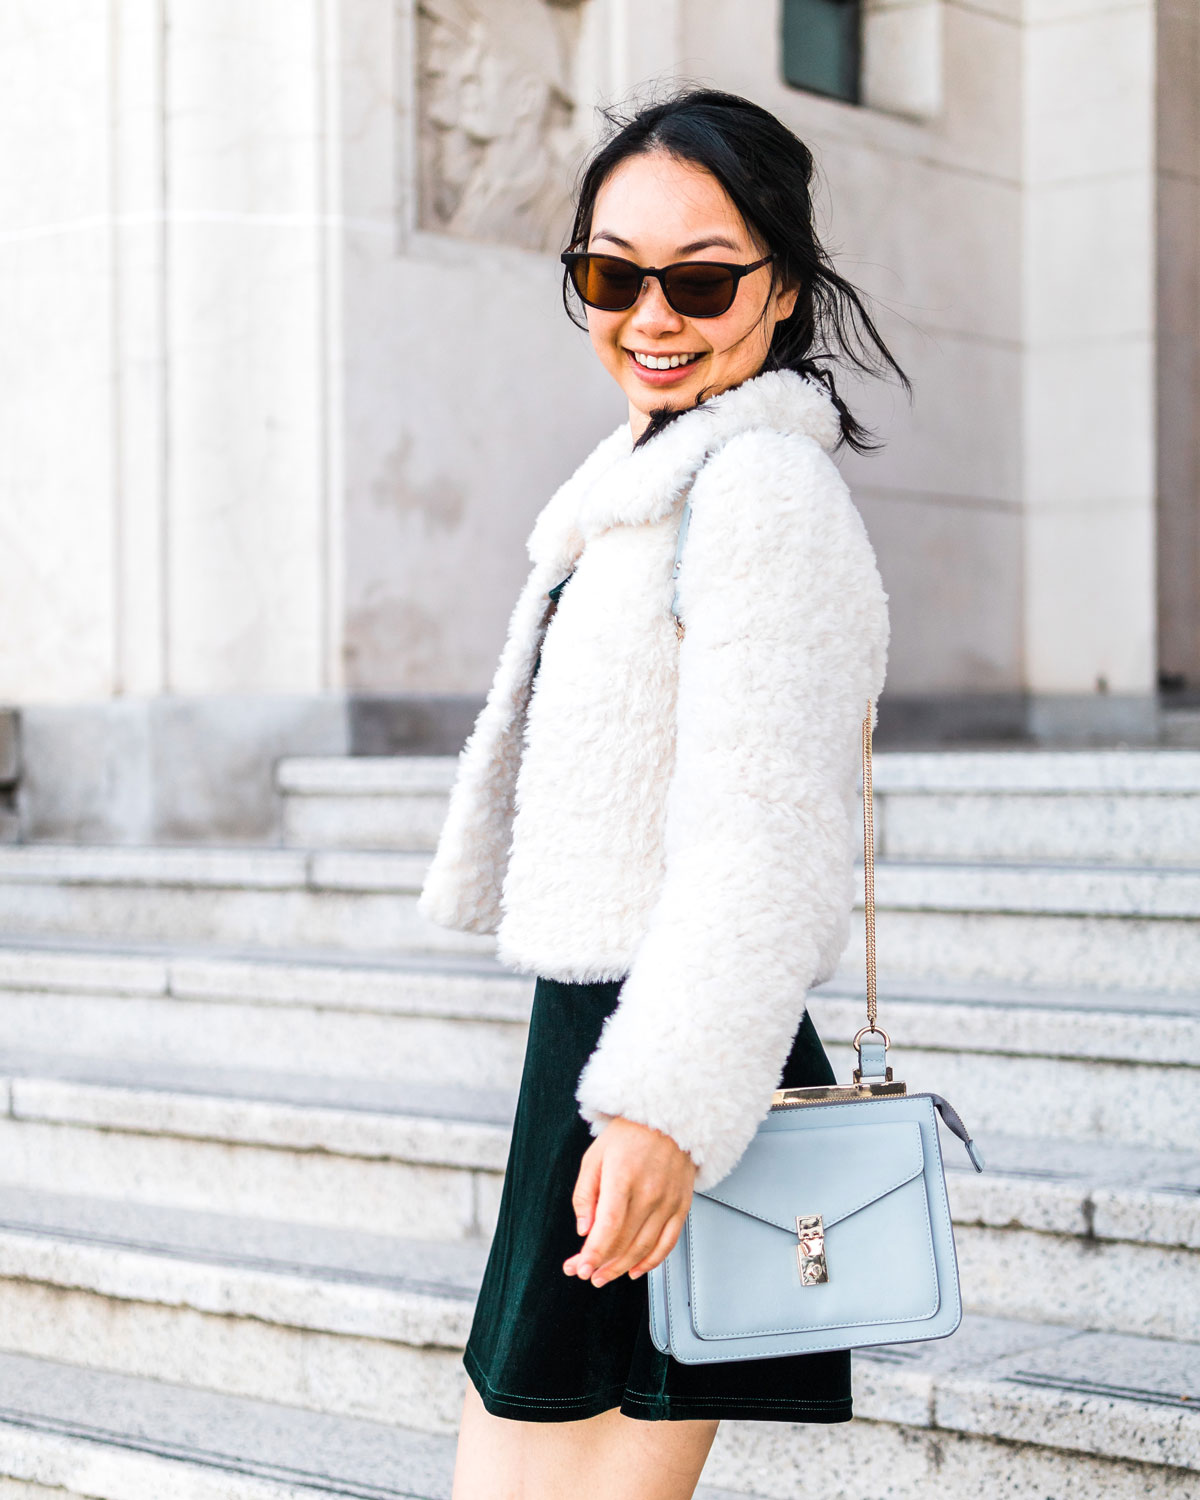
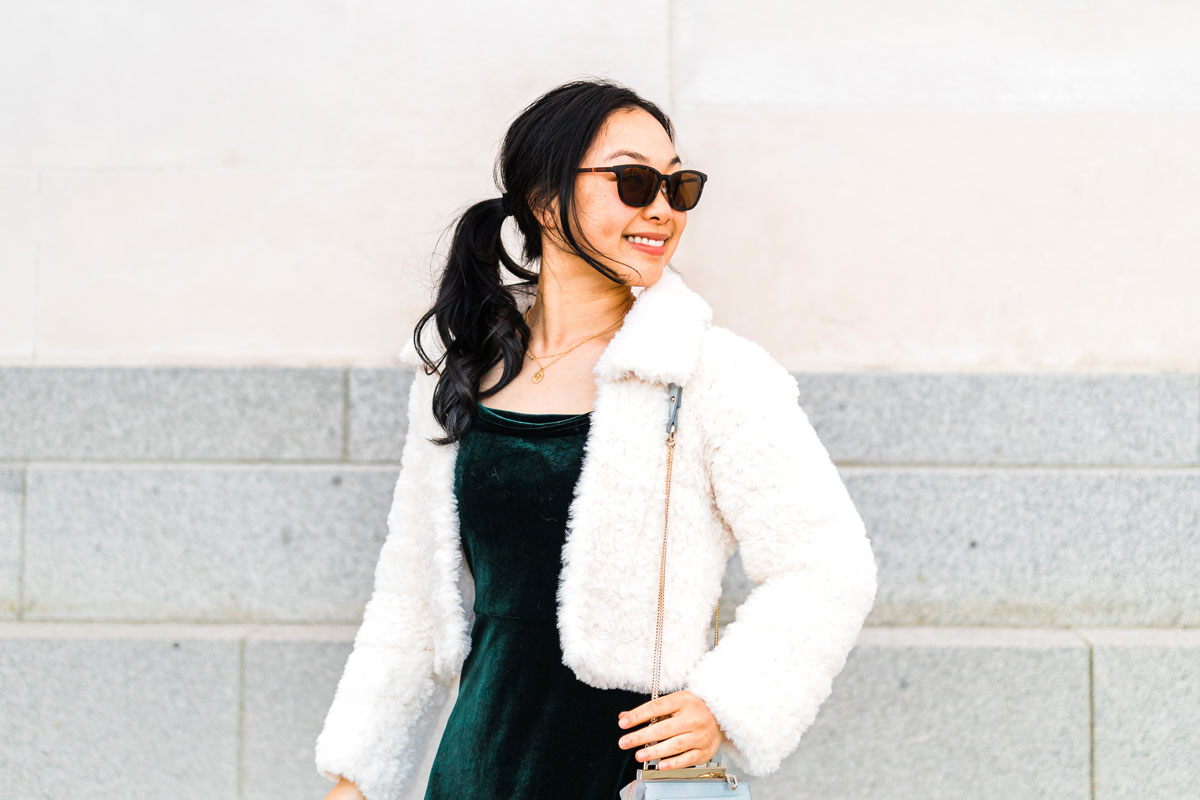
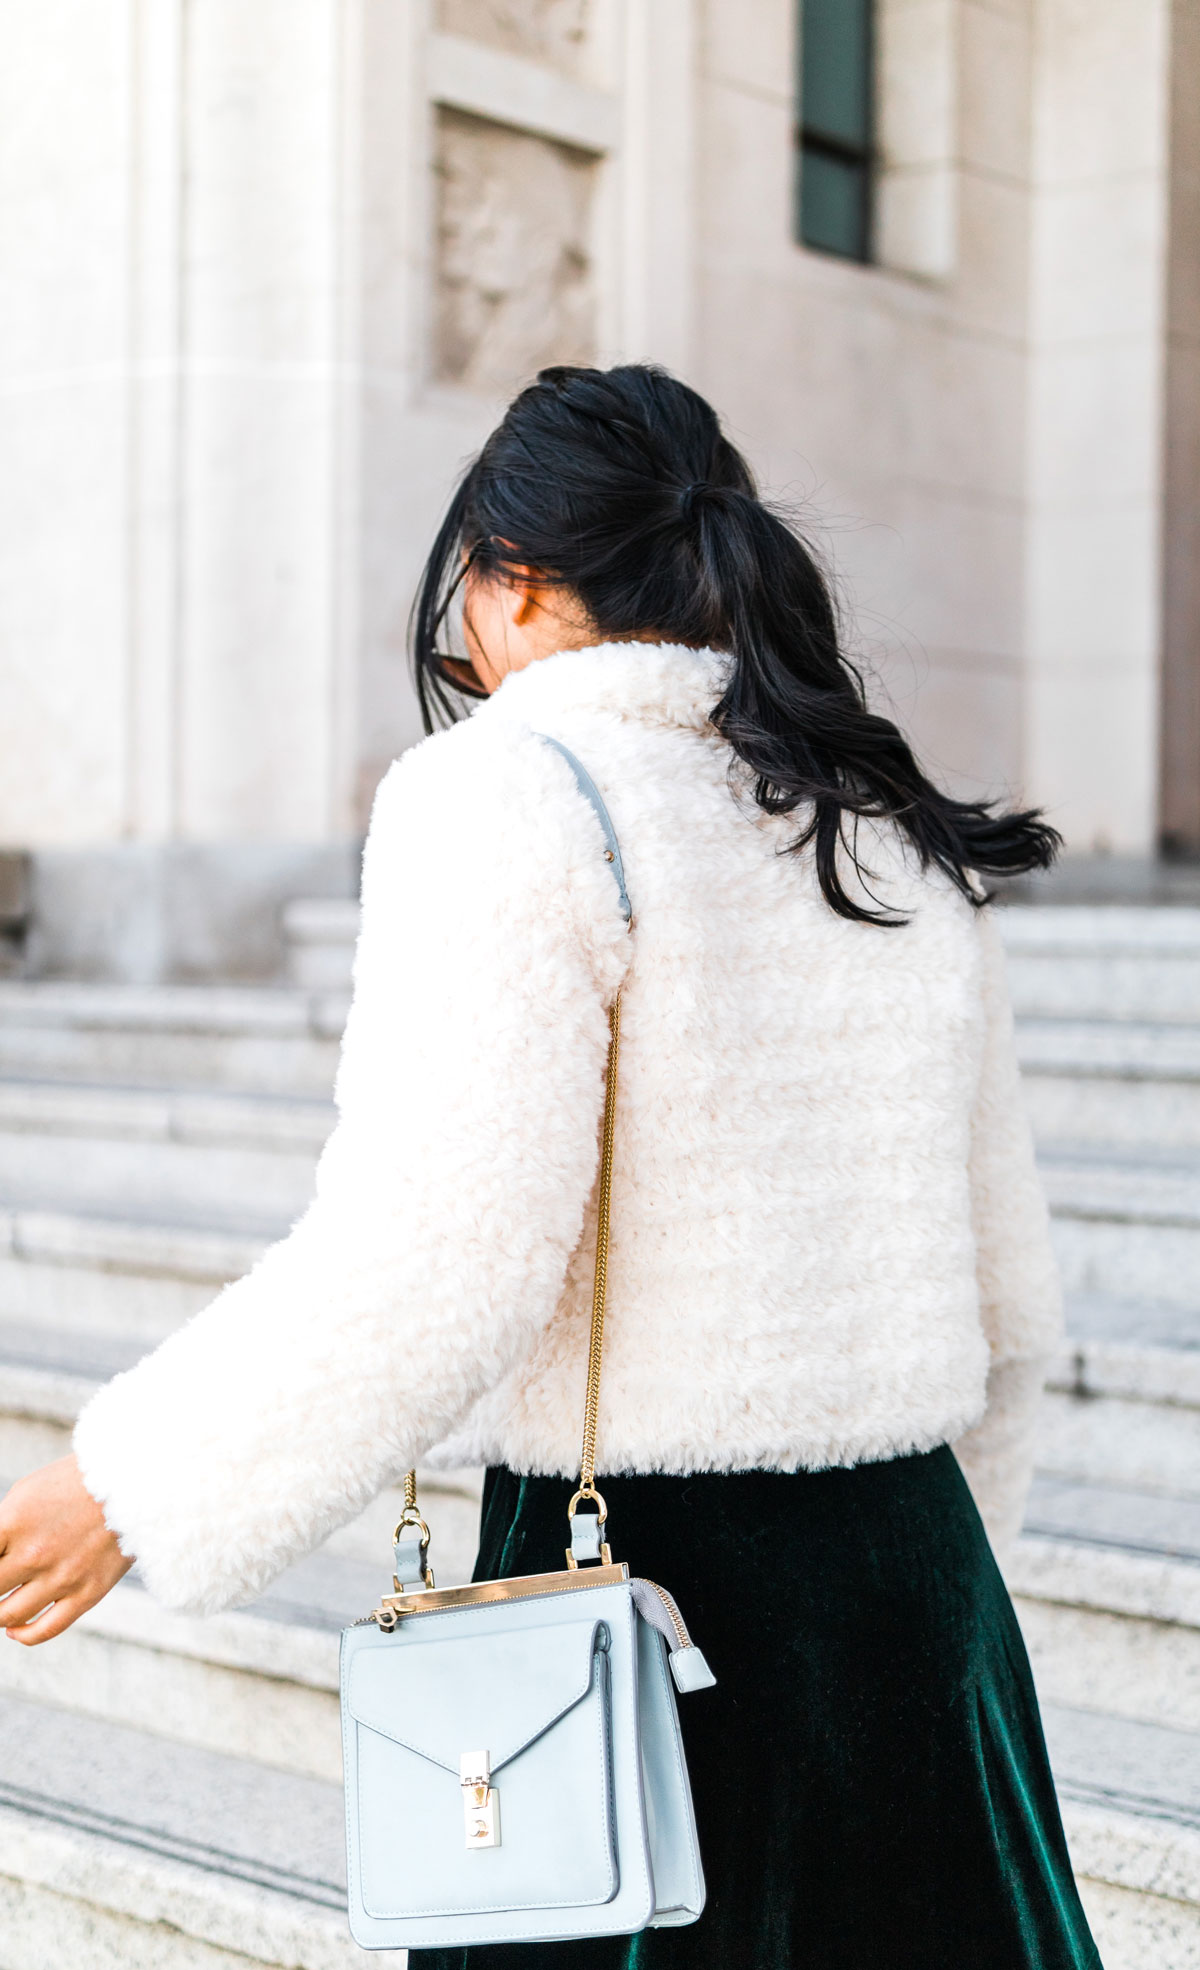
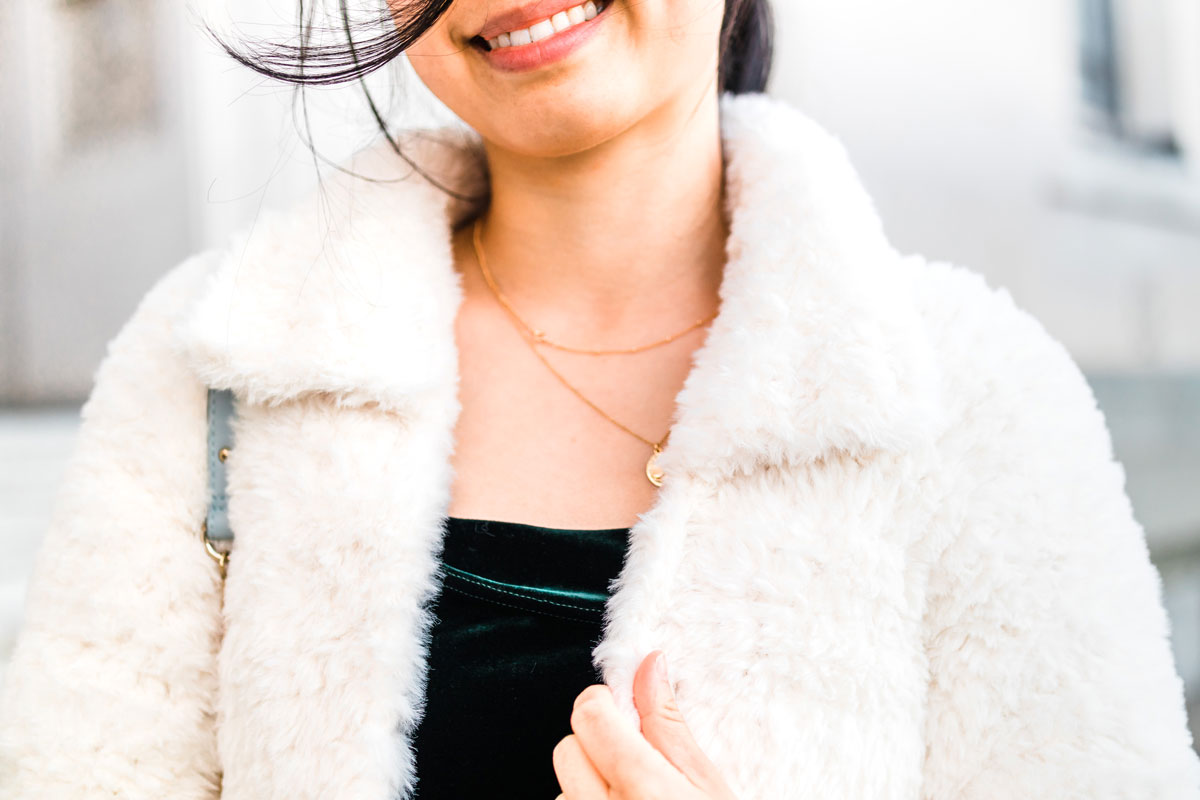
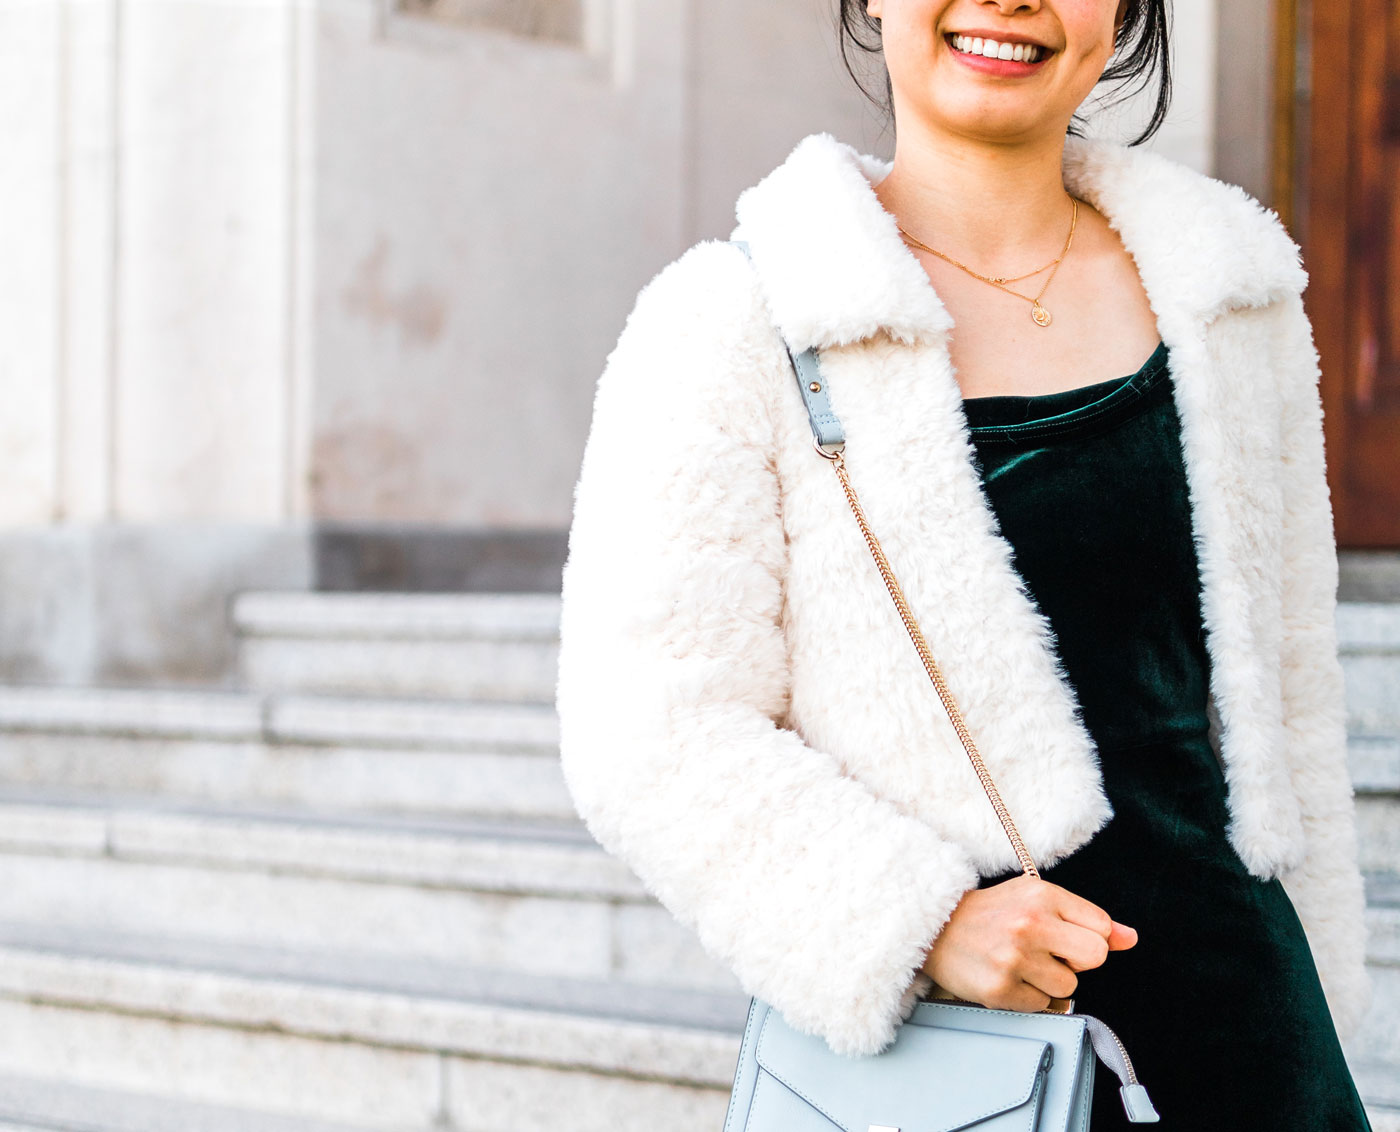
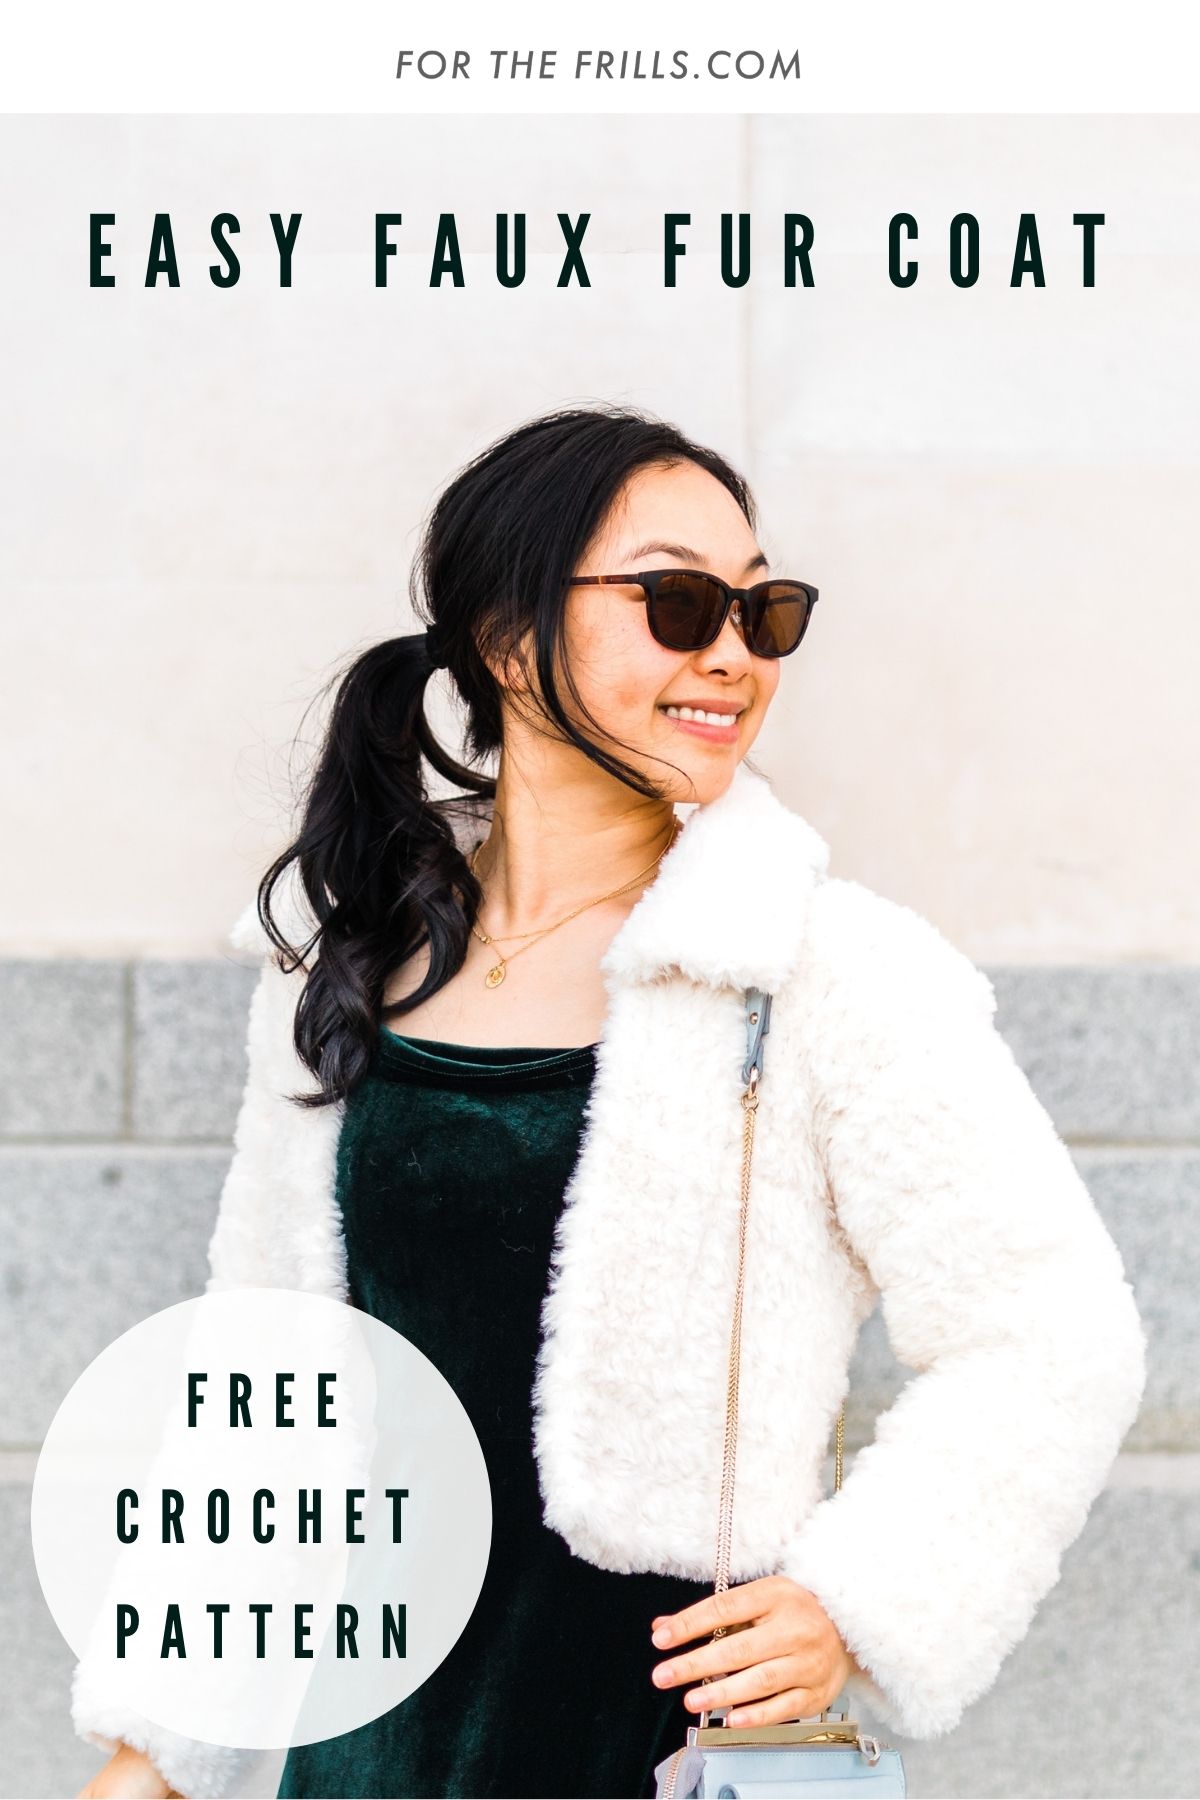
The Snow Bloom Jacket is the fluffiest crochet project ever! Made from a luxurious faux fur yarn, this stylish crochet coat is a quick and easy make that’s perfect for the chilly winter months!
Scroll on to find the free crochet faux fur coat pattern.
This post may contain affiliate links, view our disclosure policy for details.
Thank you to WeCrochet for providing the yarn for this free crochet coat pattern! As always all thoughts and opinions are 100% my own 🙂
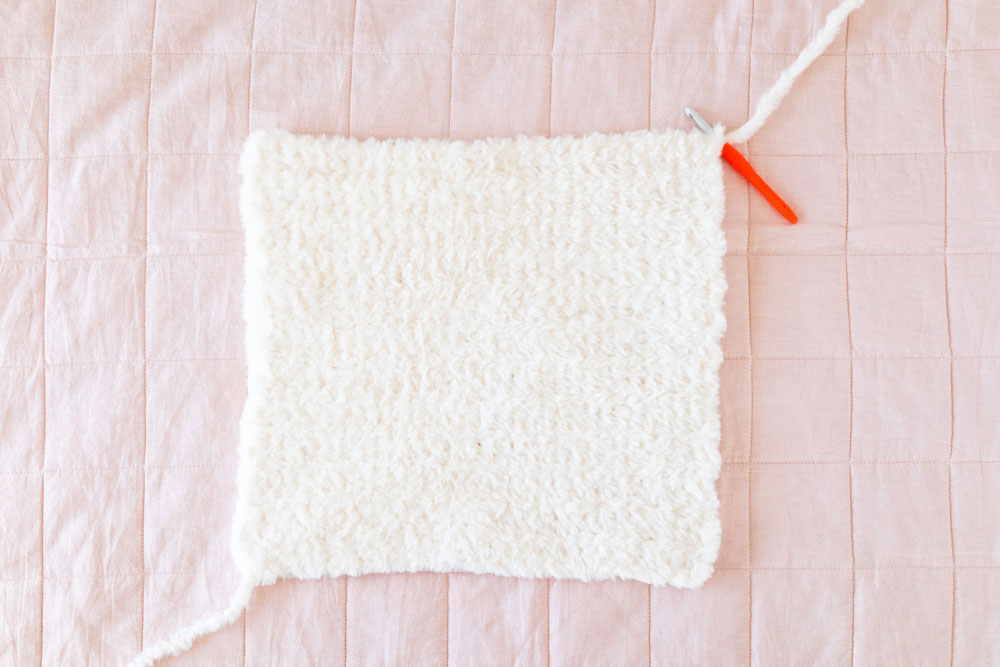
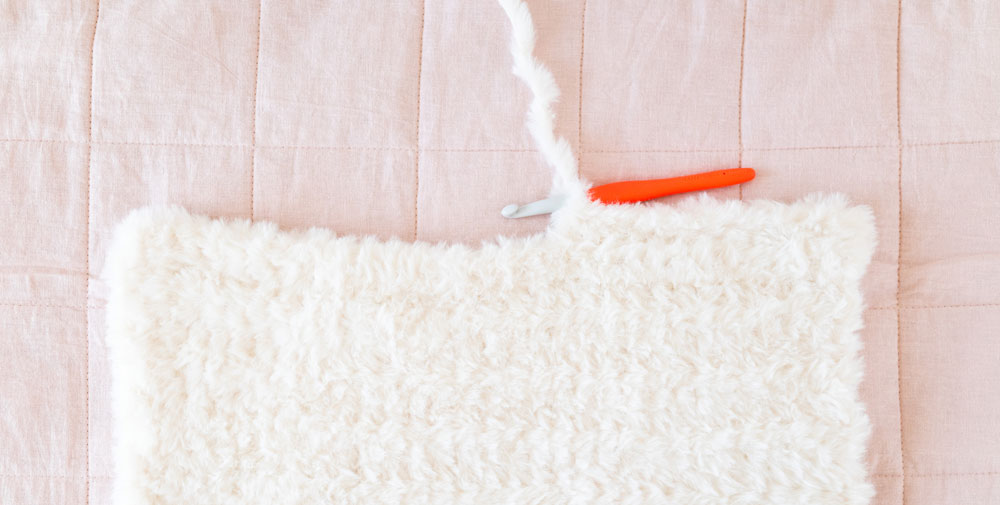
This fluffy crochet coat is made up entirely of half-double crochets – that’s it! Since We Crochet’s Fable Fur is so incredibly fuzzy and plush, this faux fur coat works up incredibly quickly. The sample coat in the photos only took me about 4 ½ hours to make from start to finish!
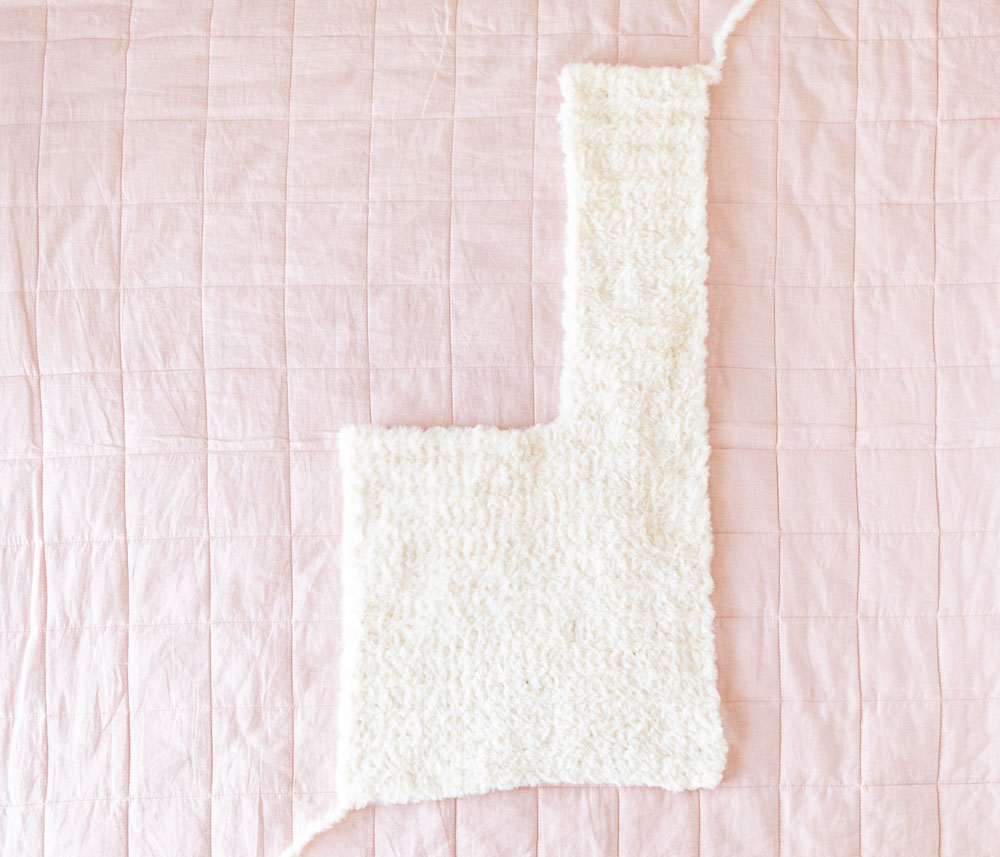
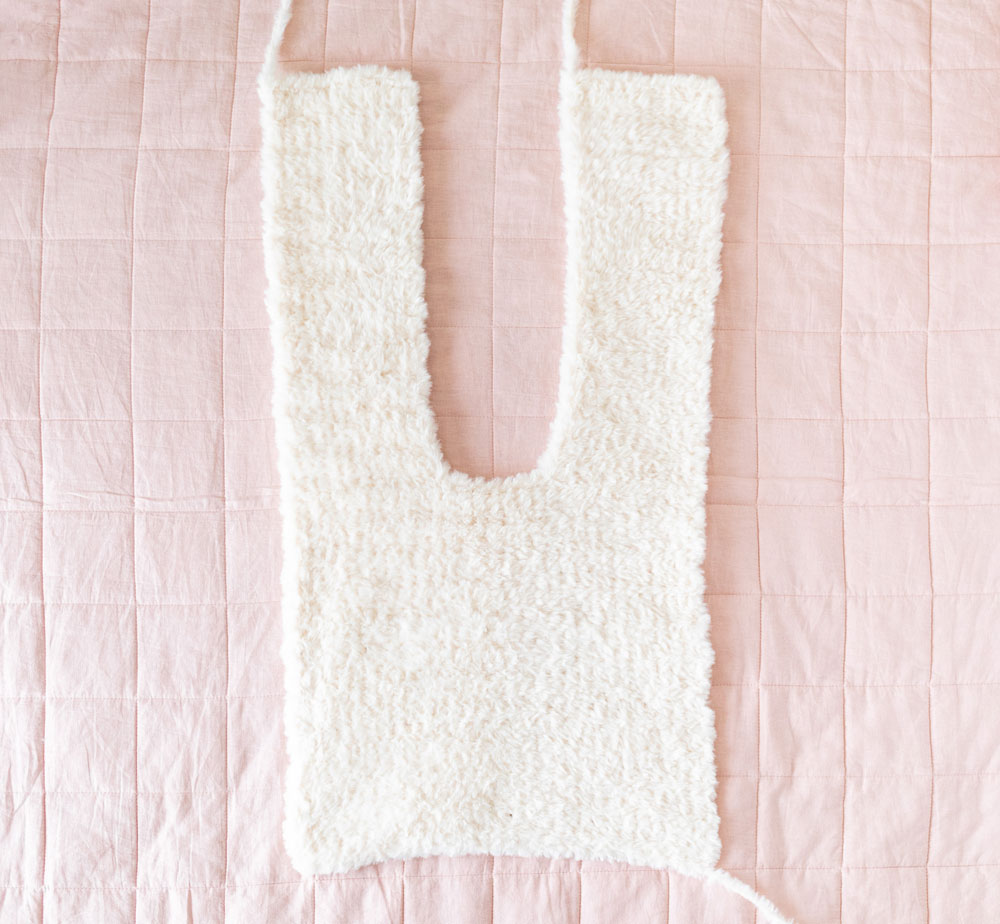
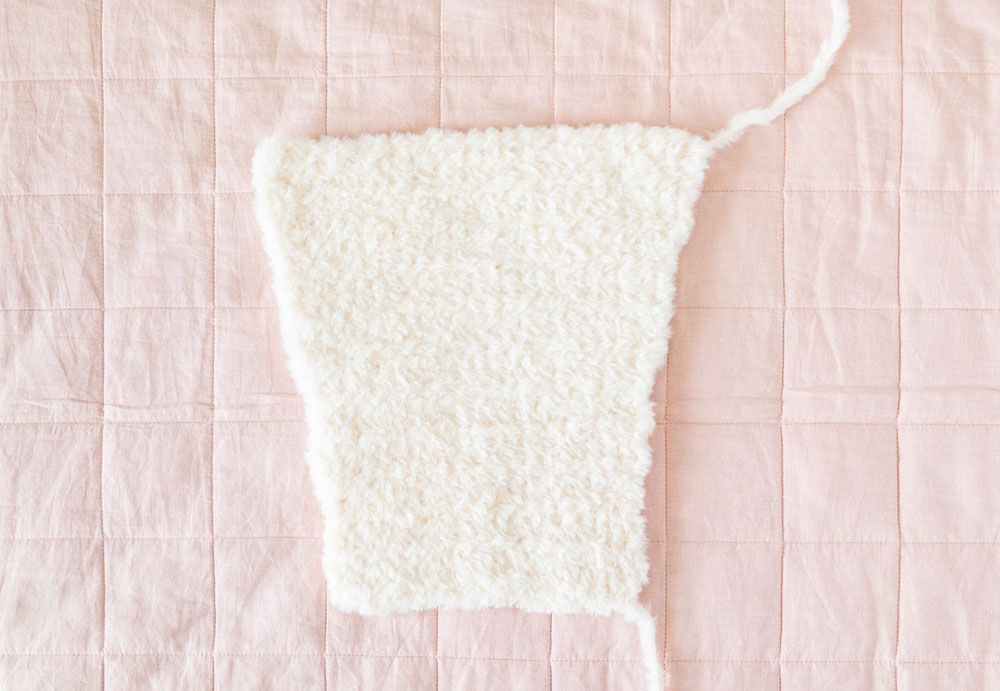
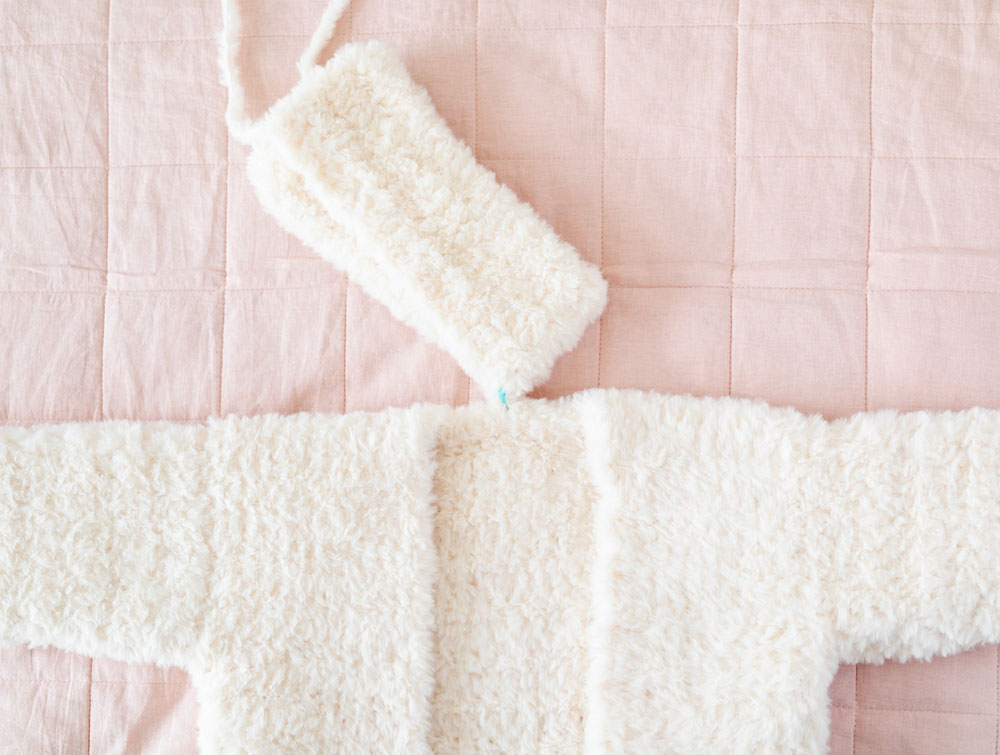
The Snow Bloom Faux Fur Coat is comprised of 4 different pieces. We’ll start by crocheting an easy rectangle for the back panel and then the front panels are crocheted directly onto the back panel.
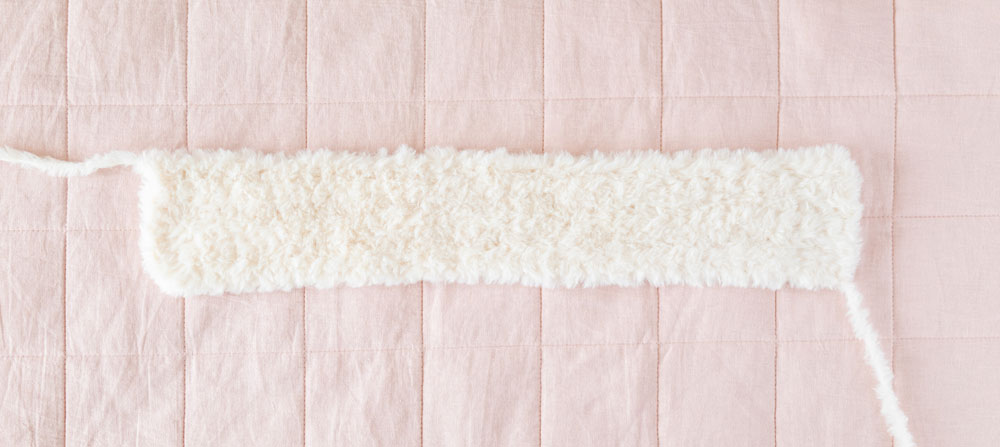
The sleeves are crocheted from the cuff up with very simple increases – 2 half double crochets in the same stitch. The collar is also a rectangle shape, so in this entire pattern there’s only 3-5 rows of increasing. Every other row is just straight half double crochet.
The simple pattern and stitches are perfect for this faux fur jacket pattern. If you’ve ever used faux fur yarn before you’ll know that it’s pretty much impossible to see your stitches. At the beginning your coat will just look like a rectangle of fluff!
The easiest way to keep track of your stitches is to ‘feel’ for them and I find it super helpful to use stitch markers to mark the rows. You’ll be able to feel the ‘gaps’ in between each stitch and you’ll be able to feel the ‘tops’ of each stitch so you’ll know where to insert your hook.
It takes a bit of getting used to but once you’ve crocheted a couple of rows you’ll get into a rhythm and be able to feel your stitches without looking.
The Snow Bloom Coat is great for watching Netflix and crocheting at the same time – you won’t need to take your eyes off the screen!
Design Inspiration
If you know me, I LOVE soft and fluffy things and throughout winter I live as a blanket burrito 24/7 🙂 (For another fuzzy project, check out the Dreamer Pocket Sweater Pattern!) I wanted to keep all of the cosiness and snugliness but create a design that you could wear outside but still feel like you’re wearing pyjamas haha.
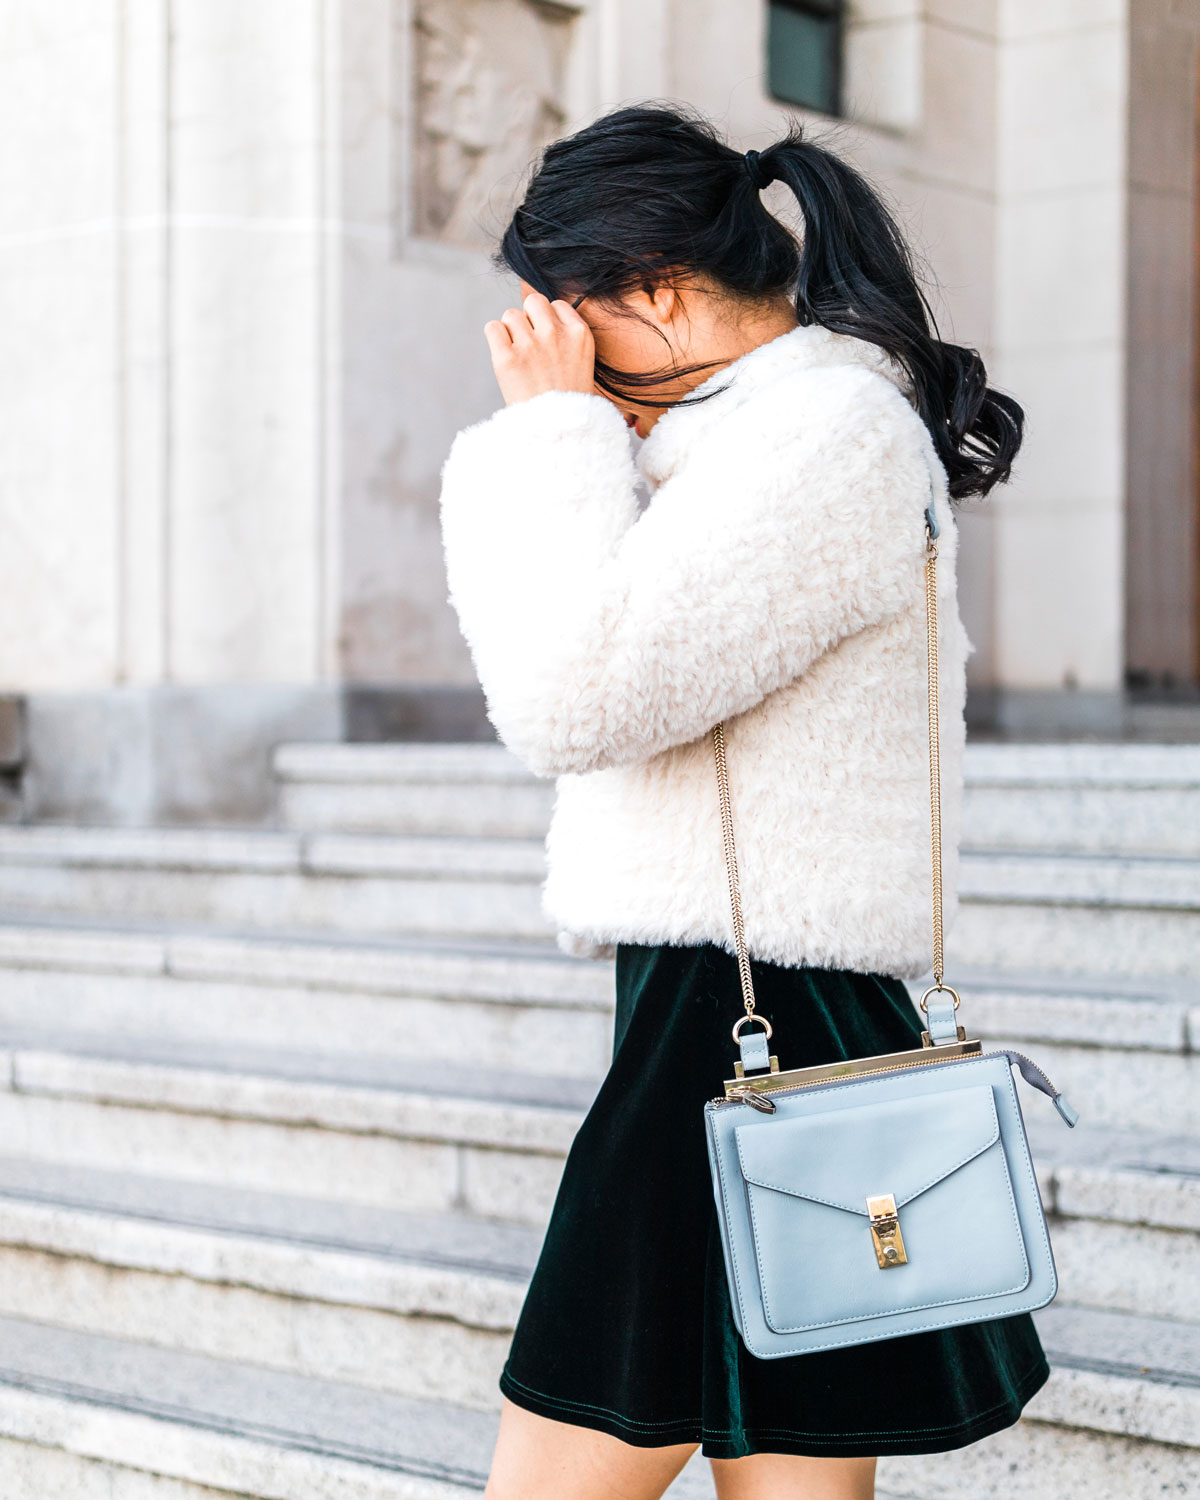
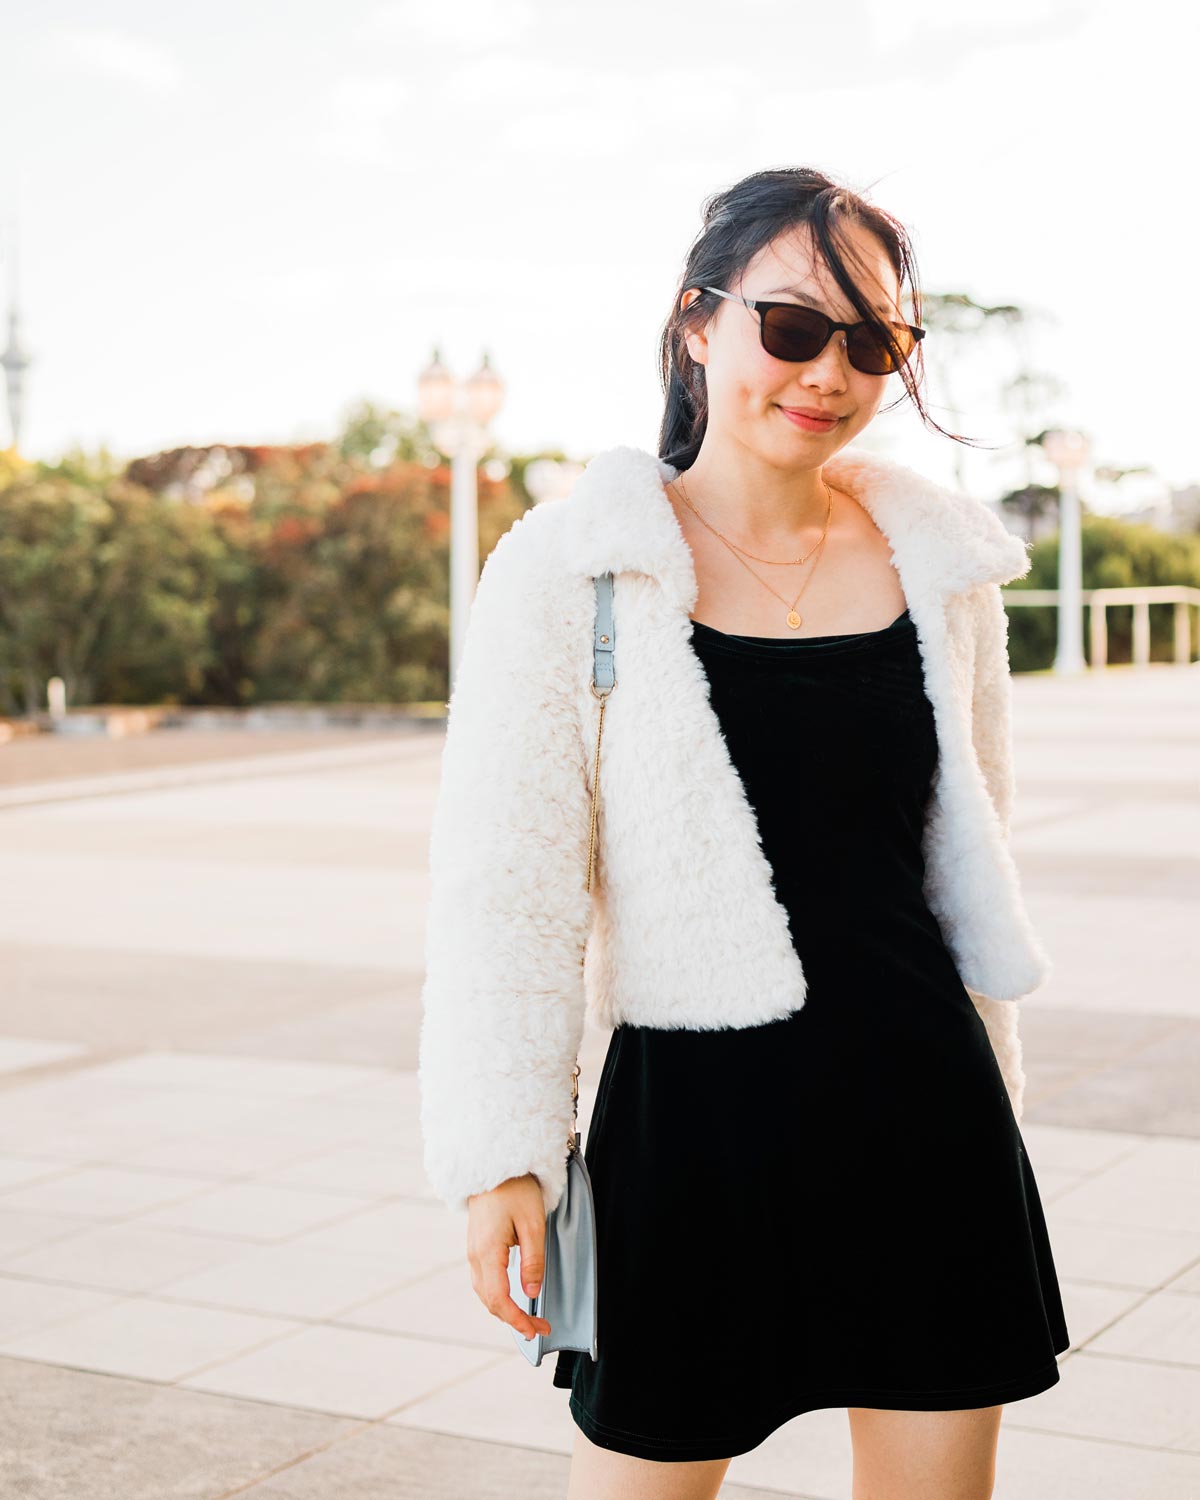
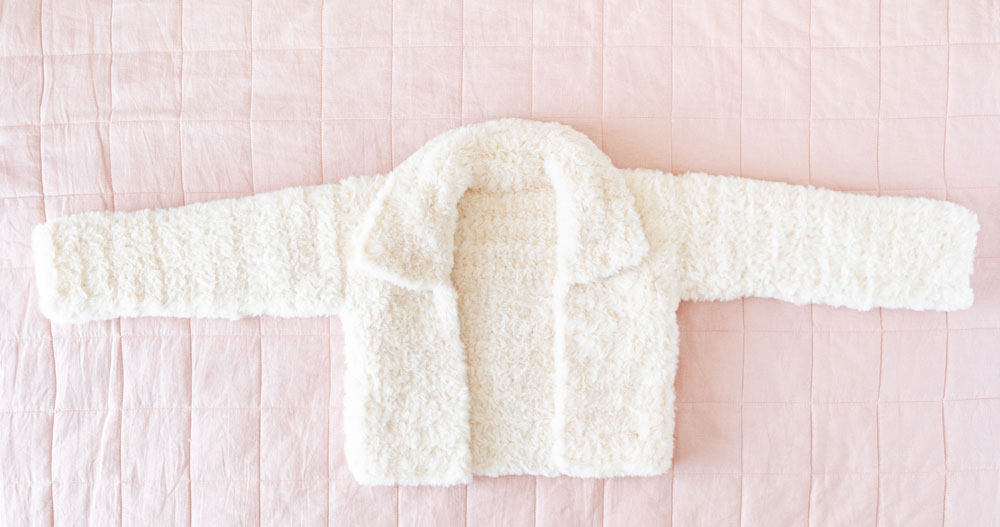
The Snow Bloom Jacket has wide straight sleeves with a boxy body and chunky collar. These simple design features create a jacket / coat / sweater (I’m not quite sure how to classify this project?) that is incredibly versatile and so ridiculously comfy you’ll never want to take it off!
In the photos I dressed it up with a velvet dress for a cute Christmas look (who says we can’t dress up even if we’re celebrating at home?) but this timeless design can be dressed down with a pair of jeans and ankle boots for a more casual look. You could even wear this fluffy sweater around the house 🙂
Looking for more free crochet patterns?
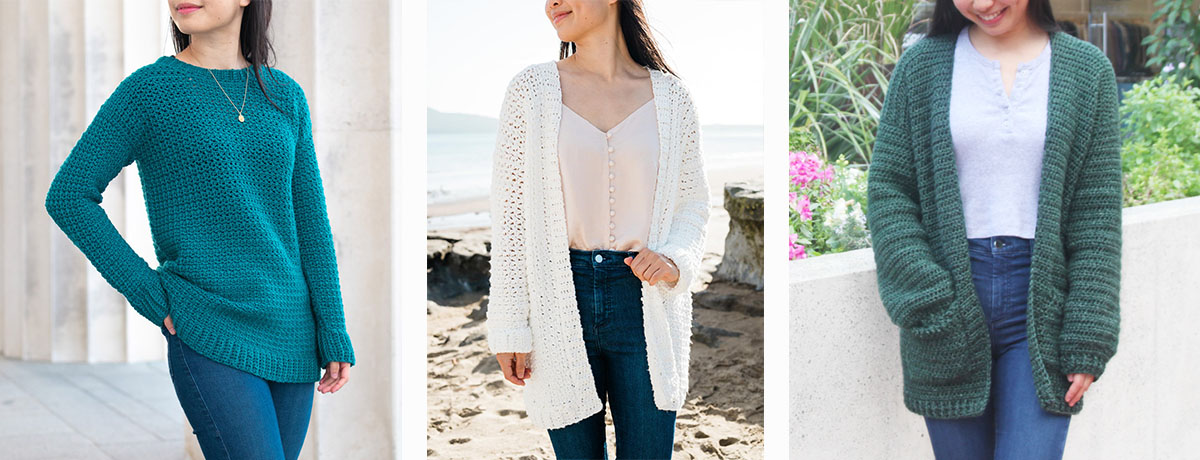
1. Weekend Snuggle Sweater / 2. In The Clouds Cardigan / 3. Briar Pocket Cardigan
Yarn
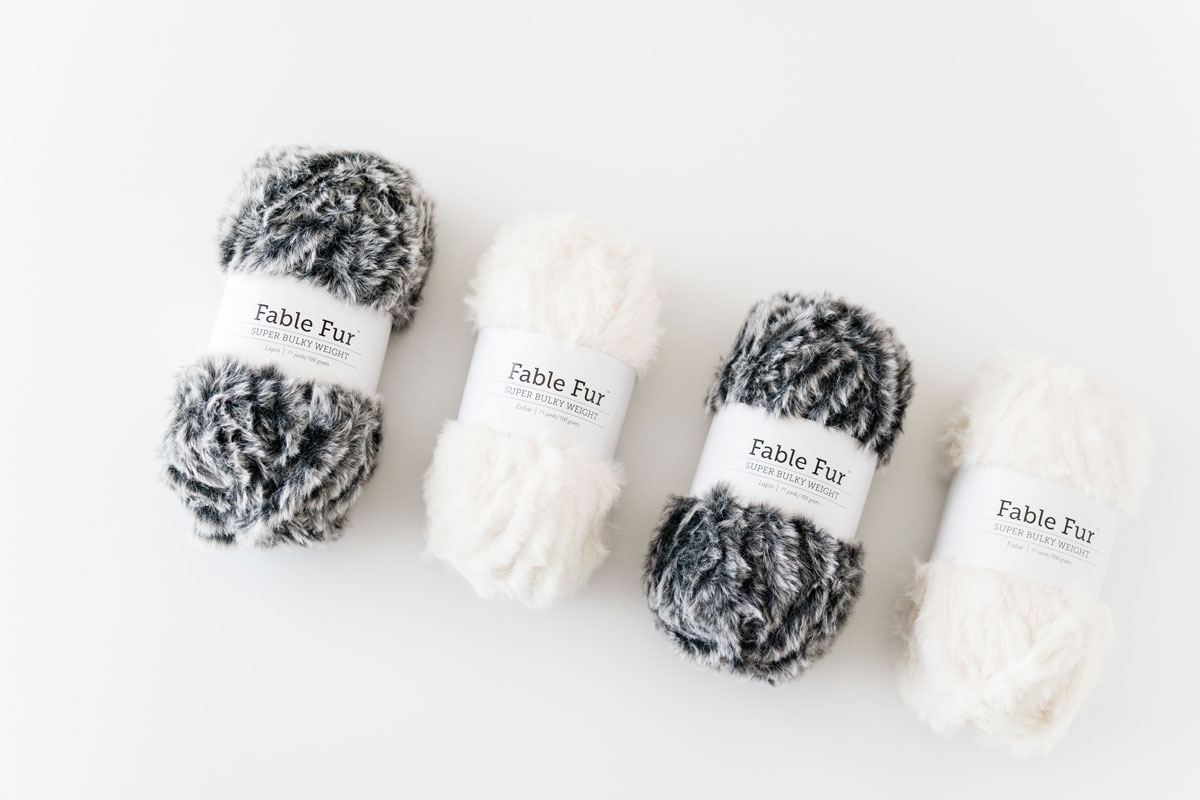
The Snow Bloom Coat uses We Crochet’s Fable Fur in the colour Eisbar. Eisbar is a very light cream shade – not quite a blinding white, but not quite a true yellow cream either. It’s just about the same shade as unwhipped double cream, so it’s a lovely neutral!
Fable Fur yarn is made up of 100% polyester and is so buttery soft. This super chunky faux yarn yarn comes in 15 shades ranging from pastel blues and pinks to more traditional ‘fur’ colours such as browns, greys and blacks.
A number of the shades are ‘mutli-dimensional’ so the base of the yarn is a darker colour while the highlights of the yarn are lighter to give incredible depth to your finished garments.
But the best thing about Fable Fur yarn is that all the shades that I’ve tried and crocheted with don’t shed! I’ve used Eisbar, Paloma, Volpe and Lapin and I haven’t had a problem with any of them. The only time you find fluff is when you cut the yarn but since you’re literally cutting through the strands of ‘fur’ it’s to be expected.
The super fluffy and soft faux fur yarn is the defining characteristic of this crochet coat but this free pattern should still work with any super bulky yarn as long as you meet gauge! If you want to substitute this yarn I’d suggest choosing a thicker super chunky yarn because the fluff of Fable Fur really adds a lot of bulk and body to this coat!
If you use a different yarn for this pattern let us know how it goes and as always you can tag me on Instagram @forthefrills to share your crochet projects!
Pin me for later!
Snow Bloom Coat Pattern
Add the Snow Bloom Coat to your Ravelry queue!
Ad-free, printable version - Snow Bloom Coat Pattern PDF!
*Sample is a size x-small shown on a 5’3” model with a 32” bust.
*The sizing guide follows size XS(S, M, L, XL)(2XL, 3XL, 4XL, 5XL). E.g. “Ch 31(35, 37, 41, 44)(48, 52, 55, 59) means Ch 31 for XS, Ch 35 for Small, Ch 37 for Medium, Ch 41 for Large, Ch 44 for XL, Ch 48 for 2XL, Ch 52 for 3XL, Ch 55 for 4XL and Ch 59 for 5XL.” If there is only one number, it applies to all sizes.
*"HDC 10" means HDC into the next 10 stitches.
*"2 HDC" means place 2 HDC into the same stitch.
*The turning chain ch 1 does NOT count as a stitch.
*Total stitches are indicated between < >.
*This pattern uses US crochet terms.
*This crochet patterns uses a super bulky faux fur yarn. With faux fur yarn, it’s very difficult to see stitches. The easiest way to count stitches is to ‘feel’ the gaps in between stitches with your fingers and use stitch markers to help you count rows.
*Body is worked in rows widthways and in one piece. We’ll start by crocheting the back panel, then crocheting the first front panel directly onto the back panel. Fasten off and reattach the yarn along the edge of the back panel to crochet the second front panel.
*Sleeves are worked in rows from the cuff up. Sleeves are folded lengthways and sewn together along the long edge.
*The sides of the body are sewn together, leaving a gap for the armholes and then the sleeves are sewn to the body.
*Collar is crocheted separately and sewn onto the neckline.
*Sew all pieces (apart from the collar) together with the wrong side facing outwards. With this pattern either side of the stitches can be the ‘right side’. Pick whichever side you prefer and be consistent when sewing your pieces together.
LEVEL: Easy
Materials
Yarn – WeCrochet Fable Fur – Super Chunky / Super Bulky (6), 65m/100g, 71yds/3.5oz, 100% Polyester, Eisbar
approx. 6(7, 8, 8, 9)(10, 11, 12, 13)skeins
Stitches & Abbreviations
Ch = Chain
HDC = Half Double Crochet
St(s) = Stitch(es)
Measurements
*Measurements taken from the garment lying flat. WeCrochet’s Fable Fur will stretch out slightly (approx. 2.5cm/1”) in length and width after the garment has been worn.
Measurements cm:
To fit Bust: 76(86, 96, 106, 117)(127, 137, 147, 158)
Back Width: 46(52, 56, 62, 66)(71, 78, 83, 89)
Armhole: 18(18, 19, 20, 21)(23, 24, 25, 27)
Sleeve length: 40(41, 41, 41, 43)(43, 45, 47, 47)
Length: 42(43, 45, 47, 49)(49, 52, 54, 56)
Measurements inches:
To fit Bust: 30(34, 38, 42, 46)(50, 54, 58, 62)
Back Width: 18(20.5, 22, 24.5, 26)(28, 30.5, 32.5, 35)
Armhole: 7(7, 7.5, 8, 8.5)(9, 9.5, 10, 10.5)
Sleeve length: 16(16.5, 16.5, 16.5, 17)(17, 17.5, 18.5, 18.5)
Length: 16.5(17, 17.5, 18.5, 19.5)(19.5, 20.5, 21, 22)
GAUGE: 10cm/4” square = 6.5 stitches wide x 5.75 rows tall in half double crochet

Back Panel
FOUNDATION CHAIN: Ch 31(35, 37, 41, 44)(48, 52, 55, 59).
ROW 1: HDC into 2nd ch from hook, HDC in each ch until end, turn.
<30(34, 36, 40, 43)(47, 51, 54, 58)>
ROW 2: Ch 1, HDC across, turn.
<30(34, 36, 40, 43)(47, 51, 54, 58)>
Repeat ROW 2 until ROW 24(25, 26, 27, 28)(29, 30, 31, 32).
<30(34, 36, 40, 43)(47, 51, 54, 58)>
*You can add/remove rows to make your jacket longer/shorter.
Do NOT fasten off. We’ll now crochet the first front panel directly onto the back panel.
First Front Panel
ROW 1: Ch 1, HDC 12(14, 15, 17, 18)(20, 22, 23, 25).
<12(14, 15, 17, 18)(20, 22, 23, 25)>
ROW 2: Ch 1, HDC across, turn.
<12(14, 15, 17, 18)(20, 22, 23, 25)>
Repeat ROW 2 until ROW 24(25, 26, 27, 28)(29, 30, 31, 32).
<12(14, 15, 17, 18)(20, 22, 23, 25)>
*If you altered the length of your back panel, crochet the same number of rows for your front panels.
Fasten off.
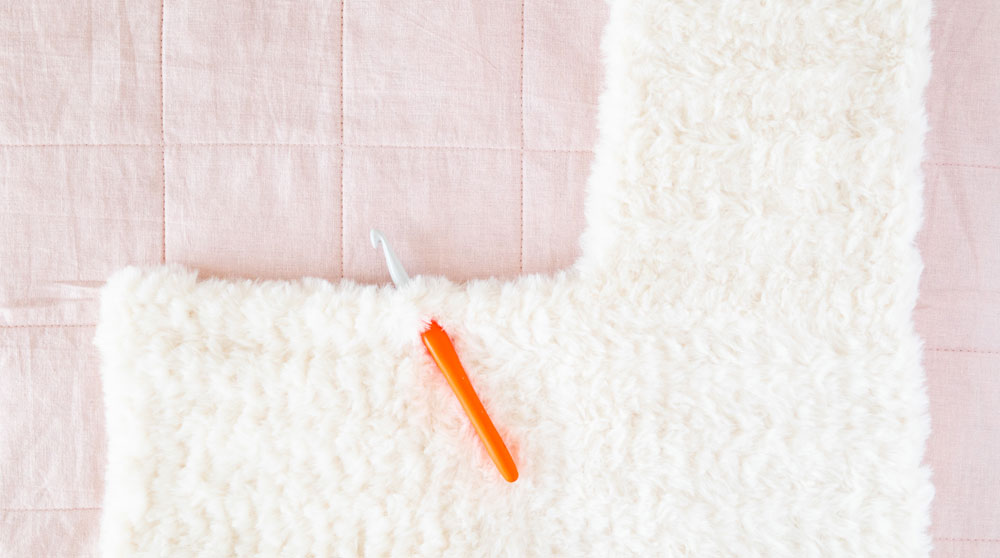
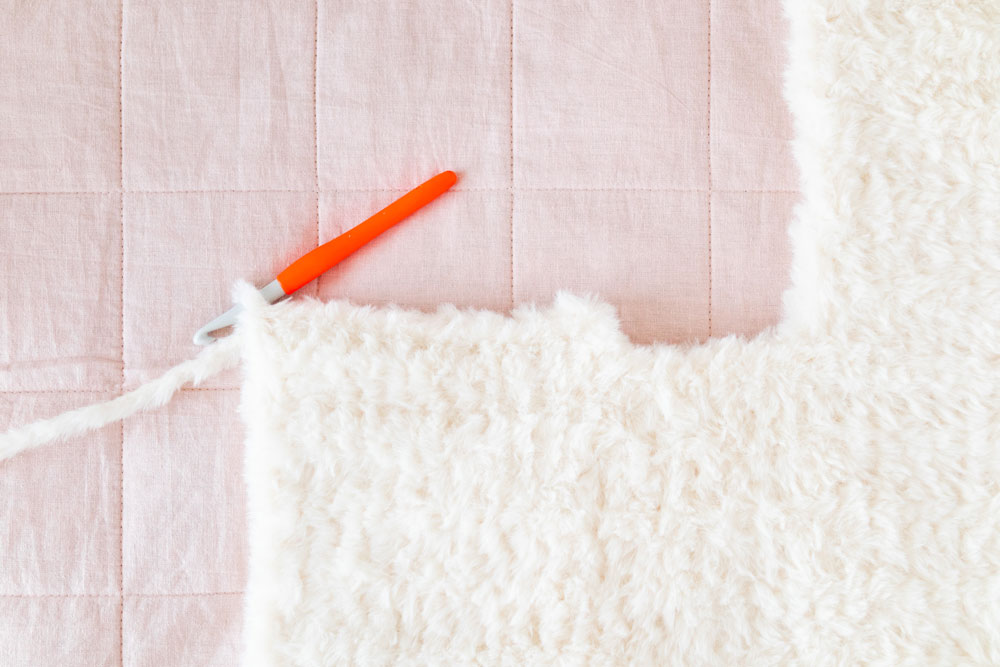
Second Front Panel
Counting from the last st of ROW 1 of the ‘FIRST FRONT PANEL’, skip 6(6, 6, 7)(7, 7, 8, 8) sts, insert hook into the next st, secure yarn and pull up a loop.
ROW 1: Ch 1, HDC across turn.
<12(14, 15, 17, 18)(20, 22, 23, 25)>
Repeat ROW 1 until ROW 24(25, 26, 27, 28)(29, 30, 31, 32).
<30(34, 36, 40, 43)(47, 51, 54, 58)>
*If you altered the length of your jacket, make sure you have the same number of rows as the back panel and first front panel.
Fasten off.
Sleeves
*Make 2
SIZES XS(S, M, L, XL)
FOUNDATION CHAIN: Ch 19(19, 20, 21, 21).
ROW 1: HDC into 2nd ch from hook, HDC in each ch until end, turn.
<18(18, 19, 20, 20)>
ROWS 2 – 6: Ch 1, HDC across, turn.
<18(18, 19, 20, 20)>
ROW 7: Ch 1, 2 HDC in 1st st, HDC in each st until last st, 2 HDC in last st, turn.
<20(20, 21, 22, 22)>
Repeat ROWS 2 – 7 until sleeve measures 40(41, 41, 41, 43)cm / 16(16.5, 16.5, 16.5, 17)” approx. ROW 23(24, 24, 24, 25)
<24(24, 25, 26, 28)>
Fasten off.
SIZES (2XL, 3XL, 4XL, 5XL)
FOUNDATION CHAIN: Ch (23, 23, 24, 26).
ROW 1: HDC into 2nd ch from hook, HDC in each ch until end, turn.
<(22, 22, 23, 25)>
ROWS 2 – 5: Ch 1, HDC across, turn.
<(22, 22, 23, 25)>
ROW 6: Ch 1, 2 HDC in 1st st, HDC in each st until last st, 2 HDC in last st, turn.
<(24, 24, 25, 27)>
Repeat ROWS 2 – 6 until sleeve measures (43, 45, 47, 47)cm / (17, 17.5, 18.5, 18.5)” approx. ROW (25, 26, 27, 27)
<(30, 32, 33, 35)>
Fasten off.
ALL SIZES: Fold sleeve in half lengthways. Whip stitch the edges of the sleeve together.

Collar
FOUNDATION CHAIN: Ch 37(37, 37, 39, 39)(41, 41, 43, 43).
ROW 1: HDC into 2nd ch from hook, HDC in each ch until end, turn.
<36(36, 36, 38, 38)(40, 40, 42, 42)>
ROW 2: Ch 1, HDC across, turn.
<36(36, 36, 38, 38)(40, 40, 42, 42)>
Repeat ROW 2 until ROW 6(6, 6, 6, 7)(7, 7, 8, 8).
<36(36, 36, 38, 38)(40, 40, 42, 42)>
Assembly
Lay the front panels on top of the back panel.
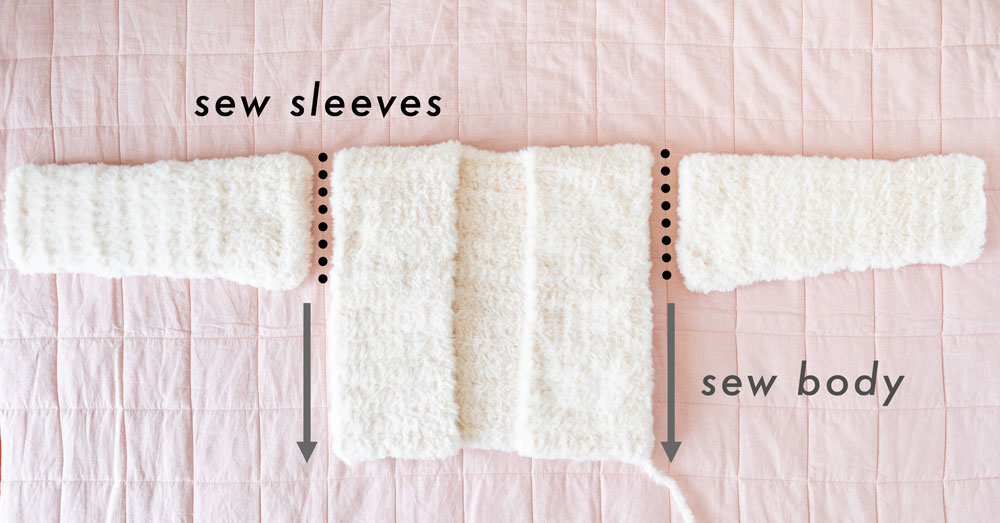
Whip stitch up the sides of body panels together, leaving a gap for the sleeves.
Whip stitch top of sleeves to arm holes.
Turn jacket inside out so that the right side is facing you. Fold collar in half lengthways and attaching the foundation chain edge of the collar to the neckline ...
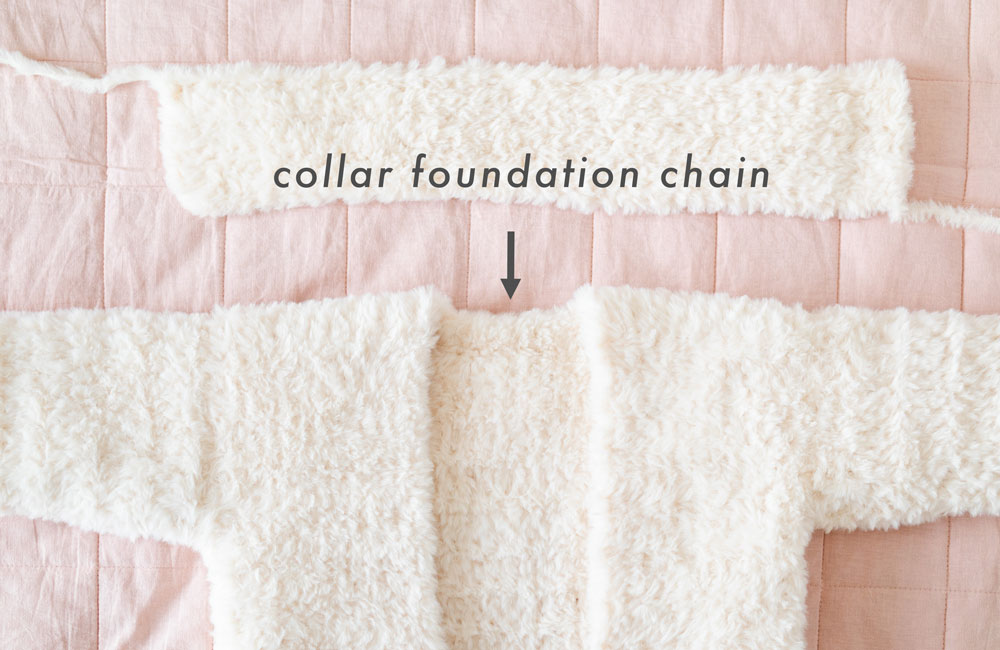
... pin the centre of the collar to the centre of the neck gap.
*I find that sewing the foundation chain edge of the collar to the body of the cardigan allows the collar to fall nicely along the neckline.
Evenly space out the collar along the top of the neckline and pin in place.
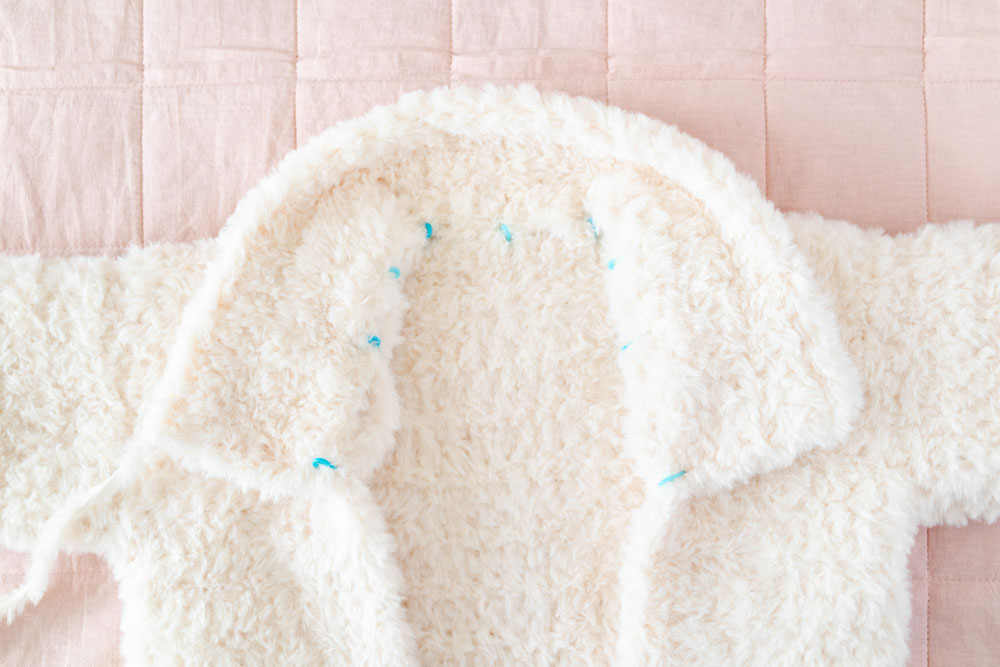
Whip stitch the collar to the neckline.
Weave in all of your ends.
Voilà! You’ve finished your Snow Bloom Faux Fur Jacket 🙂
Absolutely love this! 😍 so adorable and chic! 😍 Will definitely be on my to do list!
Thank you so much Laura! Happy Holidays 🙂 - Grace
So beautiful and so simple! Thanks for sharing 🙂
Thanks Jennifer!
I am in love with this pattern 🤩😍 definitely excited to try this one out. Thank you for doing the lord's work and sharing this 🥺🙏🏻
So glad you like the pattern Michelle!
This could not come at a better time. I have been looking fir a pattern for the faux fur ysrn that I purchased. I will probably make it a wee bit longer. I do like your patterns.
Yay! Isn't wonderful when you already have the yarn in your stash? 🙂
I cannot wait to receive my yarn to make this!! This is beautiful! Thank you for the pattern!
Glad you like the pattern Geneva!
Hi. This coat looks very beautiful!. I don't quite understand the front panels though. How do they assemble at the end?. I don't see how it comes together in the finished product.
Hi, you fold the front panels on top of the back panel and then you sew up the sides of the front and back panels, leaving a gap at the top for the sleeves.
Grace 🙂
How is it that you offer a free pattern for 4.40
This isn’t free???
Hi Jill,
The free pattern is available to view online right on this blog post - just scroll down to read the pattern. A printable, pdf version is available on Etsy.
Grace 🙂
It is magnificent. Thank you for sharing. How many yarns you used for knitting this coat?
All yarn amounts are listed in under the 'Materials' title 🙂
Hi! I love this jacket and really want to make it. I was wondering if the skeins you used were 50g or 100g? The website you linked sells 100g skeins but it looks like you wrote that you were using 50g. Just wanted to check with you so I know how much yarn to order!!
Hi Tyler,
Thanks so much for catching that - they're 100g skeins 🙂 I've updated the pattern!
Grace
Love this!!!! I have some fur yarn in my stash, just WAITING for the perfect project! I think this is it! Thanks for sharing!
I do have one question - what is your best tip for joining a new skein? This super bulky yarn doesn't prove to work so well with the "usual" knot/weave ends process.
Hi Penelope,
For fluffy yarns, I use the russian knot method (there are heaps of tutorials on youtube!). Since the yarn is so fluffy you won't be able to see the knots 🙂
Grace
Hi! Could this project be made using weight 7 Lion Brand go for faux yarn? Or Yarn bee fur the moment yarn?
Hi Shanell,
You'll want to use a super bulky (6) yarn so that you can meet the gauge stated in the pattern.
Grace 🙂
I looooved this coat, so excited to start this project! Although I'd love to see the video tutorial 🙁
Me too! I'd love a video tutorial of this!
Love this coat! I'm finishing up the back panel now (no idea how you did it in such a short time!). How do you take care of cleaning this coat? Have you tried any sort of wash?
Hi Jaci,
Any idea whether the size mentioned is finished garment size or actual body measurement? Like suppose it says bust measurement 34 inches. Does it mean the bust of the sweater will measure 34 inches or the person wearing the sweater has a bust size of 34?
Thanks,
Deb
Just finishing up this pattern for my daughter and it was so quick. I was surprised at how easy the faux fur yarn is to work with. She's going to love the boxy cropped shape. I think the sleeves need a little more ease around the armhole to fit comfortably with this bulky yarn, and to fit more like a jacket, so I added more increases in the sleeve and ended up with an 8.5" opening (size Small).
Hi,
Is the size mentioned is finished garment size or actual body measurement? Like suppose it says bust measurement 34 inches. Does it mean the bust of the sweater will measure 34 inches or the person wearing the sweater has a bust size of 34?
Thanks,
Deb
This jacket us so beautiful, thank you so much. I am a beginner crocheted but I will try it. Thank you so much for your beautiful work