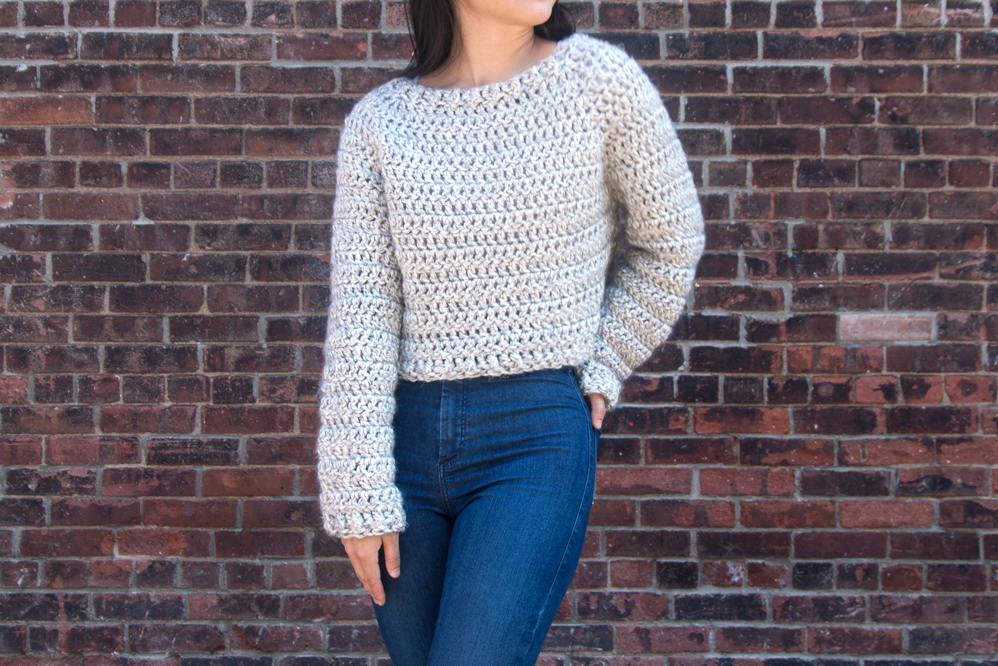
Looking for an easy crochet sweater? The Brooklyn Sweater is the perfect top-down everyday sweater that is beginner-friendly and quick! Scroll down for this free crochet cardigan pattern and step-by-step video tutorial or purchase the ad-free, printable PDF here.

This post may contain affiliate links, view our disclosure policy for details.
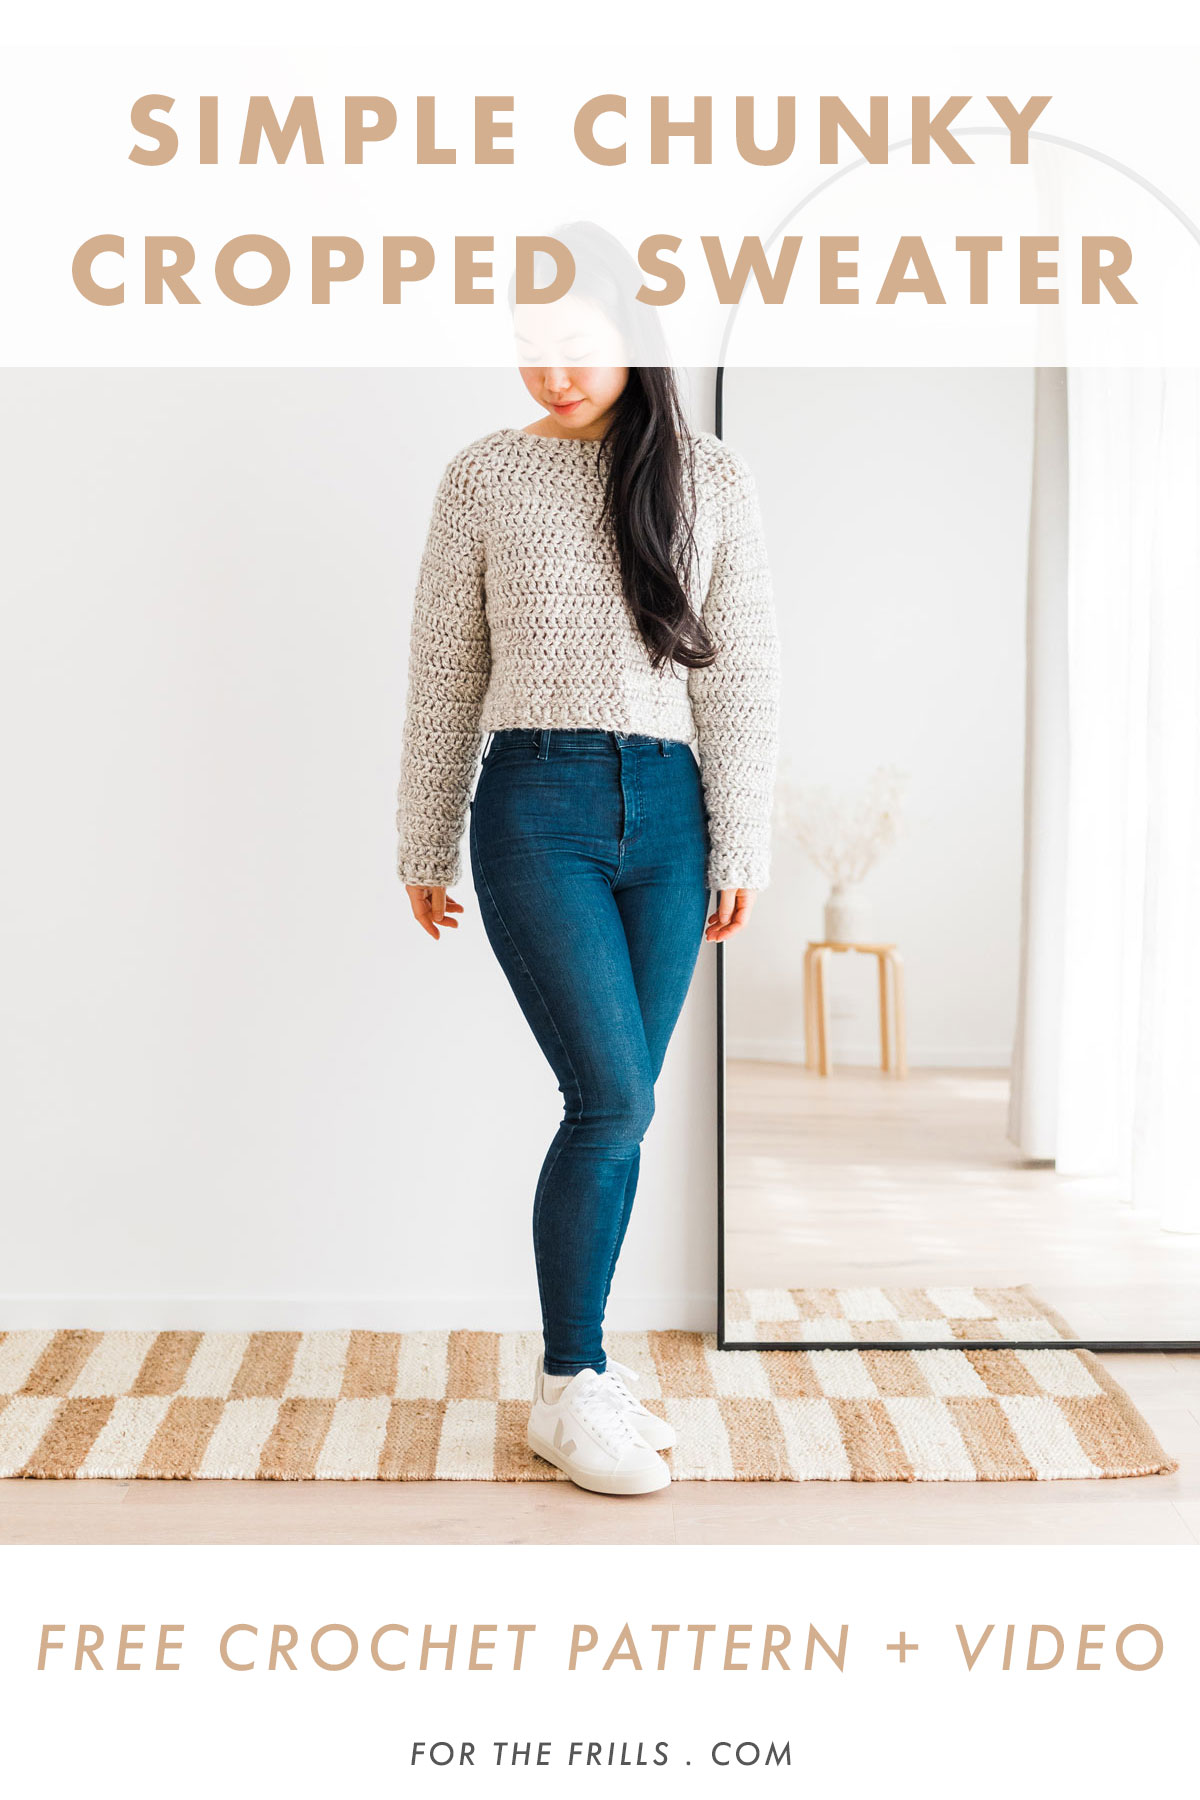
Sometimes simple is best! The Brooklyn Sweater is created for stylish comfort that’s effortless to wear and easy to crochet. The beginner-friendly top down construction means that this pattern has absolutely no sewing and you can try on your sweater as you crochet! Made with super chunky yarn, this crochet sweater works up quickly and pairs effortlessly with high-waisted jeans or over dresses 🙂 The Brooklyn Sweater will be your go-to pullover during colder months!
Top Down Sweater Construction
The Brooklyn Sweater is a top down sweater that’s worked in the round. Projects worked in the round are joined together with a slip stitch – think of it as crocheting in a circle as opposed to rows that are worked back and forth.
We’ll start by crocheting the neckline ribbing with front and back post double crochets. Then we’ll extend the yoke by placing 3 double crochets in the same stitch in each corner. For increases, stitch markers are your best friend! They are great because instead of having to count your stitches multiple times each row, so can just crochet until you reach the stitch marker.
After we’ve increased the yoke, we’ll separate out the body from the two sleeves. The joining row is a great time to try on your sweater and make sure it fits. You want to have enough space in the armholes so that your arms can move freely and for the sweater to feel comfortable across your bust.
If you want to make alterations simply undo the joining row and then remove rounds of the yoke to make the sweater smaller or add rounds to make the sweater larger.
From the joining row, we’ll crochet the body and you can extend it to any length you want. Again, try on your sweater to find the perfect length for you. If you want a longer sweater, just add more rows. If you want a shorter sweater, remove them. The only thing to consider is that the ribbing at the end will add about 2cm/0.75” of length to your sweater.
To crochet the sleeves, you’ll insert your crochet hook along the open armholes and then double crochet rounds until you reach your desired length for the sleeves. If you alter your sleeves, don’t forget to note down the exact number of rounds. This way you can make sure that both sleeves are the same length. Weave in your ends and then your all done!

Simple Stitch: Double Crochet
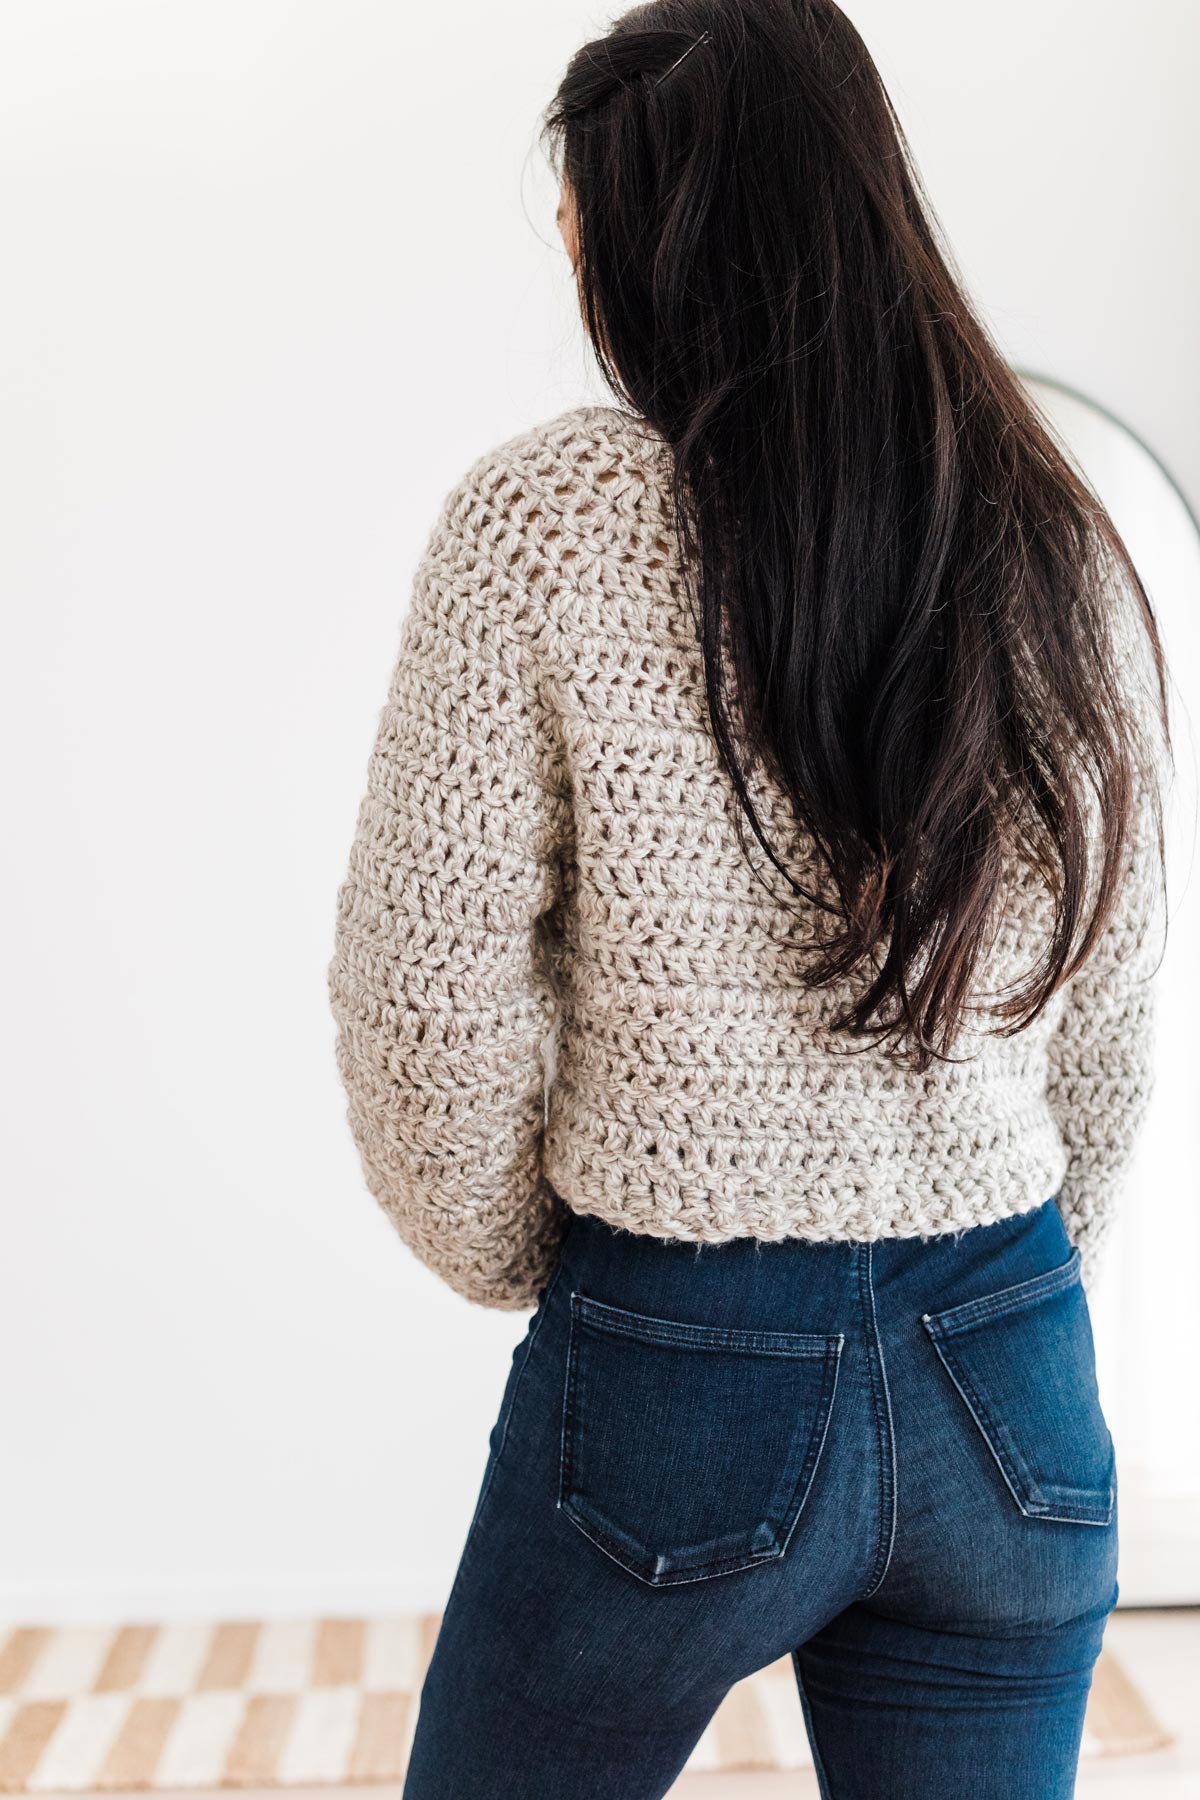
The bulk of the Brooklyn Sweater is made up of double crochets with front and back post double crochets used for the neckline, hemline and cuff ribbing. This beginner friendly stitch works up super quickly and combined with the super bulky yarn, this sweater will fly off your hook. You’ll be able to crochet this cosy sweater in an evening or two!
No Turning Chain Stitch
The only downside to double crochets is that the turning chain (of 2 chains) can be quite noticeable when working in the round. However, we can easily fix the visible seam by crocheting a ‘no turning chain’ stitch. The no turning chain stitch counts as 1 double crochet. You can find a tutorial in the step-by-step video below.
Print and crochet
I know lots of you prefer printed pattern so that you can crochet offline and on the couch.You can always find a low-cost printable PDF version of all my free patterns. This nicely-formatted pdf contains 7 pages, a link to the video tutorial and photo tutorial.
If you prefer to highlight your size and make notes as you crochet, you’ll also find the PDF to be a really valuable upgrade! It’s perfect for viewing on your phone, laptop or tablet.
Design Inspiration
My first ever pattern was a top down sweater top (Check out the Stephanie Ruffle Sleeve Top!) and it’s been months since I’ve designed a top down garment. Since seaming (and weaving in ends) is my least favourite part of a project, I wanted to create a sweater with as little sewing as possible!
Top down sweaters have so many advantages, you can try the sweater on as you to achieve perfect fit and secondly, you can pick your ideal length for the body and the sleeves.
This pattern begins with a simple ribbed neckline and you work your way down the yoke. In the joining row you separate the sleeves from the body and continue to crochet the body until you have the exact length you want.
If you’re wary about crochet projects in the round due to the seam running down the back of the body, don’t worry! You can use a stitch called a ‘no turning chain’ (demonstrated in the video tutorial) the seam becomes nearly invisible! I really recommend trying it out as it will give your sweater a more ‘finished’ look 🙂
Check out more free crochet patterns here!
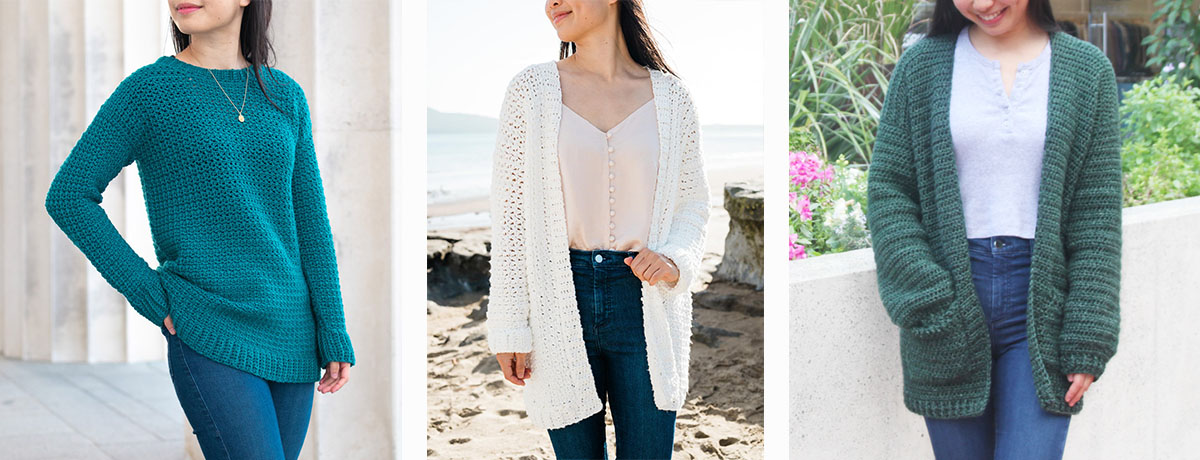
1. Easy Textured Sweater / 2. In The Clouds Cardigan / 3. Oversized Pocket Cardigan
Yarn
For this project I used Lion Brand’s Heartland Thick & Quick in the shade ‘Katmai’. It’s a lovely light warm grey with a slightly marled texture. If you look closely, all the Heartland yarns are two-toned which gives the yarn a great dimension and texture.
This yarn has a super soft, silky feel and I can hardly believe it’s 100% acrylic! Since, Heartland Thick & Quick is acrylic the sweater is a lot lighter than wool super bulky yarn and it’s also on the thinner side of a super bulky yarn so this sweater is a lot more wearable for everyday life!
Update: Lionbrand Heartland Thick and Quick has been discontinued 🙁 Similar yarns are -
- Lionbrand Hometown
- WeCrochet Mighty Stitch Super Bulky
- Lionbrand Re-Spun Thick & Quick
You’re looking for a yarn that has a soft, silky feel that isn’t too heavy per 100g. Acrylic and acrylic blends are best but most super chunky yarns work well as a substitute as long as you can meet the gauge listed in the pattern 🙂
Click to Pin me for later!
Video Tutorial
Looking to crochet your first sweater? This boxy crochet pullover combines beginner-friendly stitches and super chunky yarn to work up quickly! You’ll be wearing this sweater in no time!
Notes:
*The size guide follows size XS(S, M, L, XL, 2XL, 3XL). E.g. “Ch 100(116, 132, 148, 164, 180, 196) means Ch 100 for XS, Ch 116 for Small, Ch 132 for Medium, Ch 148 for Large, Ch 164 for XL, Ch 180 for 2XL and Ch 196 for 3XL. If there is only one number, it applies to all sizes.
*"DC 10" means DC into the next 10 stitches.
*"3DC" means place 3 DC into the same stitch.
*Ch 3 always counts as a stitch unless otherwise noted. You can replace ch 3 with a ‘no turning chain’ to reduce the visible seam.’
*Ch 1 does NOT count as a stitch.
*Total stitches are indicated between < >.
*This pattern uses US crochet terms.
LEVEL: Easy
Materials
Yarn – Lion Brand Heartland Thick & Quick – 14ply/Super Chunky/Super Bulky(6), 114m/142g, 100% Acrylic, Katmai (151)
5(5, 6, 6, 7, 8, 9) skeins
*Add 1-2 skeins if you’d like to make your sweater longer
9mm (US M) Crochet Hook
4 stitch markers
Darning Needle
Scissors
Stitches & Abbreviations
Ch = Chain
Sl st = Slip Stitch
SC = Single Crochet
DC = Double Crochet
DC2tog = Double Crochet 2 Stitches Together
FpDC = Front Post Double Crochet
BpDC = Back Post Double Crochet
St(s) = Stitch(es)
Rep = Repeat
GAUGE: 10cm/4” square = 7.5 stitches wide x 5 rows tall in Double Crochet
Measurements cm:
To fit bust: 76(86, 96, 106, 116, 126, 136)
Chest width: 44(47, 50, 52, 55, 60, 65)
Length: 40(42, 44, 46, 48, 52, 56)
Sleeve length: 40(40, 40, 40, 40, 40, 40)
Measurements inches:
To fit bust: 30(34, 38, 42, 46, 50, 54)
Chest width: 17.5(18.5, 19.5, 20.5, 21.5, 23.5, 25.5)
Length: 16(16.5, 17.5, 18, 19, 20.5, 22)
Sleeve length: 16(16, 16, 16, 16, 16, 16)
Add the Brooklyn Sweater to your Ravelry queue!
Brooklyn Sweater - Ad-free, printable pdf version!
Chunky Crochet Sweater Pattern
YOKE
FOUNDATION CHAIN: All sizes, ch 48, sl st into 1st ch to join.
ROUND 1: Ch 1, SC 48, sl st to join.
<48>
ROUND 2: Ch 3, FpDC, *BpDC, FpDC; rep from * until end, sl st to join.
<48>
ROUND 3: Ch 3, DC 7, 3DC – insert st marker on top of 2nd st in the 3DC cluster, DC 7, 3DC – insert st marker on top of 2nd st in the 3DC cluster, DC 15, 3DC – insert st marker on top of 2nd st in the 3DC cluster, DC 7, 3DC – insert st marker on top of 2nd st in the 3DC cluster, DC 7, sl st to join, turn.
<56>
*After each 3DC cluster move the st maker on top of the 2nd st.
ROUND 4: Ch 3, DC 8, 3DC, DC 9, 3DC, DC 17, 3DC, DC 9, 3DC, DC 8, sl st to join, turn.
<64>
ROUND 5: Ch 3, DC 9, 3DC, DC 11, 3DC, DC 19, 3DC, DC 11, 3DC, DC 9, sl st to join, turn.
<72>
ROUND 6: Ch 3, *DC in each st until the st marker, 3DC into the st with a st marker; rep from * three more times, DC in each st until the end of the round, sl st to join, turn.
<80>
Repeat ROUND 6 until ROUND 10(11, 12, 13, 14, 16, 18).
<112(120, 128, 136, 144, 160, 176)>
*Do not fasten off. We’ll now separate the armholes from the body.
JOINING ROUND: Ch 3, DC in each st until a st marker, DC into st with a st marker, DC into next st with a st marker (you have created your 1st armhole). DC in each st until next st marker, DC into st with a st marker, DC into next st with a st marker (you have created your 2nd armhole). DC in each st until the end of the round, sl st to join, turn.
<66(70, 74, 78, 82, 90, 98)>
*I suggest trying on your sweater – your arms should be able to move freely in the armholes and the joining row fit comfortably around your bust.
For a tighter fit – remove JOINING ROUND and remove rounds of ROUND 6.
For a looser fit – remove JOINING ROUND and add rounds of ROUND 6.
BODY
ROUND 1: Ch 3, DC in each st until end, st sl to join, turn.
<66(70, 74, 78, 82, 90, 98)>
ROUND 2: Ch 3, DC 15, DC2tog, DC 35, DC2tog, DC in each st until end, st sl to join, turn.
<64(68, 72, 76, 80, 88, 96)>
ROUND 3: Ch 3, DC in each st until end, st sl to join, turn.
<64(68, 72, 76, 80, 88, 96)>
ROUND 4: Ch 3, DC 15, DC2tog, DC 33, DC2tog, DC in each st until end, st sl to join, turn.
<62(66, 70, 74, 78, 86, 94)>
ROUND 5: Ch 3, DC in each st until end, st sl to join, turn.
<62(66, 70, 74, 78, 86, 94)>
Repeat ROUND 5 until ROUND 8.
<62(66, 70, 74, 78, 86, 94)>
*You can add or remove rounds to make your sweater longer or shorter – please note: the ribbing adds 2cm/0.75”
RIBBING ROUND: Ch3, FpDC, *BpDC, FpDC; rep from * until end, sl st to join. Fasten off.
<62(66, 70, 74, 78, 86, 94)>
SLEEVES
Insert hook along edge of the sleeve, secure yarn and pull through a loop.
*To hide the seam, make sure that the back of your sweater is facing you (the side with the line of ch 3/no turning chains), insert your hook into the st with a st marker. Also make sure that the final row of the yoke has the wrong side facing you.
ROUND 1: Ch 3, DC in each st around (including the sts with a st marker), place 2 DC2tog in between the st markers, st sl to join, turn.
<27(29, 31, 33, 35, 39, 43)>
ROUND 2: Ch 3, DC in each st until end, st sl to join, turn.
<27(29, 31, 33, 35, 39, 43)>
ROUND 3: Ch 3, DC2tog, DC in each st until end, sl st to join, turn.
<26(28, 30, 32, 34, 38, 42)>
ROUND 4: Ch 3, DC in each st until end, st sl to join, turn.
<26(28, 30, 32, 34, 38, 42)>
Repeat ROUNDS 3-4 until ROUND 18.
<19(21, 23, 25, 27, 31, 35)>
ROUND 19: Ch 3, DC in each st until end, st sl to join, turn.
*Try on your sweater. You can add or remove ROUND 19 to make your sleeves longer or shorter – please note: the ribbing adds 2cm/0.75”.
RIBBING ROUND: Ch 3, *FpDC, BpDC; rep from * until end, sl st to join. Fasten off.
<19(21, 23, 25, 27, 31, 35)>
Repeat for 2nd sleeve.
*Make sure both sleeves have the same number of rows!
Weave in all of your ends.
Voilà! You’ve finished your Brooklyn Crochet Sweater 🙂
High waisted Jeans or otherwise known as "Mom Jeans" or jeans for those of us who have no hips to keep anything up
Hi! I have some bulky (not super bulky) yarn that I'd love to use for this project. What would you suggest to make it fit? Should I go up a size, or should I use a different sized hook to achieve the same gauge? Thanks:)
Hi Shira,
I'd recommend using the correct hook size for your yarn (or the sweater will be very holey!) and then increasing the yoke until the stitch markers can meet underneath your arms when you try on the sweater. The separate the body from the sleeves. Keep in mind you'll probably need more yarn than the pattern calls for.
I hope this helps,
Grace 🙂
Hey! Are the measures per size pre or post blocking?
Hi Allison, the measurements are 'pre-blocking' although I didn't block this sweater because I liked the fit and didn't want it to grow 🙂
Grace
Are the measurements in the size guide of the finished garment or of the wearer’s body? If I make a L should it measure 42” across the bust or would it measure larger?
Hi, with measurements 'to fit bust' always the bust measurement of the wearer. Chest width = the width of your sweater, so when you measure the width of the sweater for size L it should be approx. 20.5"
Grace 🙂
I just started this pattern with another variety of yarn (Yarn Bee Astounding). I'm using a 10 mm crochet hook and the sweater is turning our super thick-almost like a rug! Perfect for cold nights, or hiking. I'm alternating some colors as I work for a striped affect. Thanks for sharing!
Hey I love this but I only have premier puzzle yarn #5 would this work should I change hook sizes thank u
Hi Katina,
If you change yarn and hook size, you'll change your gauge, so you can follow the pattern as a guide but you'll have to alter the number stitches and rounds you crochet so your sweater will fit. If you're willing to experiment go ahead but I can't guarantee your sweater will look like the sample sorry!
Grace 🙂
Hi Grace,
I cannot find the Lion Brand Heartland Thick & Quick Acrylic yarn here (Calgary, Alberta, Canada) and wanted to check with you as I can find Lion Brand Hometown Super Bulky 6 in acrylic. Is that comparable?
Hi Sharon,
You can use LionBrand Hometown as a substitute but since it's a wool blend (instead of 100% acrylic) just keep in mind that your sweater will be a lot heavier and warmer.
Grace 🙂
Hi, this is a lovely pattern, thank you! I’m really looking forward to making this.
I’m hoping to use Paintbox Yarns Simply Super Chunky, which is 60m/100g per skein. However, the yarn you have used is 230m/132g, which works out to approximately 175m/100g. I am concerned that my yarn has significantly (three times!) less length per 100g, and therefore is a lot thicker. Should I work out the number of skeins needed by weight or length? Thanks!
Hi Grace! I just finished this adorable sweater. I used Bernat Blanket yarn and its so cozy. My only issue is the top/yolk. It slightly turns up on the collar. Do you have any suggestions for how to fix this?
Hi Cayleigh,
It seems like your gauge might have changed mid pattern? I'd recommend trying to steam block your sweater so that it sits nicely on your body 🙂
Grace
*”DC 10″ means HDC into the next 10 stitches.
Did you mean Half Double Crochet? The Stitch isn’t listed.
Thank you!
Oops thanks for catching that! I've fixed the pattern to say DC 🙂 Grace
Hello!
I don’t know if it’s me or my browser or what, but I can’t find the video tutorial on this page. Is it on YouTube?
Hi Emily,
The video is on this blog post under the title 'Video Tutorial' and you can also view it on youTube here - https://youtu.be/YpIvFPnkamY
Grace 🙂
I loved using this crochet pattern! It only took me two days to finish and came out beautifully. The pattern is so easy to follow and I only had to refer back to the video tutorial once or twice to double check my work. Thank you!
Great to hear you enjoyed the pattern Stephanie!
Happy crocheting,
Grace 🙂
Hi! I'd love to try this pattern to make a longer knee length tunic. Would you recommend repeating the last rounds until I get my desired length, or should I add/decrease stitches? Thank you 🙂
Hi Anannya,
I'd recommend measuring the circumference of your sweater and make sure that it's equal to or larger than your hip measurement, if so just repeat rounds until you reach your desired length. If your hip measurement is wider than your sweater you'll need to increase as you add your rounds.
Grace 🙂
Thank you! 🙂
hello I'm trying this pattern out and was wondering if the part of the sweater where we do the no turning chain is supposed to be making the sweater be longer on that side. It's making it look a little crooked as the sweater length is about a inch more to the front
nvm i figured out what I was doing wrong Now my question is is the no turning chain noticeably running down the sweater Is it supposed to be noticeable?
Thanks for sharing the pattern, but this is SUPER heavy. It feels like a sweater that's made of a rug. I'm giving this one up after the body, but I'll try a different one! The seam down the back is also very noticeable on mine, but I'm a newbie.
Hi Sam,
Thanks for the feedback! For super chunky sweaters that are made up of solid stitches (like this one) I tend to use a yarn that has relatively more yardage per 100g. For example if yarn A has 110m/100g it will make a lot lighter sweater than yarn B which has 85m/100g. Both yarns can be the same thickness but the fibre content (sheep wool tends to be heavier than alpaca or acrylic) will make a significant difference to the weight of your sweater.
I hope this helps,
Grace
Hi I am wondering if the pattern remains the same if using the bernay blanket yarn.
As long as you can meet the gauge listed in the pattern, you should be ok!
Grace
Hi,
This is the second sweater I made from your pattern - are perfect and super easy to do!
Love them all 🙂
At the end of row 11 do I do a slip stitch then turn my work to start doing the arm holes? Thanks
Thank you so much for creating and sharing your easy to follow pattern. Because of you, I was able to make myself my first sweater this weekend!
Hi Grace im just starting the body. I'm doing XL so I have DC in each stitch on the round but next step is DC in the next 15, is this the same for an XL one??
Hi Joanne,
Yes it's just a slight decrease to make the sweater fall nicely under your bust so the placement isn't important across the different sizes.
Grace 🙂
This is a fantastic pattern, and very easy to follow even for someone with little experience. It took me much less time than I expected (about two days) and I am thrilled with the result. Thank you so much for creating this!
Hi Muriel,
I'm so glad you found this pattern easy to follow and that you like the finished result!
Happy crocheting,
Grace 🙂
So I've started this sweater but on the 3rd row I seem to maybe mess up? I do all the stitches right but I end up with one stitch left and it still counts as 56 stitches. I'm not sure what im doing wrong and i don't wanna mess it up lol, if you could give me some advice that'd be awesome. Thanks!
Hi Cait,
That last 'gap' at the end of the round isn't actually a stitch - it's connected to the turning chain - so if you add a stitch in it your sweater will form a point (a bit like a flat triangle) instead of having a flat edge. As long as you have the right number of stitches as listed in the pattern, you're on the right track!
Grace 🙂
Hi grace, I'm a newbie and am wondering how many balls of yarn are needed for this pattern, given ~110m balls? Thanks!
Hi Grace, I have got to row 7 and only just noticed the word "turn" before beginning a row. I am thinking this is why my work is not lying as flat as it could ? I think I will press on but start turning from now . I have never seen a circular pattern that "turns" before so I am guessing this is unusual, and might have been highlighted in the video, rather than distracting us with the "no chain turn" . . although it seems its only me who missed it judging by the comments !
I'm trying sweater for first time fairly simple but I'm afraid I made it too small daughter wants it looser I have yoke finished is there any way to enlarge without having to frog the whole thing PLEEZ
MRS MOM
Hi Grace, Just finished this sweater, using a #5 weight yarn. Came out great. Now my brother wants one. Could this pattern work for a man. Thank you for the great patterns
i’m so excited to try this pattern! i’m totally new at reading patterns and will have to take my time, and i was going to try to make this with lighter weight yarn and an “I” hook - will i be able to still follow the pattern, just increase the stitch count? i hope that makes sense!
Grace,
Thank you so much for this pattern! I have been crocheting on and off for a couple years but never had the confidence to crochet a sweater. I found your pattern on Pinterest and decided to give it a shot. I did it, and it's beautiful! I'm so grateful!
Hope you have a Happy New Year!
I've made this amazing sweater as my first crochet project.
The sweater turned out amazing. The size M fits amazing!
Thank you so much for sharing this pattern!! Lots of love from the Netherlands
Hi there,
This is my first time crocheting a sweater and I am giving it away as a gift. I have been workin g on the body part of the sweater but the back is very unsymmetric to the front, it is coming to a point in the back and when I try it on the back is very lumpy and wavy. I am not sure why this is happening and would LOVE to fix it (hopefully without scrapping the whole thing)
Thankyou!
I am excited to try this pattern but would love to watch the video first. I can't seem to find the right link to your video tutorial on this page. Can you help direct me to the right location? Thanks! Kay
Hi Grace, I just finished this a couple of weeks ago and want to thank you for such an easy project. It really came out nice. Having your video tutorial to reference was extremely helpful.
Please I don't know how you go from 80 stitches to 120 am I missing something?
I’ve never tried a sweater before, but this looks like a great place to start. The problem I’m having is that I can’t find a single super bulky (6) or bulky (5) yarn that even comes close to having the same meters or yards per gram. All of them seem to be much less (75-85 vs 100+). Seems like this means the sweater will be extremely thick and warm - any advice? Even the same Lion Brand Thick and Quick is listed at 106yds for 170g.
Hi Grace, thank you for this beautiful free pattern! But I've just finished the body using the turning chain technique and it resulted in a noticeable diagonal join down the back. I saw where others had the same issue. How do I correct that? I'm going to frog this and start again, as painful as that is, and I want this to be my only re-do.
Hi loved making this..had a little problem with the special no turning chain stitch but I'm not a perfectionist so I'm good...I did have a question. I thought I saw some option for adding or extending the neck to a cowl or similar but can't find it again. Did I imagine that?? I love the sweater but would like to add to neckline and have a little yarn leftover. Just wondering
Hi Grace, I Love your sweaters! I received alot of Caron Simply Soft Yarn. I wanted to make a sweater simular to this .one do you have one that would work with a #4 yarn and a 5mm or 5.5mm hook ? Sincerely, Renae
Hello Grace, With your gauge I came up with a 25.6" neckline. my gauge is 14hdc × 10 rows.
14hdc ÷ 4"= 3.5 =1" So 35×25.6=89hdc. if I only increased every. other row would that work.?
Hello Grace,
If I wanted to make the neck line a bit larger/ wider, by how many chains should I increase the initial row?