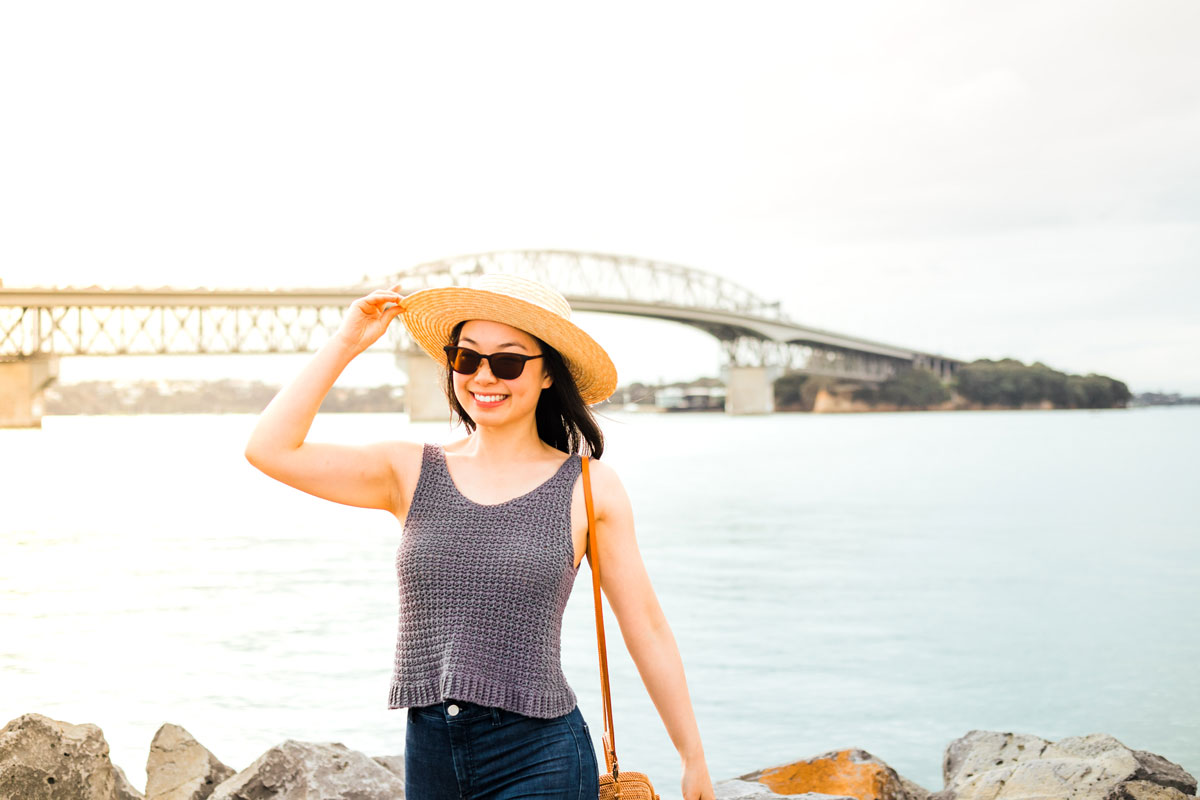
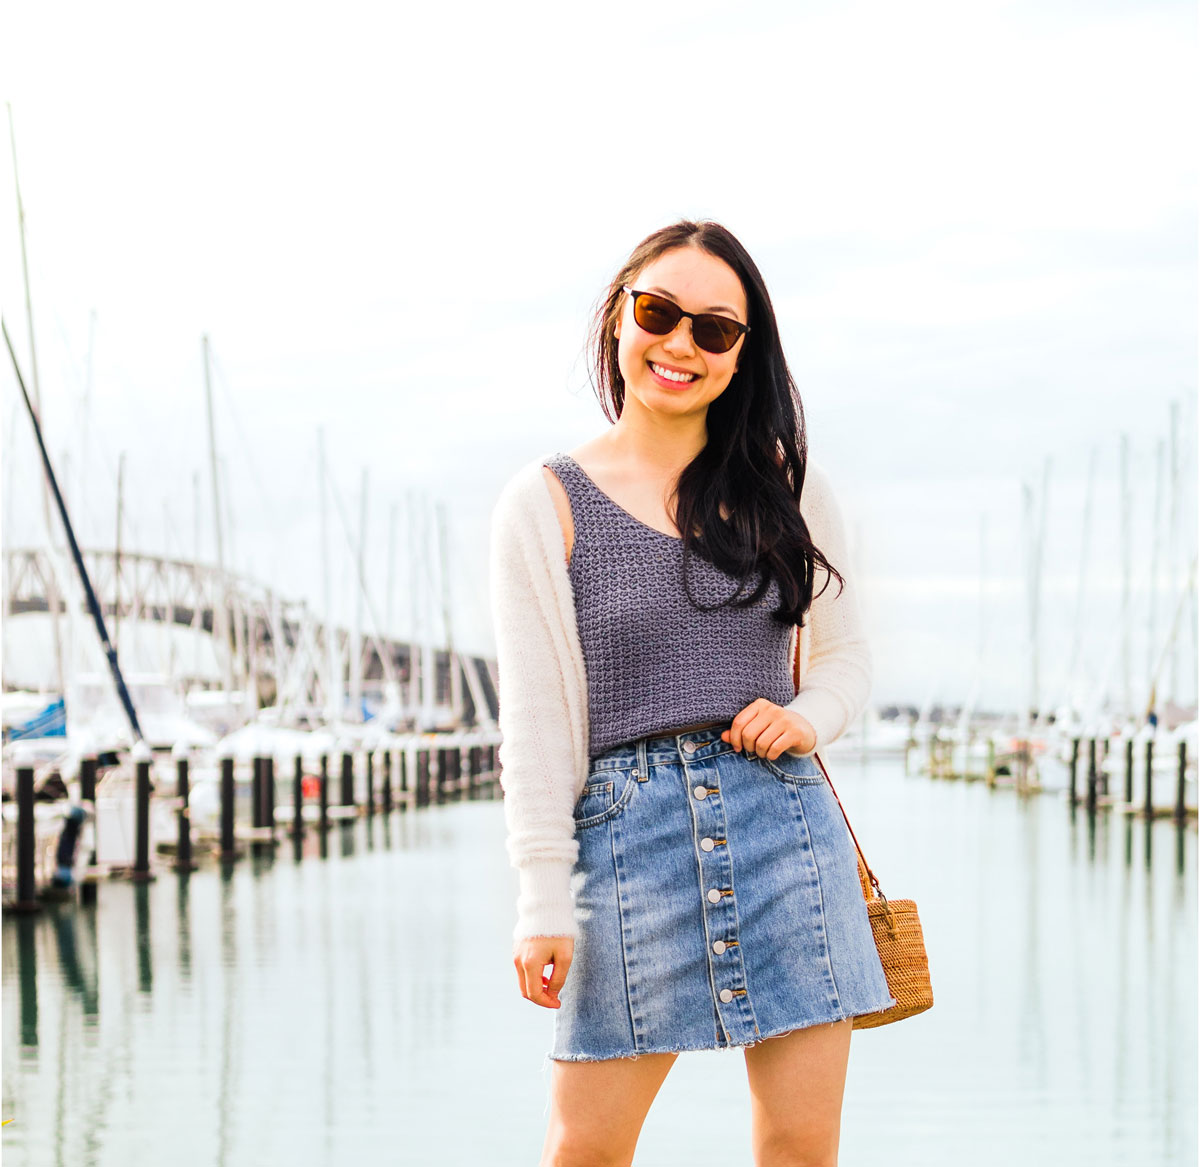
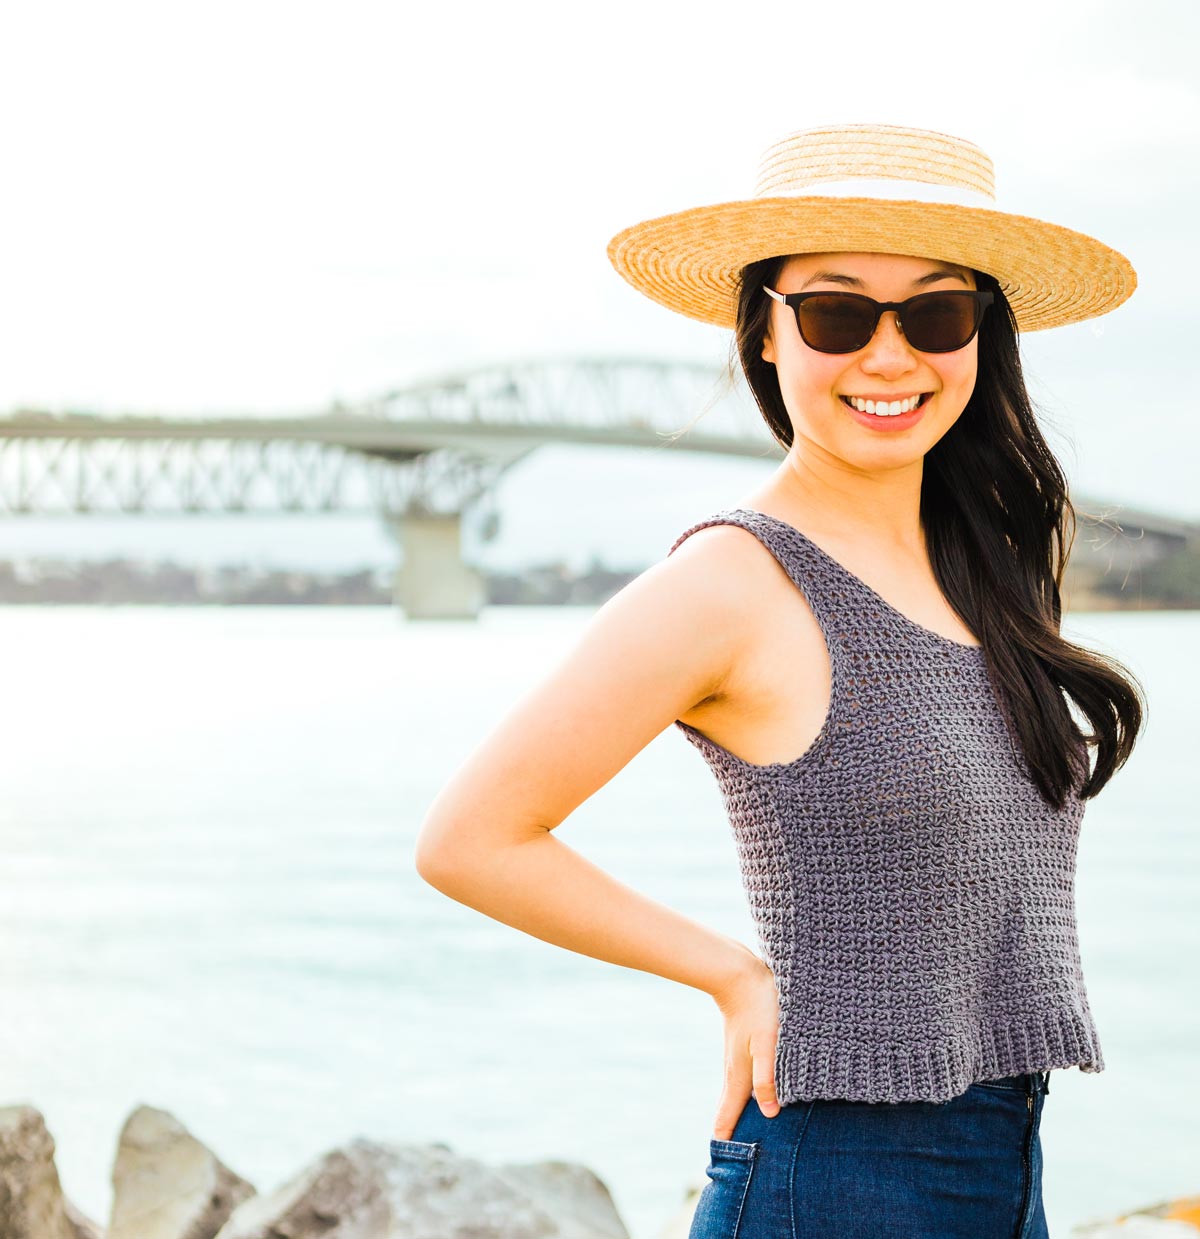
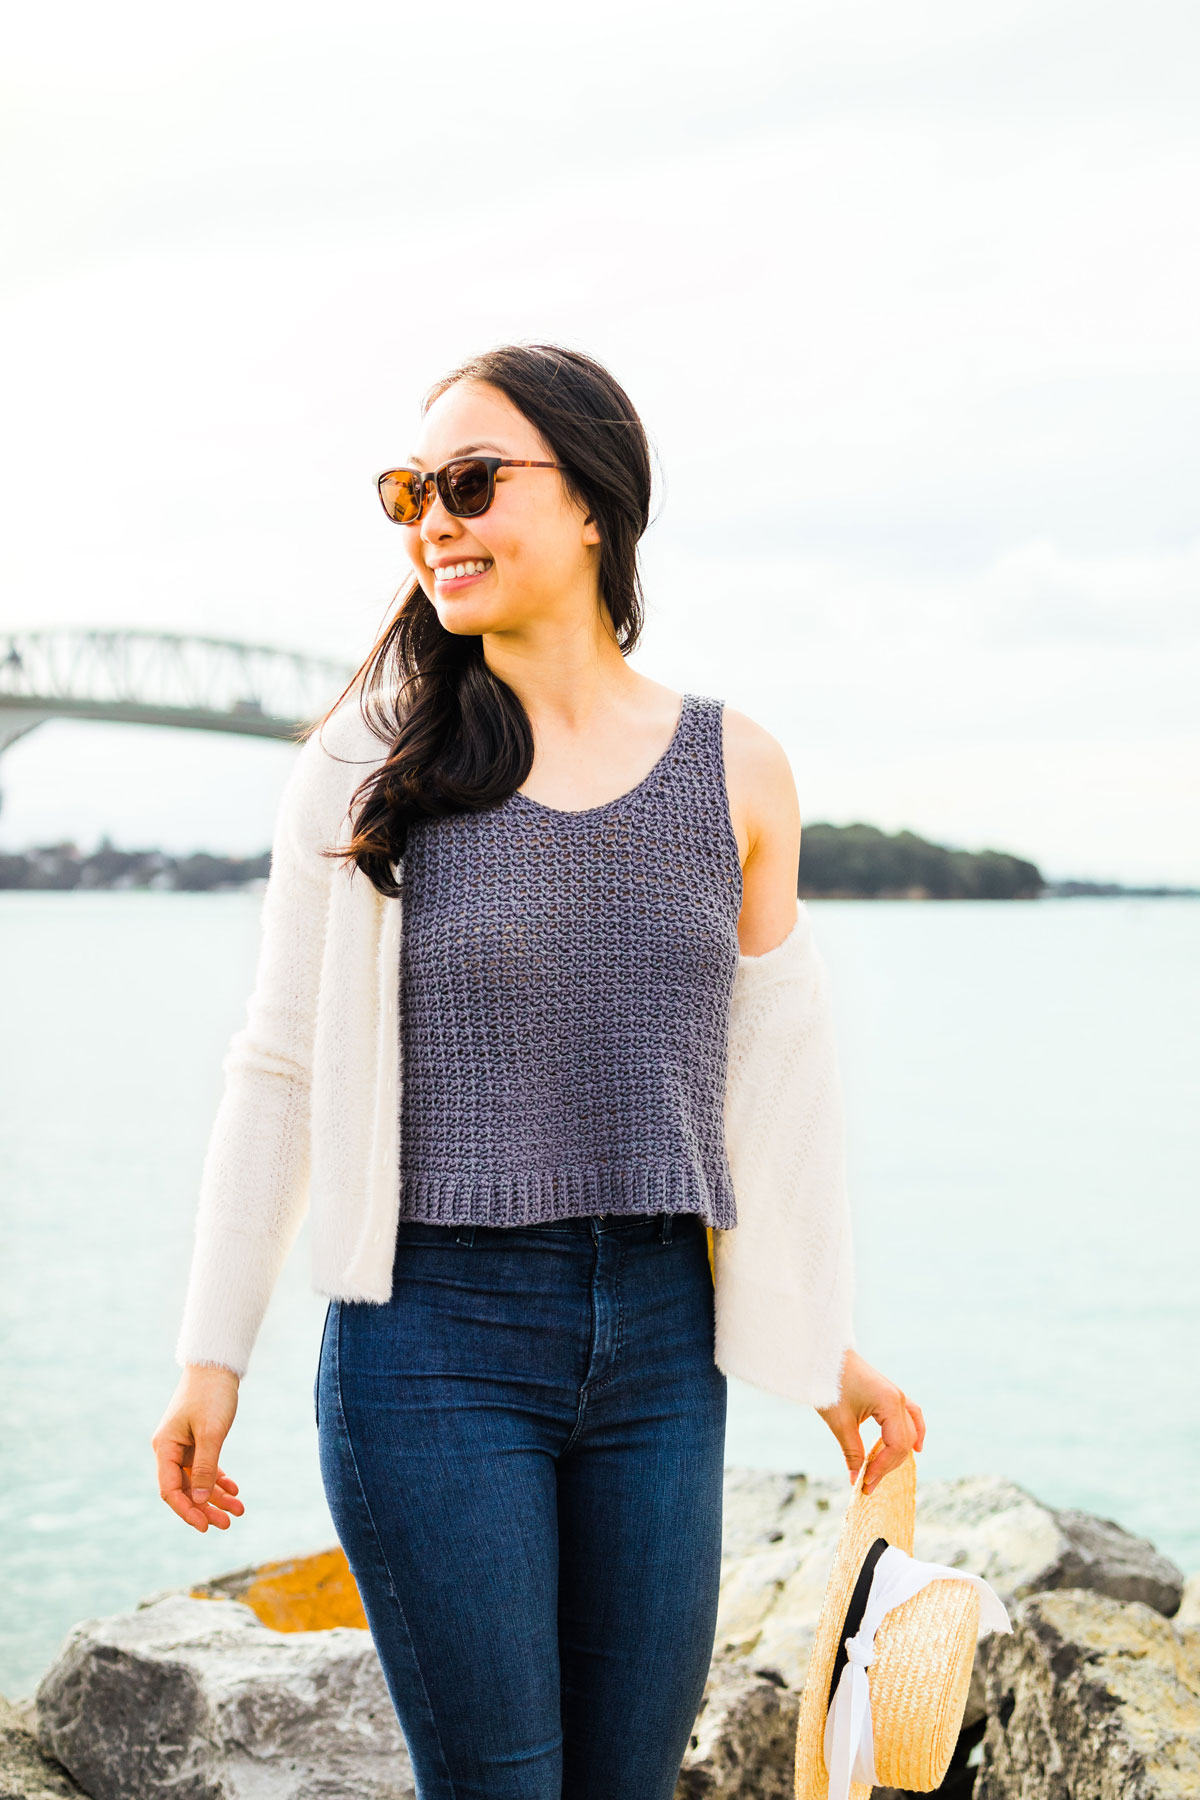
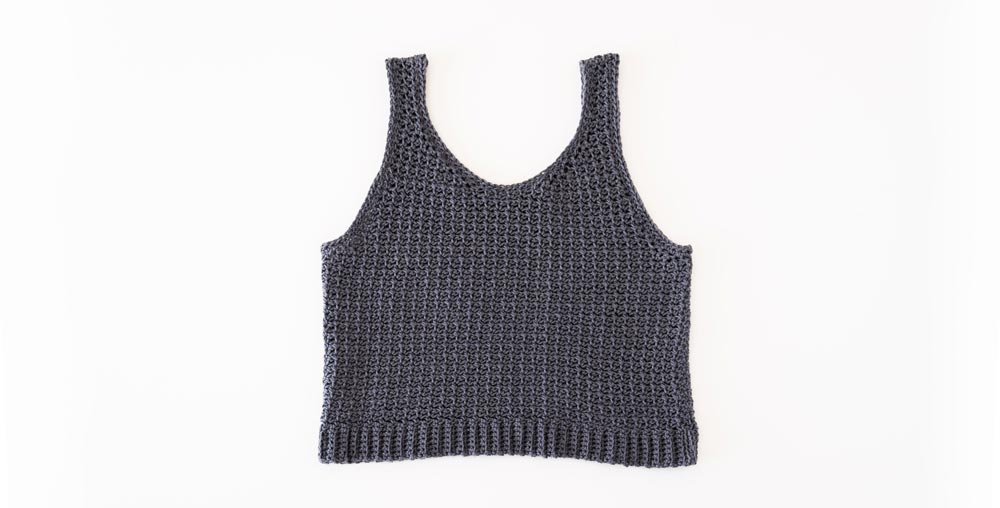
Looking for a light and airy summer crochet pattern? The Terrazzo Tank Top is a round-neck singlet with a textured mesh surface. Perfect on its own or over swimsuits, bandeaus or sports bras, this slouchy camisole is the comfiest thing you’ll wear all summer!
Scroll down for the free crochet tank top pattern and video tutorial or you can purchase the printable, ad-free version here!
This post may contain affiliate links, view our disclosure policy for details.
Thank you to WeCrochet for providing the yarn for this free crochet tank top pattern! As always all thoughts and opinions are 100% my own 🙂
The Terrazzo Tank Top is relaxed, casual and so comfortable! The design features a round neck, thick straps and simple ribbed hem.
This crochet camisole is worked up in the Single Crochet Column Stitch (You can also see this stitch in the Weekend Snuggle Sweater and In The Clouds Cardigan Patterns!) which is the perfect stitch for drapey summer projects.
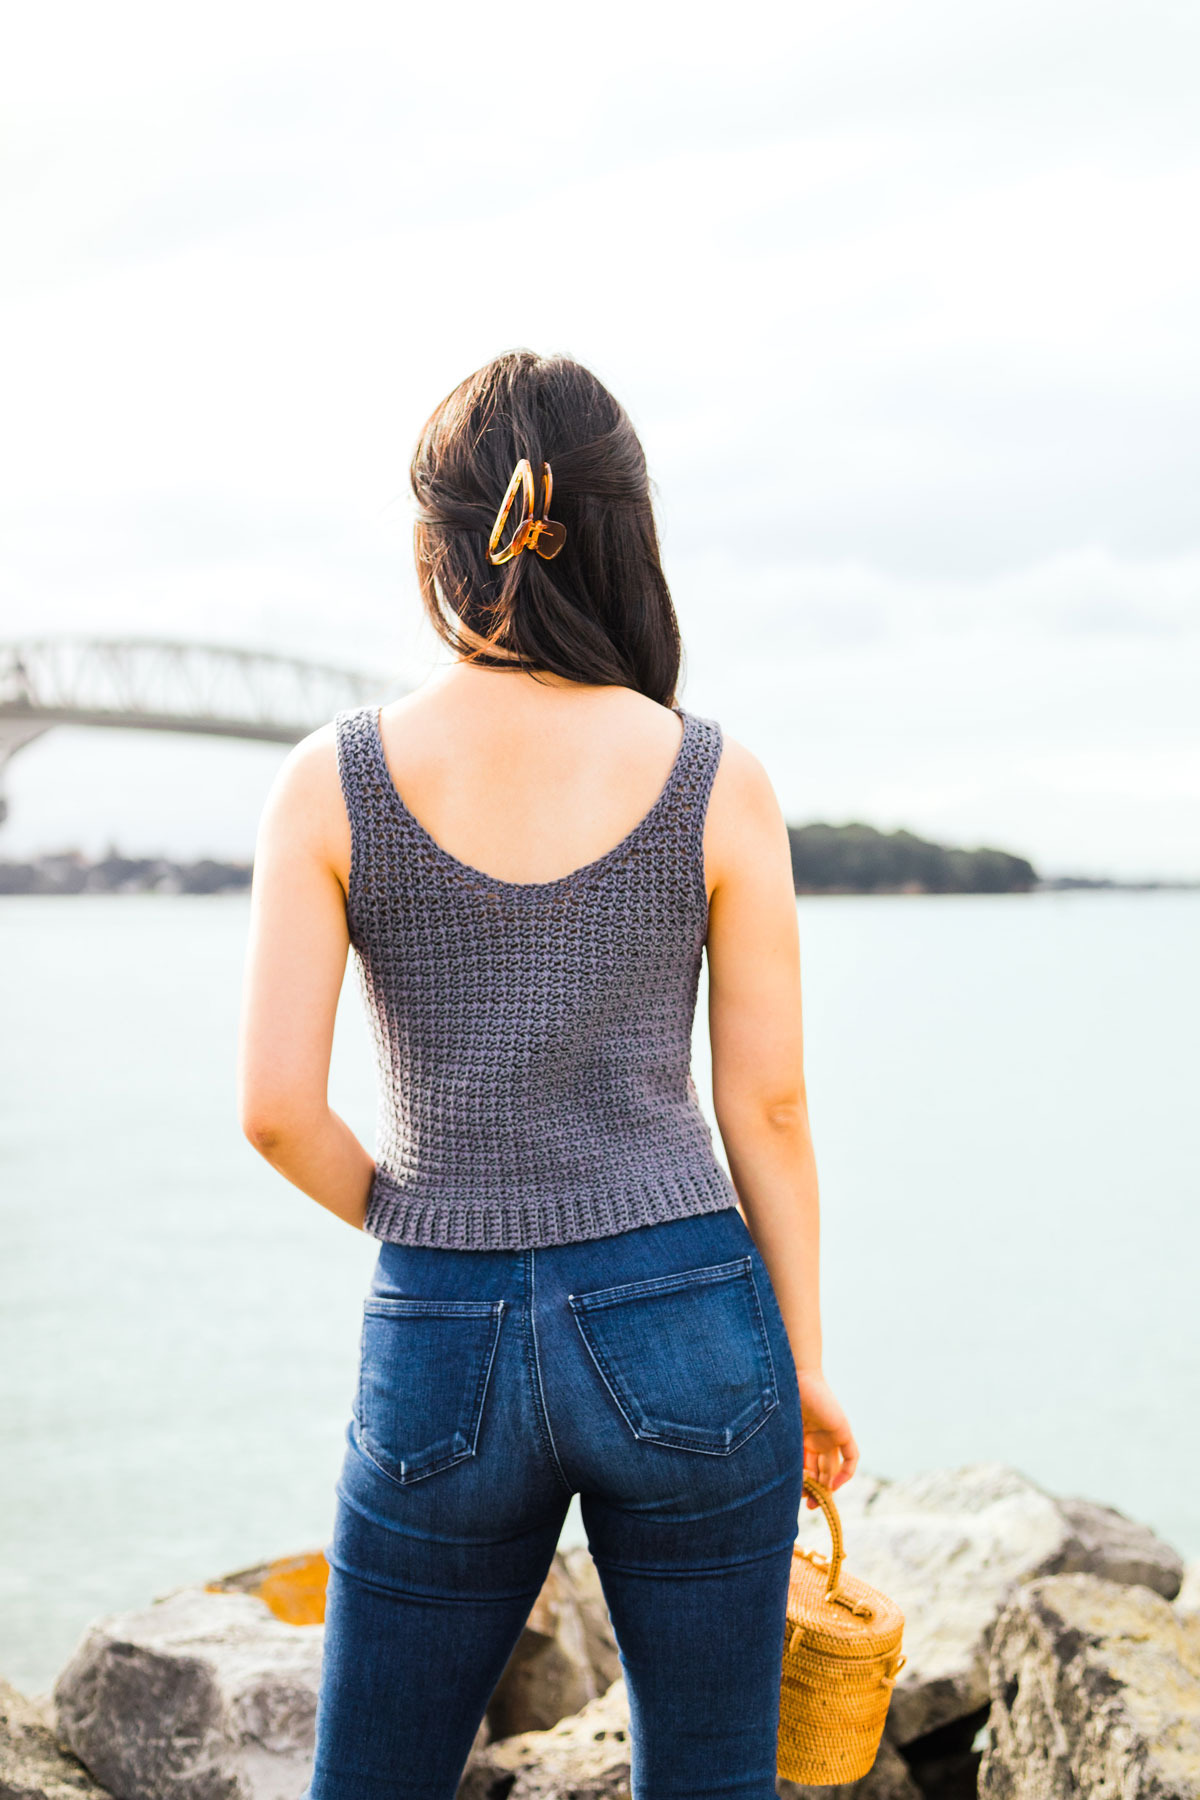
The Single Crochet Column stitch is made out of single crochets and chains - that’s it! The chains are placed in between the single crochets to create small ‘gaps’ that create the textured mesh surface. The chain spaces also allow air to flow through the top which means you’ll stay cool during the summer.
At first glance this crochet singlet looks like a solid surface of stitches but when you look closer you’ll see that the stitches have more of a mesh look. To stay as cool as possible, I just wear a skin coloured bra underneath my tank top (that’s what I’m wearing underneath the top in all the photos and I think you can’t see anything!) but if you’d like more coverage this design would work well over a bandeau, bikini or sports bra!
Pattern Construction
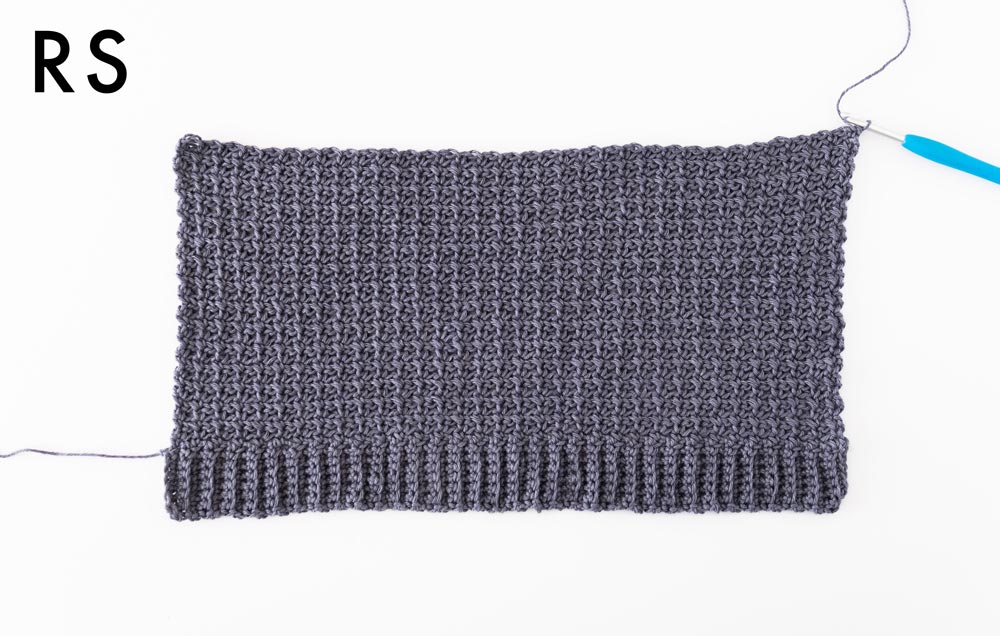
The Terrazzo Tank Top is crocheted from the bottom up and the entire pattern only uses 2 different stitches - single crochet and single crochet two together!
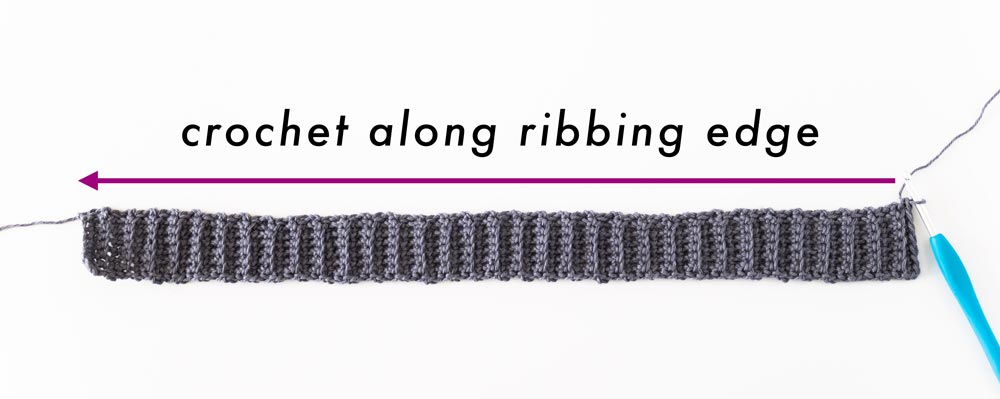
We’ll start this crochet tank top by crocheting single crochets into the back loops to form the ribbing. By working into the back loops, we’ll get the ribbed texture along the hem.
Then, we’ll crochet along the long edge of the ribbing with the single crochet column stitch to form the body of the tank top. At this point you can also alter the length of your top and all the alteration instructions are included in the pattern.
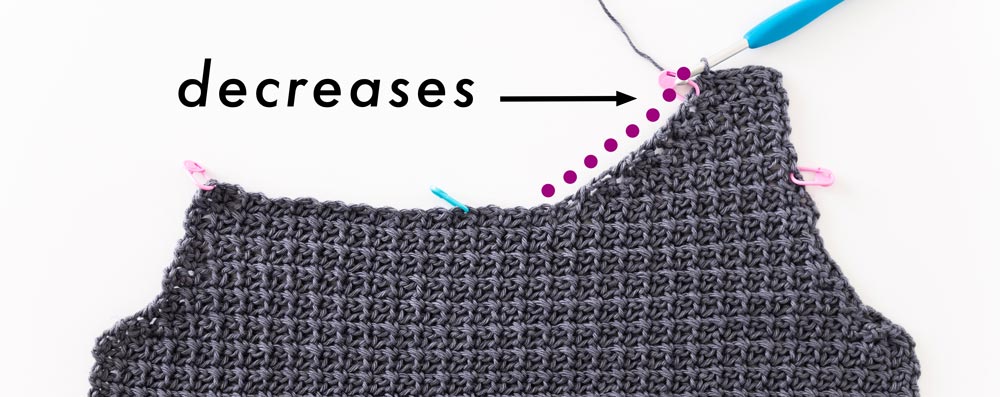
Once we’ve crocheted the main body portion we’ll decrease along the edges for some armhole shaping. The single crochet two together stitch gives the tank top a flattering and comfy fit when worn. We’ll then move onto creating the round scoop neckline and straps.
Looking for more free crochet patterns?
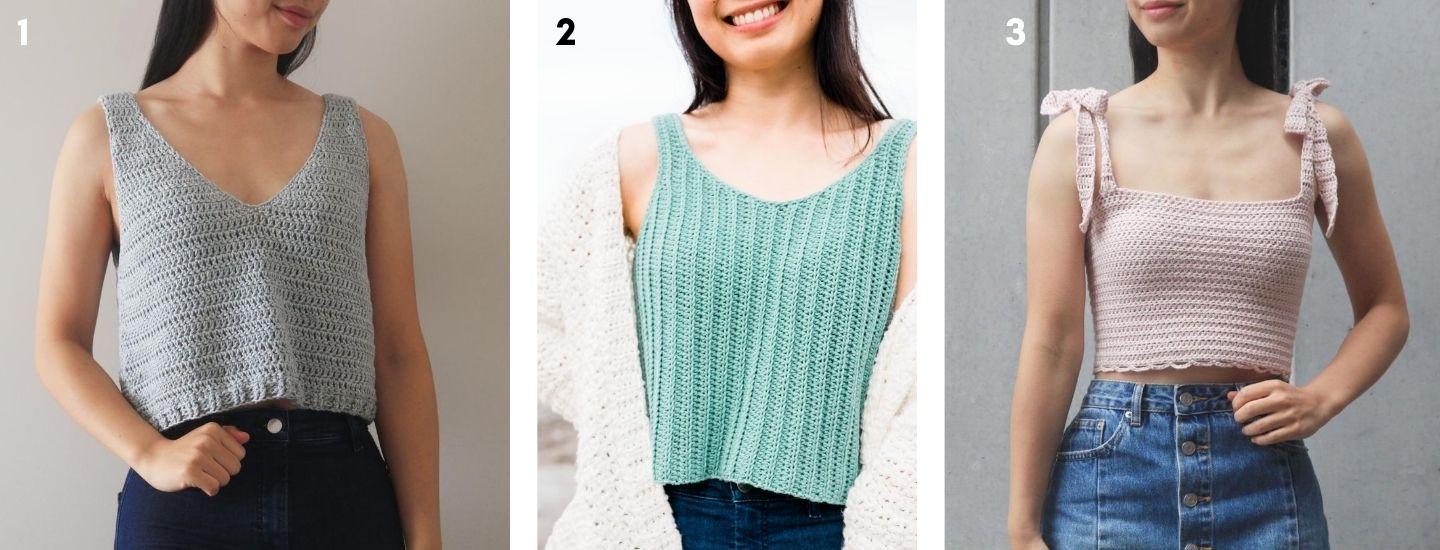
1. Sea Breeze Tank Top / 2. Sagebrush Tank Top / 3. Leila Crop Top
You can also find more summer crochet top patterns here!
If this is your first time adding shaping to your crochet garment don’t worry! The single crochet column stitch is really simple to decrease and by using stitch markers can make it so easy to count your stitches. Once you get into the habit of decreasing, the strap rows will breeze by and the end result is soooo worth it!
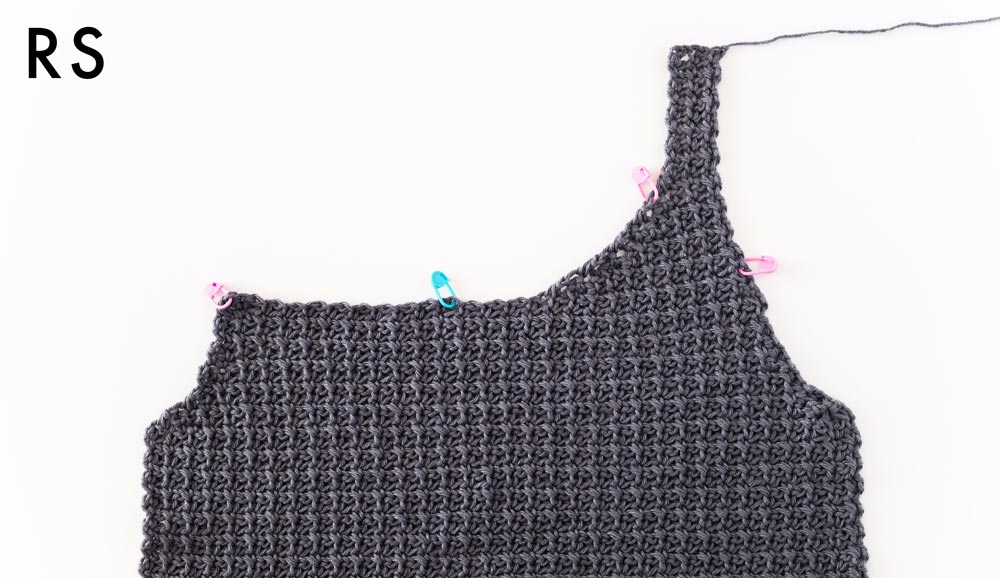
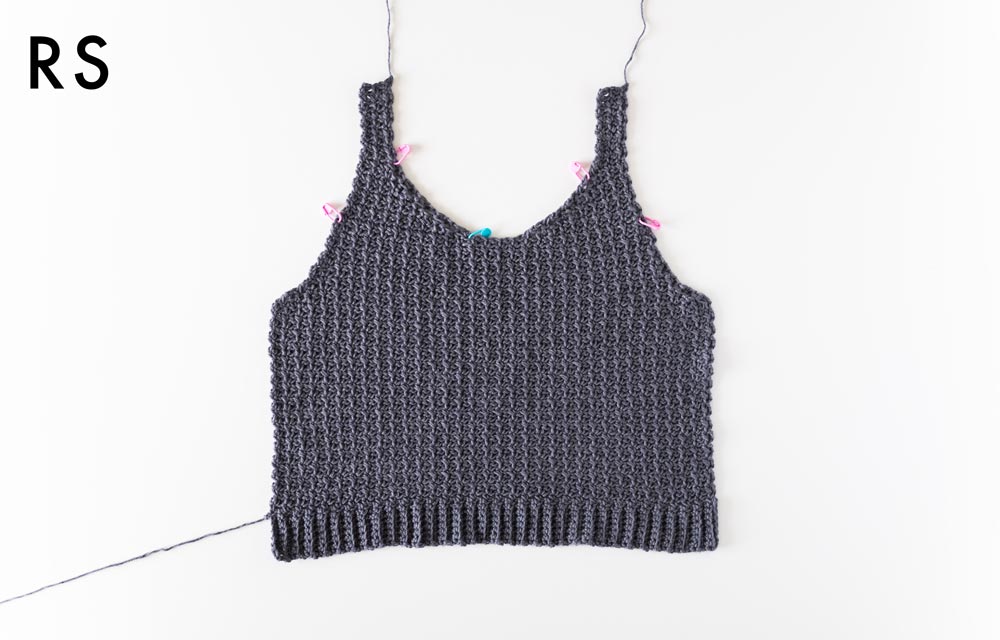
The front and back panels are exactly the same, so once you have two panels just sew them together along the sides and at the tops of the straps to join. In general, I always whip stitch seams together with the wrong side facing outwards and the right sides touching each other on the inside of the top. It just gives the seams a neater and more ‘professional’ finish.
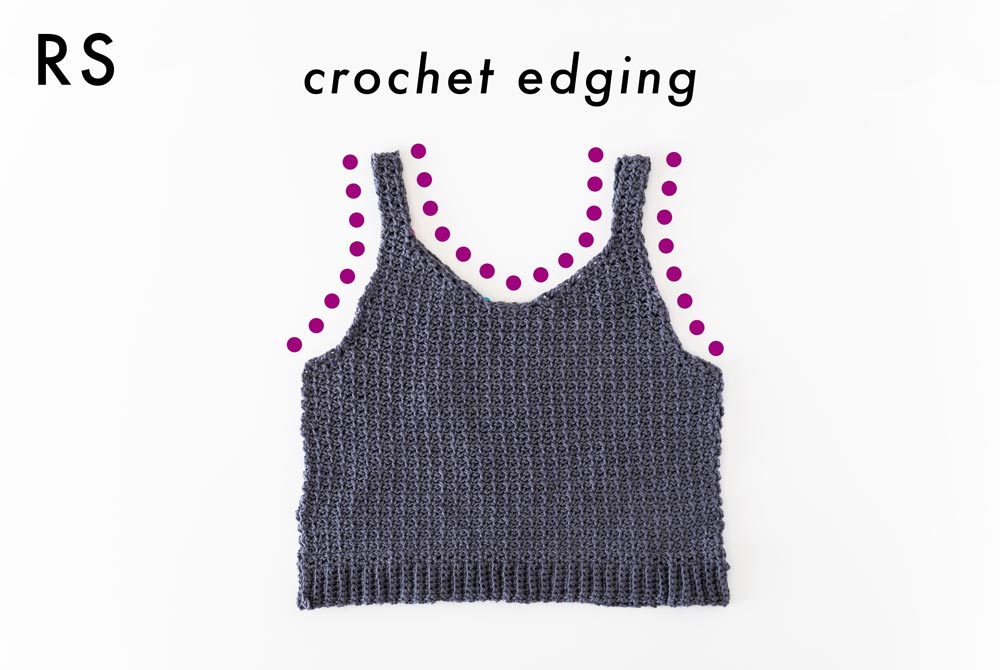
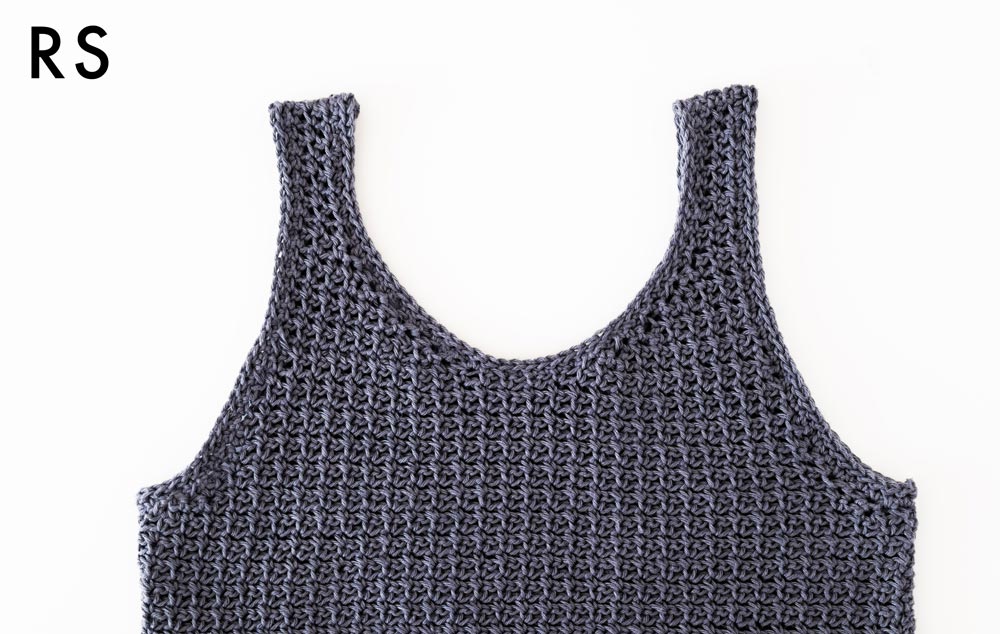
Finally, we’ll turn our tank tops inside out (so that the right side is facing us) and crochet the edging along the neckline and armholes. The first round of edging consists of single crochets and the second of back loop slip stitches.
How to crochet smooth edging
To crochet smooth and neat edging make sure you have even tension. Tension consists of how tightly you hold your yarn and how evenly you space out your single crochets. I can’t impress enough how important it is for your stitches to be spaced out evenly!
Lots of crocheters ask, ‘How can I measure tension?!’, the truth is that it’s something you’ll be able to see before it becomes muscle memory. There is no magic number of stitches (as different types of yarn will need a different number of stitches around the edge) but remember that you can always undo your stitches and try again!
Generally, you can tell something is ‘off’ if the neckline is ruffling - in which case you have too many stitches and you need to space your stitches further apart. The other problem you can run into is puckering, which means you have too few stitches and you’ll need more stitches around the neckline.
Another tip, while I’m crocheting edging I tend to stop and put down my hook after crocheting curved portions and lay my tank top on a flat surface. Look to see if any parts of your neckline are looking ‘bumpy’ or ‘tight’.
When you’re learning to crochet edging, it’s perfectly normal for some parts of your neckline to look great while others can look a bit funny. Take a look at your stitches and take note of any parts that look uneven (you can also place a stitch marker along the ‘trouble points’) and when you undo your stitches try out a different number of stitches or stitch placement.
Also remember that your garment is handmade and that’s the beauty of it! 🙂 As long as you’re having fun while crocheting and enjoy wearing your top, chances are no one else will notice that a few stitches aren’t ‘perfect 🙂

Design Inspiration
Round neck tank tops are some of my favourite items to wear in the summer but I’ve always found that crocheting round necks can be quite tricky! It’s super important to get the correct shape and ‘scoop’ but at the same time you don’t want to add so much shaping that the pattern is too difficult to follow.
So when I set out to create a ‘simple round neck tank top’, I thought it would take a bit of experimenting … but 4 finished sample tank tops later I still hadn’t settled on a favourite design.
I orginially designed this pattern just using double crochets (The humble double crochet is still one of my all time favourite stitches - for a double crochet tank top check out the Sea Breeze V-neck Tank!), but on attempt number 5 I decided to try out the single crochet column stitch and finally feel in love! The loose drapey texture is truly perfect stitch for the scoop neck look.
This design also has thick straps so you’ll be be able to wear a bra with straps underneath and they’ll be hidden (yay!).
Yarn
The Terrazzo Tank Top uses WeCrochet CotLin which is a gorgeous blend of 70% Tanguis Cotton and 30% Linen. CotLin is one of my favourite summer yarns of all time (Check out the Sagebrush Tank Top - it also uses CotLin yarn!) and the best thing is that is is so breathable! Crochet stitches tend to be denser than knit stitches and it’s so important during summer to make the correct yarn choice!
The blend of cotton and linen also means that your top will become softer as your wear it and it will feel cool to the touch. CotLin is a true DK / Light (3) and it comes in over 20 shades so you’ll be able to find a colour way that’s perfect for you!
The sample tank uses the shade ‘Rocket’, which looks like a dark neutral grey but has strong purple blue undertones. In some light, it looks more like a dark muted purple or blue so just keep that in mind if you want to use the same shade as me 🙂
Pin me for later!
Video Tutorial
Add the Terrazzo Tank Top to your Ravelry queue!
Purchase the ad-free, printable pdf version of the Terrazzo Tank!
Pattern Notes:
*Sample is a size small shown on a 5’3” model with a 32” bust.
*The sizing guide follows size XS(S, M, L, XL)(2XL, 3XL, 4XL, 5XL). E.g. “59(67, 75, 83, 91)(99, 107, 115, 123) means SC 59 for XS, SC 67 for Small, SC 75 for Medium, SC 73 for Large, SC 91 for XL, SC 99 for 2XL, SC 107 for 3XL, SC 115 for 4XL and SC 123 for 5XL.” If there is only one number, it applies to all sizes.
*"SC 10" means SC into the next 10 stitches.
*"2SC" means place 2 SC into the same stitch.
*The turning chain ch 1 does NOT count as a stitch, otherwise ch 1 does count as a stitch.
*Total stitches are indicated between < >.
*This pattern uses US crochet terms.
*This tank top is crocheted from the bottom up.
*The ribbing is worked vertically and then we’ll crochet along the long edge of the ribbing to form the body of the tank top.
*The straps are created by decreasing along the edges of the tank top.
*The front and back are identical. The sides and top of the straps are whip stitched together.
*The edging is crocheted directly onto the neckline and armholes.
*The majority of this pattern follows a one-row repeat which is referred to as the ‘BASE ROW’.
*The length of this tank top is customisable (alteration instructions provided).
Add approx. 12(14, 15, 17, 18)(20, 22, 23, 25)g of yarn for every additional 2.5cm/1” of length.
LEVEL: Easy+
Materials
Yarn – WeCrochet CotLin – DK/Light (3), 112m/50g, 123yds/1.75oz, 70% Tanguis Cotton, 30% Linen, Rocket
approx. 120(150, 175, 205, 250)(275, 315, 360, 405)g
5mm Crochet Hook
Darning Needle
Scissors
5 Stitch markers/Safety pins
Ch = Chain
Sl st = Slip Stitch
SC = Single Crochet
SC2tog = Single Crochet 2 Stitches Together
BLO = Back Loop
St(s) = Stitch(es)
Rep = Repeat
Sk = Skip
RS = Right Side
WS = Wrong Side
Measurements
*Measurements are taken from the tank top lying flat.
Length will stretch out approx. 2.5 - 5cm / 1-2” (depending on yarn) once the tank top has been worn a few times.
Measurements cm:
To fit Bust: 71(81, 91, 101, 112)(122, 132, 142, 152)
Top Width: 37(42, 47, 52, 57)(62, 67, 72, 77)
Armhole: 15(17, 18, 19, 22)(24, 26, 28, 30)
Length: 39(41, 42, 44, 47)(48, 50, 52, 54)
Measurements inches:
To fit Bust: 28(32, 36, 40, 44)(48, 52, 56, 60)
Top Width: 14.5(16.5, 18.5, 20.5, 22.5)(24.5, 26.5, 28.5, 30.5)
Armhole: 6(6.5, 7, 7.5, 8.5)(9.5, 10, 11, 12)
Length: 15.5(16, 16.5, 17.5, 18.5)(19, 19.5, 20.5, 21.5)
GAUGE: 10cm/4” square = 16 stitches wide x 16.5 rows tall in single crochet column stitch
Single Crochet Columns:
Chain an even number of chains.
ROW 1: SC in 2nd ch from hook, *ch 1, sk 1, SC; rep from * until end, turn.
ROW 2(BASE ROW): Ch 1, SC in 1st st, *ch 1, sk 1, SC; rep from * until end, turn.
Repeat ROW 2 until you reach desired length.
Terrazzo Tank Top Crochet Pattern
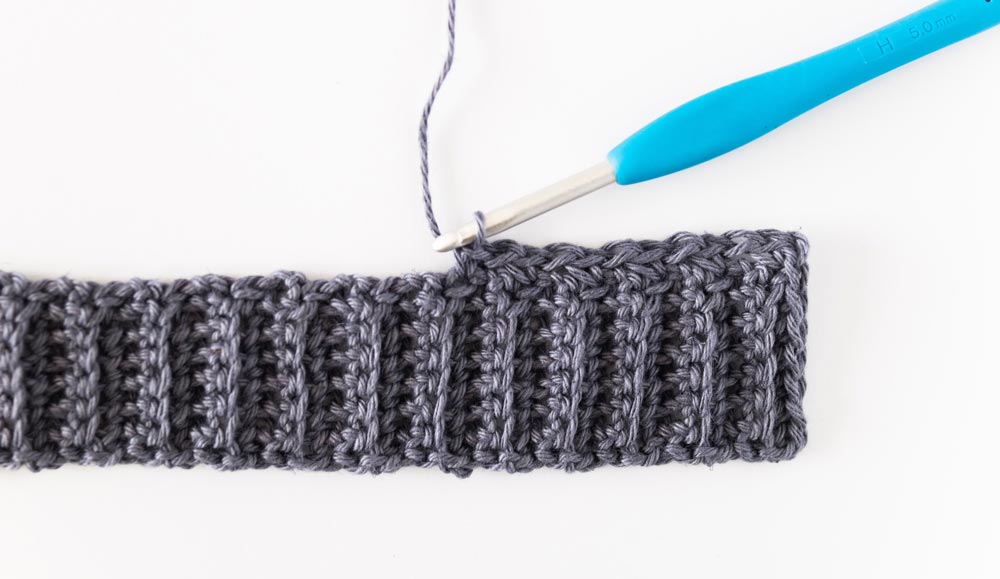
Hemline Ribbing
FOUNDATION CHAIN: Ch 8.
ROW 1: SC into 2nd ch from the hook, SC in each ch until end, turn.
<7>
ROW 2: Ch 1, BLO SC across, SC in last st, turn.
<7>
Repeat ROW 2 until ROW 59(67, 75, 83, 91)(99, 107, 115, 123).
Do not fasten off! We will now work along the long edge of the band. Each row equals 1 stitch.
Body
ROW 1(RS): Ch 1, SC in 1st row, *ch 1, sk 1 row, SC in next row; rep from * until end, turn.
<59(67, 75, 83, 91)(99, 107, 115, 123)>
ROW 2 (BASE ROW): Ch 1, SC in 1st st, *ch 1, sk 1 st, SC; rep from * until end, turn.
<59(67, 75, 83, 91)(99, 107, 115, 123)>
Repeat BASE ROW until ROW 28(30, 32, 34, 36)(38, 40, 42, 44).
*ALTERATION NOTE: You can add or remove rows to make your tank top longer or shorter. Keep in mind that the armhole shaping + straps will add approx. 15(17, 18, 19, 22)(24, 26, 28, 30)cm / 6(6.5, 7, 7.5, 8.5)(9.5, 10, 11, 12)” to the current length of your top.
Do not fasten off! We will now decrease along the edges to create the armhole shaping.
Armhole Shaping
*If you have trouble spotting the last st of each row, along the decreases place a SM in the 1st st of the row. This stitch will become the ‘last stitch’ when crocheting the next row.
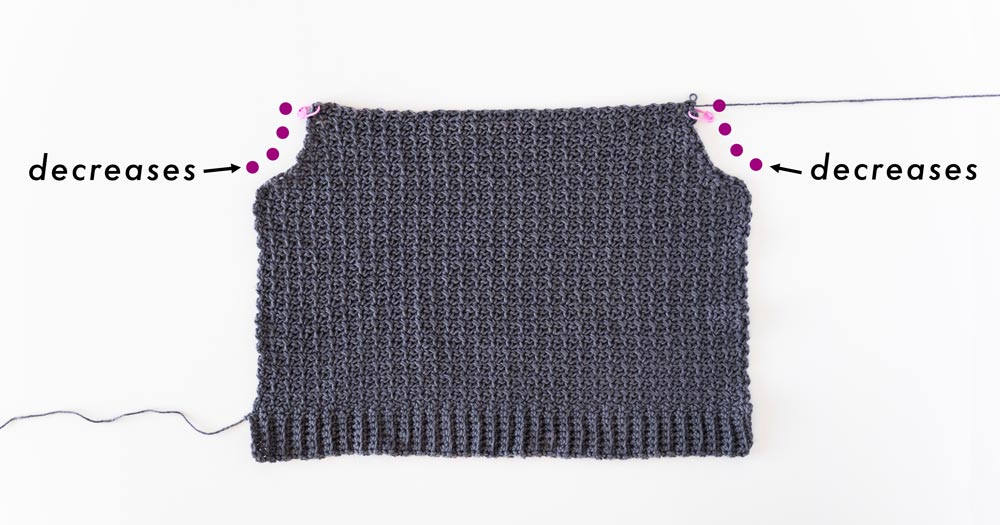
ROW 1: Ch 1, SC2tog 2, SC, *ch 1, sk 1 st, SC; rep from * until 4 sts left, SC2tog 2, turn.
<55(63, 71, 79, 87)(95, 103, 111, 119)>
ROW 2: As ROW 1.
<51(59, 67, 75, 83)(91, 99, 107, 115)>
ROW 3: Ch 1, SC2tog, SC, *ch 1, sk 1 st, SC; rep from * until 2 sts left, SC2tog, turn.
<49(57, 65, 73, 81)(89, 97, 105, 113)>
ROW 4: Ch 1, SC2tog, ch 1, sk 1 st, *SC, ch 1, sk 1 st; rep from * until 2 sts left, SC2tog, turn.
<47(55, 63, 71, 79)(87, 95, 103, 111)>
ROW 5: As BASE ROW.
<47(55, 63, 71, 79)(87, 95, 103, 111)>
ROW 6: As ROW 3.
<45(53, 61, 69, 77)(85, 93, 101, 109)>
ROW 7: Ch 1, SC 2, *ch 1, sk 1 st, SC; rep from * until 1 st left, SC in last st, turn.
<45(53, 61, 69, 77)(85, 93, 101, 109)>
SIZE XS only: ROW 8: As ROW 7 – Do not fasten off! Proceed directly to ‘FIRST STRAP’ instructions.
ROW 8: As ROW 4.
<(51, 59, 67, 75)(83, 91, 99, 107)>
ROW 9: As BASE ROW.
<(51, 59, 67, 75)(83, 91, 99, 107)>
ROW 10: As BASE ROW.
<(51, 59, 67, 75)(83, 91, 99, 107)>
ROW 11: As ROW 3.
<(49, 57, 65, 73)(81, 89, 97, 105)>
ROW 12: As ROW 7.
<(49, 57, 65, 73)(81, 89, 97, 105)>
SIZES S, M & L only – Do not fasten off! Proceed directly to ‘FIRST STRAP’ instructions.
ROW 13: As ROW 4.
<(71)(79, 87, 95, 103)>
ROW 14: As BASE ROW.
<(71)(79, 87, 95, 103)>
ROW 15: As ROW 3.
<(69)(77, 85, 93, 101)>
ROW 16: As ROW 7.
<(69)(77, 85, 93, 101)>
SIZES XL & 2XL only – Do not fasten off! Proceed directly to ‘FIRST STRAP’ instructions.
ROW 17: As ROW 4.
<(83, 91, 99)>
ROW 18: As BASE ROW.
<(83, 91, 99)>
ROW 19: As ROW 3.
<(81, 89, 97)>
ROW 20: As ROW 7.
<(81, 89, 97)>
SIZES 3XL & 4XL only – Do not fasten off! Proceed directly to ‘FIRST STRAP’ instructions.
ROW 21: As ROW 4.
<(95)>
ROW 22: As BASE ROW.
<(95)>
ROW 23: As ROW 3.
<(93)>
ROW 24: As ROW 7.
<(93)>
SIZE 5XL only – Do not fasten off! Proceed directly to ‘FIRST STRAP’ instructions.
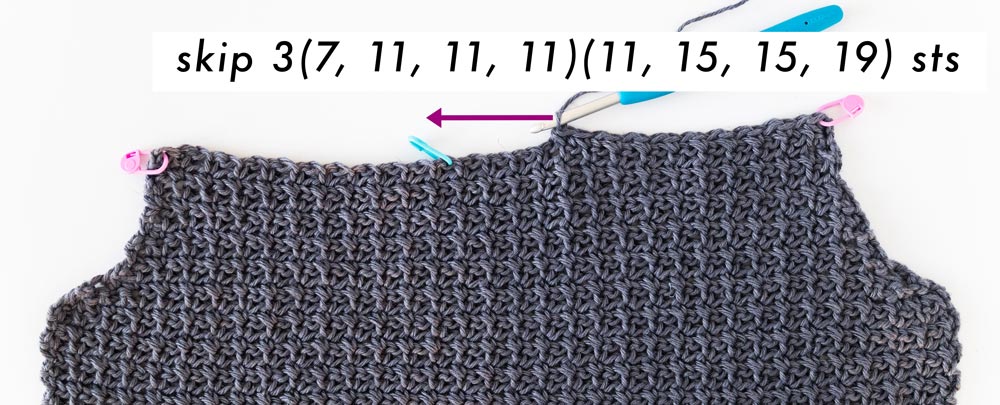
First Strap
ALL SIZES
ROW 1: Ch 1, SC2tog, ch 1, sk 1 st, *SC, ch 1, sk 1 st; rep from * until you have 16(16, 18, 22, 24)(28, 28, 32, 32) sts in your row, SC2tog 2, sk 3(7, 11, 11, 11)(11, 15, 15, 19) sts, place SM in next st, turn.
<18(18, 20, 24, 26)(30, 30, 34, 34)>
*SM should be in a placed in a ch, not a SC.
ROW 2: Ch 1, SC2tog 2, *ch 1, sk 1 st, SC; rep from * until end, turn.
<16(16, 18, 22, 24)(28, 28, 32, 32)>
ROW 3: Ch 1, *SC, ch 1, sk 1 st; rep from * until 4 sts left, SC2tog 2, turn.
<14(14, 16, 20, 22)(26, 26, 30, 30)>
ROW 4: As ROW 2.
<12(12, 14, 18, 20)(24, 24, 28, 28)>
ROW 5: Ch 1, *SC, ch 1, sk 1 st; rep from * until 2 sts left, SC2tog, turn,
<11(11, 13, 17, 19)(23, 23, 27, 27)>
ROW 6: Ch 1, SC2tog 2, SC, *ch 1, sk 1 st, SC; rep from * until end, turn.
<9(9, 11, 15, 17)(21, 21, 25, 25)>
ROW 7: Ch 1, SC, *ch 1, sk 1 st, SC; rep from * until 4 sts left, SC2tog 2, turn.
<7(7, 9, 13, 15)(19, 19, 23, 23)>
SIZES XS(S, M) only
ROW 8: Ch 1, SC2tog, SC, *ch 1, sk 1 st, SC; rep from * until end, turn.
<6(6, 8)>
ROW 9: As ROW 5.
<5(5, 7)>
SIZES XS & S – Do not fasten off! Proceed to ‘FINAL STRAP ROW’.
ROW 10: As ROW 8.
<(6)>
ROW 11: As ROW 5.
<(5)>
SIZE M – Do not fasten off! Proceed to ‘FINAL STRAP ROW’.
SIZES (L, XL) only
ROW 8: Ch 1, SC2tog 2, SC, *ch 1, sk 1 st, SC; rep from * until end, turn.
<(11, 13)>
ROW 9: Ch 1, SC, *ch 1, sk 1 st, SC; rep from * until 4 sts left, SC2tog 2, turn.
<(9, 11)>
ROW 10: As ROW 8.
<(7, 9)>
ROW 11: Ch 1, SC, *ch 1, sk 1 st, SC; rep from * until 2 sts left, SC2tog, turn.
<(6, 8)>
ROW 12: Ch 1, SC2tog, *ch 1, sk 1 st, SC; rep from * until end, turn.
<(5, 7)>
SIZES L & XL – Do not fasten off! Proceed to ‘FINAL STRAP ROW’.
SIZES (2XL, 3XL, 4XL, 5XL) only
ROW 8: Ch 1, SC2tog 2, SC, *ch 1, sk 1 st, SC; rep from * until end, turn.
<(17, 17, 21, 21)>
ROW 9: Ch 1, SC, *ch 1, sk 1 st, SC; rep from * until 4 sts left, SC2tog 2, turn.
<(15, 15, 19, 19)>
ROW 10: As ROW 8.
<(13, 13, 17, 17)>
ROW 11: As ROW 9.
<(11, 11, 15, 15)>
ROW 12: As ROW 8.
<(9, 9, 13, 13)>
ROW 13: Ch 1, SC, *ch 1, sk 1 st, SC; rep from * until 2 sts left, SC2tog, turn.
<(8, 8, 12, 12)>
ROW 14: Ch 1, SC2tog, *ch 1, sk 1 st, SC; rep from * until end, turn.
<(7, 7, 11, 11)>
SIZES 2XL & 3XL – Do not fasten off! Proceed to ‘FINAL STRAP ROW’.
ROW 15: As ROW 13.
<(10, 10)>
ROW 16: As ROW 14.
<(9, 9)>
SIZES 4XL & 5XL – Do not fasten off! Proceed to ‘FINAL STRAP ROW’.
ALL SIZES
FINAL STRAP ROW: As BASE ROW.
<5(5, 5, 5, 7)(7, 7, 9, 9)>
Repeat BASE ROW until ROW 18(18, 20, 22, 24)(26, 26, 28, 28).
Total Rows: <54(60, 64, 68, 76)(80, 86, 90, 96)>
Fasten off.
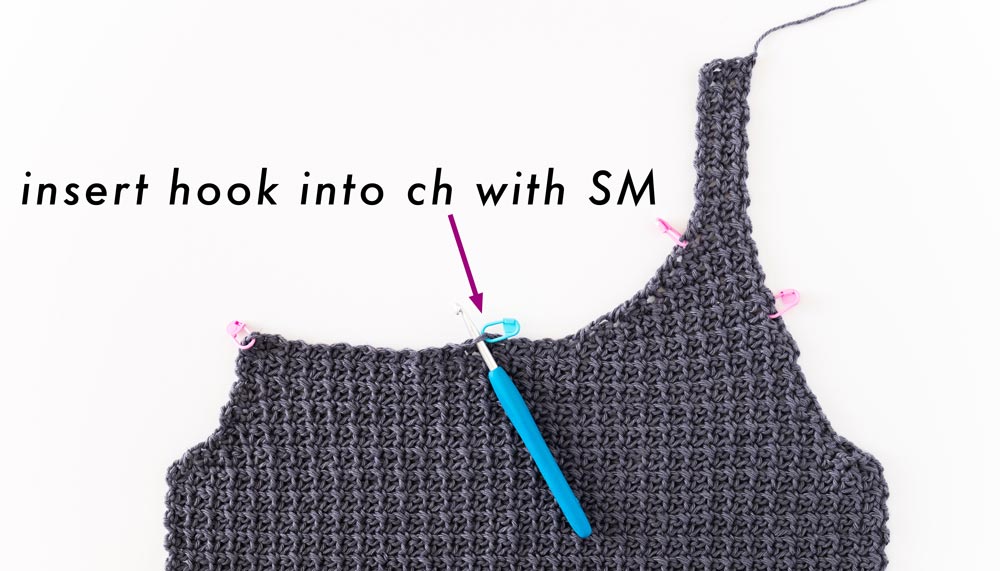
Second Strap
ALL SIZES
With the RS facing, insert hook in ch with a SM. Secure yarn and pull up a loop.
ROW 1: Ch 1, SC2tog 2, ch 1, sk 1 st, *SC, ch 1, sk 1 st; rep from * until 2 sts left, SC2tog, turn.
<18(18, 20, 24, 26)(30, 30, 34, 34)>
ROW 2: Ch 1, *SC, ch 1, sk 1 st; rep from * until 4 sts left, SC2tog 2, turn.
<16(16, 18, 22, 24)(28, 28, 32, 32)>
ROW 3: Ch 1, SC2tog 2, *ch 1, sk1 st, SC; rep from * until end, turn.
<14(14, 16, 20, 22)(26, 26, 30, 30)>
ROW 4: As ROW 2.
<12(12, 14, 18, 20)(24, 24, 28, 28)>
ROW 5: Ch 1, SC2tog, *ch 1, sk 1 st, SC; rep from * until end, turn.
<11(11, 13, 17, 19)(23, 23, 27, 27)>
ROW 6: Ch 1, SC, *ch 1, sk 1 st, SC; until 4 sts left, SC2tog 2, turn.
<9(9, 11, 15, 17)(21, 21, 25, 25)>
ROW 7: Ch 1, SC2tog 2, SC, *ch 1, sk 1 st, SC; rep from * until end, turn.
<7(7, 9, 13, 15)(19, 19, 23, 23)>
SIZES XS(S, M) only
ROW 8: Ch 1, SC, *ch 1, sk 1 st, SC; rep from * until 2 sts left, SC2tog, turn.
<6(6, 8)>
ROW 9: As ROW 5.
<5(5, 7)>
SIZES XS & S – Do not fasten off! Proceed to ‘FINAL STRAP ROW’.
ROW 10: As ROW 8.
<(6)>
ROW 11: As ROW 5.
<(5)>
SIZE M – Do not fasten off! Proceed to ‘FINAL STRAP ROW’.
SIZES (L, XL) only
ROW 8: Ch 1, SC, *ch 1, sk 1 st, SC; rep from * until 4 sts left, SC2tog 2, turn.
<(11, 13)>
ROW 9: Ch 1, SC2tog 2, SC, *ch 1, sk 1 st, SC; rep from * until end, turn.
<(9, 11)>
ROW 10: As ROW 8.
<(7, 9)>
ROW 11: Ch 1, SC2tog, SC, *ch 1, sk 1 st, SC; rep form * until end, turn.
<(6, 8)>
ROW 12: Ch 1, *SC, ch 1, sk 1 st; rep from * until 2 sts left, SC2tog, turn.
<(5, 7)>
SIZES L & XL – Do not fasten off! Proceed to ‘FINAL STRAP ROW’.
SIZES (2XL, 3XL, 4XL, 5XL) only
ROW 8: Ch 1, SC, *ch 1, sk 1 st, SC; rep from * until 4 sts left, SC2tog 2, turn.
<(17, 17, 21, 21)>
ROW 9: Ch 1, SC2tog 2, SC, *ch 1, sk 1 st, SC; rep from * until end, turn.
<(15, 15, 19, 19)>
ROW 10: As ROW 8.
<(13, 13, 17, 17)>
ROW 11: As ROW 9.
<(11, 11, 15, 15)>
ROW 12: As ROW 8.
<(9, 9, 13, 13)>
ROW 13: Ch 1, SC2tog, SC, *ch 1, sk 1 st, SC; rep from * until end, turn.
<(8, 8, 12, 12)>
ROW 14: Ch 1, *SC, ch 1, sk 1 st; rep from * until 2 sts left, SC2tog, turn.
<(7, 7, 11, 11)>
SIZES 2XL & 3XL – Do not fasten off! Proceed to ‘FINAL STRAP ROW’.
ROW 15: As ROW 13.
<(10, 10)>
ROW 16: As ROW 14.
<(9, 9)>
SIZES 4XL & 5XL – Do not fasten off! Proceed to ‘FINAL STRAP ROW’.
ALL SIZES
FINAL STRAP ROW: As BASE ROW.
<5(5, 5, 5, 7)(7, 7, 9, 9)>
Repeat BASE ROW until ROW 18(18, 20, 22, 24)(26, 26, 28, 28).
Total Rows: <54(60, 64, 68, 76)(80, 86, 90, 96)>
Fasten off.
Repeat all Tank Top steps for the 2nd panel.
Assembly
With the wrong sides facing outwards, whip stitch the sides of the tank top and tops of the straps together.
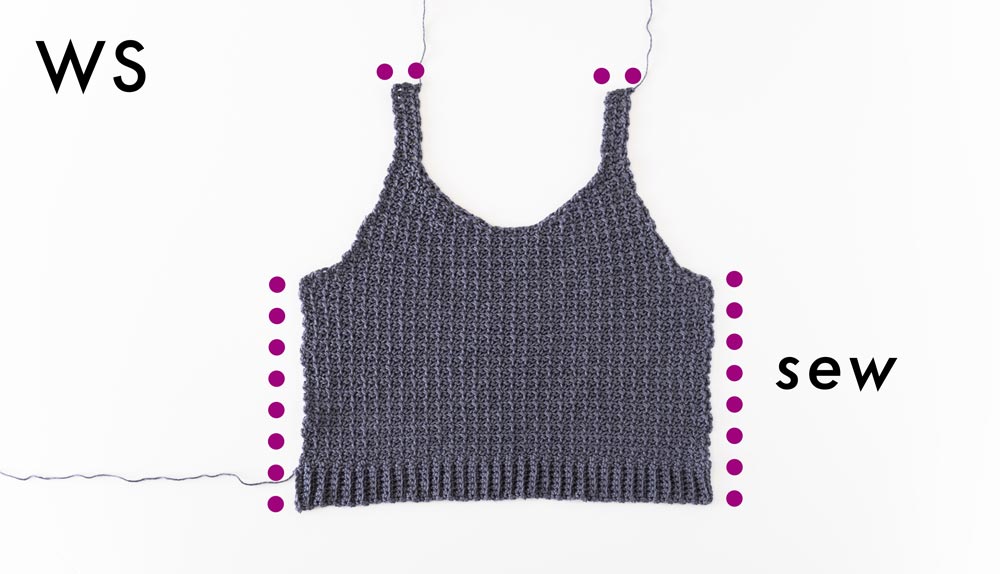
Turn your top inside out so that the right side is facing you.
Insert hook along inner edge at the top of a strap. Secure yarn and pull up a loop.
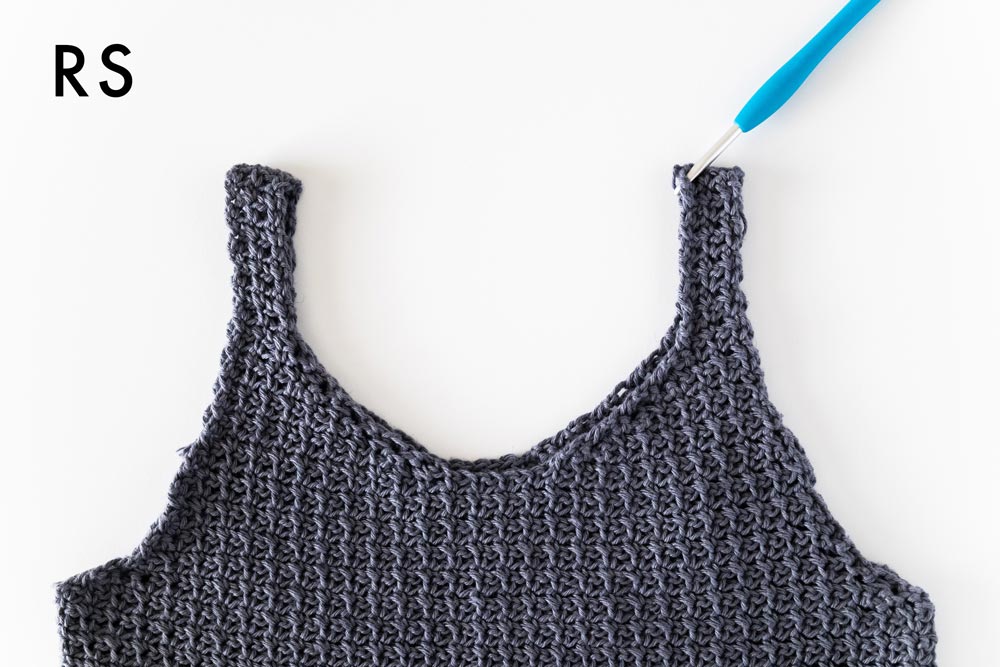
Edging
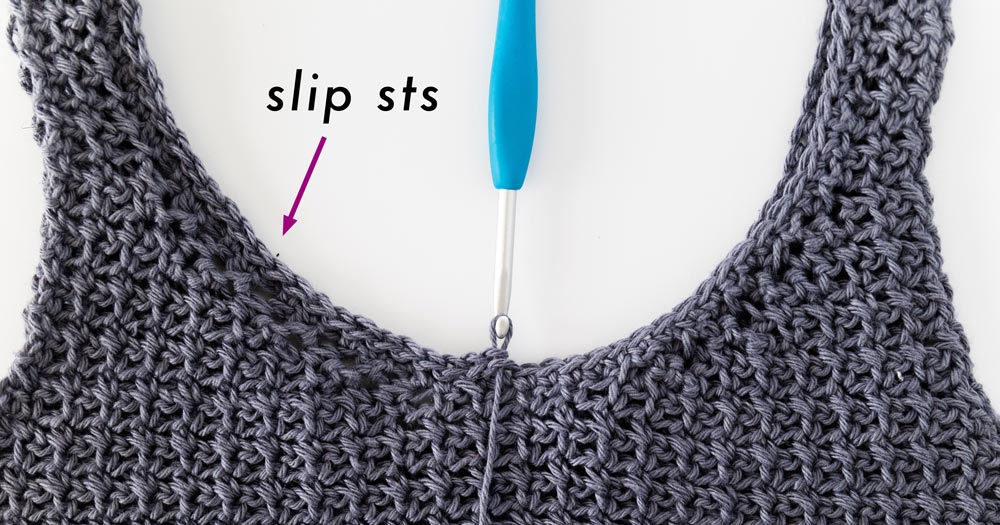
ROUND 1: Ch 1, SC evenly along the neckline of the tank top, when you reach the first SC, sl st into the 1st st to join, turn.
*The exact number of stitches doesn’t matter, rather focus on spacing out your stitches evenly. If your neckline is ruffling you have too many stitches and if your neckline is puckering you have too few stitches.
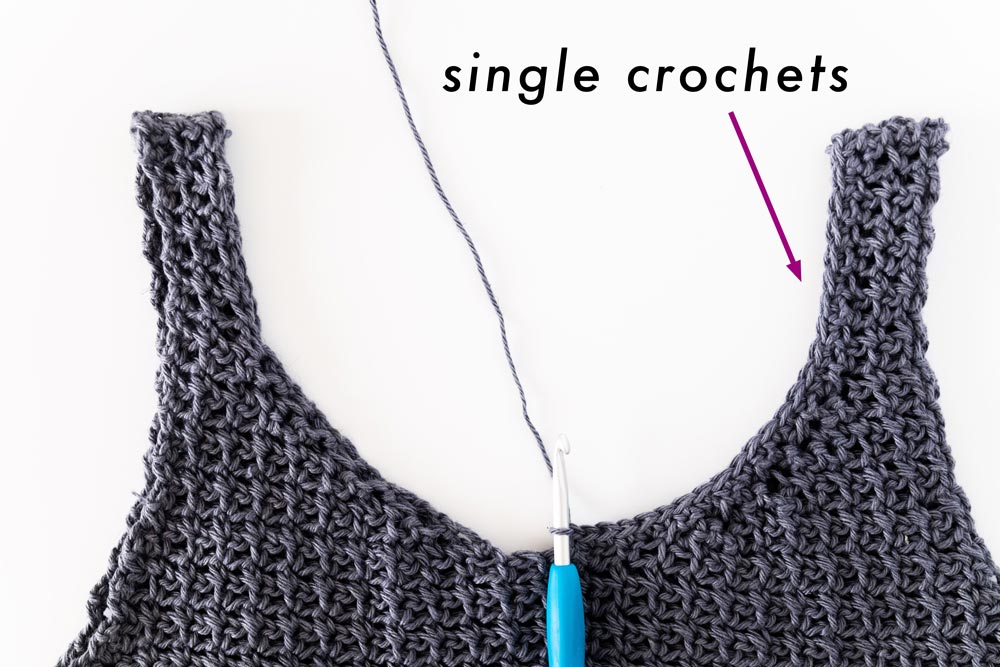
ROUND 2: Ch 1, BLO sl st in each st around, sl st into 1st st to join.
Fasten off.
Repeat ‘EDGING’ instructions along the armholes.
Finishing
Weave in all of your ends.
Voilà! You’ve finished your crochet tank top 🙂
Check out more summer crochet patterns here!
love your patterns and instructions
how much yarn should I get for this pattern?
All the yarn amounts are listed under 'Materials' 🙂
Hi! I loved your new pattern!! Thanks =)
But I have a question...
I didn't understand what did you mean when you said:
GAUGE = "16.5 rows"
Is that number in cm?
Thank you
Hi Gabriela,
All of the gauge amounts as based on a 10cm x 10cm square.
Grace
Hey, what if i'm using 4mm crochet hook? I guess i have to make few more chains at the beggining for sure right?
Im trying to start this top for like a 18th time, but i have different yarn so it makes it harder hahah
Pleaseee help me 😉
What does “as base row” mean in the arm hole shaping section?
I just finished this top with Truboo. I love it! The only thing I found was the sizing was kind of intimidating. I am a size 8 on the bottom and size 12 on top (small/medium bottom and med/large top). For this pattern I had to make the 4XL......it fits perfect but may put people off from trying the pattern
Ilove this pattern, but I had to use worsted weight yarn (Lion Brand Re-Up) and a 6mm hook to meet the gauge. I was hoping to make this top with Lion Brand Truboo, but I may try sizing up 1 or 2 sizes so I still can. That being said, after sizing up the yarn and the hook, the top turned out great.
Hey! I am making this tank now amd having some trouble. Sending you an email! 💜
I loved this pattern and now my daughter-in-laws want one after they saw mine. I hope to make some of your other patterns because they all look so cute!
In this instruction, what does 'SM' mean? I didn't see it in the list of abbreviations.
"place SM in next st, turn.
*SM should be in a placed in a ch, not a SC."
nevermind, I figured it out, it stands for "Stitch Marker" thanks!
This is an excellent pattern! I’m using bernat softee cotton & 5mm to meet gauge. Zero mistakes in her pattern & very easy to follow along. The pictures helped to make sure I was doing the straps correctly. I spent 2 evenings crocheting this top and all that’s left is seaming the sides. Thank you for this free pattern. Excited to try your other patterns too! I have no doubts that a beginner would be able to make this top! Thanks again!!!