Scroll down for this free crochet pocket cardigan pattern or purchase the ad-free, printable PDF here. Learn how to crochet a waffle-like cardigan with pockets!
This post may contain affiliate links, view our disclosure policy for details.
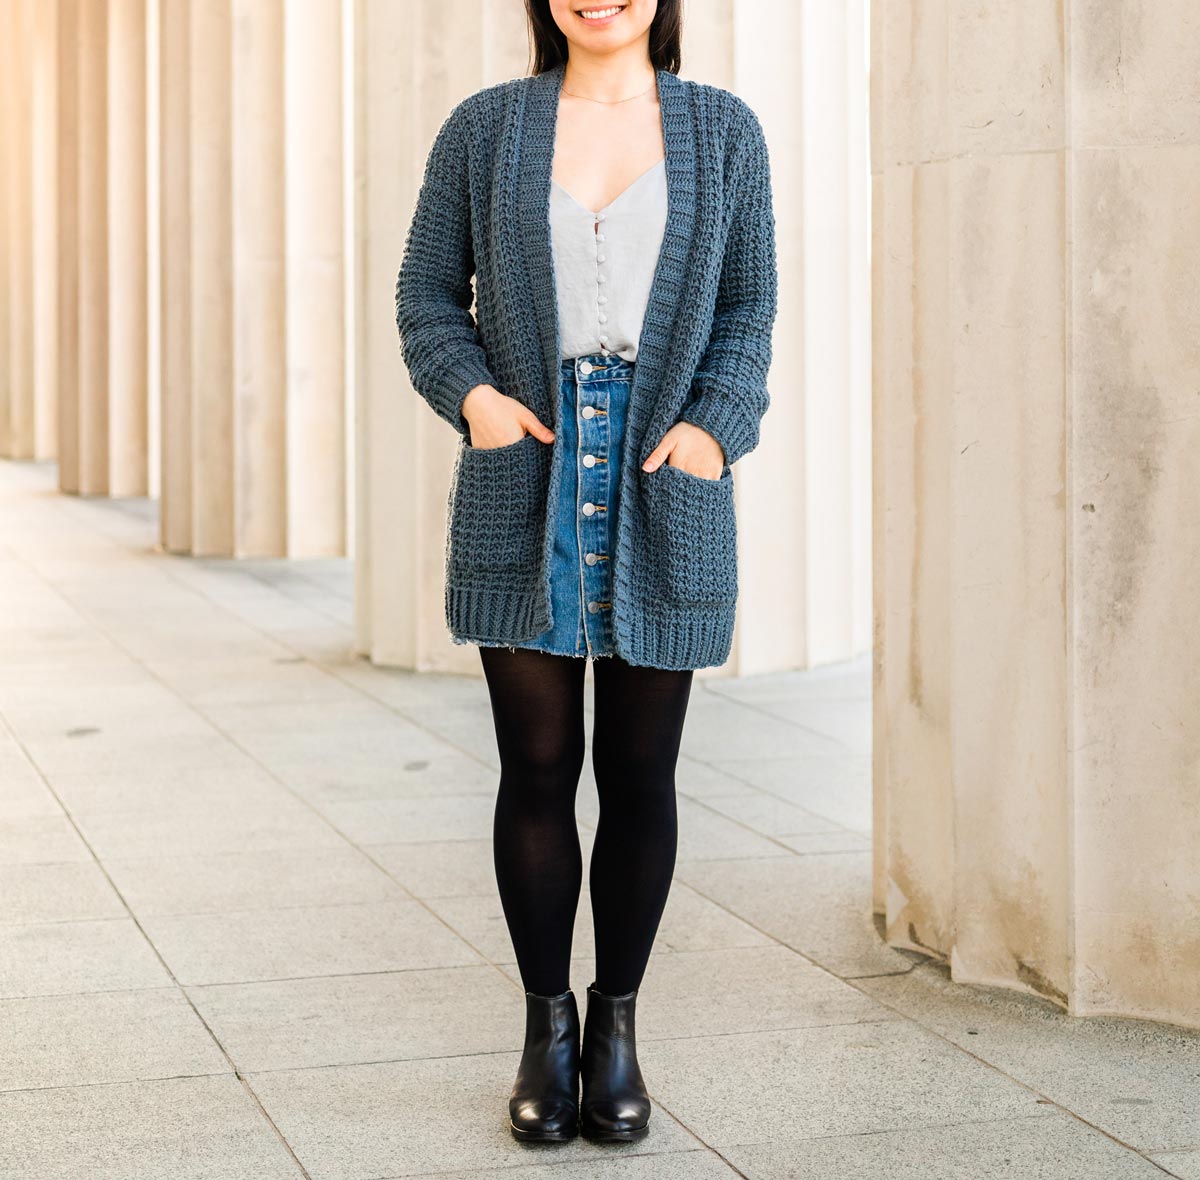
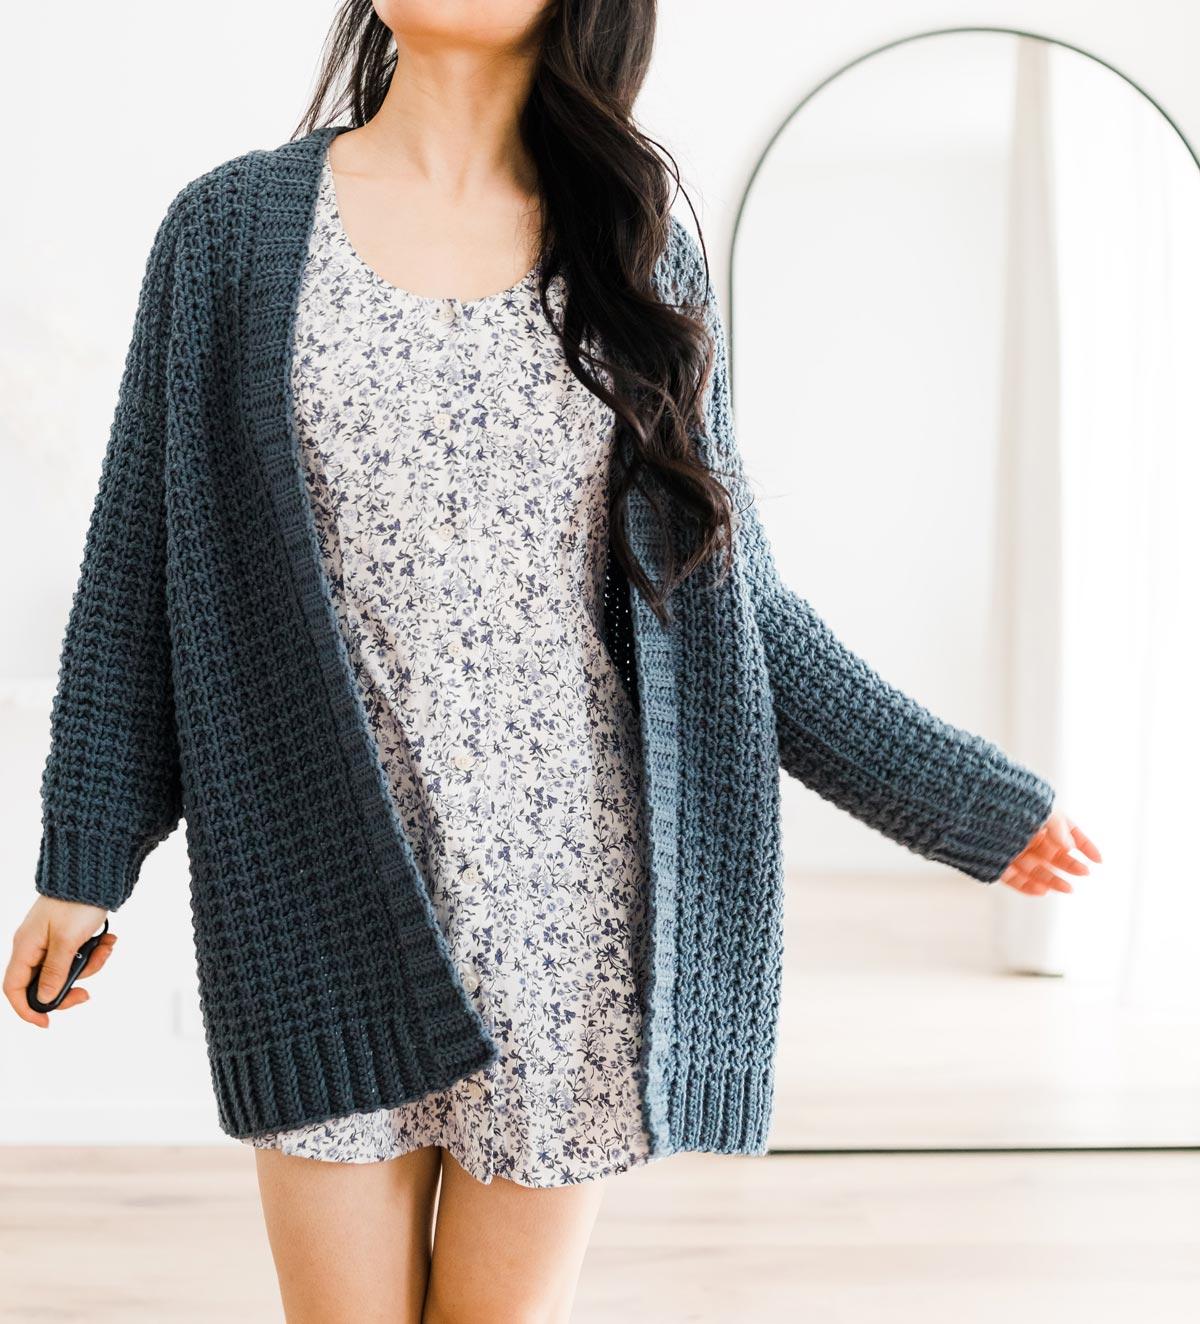
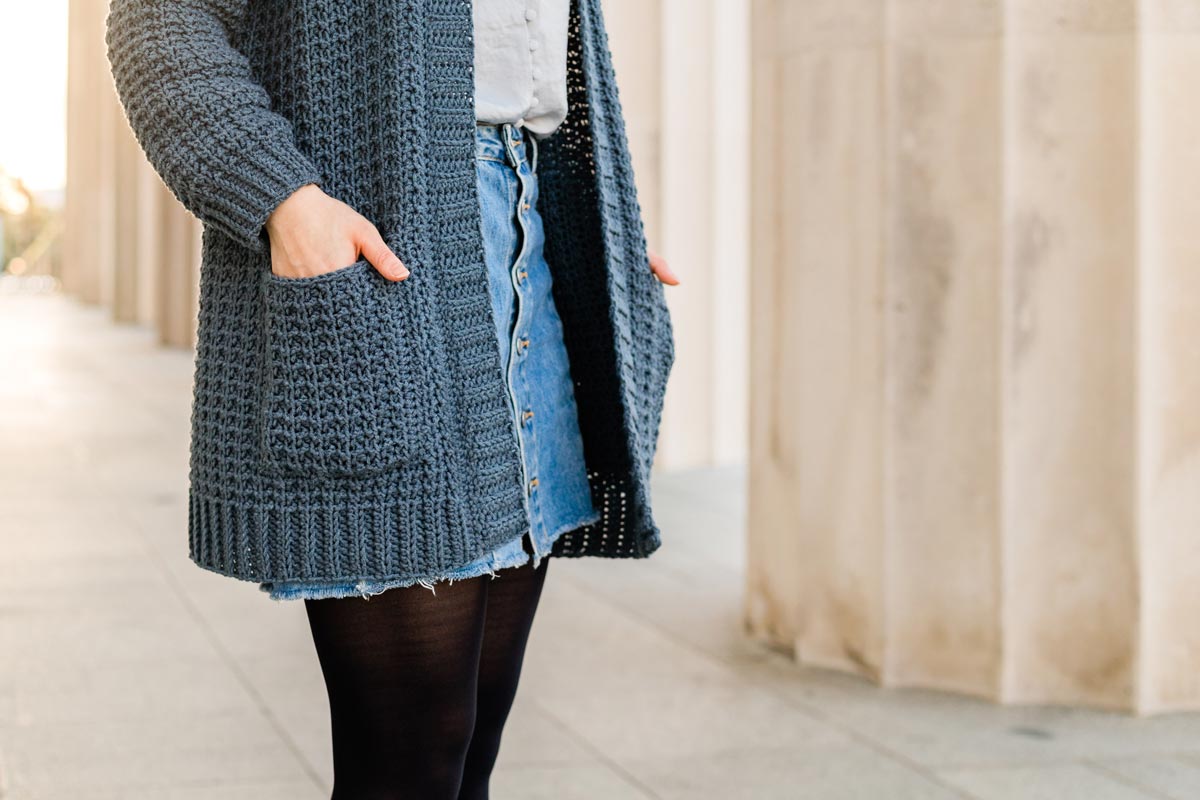
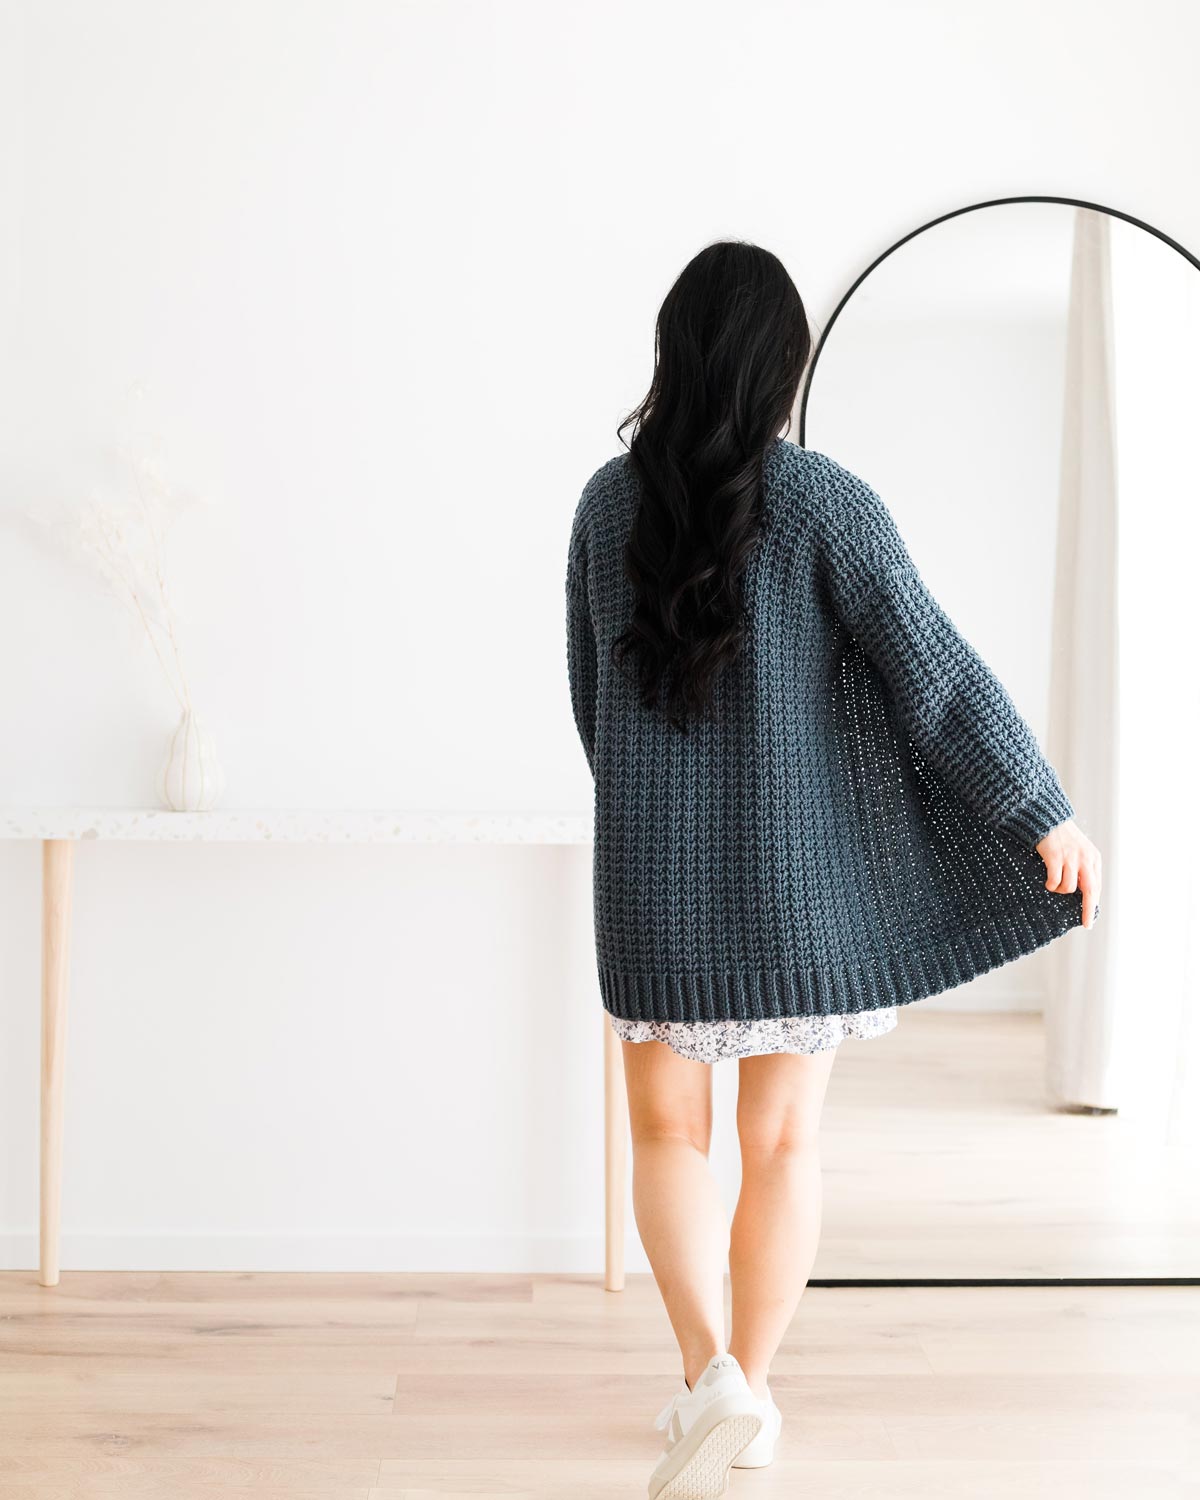
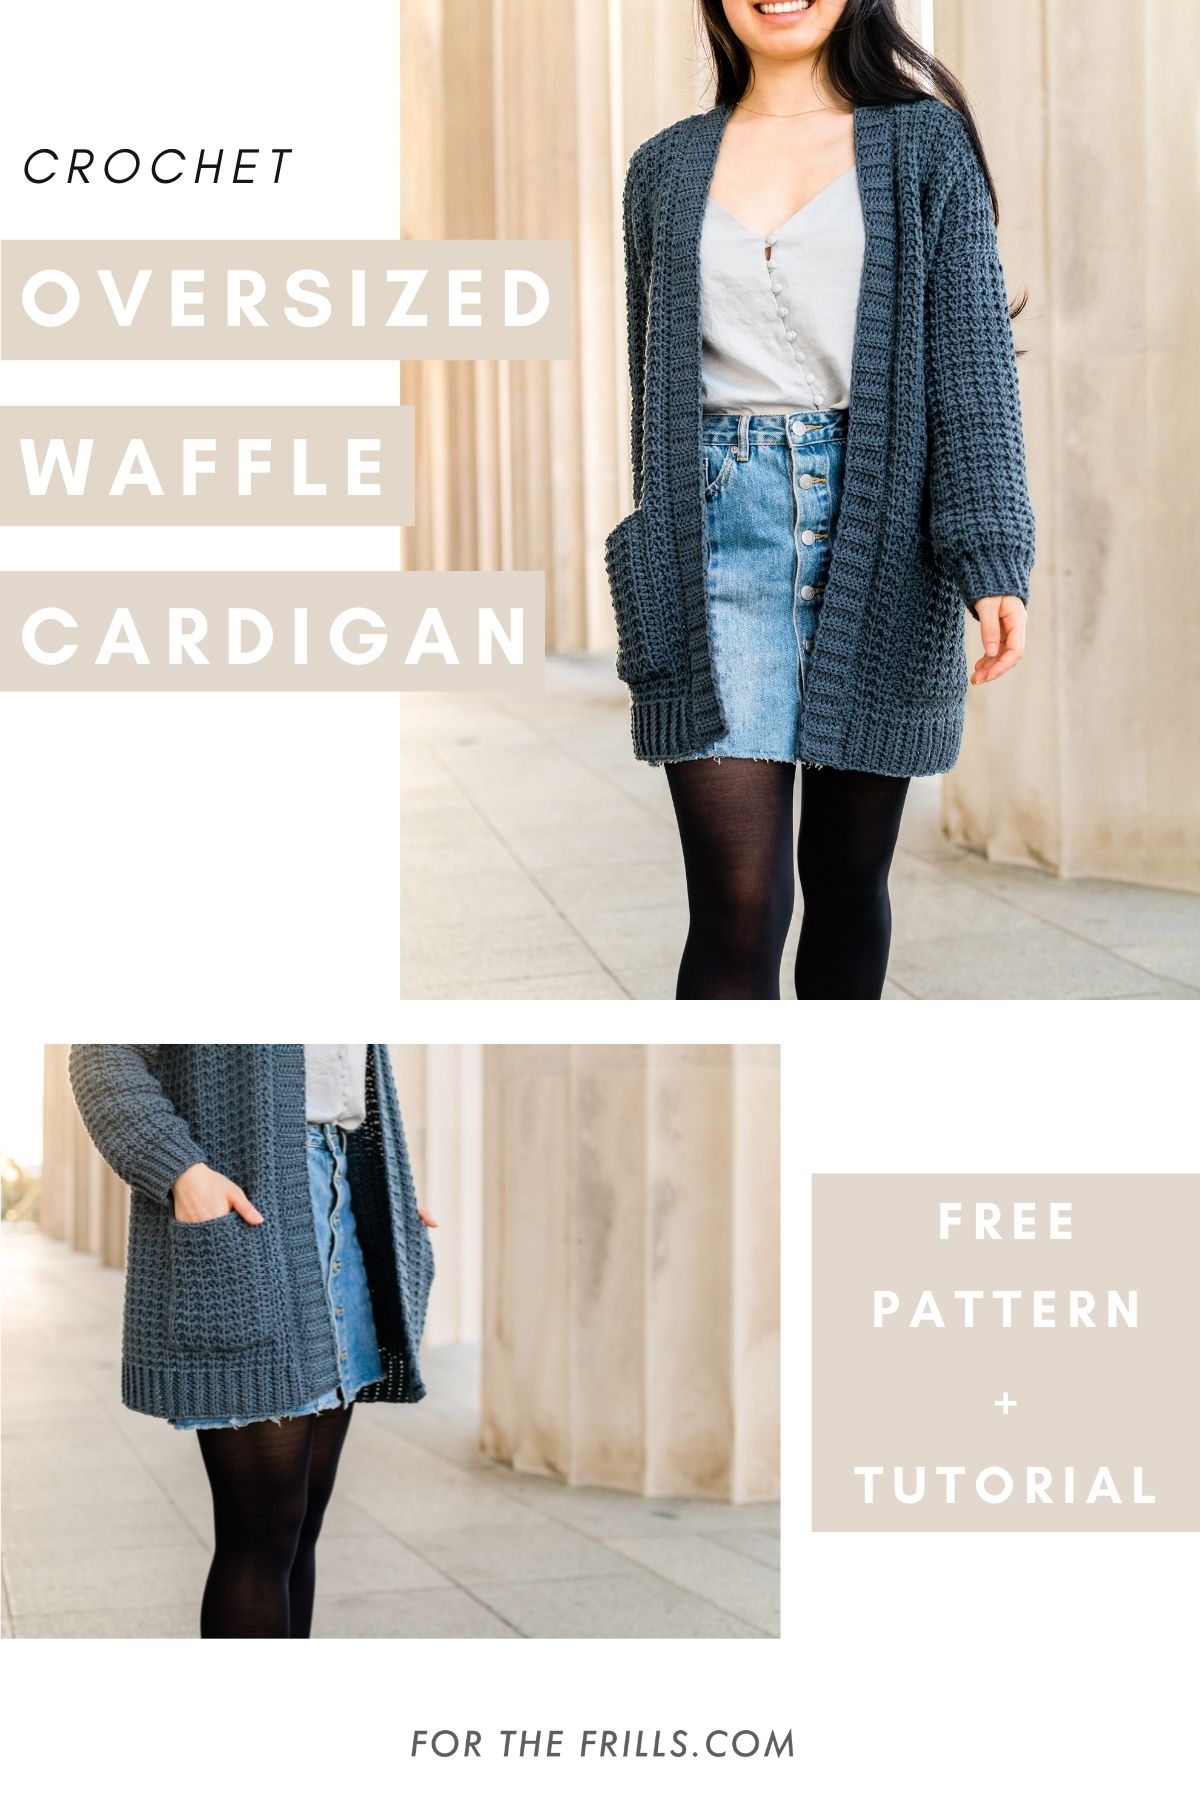
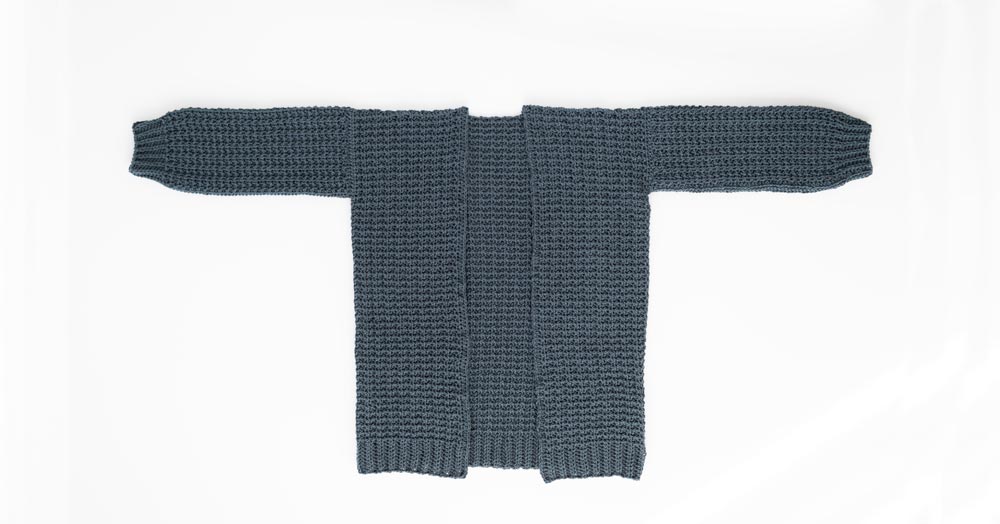
Simple, oversized and pockets – what’s not to love! The Midnight Cardigan is the oversized fall sweater of your dreams! Worked flat and built with half double crochets, this waffle-like textured cardigan features a wide boxy fit, slouchy sleeves and knit-look ribbing. Pair the Midnight Waffle Cardigan with jeans, over dresses or for lounging at home, this versatile crochet sweater is a modern take on the timeless waffle knit.
Crumpled Waffle Stitch
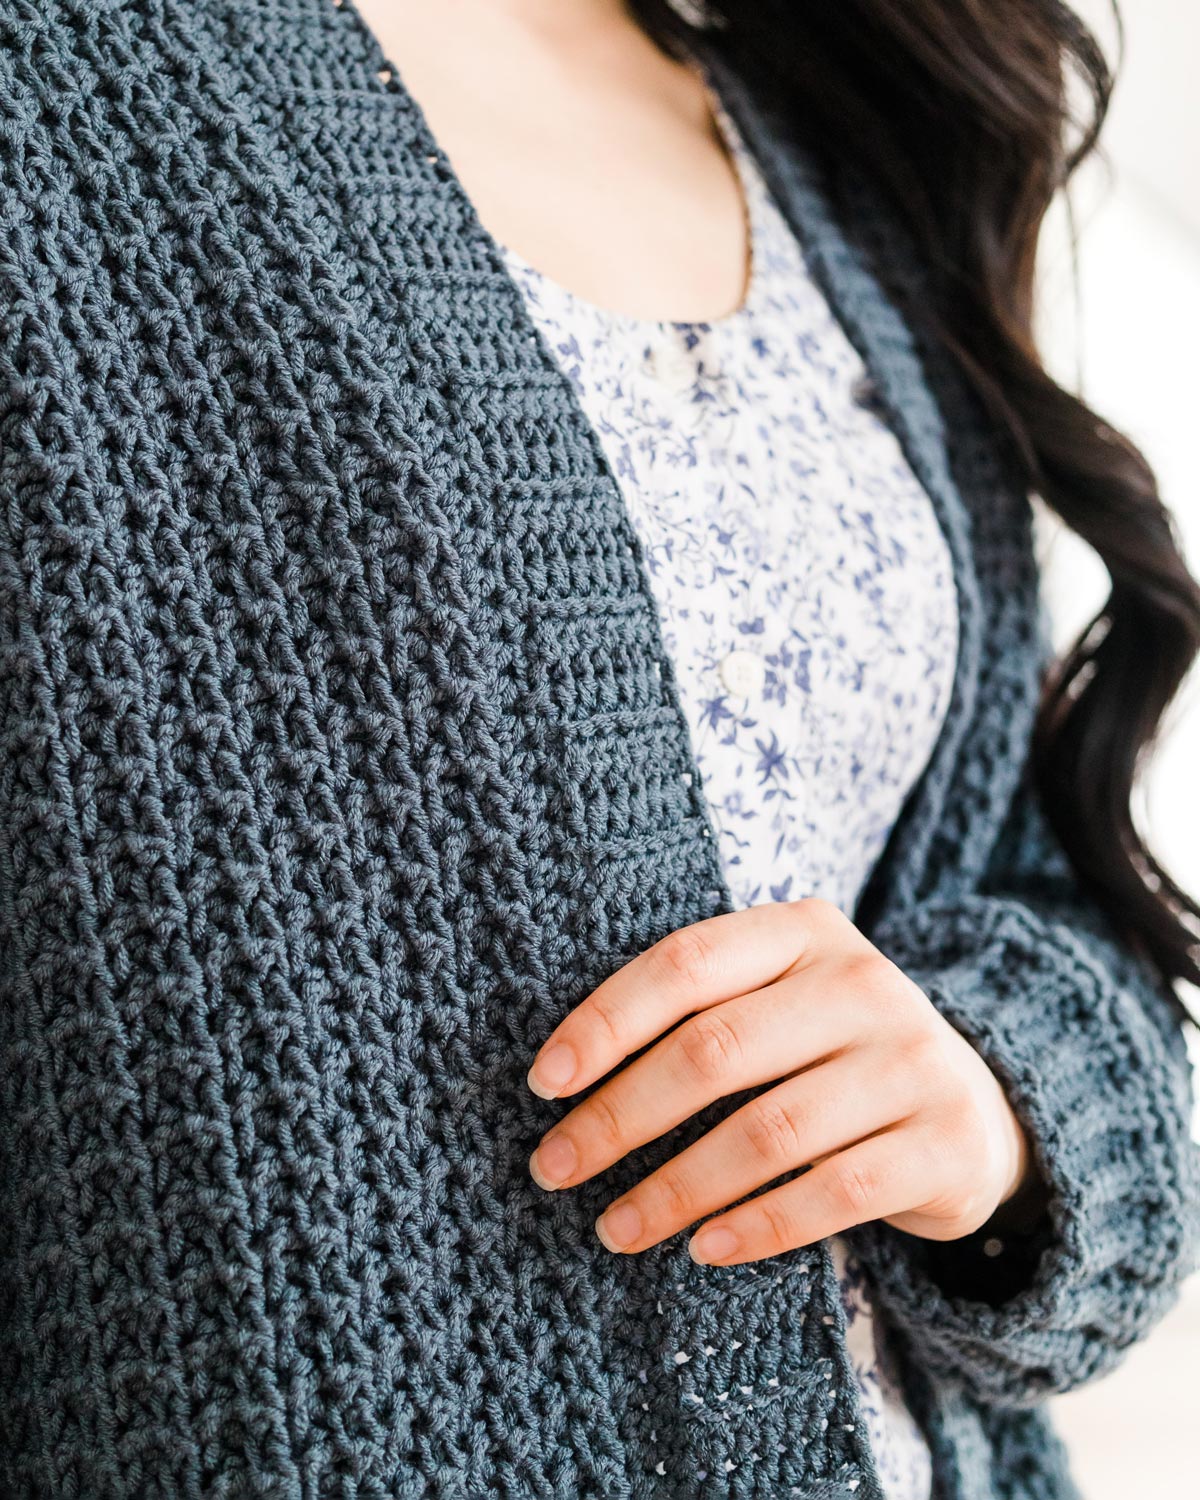
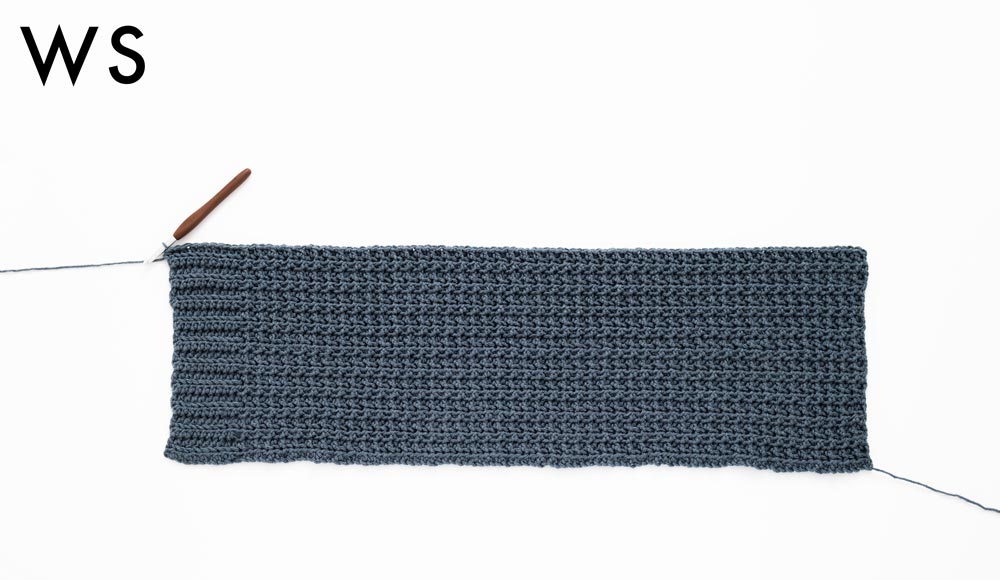
For The Frills designs are all about modern crochet look with beginner friendly stitches and the Midnight Cardigan is no exception! This waffle-like texture is created entirely using half double crochets. By alternating between front and back post half double crochets, we get a unique crumpled that has weight and thickness without compromising on the drape and comfort of the cardi – the perfect casual sweater.
From first glance, you’ll see that this Waffle Cardigan doesn’t have the same look as the traditional crochet waffle stitch. The reason is simple! Front post double crochets create a very stiff and dense fabric that has little movement or drape. On top of that, you have to constantly count your stitches to make sure the waffle grid lines up perfectly! I love the look of waffle stitches but hate how rigid the crocheted fabric feels.
When experimenting with lots of different stitch combos I stumbled upon this pattern and immediately fell in love with the simplicity and the drape. I first used this textured stitch with the Twilight Button Cardigan and loved it so much I knew I needed a long cardigan with this stitch!
Print and Crochet!
Love to crochet on the couch? You can always find a low-cost printable PDF version of all my free patterns. Perfect for printing out or viewing offline on your tablet or phone. This nicely-formatted pdf contains 20 pages and photo tutorial. The pictures are also separated from the written pattern so you can save on ink! The printable pdf is a super useful upgrade that makes it even easier to crochet.
Cardigan Construction
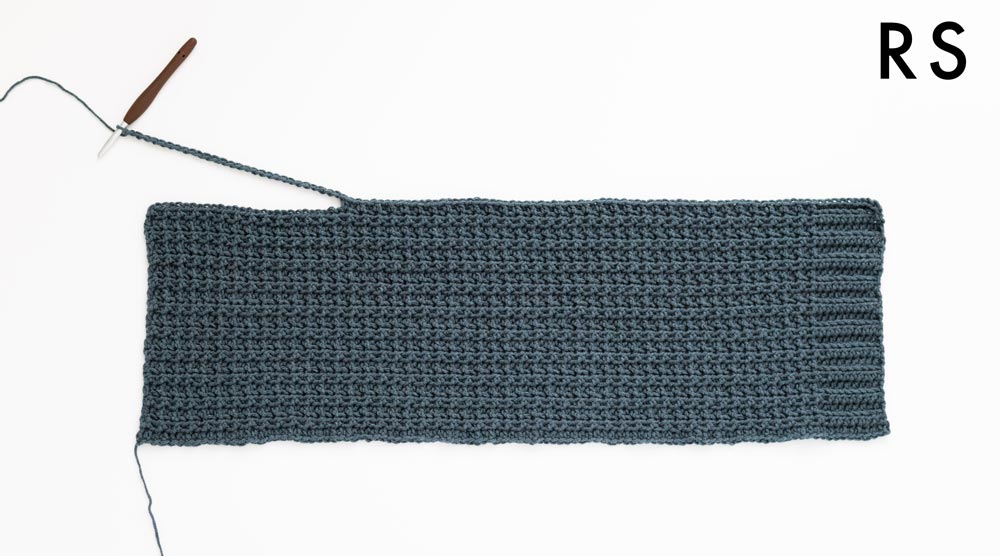
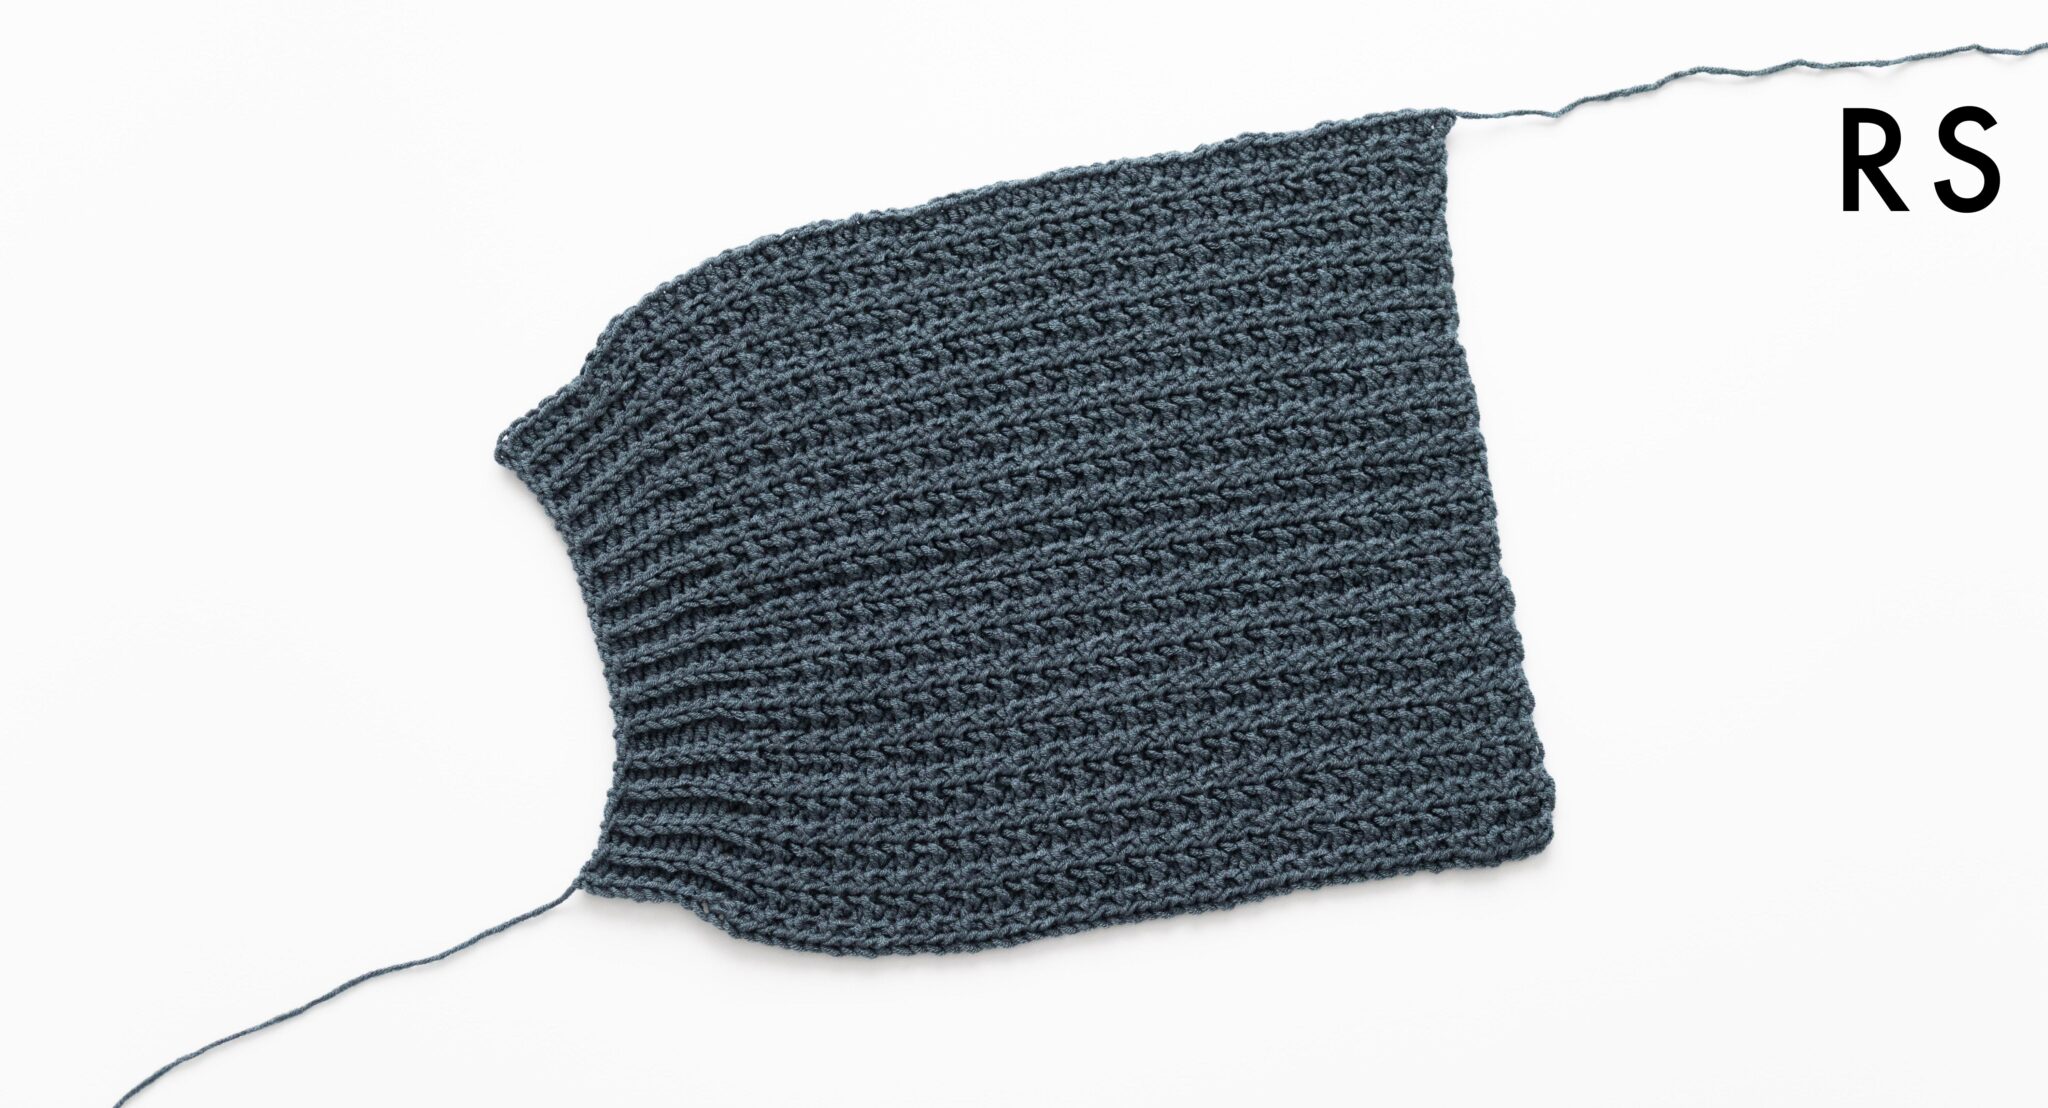
I find this waffle-like stitch shines best when it’s worked lengthways not widthways. This means the foundation chain runs the length of the sweater and sleeves, instead of the width. It’s easy to alter the length by simply adding chains to your foundation chain – full alteration instructions are provided in the pattern.
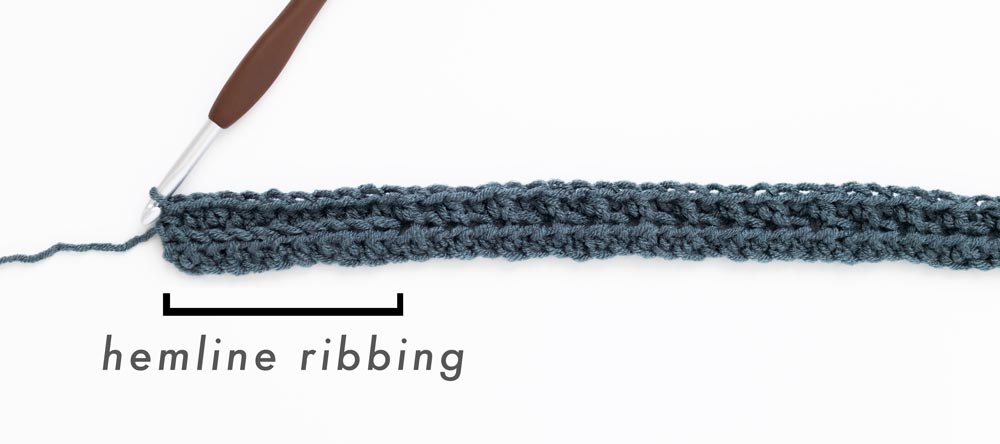
The body of the Midnight Waffle Cardigan is worked entirely in one piece, including the hemline ribbing! (The neckline ribbing is worked separately but is entirely optional 🙂 ) We’ll start by crocheting a row of half double crochets and then the majority of the pattern follows a two row repeat. You’ll alternate between front loop and back loop half double crochets with a section of consecutive back loop half crochets to create the hemline ribbing. Trust me – it’s a lot easier than it sounds!
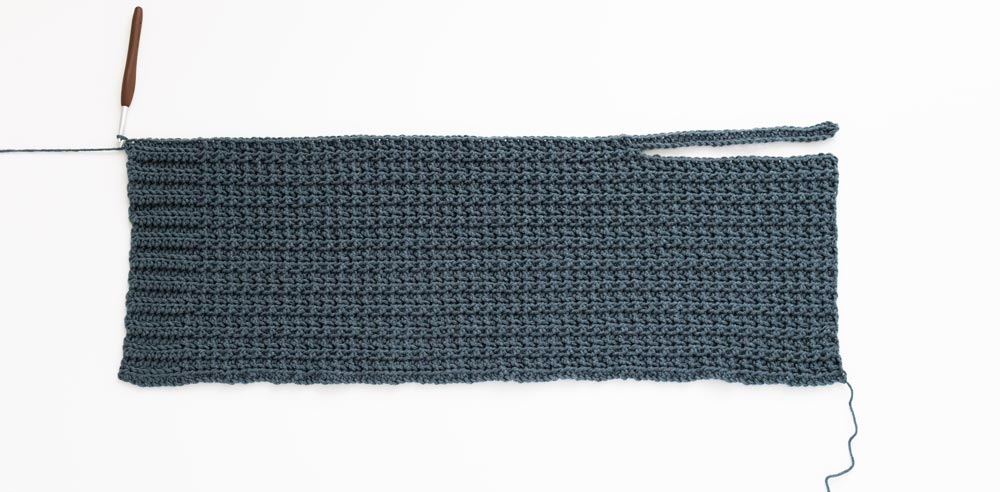
At two different points we’ll crochet separating rows to make space for the armholes of the sleeves. This way we can crochet the first front panel, then the back panel and finally the second front panel in one piece.
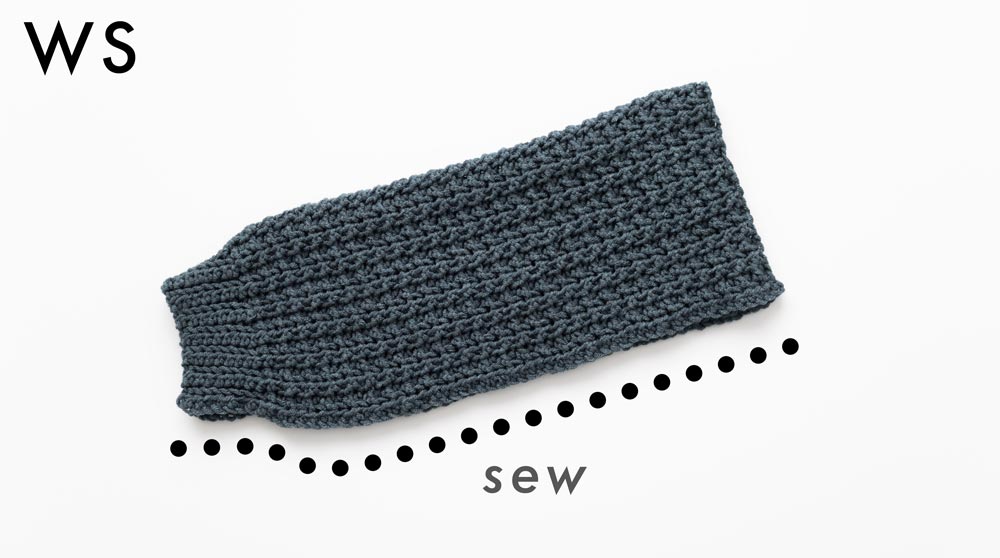
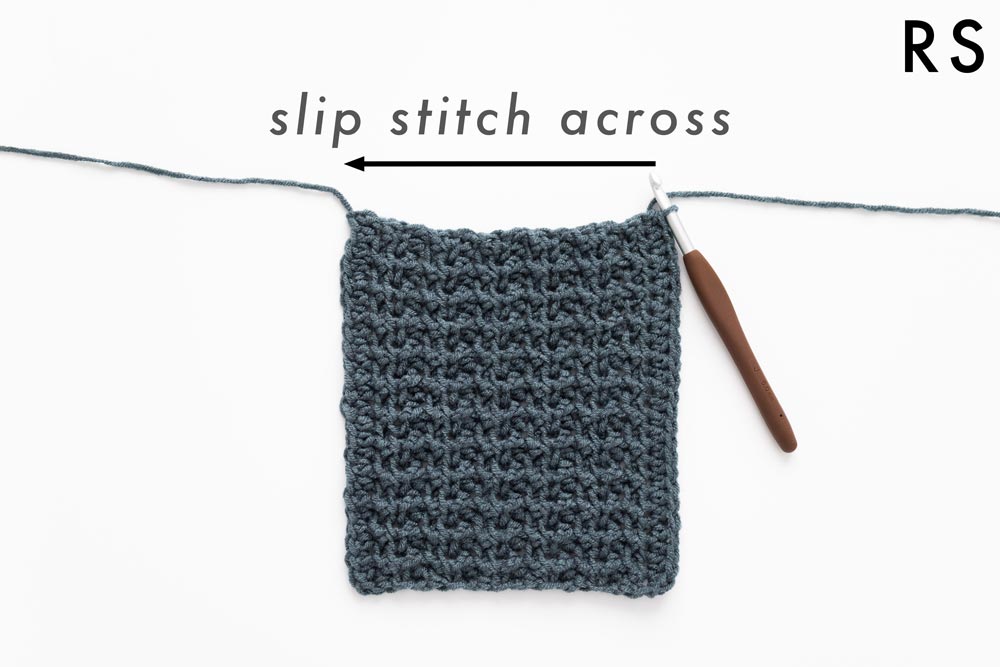
The sleeves are also worked lengthways with the cuff ribbing as a part of the main part of the sleeve. The slightly cuffed look is super simple to create by alternating between rows of half double crochets and slip crochets. This technique creates a tighter cuff without any complicated shaping.
To assemble, simply sew the tops of the shoulders and then the sleeves to the armholes. The neckline ribbing is worked separately in back loop half double crochets and then sewn on to the cardi.
Neckline Ribbing
You might be wondering why I don’t crochet the neckline ribbing directly onto the sweater? The reason is simple – gauge! I find that when crocheting the neckline ribbing onto the body of the cardigan it can cause the neckline to ruffle and spread out. I wanted to keep the look of the back loop half double crochets to match the hemline ribbing.
If you really hate sewing pieces together, you can crochet ribbing directly onto the cardigan by using back loop single crochets. You might need to experiment a bit with different hook sizes (probably a size or two larger) to get the perfect gauge and remember that your ribbing won’t exactly match the hemline. But it’s a good option if you don’t want to sew.
Design Inspiration
Oversized cardigans are some of my favourite patterns to design because they are so simple in construction with next to no shaping and it seems that you all love them too!
However, one downside is that the longer length can often cause to the cardigan to stretch out too much due to the added weight. The stretching out can be solved by using a stiffer stitch but then the sweater isn’t nearly as comfortable to wear as there is less drape.
Stitch choice is to key to creating a long cardigan that is comfy and stylish! When I stumbled upon this waffle stitch with the Twilight Cardigan, I knew that it was just a matter of time before I used it again!
Looking for more free patterns?

1. Twilight Button Cardigan / 2. In The Clouds Cardigan / 3. Pompeii Cardigan
Also check out a comprehensive guide to 50+ Crochet Sweaters on Make and Do Crew!
What yarn do I need?
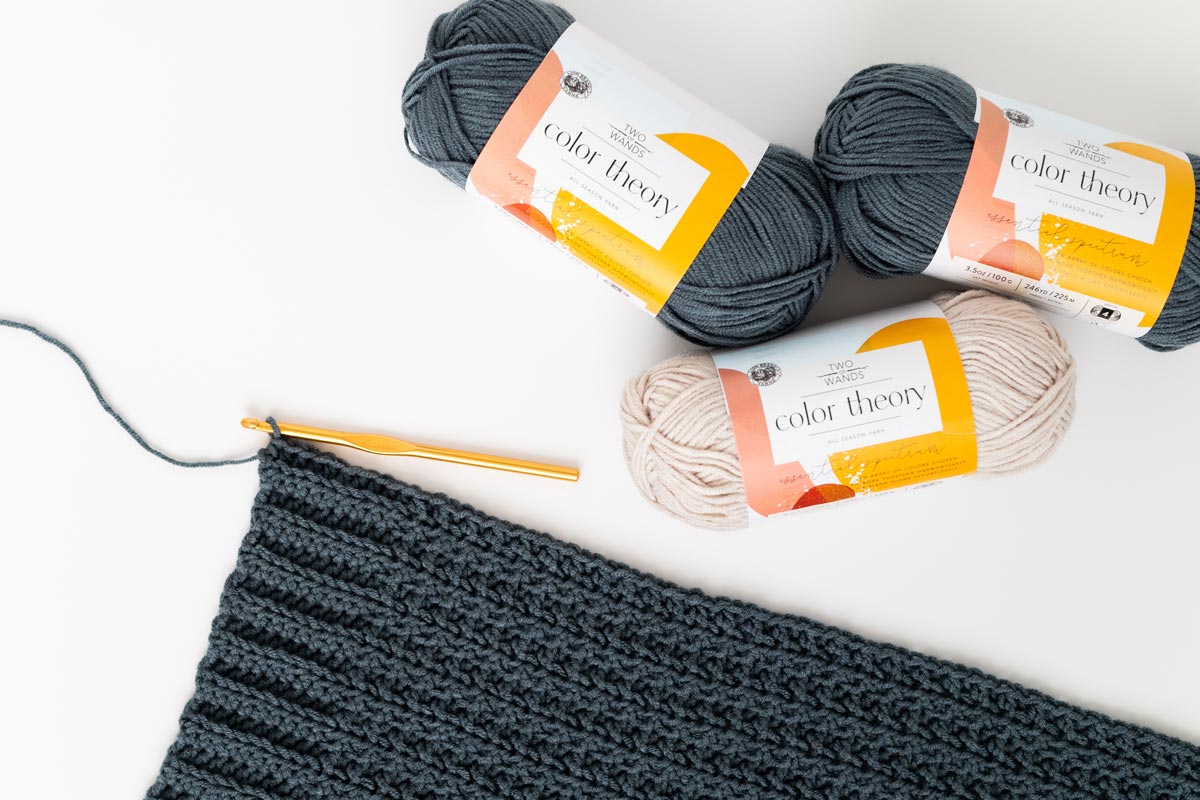
The Midnight Cardigan uses Lion Brand Color Theory, a 100% acrylic yarn with the most gorgeous range of colours. The entire line is designed with complementary hues so you can mix and match any of the colours and still have an aesthetically pleasing combination. The shade I’m using for this project is Stonewash. It’s a lovely mid tone blue that has a slight grey undertone.
Color Theory is a very versatile yarn, so it’d work well for most types of wearable projects – anything from crop tops to sweaters! It has a good amount of stretch and spring which makes it great for fitted projects (check out the Blair Crop Top!) and the acrylic fibre means that it can be worn in any season (a great fall project, the Dewdrop Wrap!).
Lionbrand’s Color Theory is classified as a medium (4) / aran / worsted weight yarn. If you want to substitute this yarn, make note that it’s on the thinner side for a worsted yarn.
Some good substitution options are -
Video Tutorial
Check back next week for the step-by-step video tutorial!
Click to Pin Me for later!
I love to see your finished projects! Use #forthefrills and tag me on Instagram @forthefrills for a chance to be featured 🙂
Add the Midnight Waffle Cardigan to your Ravelry queue!
Ad-free, printable version of the Midnight Waffle Cardigan!
MINI EXPLANATION:
Beginner friendly textured crochet cardigan with pockets. Constructed using back loop and front loop half double crochets, this crochet sweater is worked flat and with the body and sleeves seamed together.
NOTES:
*Sample is a size small shown on a 5’3” model with a 32” bust.
*The sizing guide follows size XS(S, M, L, XL)(2XL, 3XL, 4XL, 5XL). E.g. “Ch 91(95, 95, 95, 95)(99, 99, 99, 99) means Ch 91 for XS, Ch 95 for Small, Ch 95 for Medium, Ch 95 for Large, Ch 95 for XL, Ch 99 for 2XL, Ch 99 for 3XL, Ch 99 for 4XL and Ch 99 for 5XL.” If there is only one number, it applies to all sizes.
*”HDC 10” means HDC into the next 10 stitches.
*The turning chain, ch 1 does NOT count as a stitch. Otherwise, ch 1 does count as a stitch.
*Total stitches are indicated between < >.
*This pattern uses US crochet terms.
*The body is worked entirely in one piece with the hemline ribbing included. The body begins with the first front panel, an opening for the 1st sleeve, the back panel, an opening for the 2nd sleeve and the second front panel.
*The sleeves, back and front panels are worked from side to side. The foundation chain runs the length of the sleeve and the length of the sweater.
*The sleeves, neckline ribbing and pockets are worked separately and sewn onto the body panel.
*All pieces are sewn together with the RS on the inside and the WS facing outwards.
*To make your cardigan shorter/longer, remove/add chains in multiples of 2.
*Add approx. 14(16, 18, 19, 20)(22, 23, 25, 26)gof yarn for every additional 2.5cm / 1” of body length.
*To make your sleeves shorter/longer, remove/add chains in multiples of 2.
*Add approx. 9(11, 11, 12, 13)(14, 15, 16, 16)g of yarn for every additional 2.5cm / 1” of sleeve length.
*The sample sweater uses Lionbrand Color Theory, an Aran / Worsted / 10ply / Medium (4) yarn. If you want to substitute this yarn, it’s a thinner Aran/Medium (4) yarn and close to a thick DK/Light(3).
LEVEL: Easy
Materials
Yarn – Lionbrand Color Theory – Aran / Worsted / 10ply / Medium (4), 225m/100g, 246yds/3.5oz, 100% Acrylic, Stonewash
approx. 520(585, 635, 675, 725)(810, 860, 915, 970)g
6mm (US J) Crochet Hook
Darning Needle
Scissors
Stitch markers/Safety pins
Stitches & Abbreviations
Ch = Chain
Sl st = Slip Stitch
HDC = Half Double Crochet
FLO = Front Loop
BLO = Back Loop
St(s) = Stitch(es)
Rep = Repeat
RS = Right Side
WS = Wrong Side
Measurements
Measurements cm:
To fit Bust: 71(81, 91, 101, 112)(122, 132, 142, 152)
Back Width: 47(53, 58, 62, 66)(73, 77, 83, 87)
Armhole: 14(15, 16.5, 18, 19)(21, 22, 23, 24)
Sleeve length: 39(39, 41, 41, 42)(42, 43, 43, 45)
Length: 62(65, 65, 65, 65)(67, 67, 67, 67)
Measurements inches:
To fit Bust: 28(32, 36, 40, 44)(48, 52, 56, 60)
Back Width: 18.5(21, 23, 24.5, 26)(29, 30.5, 32.5, 34)
Armhole: 5.5(6, 6.5, 7, 7.5)(8, 8.5, 9, 9.5)
Sleeve length: 15.5(15.5, 16, 16, 16.5)(16.5, 17, 17, 17.5)
Not sure which size to pick?
Learn more about crocheting perfect fitting garments here!
GAUGE: 10cm/4” square = 14.5 stitches wide x 9.5 rows tall in Crumpled Waffle Stitch Pattern
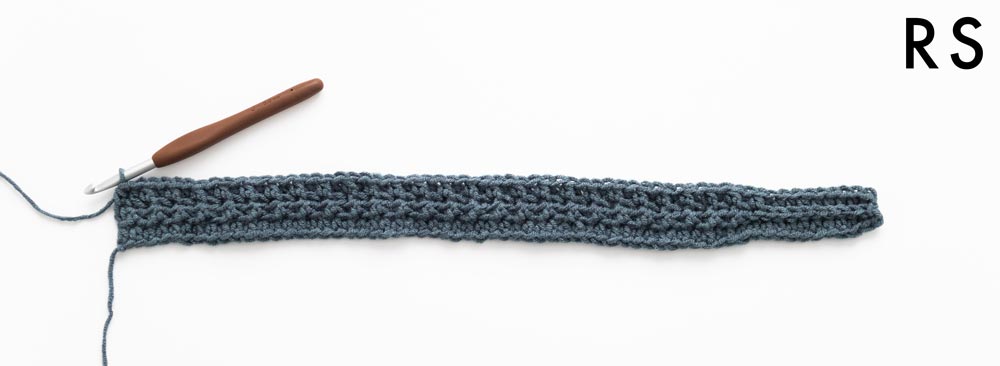
Crumpled Waffle Stitch / Textured HDC Stitch Pattern
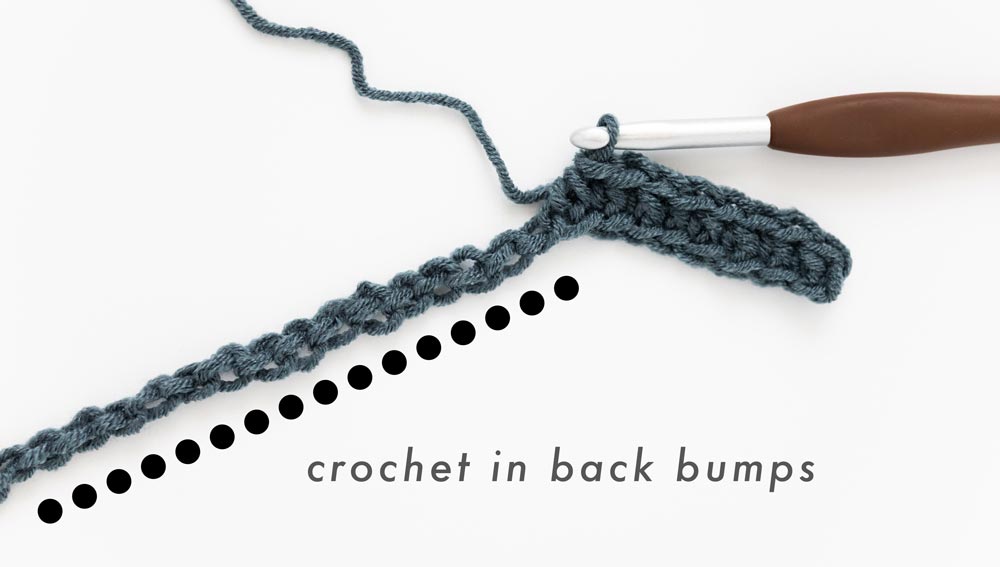
FOUNDATION CHAIN: Ch an even number of stitches.
ROW 1: Working into the back bumps of the chs, HDC in 2nd ch from hook, HDC across, turn.
ROW 2: Ch 1, *BLO HDC, FLO HDC; rep from * across, HDC in last st, turn.
ROW 3: Ch 1, *FLO HDC, BLO HDC; rep from * across, HDC in last st, turn.
Repeat ROWS 2 – 3 until you reach your desired length.
Midnight Waffle Cardigan Crochet Pattern
BODY PANEL
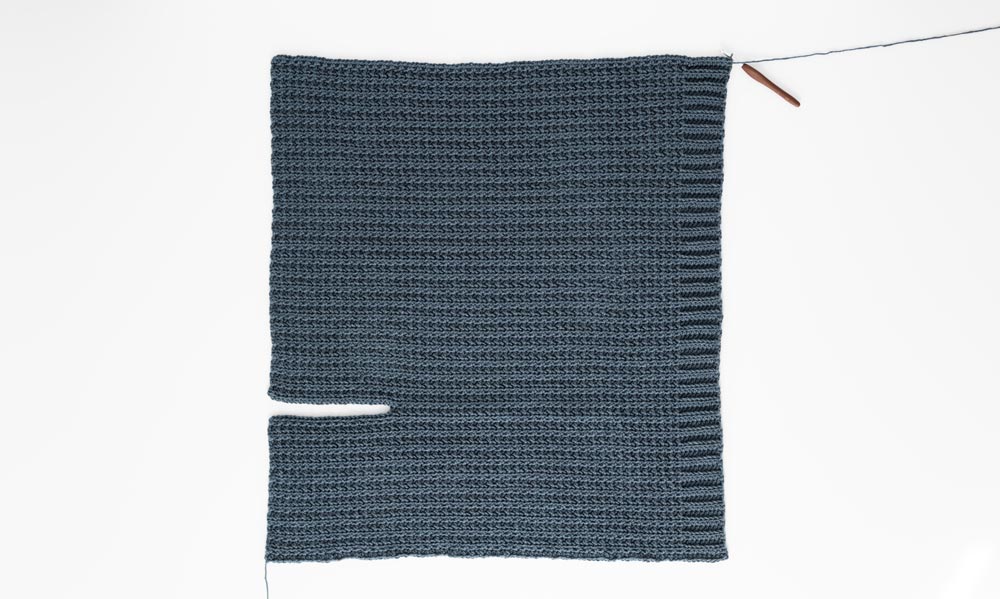
FIRST FRONT PANEL
FOUNDATION CHAIN: Ch 91(95, 95, 95, 95)(99, 99, 99, 99).
ROW 1 (RS): Working into the back bumps of the chs, HDC in 2nd ch from hook, HDC across, turn.
<90(94, 94, 94, 94)(98, 98, 98)>
ROW 2 (BODY ROW B): Ch 1, *BLO HDC, FLO HDC; rep from * until 10 sts left, BLO HDC 9, HDC in last st, turn.
<90(94, 94, 94, 94)(98, 98, 98)>
ROW 3 (BODY ROW A): Ch 1, BLO HDC 9, *FLO HDC, BLO HDC; rep from * across, HDC in last st, turn.
<90(94, 94, 94, 94)(98, 98, 98)>

ROW 4: As BODY ROW B.
<90(94, 94, 94, 94)(98, 98, 98)>
Repeat BODY ROWS A – B until ROW 18(20, 22, 24, 26)(28, 30, 32, 34).
We’ve finished the FIRST FRONT PANEL. Do not fasten off! We’ll now crochet the ‘BACK PANEL’.
BACK PANEL
BACK PANEL ROW 1: Ch 1, BLO HDC 9, *FLO HDC, BLO HDC; rep from * until 27(29, 31, 33, 35)(37, 39, 41, 43) sts left, HDC in next st, ch 27(29, 31, 33, 35)(37, 39, 41, 43), turn.
<64(66, 64, 62, 60)(62, 60, 58, 56) + 27(29, 31, 33, 35)(37, 39, 41, 43) chs>
*The chs form the 1st sleeve armhole opening.
BACK PANEL ROW 2: HDC in 2nd ch from hook, HDC in each ch, *BLO HDC, FLO HDC; rep from * until 10 sts left, BLO HDC 9, HDC in last st, turn.
<90(94, 94, 94, 94)(98, 98, 98)>
Repeat BODY ROWS A – B until ROW 44(50, 54, 58, 62)(68, 72, 78, 82).
<90(94, 94, 94, 94)(98, 98, 98)>
Total Rows: <62(70, 76, 82, 88)(96, 102, 110, 116)>
We’ve finished the BACK PANEL. Do not fasten off! We’ll now crochet the ’SECOND FRONT PANEL’.
SECOND FRONT PANEL
ROW 1: As Back Panel Row 1.
*The chs form the 2nd sleeve armhole opening.
Total Rows: <63(71, 77, 83, 89)(97, 103, 111, 117)>
ROW 2: As Back Panel Row 2.
Total Rows: <64(72, 78, 84, 90)(98, 104, 112, 118)>
Repeat BODY ROWS A – B until ROW 18(20, 22, 24, 26)(28, 30, 32, 34).
Total Rows: <80(90, 98, 106, 114)(124, 132, 142, 150)>
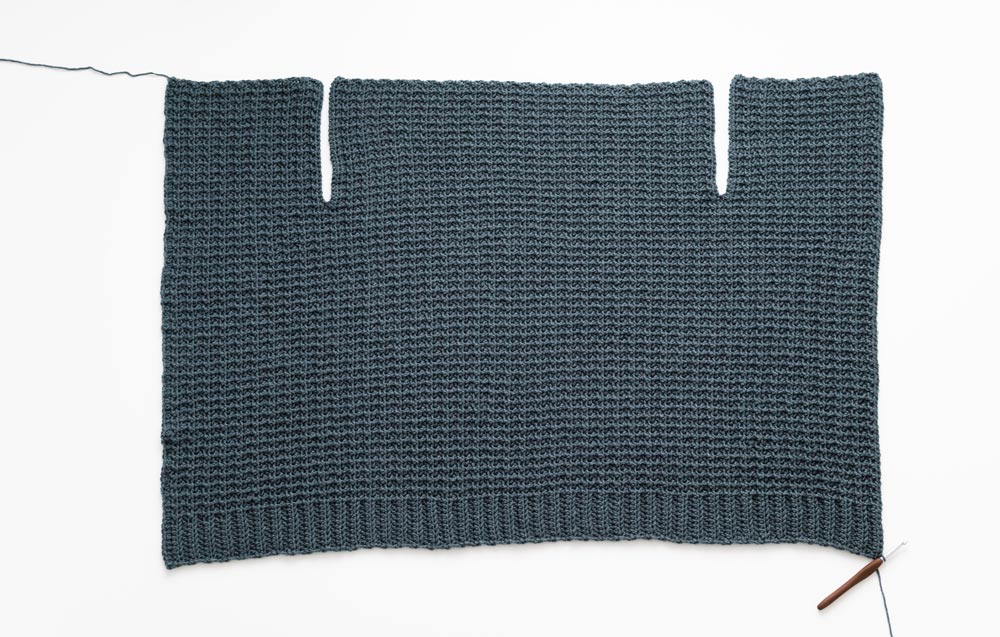
FINAL BODY ROW: Ch 1, BLO HDC 9, HDC across.
<90(94, 94, 94, 94)(98, 98, 98)>
Total Rows: <81(91, 99, 107, 115)(125, 133, 143, 151)>
*The first and final row of the body panels are longer than the rest of the cardigan. After we add the neckline ribbing, the length difference won’t be noticeable when you wear the final cardigan.
Fasten off.
SLEEVES
(*Make 2)
FOUNDATION CHAIN: Ch 63(63, 65, 65, 67)(67, 69, 69, 71).
ROW 1 (RS): Working into the back bumps of the chs, HDC in 2nd ch from hook, HDC in each ch across, turn.
<62(62, 64, 64, 66)(66, 68, 68, 70)>
ROW 2: Ch 1, *BLO HDC, FLO HDC; rep from *until 10 sts left, BLO sl st 9, sl st in last st, turn.
<62(62, 64, 64, 66)(66, 68, 68, 70)>

ROW 3: Ch 1, BLO HDC 9, *FLO HDC, BLO HDC; rep from * across, HDC in last st, turn.
<62(62, 64, 64, 66)(66, 68, 68, 70)>
Repeat ROWS 2 – 3 until ROW 26(30, 32, 34, 36)(40, 42, 44, 46).
*You should end with a repeat of ROW 2.
Fasten off.
Fold sleeve in half lengthways. Whip stitch the edges of the sleeve together.
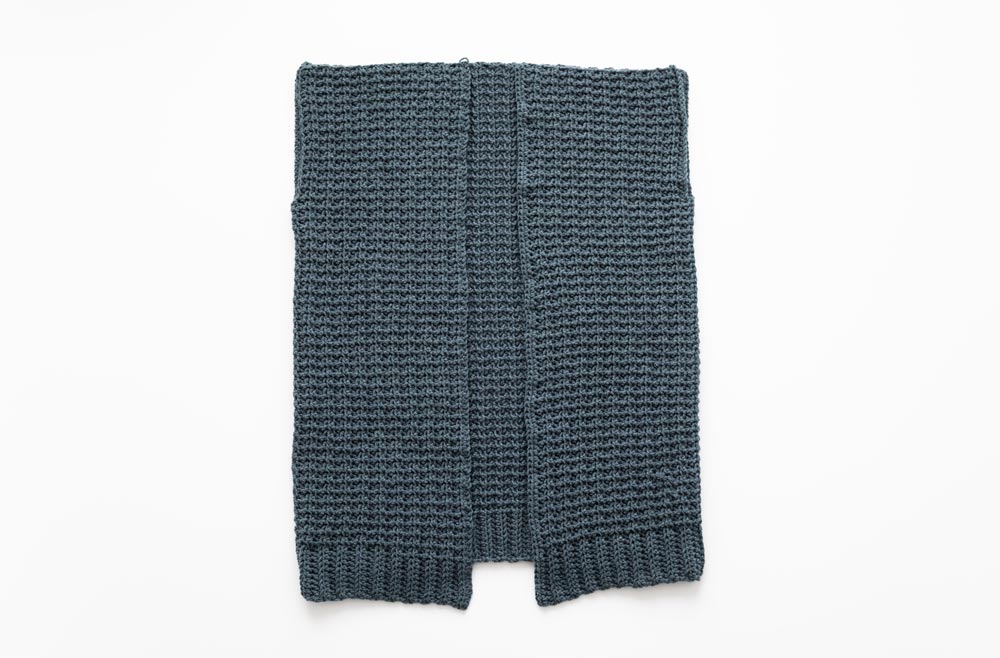
ASSEMBLY
Lay front panels on top of the back panel.
Whip stitch shoulder seams together.
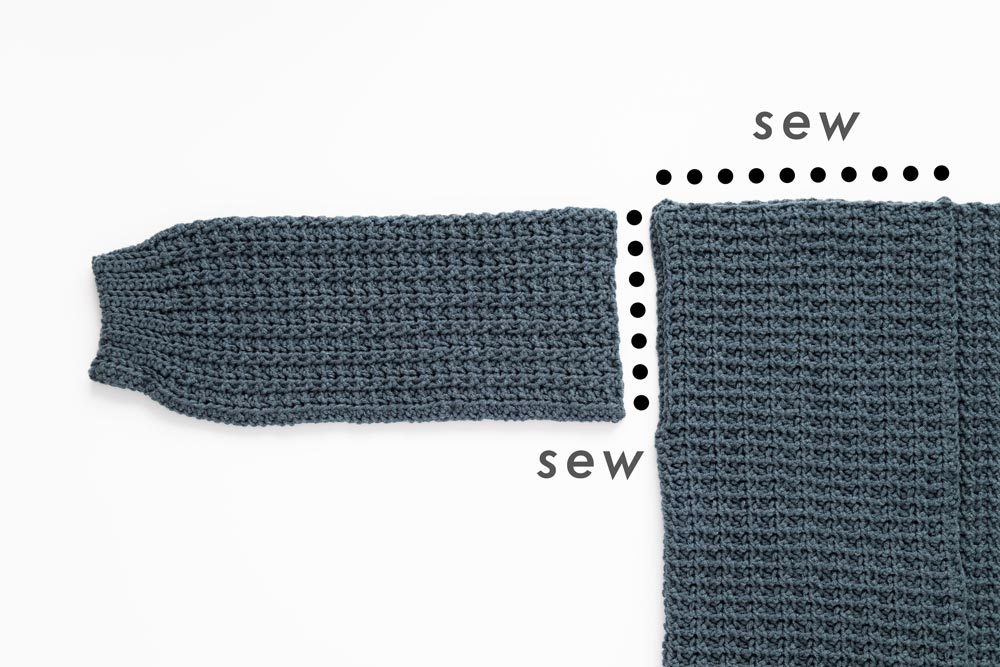
Whip stitch top of sleeves to arm holes.
NECKLINE RIBBING
FOUNDATION CHAIN: Ch 8.
ROW 1: HDC in 2nd ch from hook, HDC in each ch across, turn.
<7>
ROW 2: Ch 1, BLO HDC 6, HDC in last st, turn.
<7>
Repeat ROW 2 until the ribbing measures the length of the entire neckline.
Fasten off.

Pin ribbing along neckline and whip stitch ribbing to neckline.

POCKETS
(*Make 2/optional)
FOUNDATION CHAIN: Ch 25.
ROW 1(RS): Working into the back bumps of the chs, HDC in 2nd ch from hook, HDC in each ch across, turn.
<24>
ROW 2: Ch 1, BLO HDC, *FLO HDC, BLO HDC; rep from * across, HDC in last st, turn.
<24>
Repeat ROW 2 until ROW 12.
ROW 13: Ch 1, HDC across.
<24>
POCKET EDGING: Rotate work 45 degrees. Ch 1, sl st along the raw edge of the pocket.
*The sl st edge is the top edge of the pocket. It is not sewn onto the cardigan.

Fasten off.
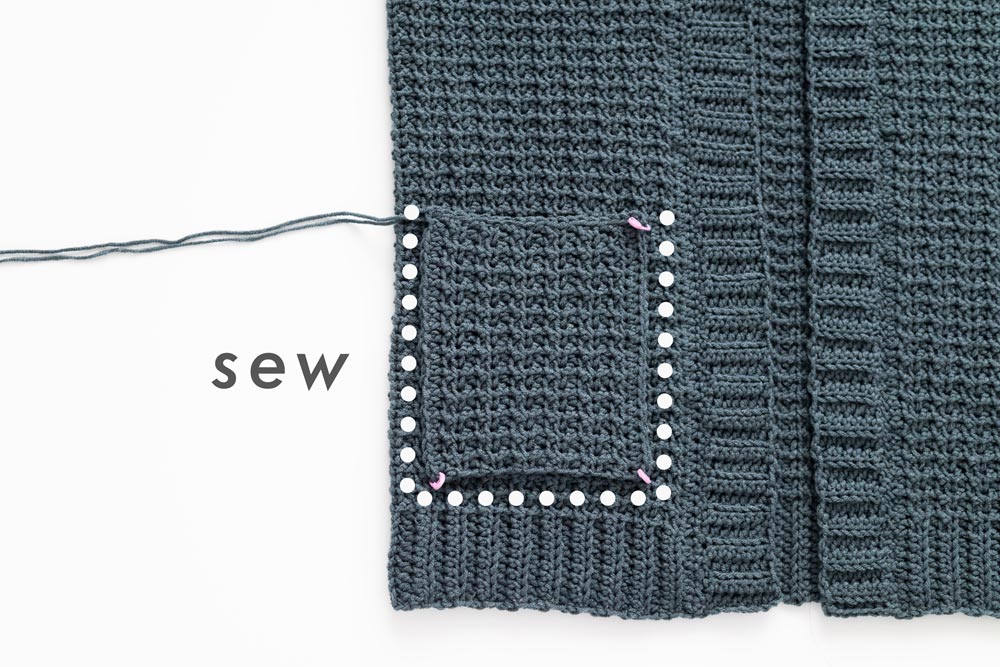
Pin pocket to cardigan, whip stitch pockets to cardigan.
*Try on the cardigan to double-check pocket placement, adjust if necessary.
*Make sure you only stitch through the front panel of the cardigan, do not sew the pocket through the front and back panels.
FINISHING
Weave in all of your ends. Steam block your cardigan.
Voilà! You’ve finished your Midnight Waffle Cardigan 🙂
"ROW 2 (BODY ROW B): Ch 1, *BLO HDC, HDC; rep from * until 10 sts left, BLO HDC 9, HDC in last st, turn."
Is that a typo? Is the repeat supposed to be BLO HDC, FLO HDC? Just want to make sure. 🙂
I’m confused because Body Row B on the first panel is different than on the gauge swatch, back panel and second front panel. It does not alternate BLO HDC and FLO HDC (BLO HDC, HDC). Is it possible this is a typo?
Yes it's a typo sorry! The draft version was accidentally uploaded and I've fixed the pattern!
Hi,
Just checking my understanding of the pattern...am I always BLO HDC on top of a BLO HDC on the previous row?
thanks,
Ann
Yes. Because when you turn to start the next row, you will be doing the opposite so it alternates, causing it to have a stretchy effect.
On the sleeves it says you should end with a repeat of ROW 2. I end with row 3 for the rows for my size, so should i be doing an extra row 2 or what is meant there?
Hi,
I am a bit confused about doing the gauge swatch. I’ve never made a clothing item before and therefore have never done a gauge swatch.
“ GAUGE: 10cm/4” square = 14.5 stitches wide x 9.5 rows tall in Crumpled Waffle Stitch Pattern” how do I do half of a stitch, and how do I do half a row?
I apologise if this is a silly question!
Thanks!
This may be too late, but usually when crocheting a guage swatch youd make it bigger than you need to. So say make it 16 st wide and 11 rows tall and measure how many stitches are in 4 inches wide. Likewise measure how many rows you get in 4inches. hsometimes you just kinda have to eyeball it. If it's pretty darn close but your not quite sure, it's usually fine to proceed.
Hi, I finished my cardigan but it feels very bulky under the arms. Do you know why/how to fix it? Thanks in advance!
My ribbing isn't sinching in for the sleeves. I know I'm doing back loop hdc. Suggestions?
Are you doing the slip stitch rows as well? One direction is hdc blo, and the other is slip stitch.
Do you have a video for back panel row 1? It’s not making sense for me. After you do the first set of chains you turn, make x amount of stitches then make another set of chains but at the bottom? Do you have a video on this? My mom and fellow crochet friends are confused too
When starting the back panel and chaining at the end of the first row for the arm hole, and then going on to row two, the back panel is now longer than the first front panel by a good inch. I don't know if it's because I chain loose, but is this going to be a problem when constructing at the end? I have double checked, and I still have the same number of stitches as I had with the first front panel (making a size medium) Front panel ended with 94, and row two of back panel ended with 94, with the same number of stitches from the gap to the end of the row as the last row on the front panel. Just don't want to continue working if at the end it will be an issue, but also don't know how I would fix that since that is my tension probably.
Hi, I just started on the sleeves and want to make sure we alternate between slip stitches on even rows and hdc on odd rows for the cuff. Thanks for your pattern.