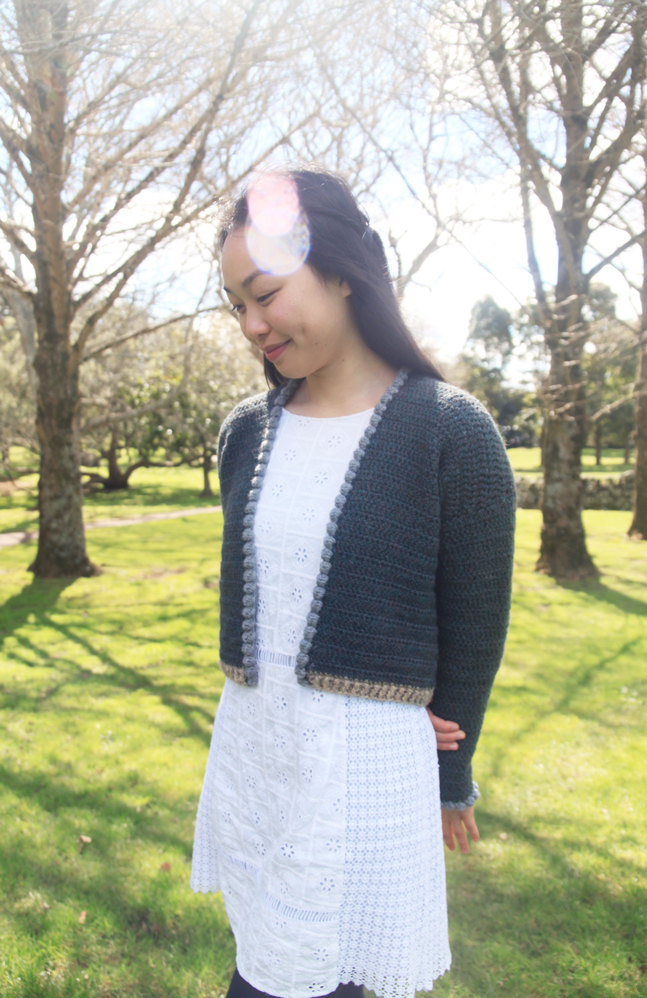
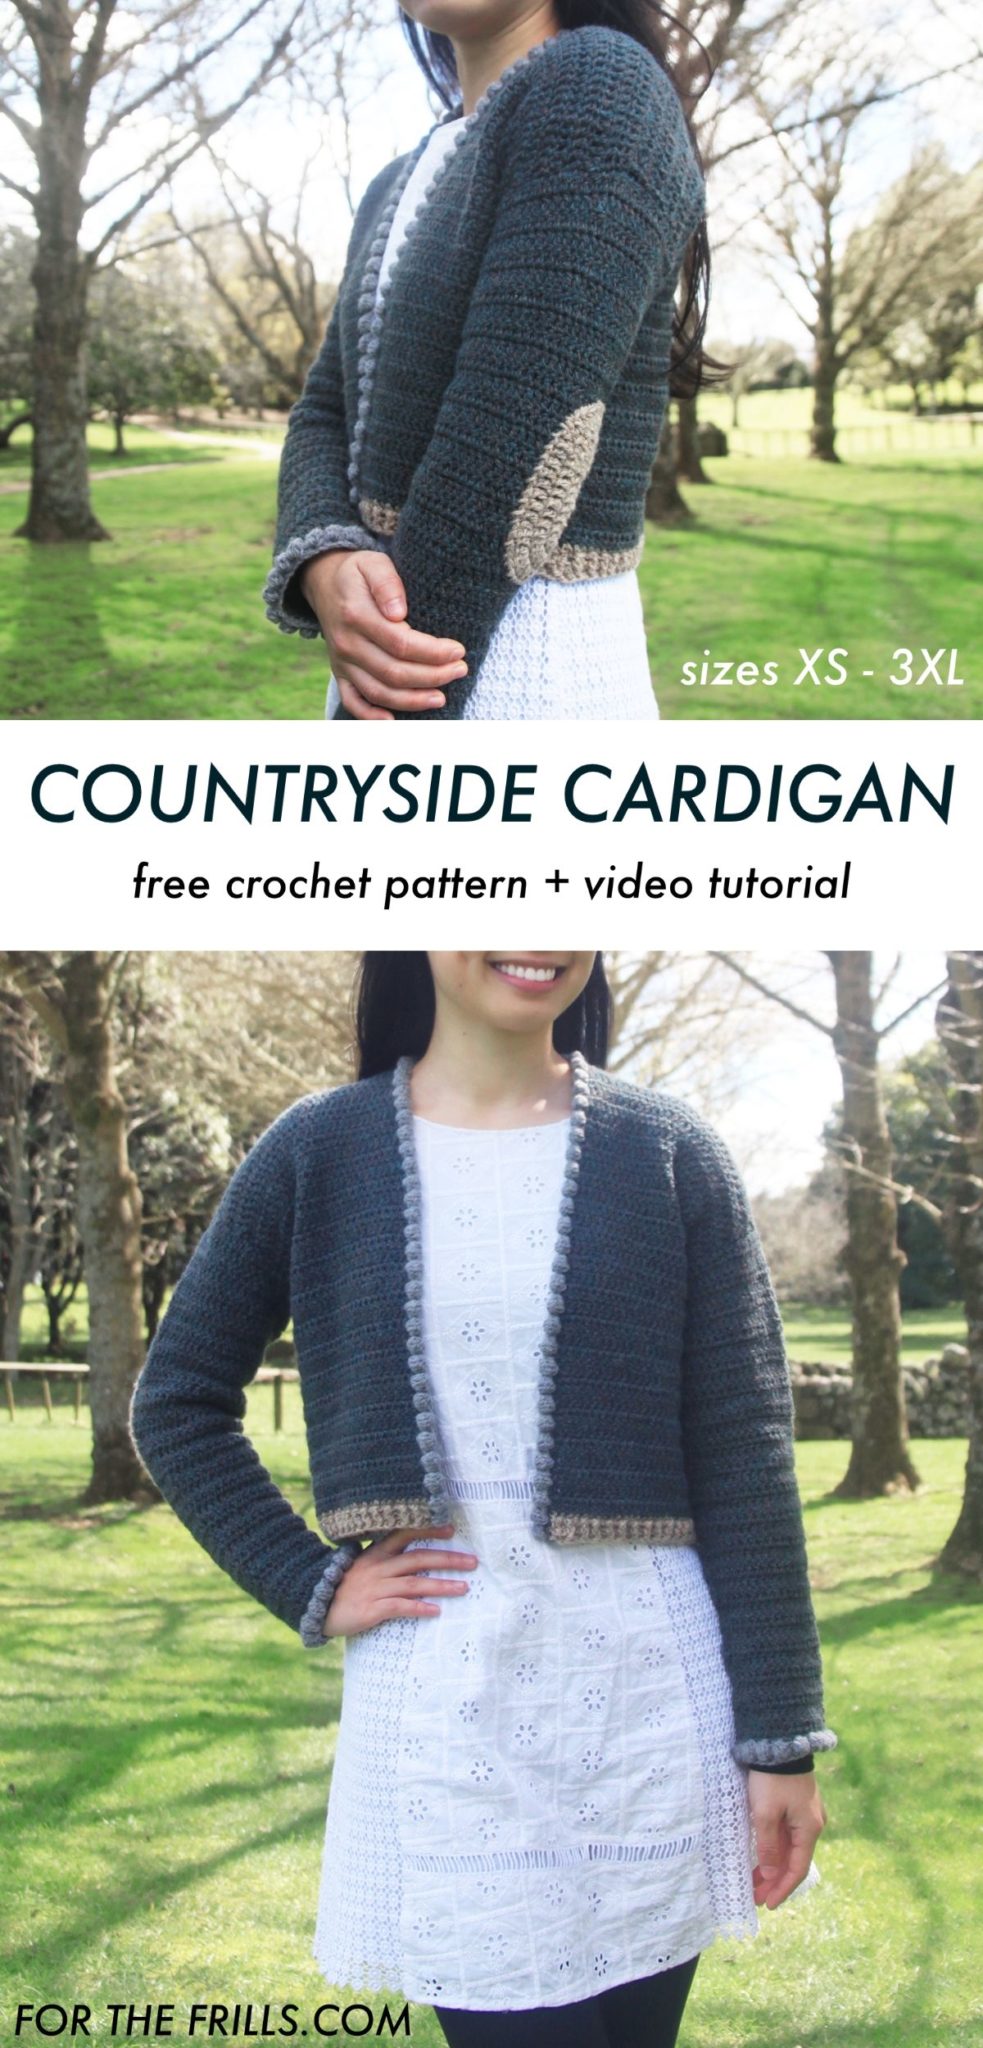
I’m so excited to share my latest free crochet pattern with you – the Countryside Cardigan!
This free crochet cardigan pattern is accompanied by a video tutorial.
This post may contain affiliate links, view our disclosure policy for details.
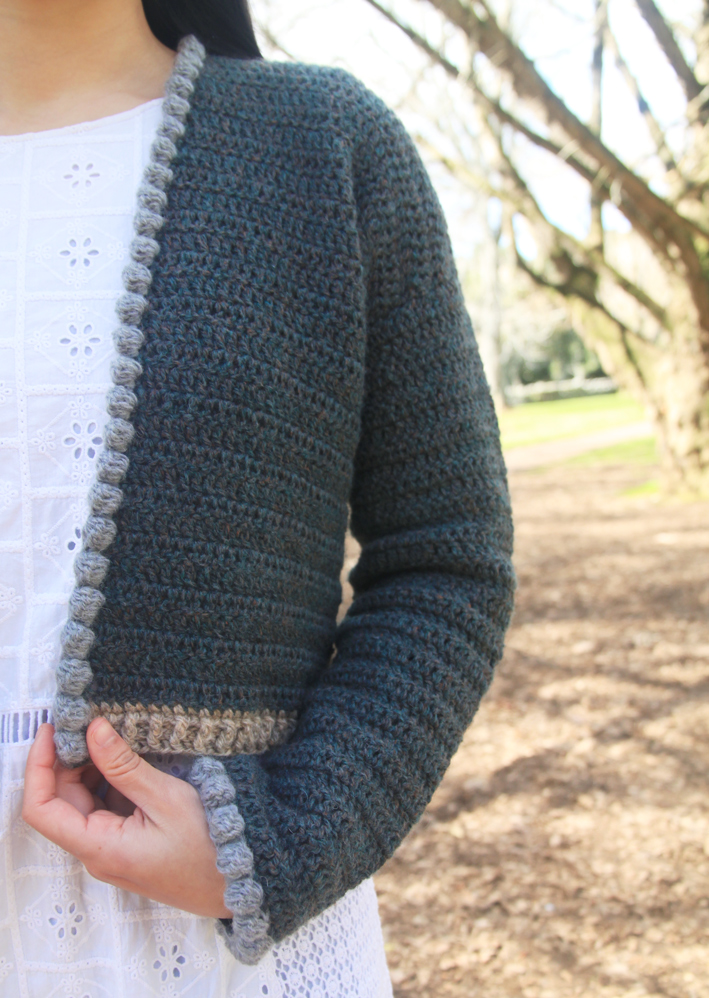
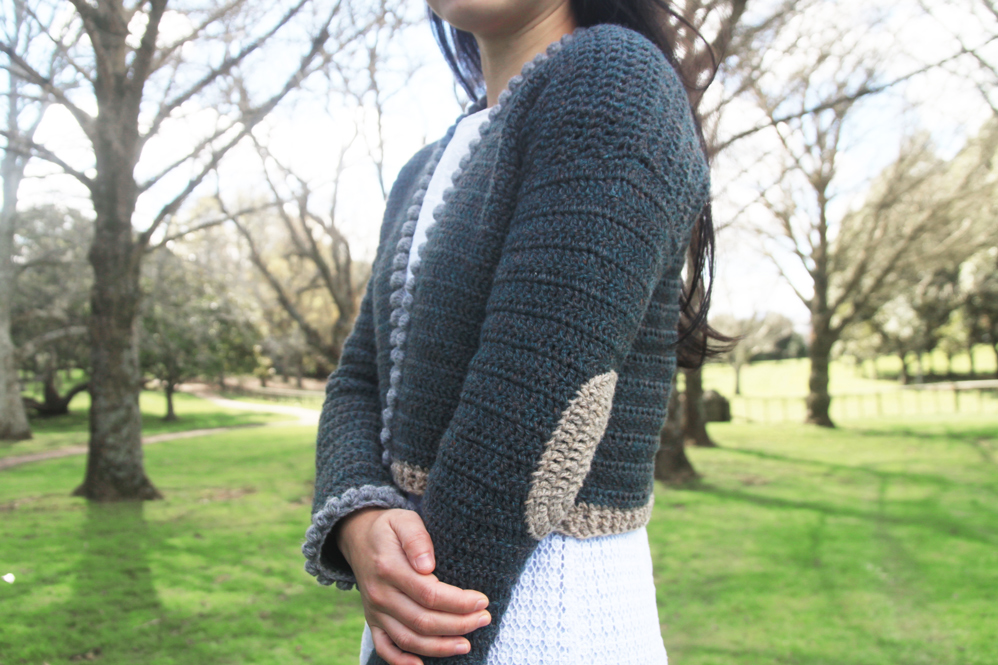
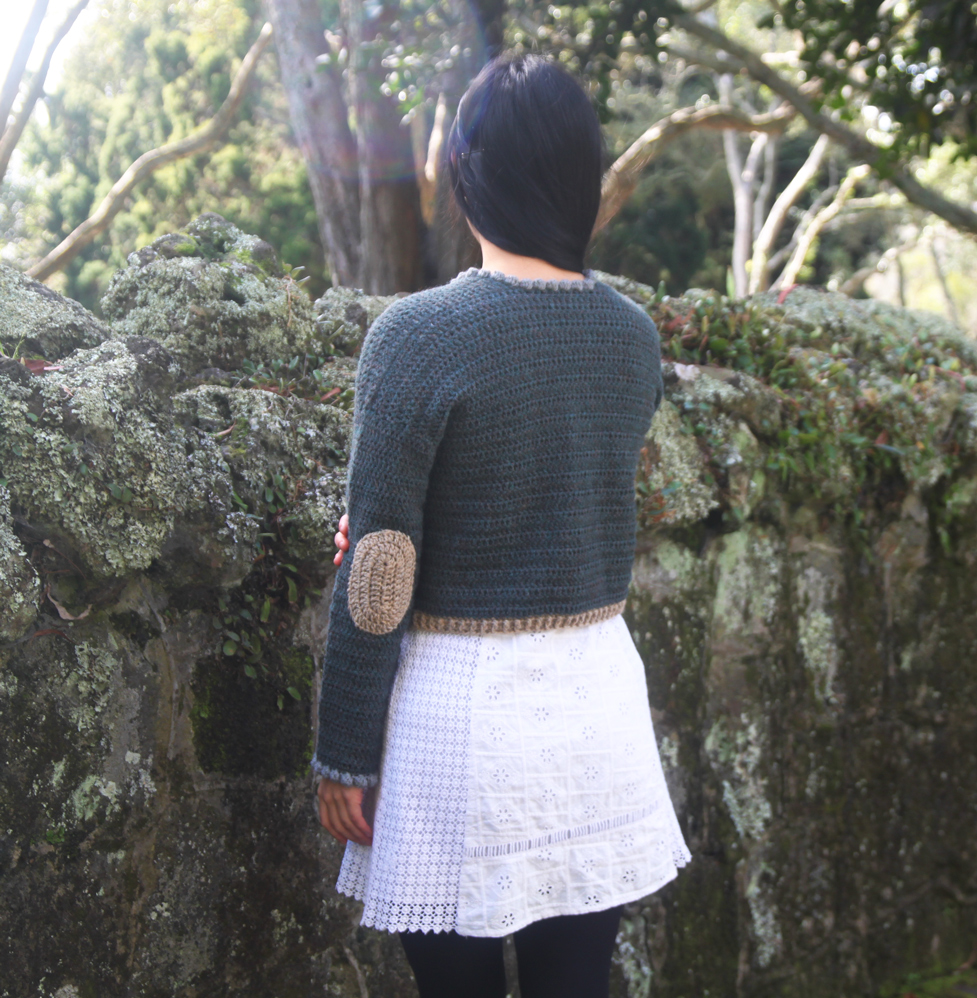
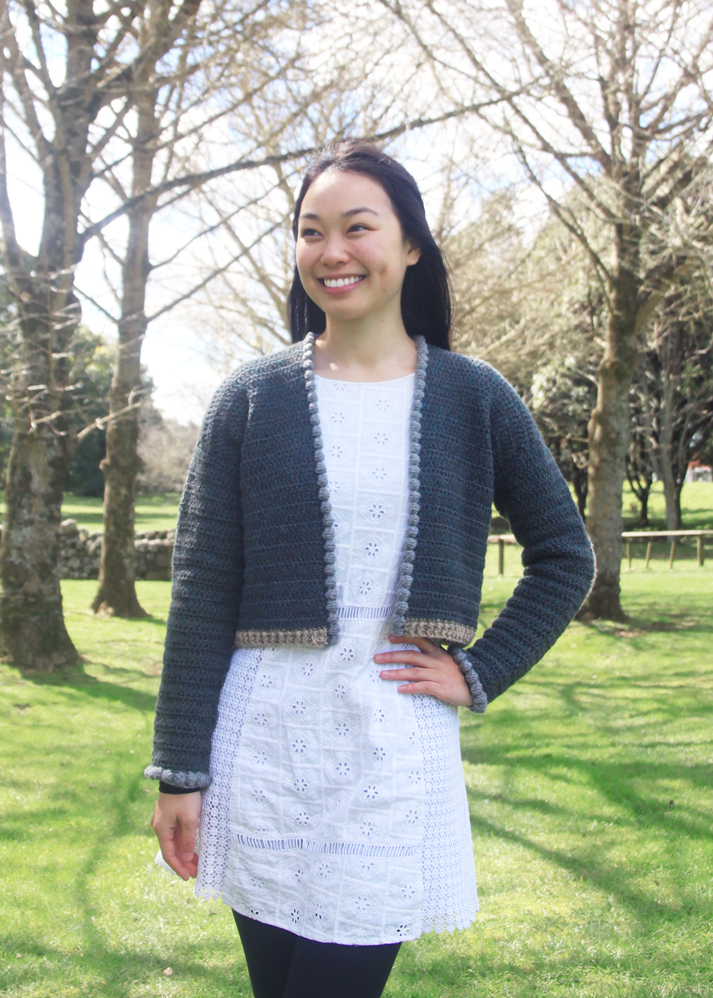
The Countryside Cardigan is created in collaboration with The Fibre Co. Indie Designer yarn support programme! This is a boxy, cropped crochet cardigan features tapered sleeves finished with bobble cuffs and neckline. This drop shoulder design is created in five panels that are seamed together with optional elbow patches instructions to create a rustic à la campagne look 🙂
Design Inspiration
Although named the ‘Countryside Cardigan’, this design transitions effortlessly from the countryside to the city. You can easily dress this design up or down - wear it on country walks with jeans and gumboots or pair it with ankle boots for a chic, brunch look! I love the look of tapered sleeves and feel like they give woollen garments such a smart and tailored finish. The bobble borders create a fun texture while the waist ribbing adds a different stitch dimension to the cardigan. One of my fibre friends told me that she thought is looked like a Chanel tweed jacket 🙂 (I think it’s the nicest complement I’ve ever received haha)
Yarn
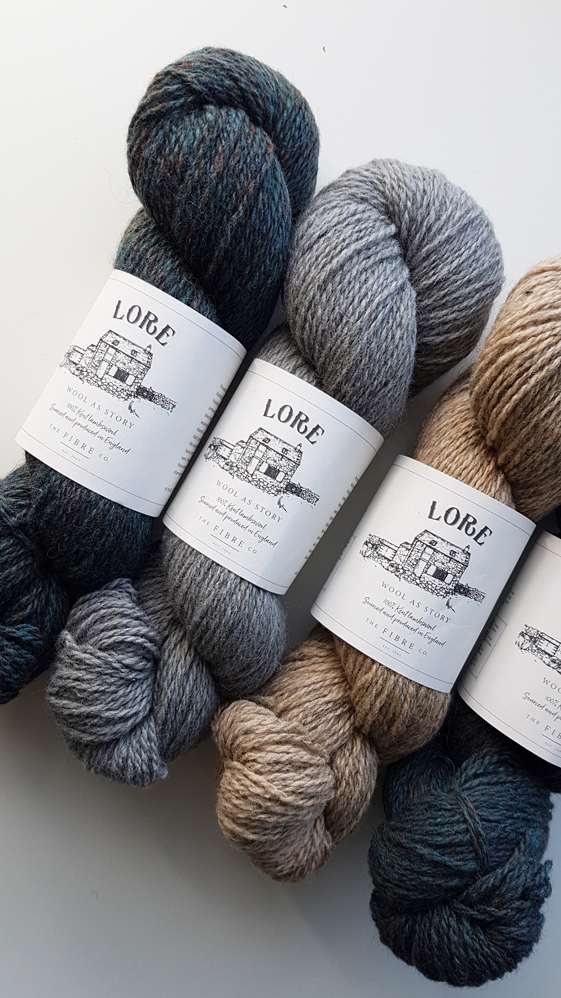
When researching The Fibre Co.’s various yarns, I immediately fell in love with Lore! The DK weight, speckled (almost tweed like in some colours) 100% lambswool yarn is perfect for more structured garments and it gorgeously softens up after washing. Made from English Romney Sheep, the colour palette ranges from rich jewel tones to flecked neutrals. Since the yarn is not 100% a solid colour which creates wonderful texture and depth to the garment when worked up. The Fibre Co. sum it up best! – Lore is 'perfect for everyday and special adventures alike.'
(You can purchase The Fibre Co. Lore here!)
Add it to your Ravelry queue here!
Ad-free, printable version here!
Pin me for later!
Video Tutorial
*The sizing guide follows size XS(S, M, L, XL, 2XL, 3XL). E.g. “Ch 70(76, 84, 90, 98, 104, 112) means Ch 70 for XS, Ch 76 for Small, Ch 84 for Medium, Ch 90 for Large, Ch 98 for XL, Ch 104 for 2XL and Ch 112 for 3XL. When there is only one number, it applies to all sizes.
*"DC 10" means DC into the next 10 stitches.
*"2DC" means place 2 DC into the same stitch.
*Ch 1 and Ch 2 do NOT count as a stitch.
*Total stitches are indicated between < >.
*This pattern uses US crochet terms.
LEVEL: Easy
MATERIALS
Yarn – The Fibre Co. Lore – DK/Light (3)/8ply – 100% Lambswool 250m/100g
Yarn A: Truth 3(4, 4, 5, 5, 6, 6) skeins
approx. 300(350, 385, 440, 475, 530, 565)g
Yarn B: Stable – 1(1, 1, 1, 1, 1, 1) skeins
approx. 15(15, 15, 20, 20, 20, 20)g + 15g for 2 elbow patches
Yarn C: Mystery – 1(1, 1, 1, 1, 1, 1) skeins
approx. 60(65, 65, 70, 75, 80, 80)g
4.5mm (7) Crochet Hook
Darning Needle
Scissors
STITCHES & ABBREVIATIONS
Ch = Chain
Sl st = Slip Stitch
SC = Single Crochet
DC = Double Crochet
FpDC = Front Post Double Crochet
BpDC = Back Post Double Crochet
Stitch(es) = st(s)
Rep = Repeat
SPECIAL STITCHES
Bobble Stitch = Yarn over, insert hook into st, yarn over and pull up a loop, yarn over and pull through 2 loops (2 loops on your hook). Yarn over, insert hook into the same st, yarn over and pull up a loop, yarn over and pull through 2 loops (3 loops on your hook). Yarn over, insert hook into the same st, yarn over and pull up a loop, yarn over and pull through 2 loops (4 loops on your hook). Yarn over, insert hook into the same st, yarn over and pull up a loop, yarn over and pull through 2 loops (5 loops on your hook). Yarn over, insert hook into the same st, yarn over and pull up a loop, yarn over and pull through 2 loops (6 loops on your hook). Yarn over and pull through all 6 loops on your hook.
GAUGE: 10cm/4” square = 15 stitches wide x 9 rows tall in double crochet
Measurements cm:
Width: 45(49, 54, 59, 64, 68, 73)
To fit Bust: 76(86, 96, 106, 117, 127, 137)
Length: 41(43, 43, 46, 46, 48, 48)
Sleeve length: 42(43, 43, 45, 45, 46, 46)
Armhole: 16(17, 18, 19, 20, 21.5, 23)
Measurements inches:
Width: 17.5(19, 21, 23, 25, 27, 29)
To fit Bust: 30(34, 38, 42, 46, 50, 54)
Length: 16(17, 17, 18, 18, 19, 19)
Sleeve length: 16.5(17, 17, 17.5, 17.5, 18, 18)
Armhole: 6.5(7, 7.5, 8, 8.5, 9, 9.5)
BACK PANEL
FOUNDATION CHAIN: With Yarn A, Ch 70(76, 84, 90, 98, 104, 112).
ROW 1: DC into 3rd ch from the hook, DC in each st until end.
<68(74, 82, 88, 96, 102, 110)>
ROW 2: Ch 2, turn, DC in each st until end. <68(74, 82, 88, 96, 102, 110)>
Repeat ROW 2 until ROW 35(37, 37, 39, 39, 41, 41).
*You can add or remove rows to reach your desired length. The ribbing adds 2.5cm/1”.
RIBBING ROW 1: With Yarn B, Ch 1, turn, SC in each st until end.
<68(74, 82, 88, 96, 102, 110)
RIBBING ROWS 2 - 3: Ch 2, turn, DC in first st, *FpDC, BpDC; rep from * until last st, DC in last st.
<68(74, 82, 88, 96, 102, 110)>
Fasten off.
FRONT PANEL (make 2)
FOUNDATION CHAIN: With Yarn A, Ch 30(32, 36, 39, 43, 46, 50).
ROW 1: DC into 3rd ch from the hook, DC in each st until end.
<28(30, 34, 37, 41, 44, 48)>
ROW 2: Ch 2, turn, DC in each st until end.
<28(30, 34, 37, 41, 44, 48)>
Repeat ROW 2 until ROW 35(37, 37, 39, 39, 41, 41).
*Or until you have the same number of rows as your back panel.
RIBBING ROW 1: With Yarn B, Ch 1, turn, SC in each st until end.
<28(30, 34, 37, 41, 44, 48)>
RIBBING ROWS 2 - 3: Ch 2, turn, DC in first st, *FpDC, BpDC; rep from * until last st, DC in last st.
<28(30, 34, 37, 41, 44, 48)>
Fasten off.
Repeat these steps for the 2nd Front Panel.
SLEEVES (make 2)
*Sleeves are worked from the cuff up and seamed to the body panels.
FOUNDATION CHAIN: With Yarn C, Ch 34(38, 42, 46, 50, 54, 58).
ROW 1: SC into 2rd ch from the hook, SC in each st until end.
<33(37, 41, 45, 49, 53, 57)>
ROW 2: Ch 1, turn, SC in first st, *Bobble, SC; rep from * until end.
<33(37, 41, 45, 49, 53, 57)>
ROW 3: With Yarn A, Ch 1, turn, SC in each st until end.
<33(37, 41, 45, 49, 53, 57)>
ROW 4: Ch 2, turn, 2DC, DC in each st until last st, 2DC in last st.
<35(39, 43, 47, 51, 55, 59)>
ROWS 5-7: Ch 2, turn, DC in each st until end.
<35(39, 43, 47, 51, 55, 59)>
Repeat ROWS 4-7 until ROW 15.
<39(43, 47, 51, 55, 59, 63)>
ROW 16: Ch 2, turn, 2DC, DC in each st until last st, 2DC in last st.
<41(45, 49, 53, 57, 61, 65)>
ROW 17-18: Ch 2, turn, DC in each st until end.
<41(45, 49, 53, 57, 61, 65)>
Repeat ROWS 16-18 until ROW 36.
<53(57, 61, 65, 69, 73, 77)>
ROW 37: Ch 2, turn, DC in each st until end.
<53(57, 61, 65, 69, 73, 77)>
Repeat ROW 37 until ROW 38(39, 39, 40, 40, 41, 41).
Fasten off. Leave a long tail of yarn (approx. 3x length of seam) for sewing.
Repeat these steps for the 2nd Sleeve.
ASSEMBLY
Sew the front panels to the back panel.
Fold the sleeves in half and line them up to the middle of the body piece (where the back and front panel meet).
Sew the sleeves to the body with a darning needle. (I used a mattress stitch).
Fold the cardigan in half and sew down the sides of the sleeves and the body.
NECKLINE BOBBLE BORDER
Insert your hook into the corner of the front panel. Secure your yarn and pull through a loop.
ROW 1: Ch 1, SC evenly around the entire neckline until you reach the other side. (Work 1 SC into each stitch along the back of the neckline).
*You want to finish with an odd number of stitches – exact stitch count is not important but focus on keeping your stitches even and the same tension. Too few stitches will make your neckline line gather, too many stitches will cause it to ruffle.
ROW 2: Ch 1, turn, SC, *Bobble, SC; rep from * until end.
Fasten off. Weave in all of your ends.
OVAL ELBOW PATCHES (optional)
Check out the video tutorial here!
FOUNDATION CHAIN: With Yarn B, Ch 10.
ROUND 1: DC into 3rd ch from the hook, DC 6, 6DC into last chain. (*Note – you are now working on the opposite side of the foundation chain). DC 6, 5DC into the last ch, sl st to join. <24>
ROUND 2: Ch 2, 2DC, DC 6, 2DC in each of the next 6 sts, DC 6, 2DC in each of the next 5 sts, sl st to join. <36>
ROUND 3: Ch 2, 2DC, DC 7, rep [2DC, DC] six times, DC 6, rep [2DC, DC] five times, sl st to join. <48>
Sizes L, XL, 2XL, 3XL only
ROUND 4: Ch 1, 2SC, SC 8, rep [2SC, SC 2] six times, SC 6, rep [2SC, SC 2] five times, sl st to join. <60>
Fasten off.
Repeat steps for 2nd Elbow Patch.
Try on cardigan and pin elbow patches to desired placement.
Whip stitch around the edge of the elbow patch. Make sure you are only sewing through one side of the sleeve.
Repeat for 2nd Elbow Patch.
Weave in all of your ends. Steam and block.
*If you are using The Fibre Co. Lore or lambswool equivalent, I highly recommend soaking and washing your garment in a good quality wool wash. The stitches will relax and the garment will drape better on the body.
I’m so excited to start this pattern - I love it! Can you confirm the gauge? 9 stitches is coming up less than half the size it should be. Thanks!
I've just finished this pattern and the cardigan is very cosy 🙂 Mine looks more couch cosy than brunch chic, but that's what I wanted. I used the Medium size guide for the body, which turned out to be too big (a size guide would have helped a lot)! So I sewed it together with some wide seams and it fits more closely now. I also made the small sleeves, since I didn't want them too wide, and I had to shorten them by quite a few rows, and also sew them up smaller - that said, it was very easy to sew it up and modify the pattern where I wanted to. Thanks for the free pattern, and also for the gauge size and yarn info - very helpful!