
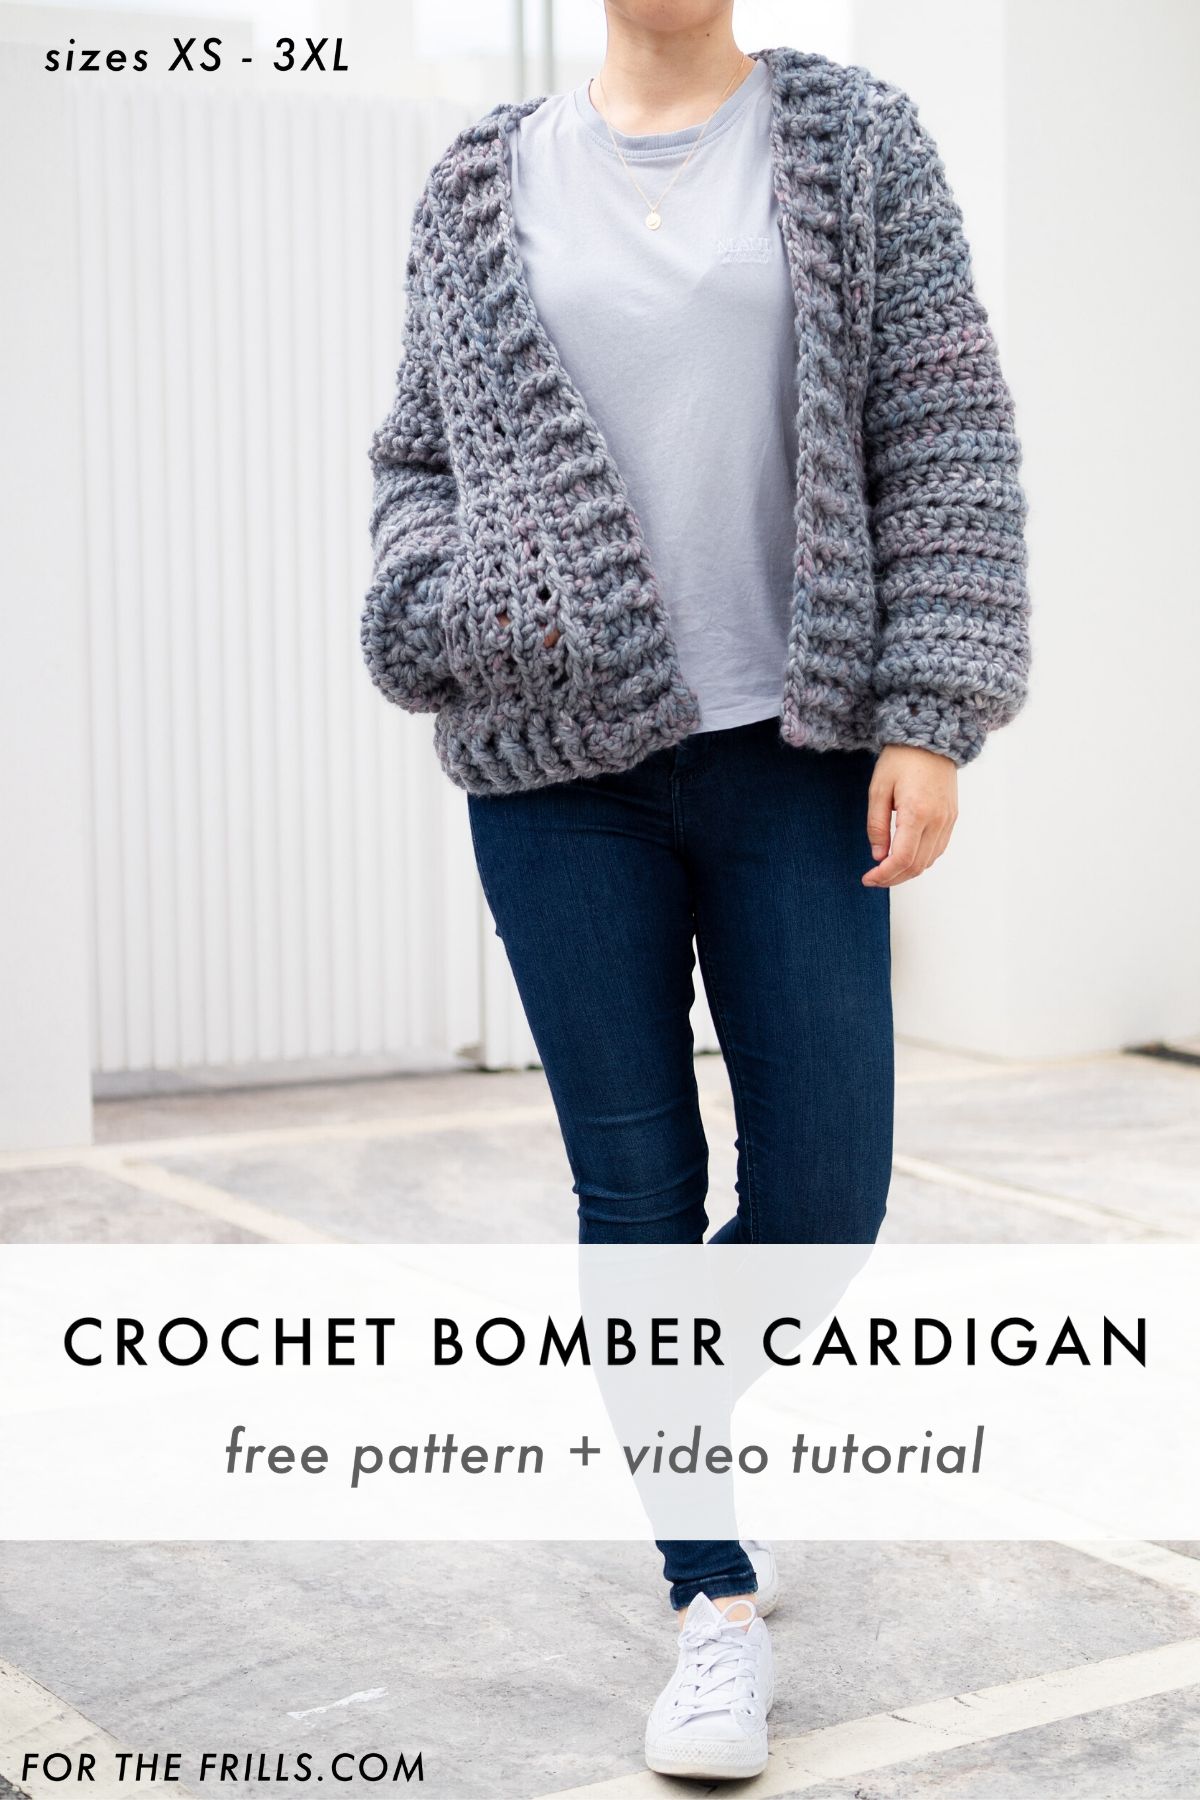
Cosy, chunky and quick, there’s nothing like a classic bomber jacket! Scroll down for the free crochet cardigan pattern and step-by-step video tutorial, or purchase the ad-free, printable PDF here.
This post may contain affiliate links, view our disclosure policy for details.
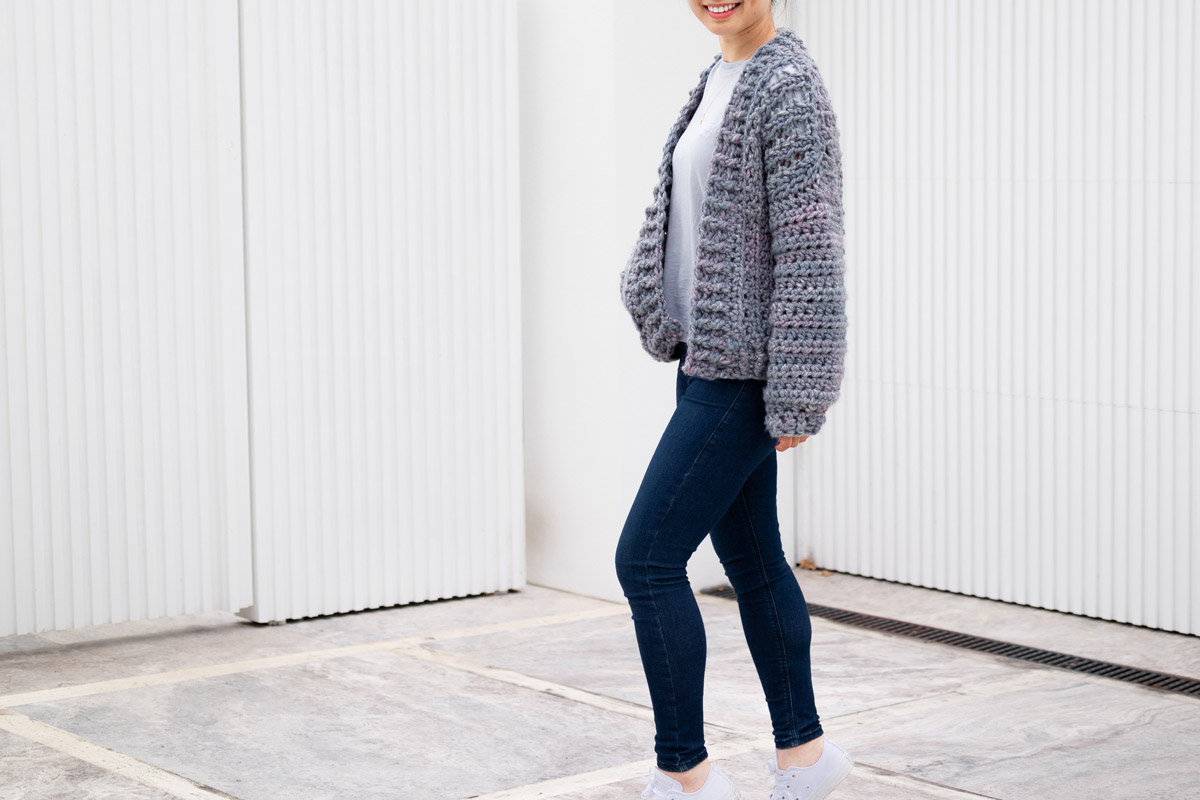
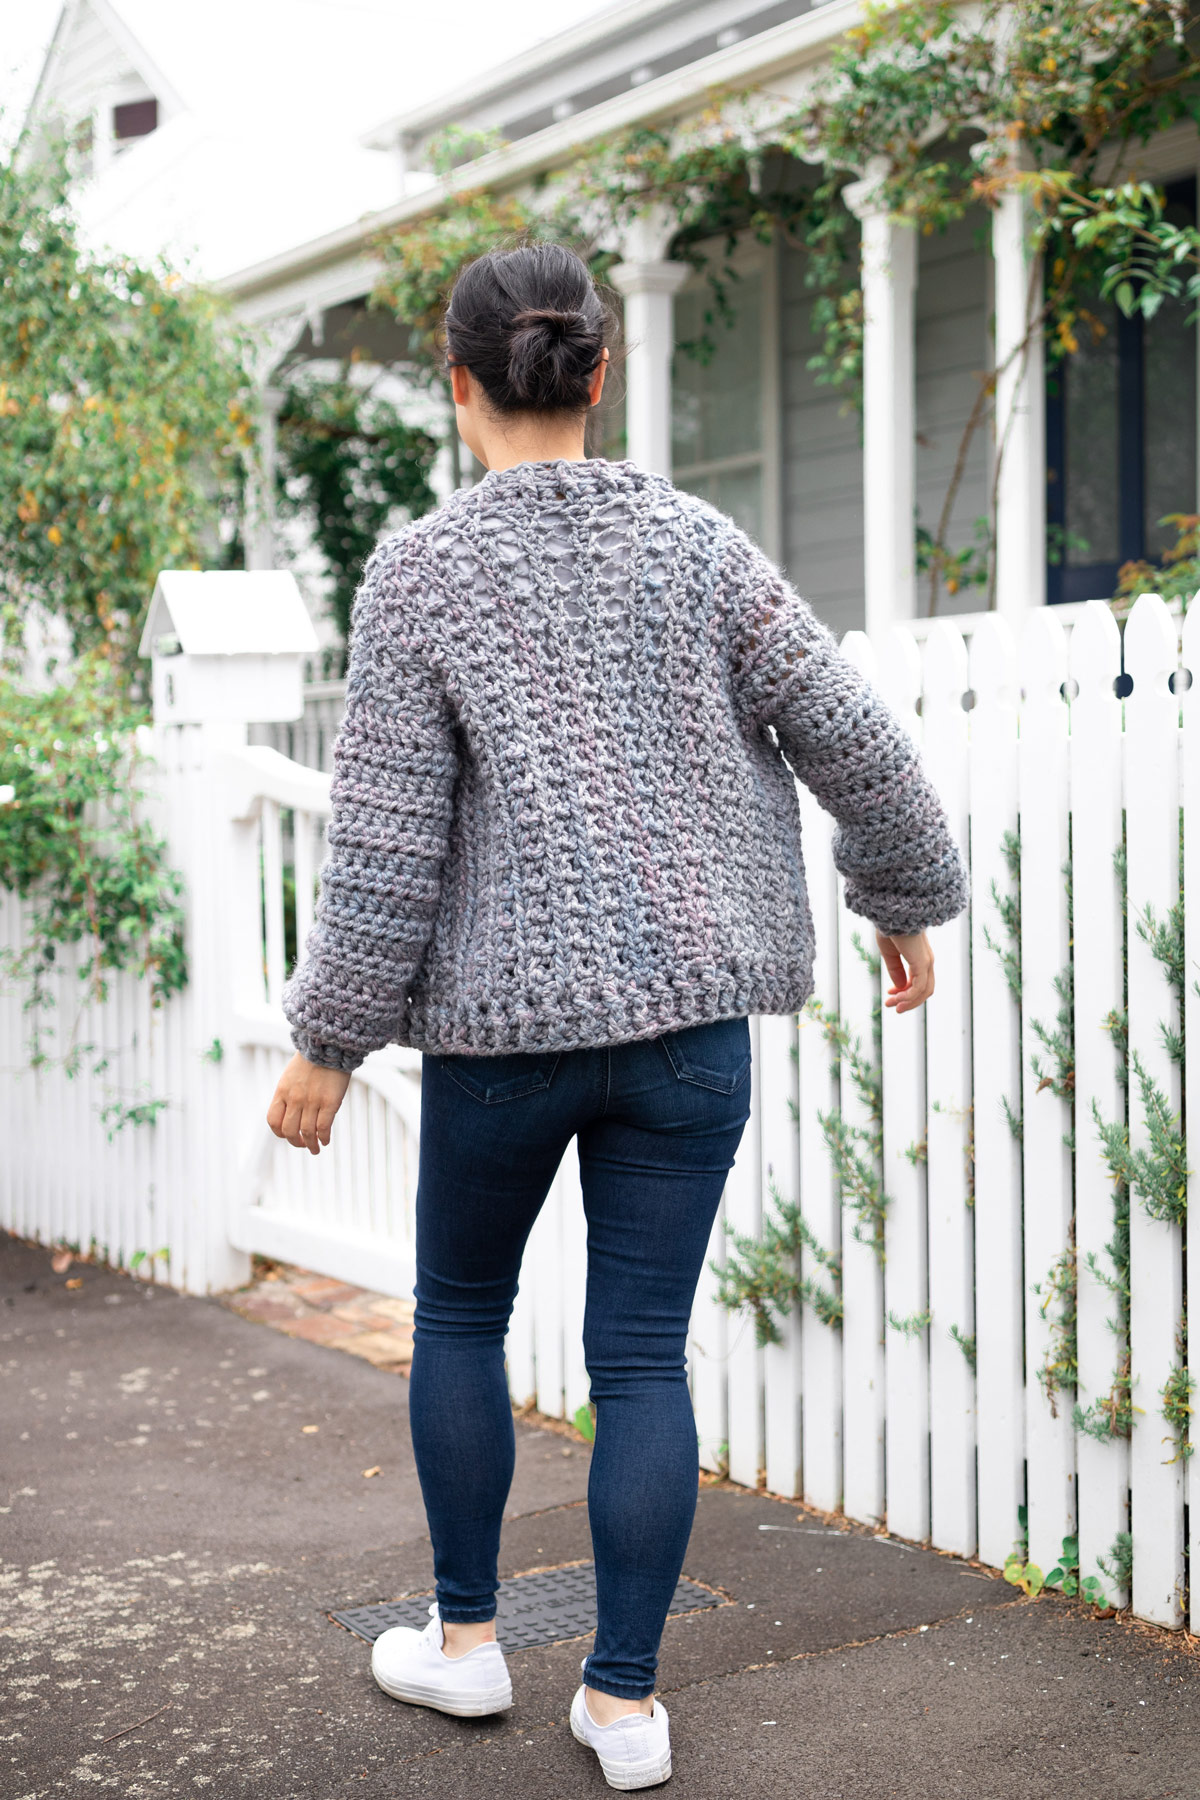
Looking for instant crochet satisfaction? This Chunky Bomber Cardigan will fly off your hook and into your wardrobe in an evening or two. Whether you’re chilling on the couch or running errands, the oversized fit and open stitches work together to create a comfy and modern crochet cardigan.
This crochet bomber jacket features stylish balloon sleeves with a chunky ribbed hem. There are hidden pockets which add interest to this piece but if you’re a crochet beginner, just leave them out (the alteration instructions are provided in the written pattern!) and you’ll be shocked at how simple and quick this pattern is!
Even if you’re a beginner crocheter, you can still challenge yourself and test out crocheting the pockets. Since this pattern uses super chunky yarn, the pockets work up so quickly and if you’re a visual leaner the video tutorial will guide you through every step.
Simple Chunky Mesh Stitch
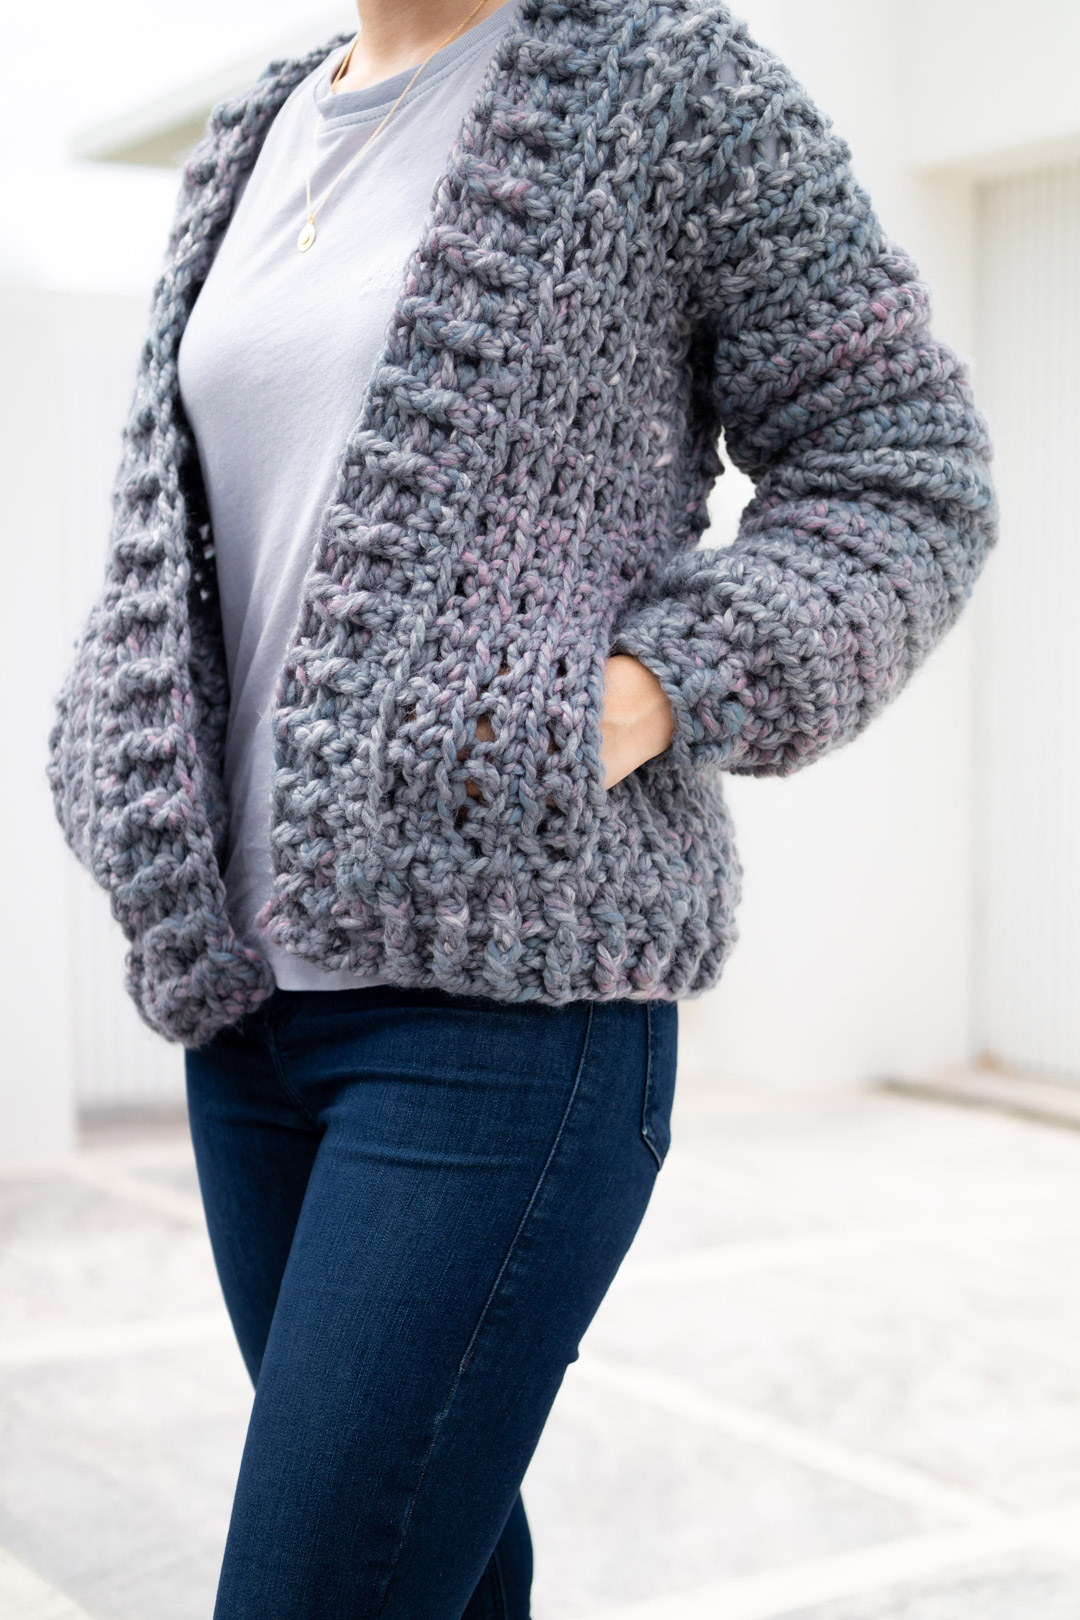
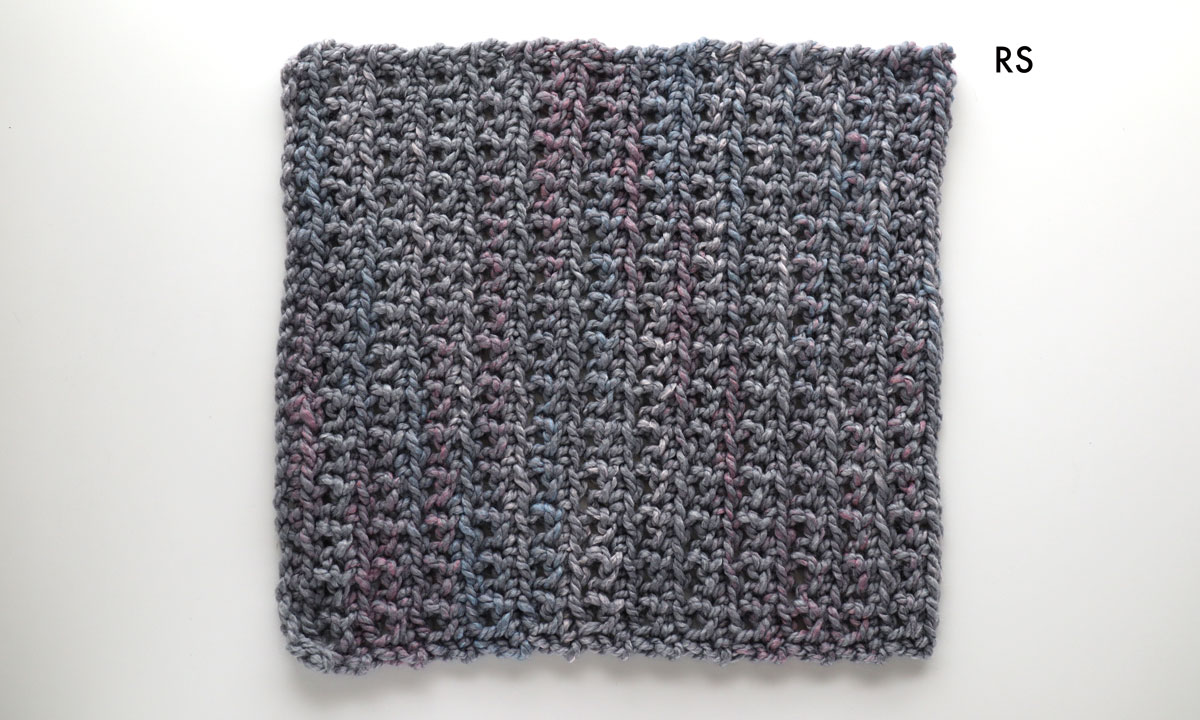
For this crochet bomber cardigan, the body portions are crocheted with an open mesh stitch which uses single crochets with chains. The combination of working in the single crochets in the front and back loops create great drape and airiness. This makes the bomber cardigan so much more wearable since the sample pattern uses a super bulky yarn (Lion Brand Wool-Ease Thick & Quick).
When you use super bulky yarns (also know as super chunky or 14 ply yarns) to crochet garments, your sweater can get uncomfortably heavy very quickly. The chains and skipped stitches help the body portion be light and comfortable to wear.
Front Loop vs. Back Loop
One of the most common questions I receive is ‘how do I spot the difference between the front and back loop?’ The front loop is defined as the strand of yarn closet to you, while the back loop is the strand of furthest away from you. Sounds simple, but how you know which strand of yarn is truly the closet and furthest away?
There is one easy trick to clearly see your stitches! Rotate your work towards you so the top of the sideways ‘v’ shapes are facing you. If you’re looking at your stitches and you can’t see any ‘v’ shapes, that means that the sides of the stitches are facing you. The sides of the stitches create the texture you’ll see on the finished cardigan. But while you are crocheting, if the sides of the stitch are facing you, usually you can only spot the front loop.
Check out the video tutorial to see the visual demonstration!
How do I print the pattern?
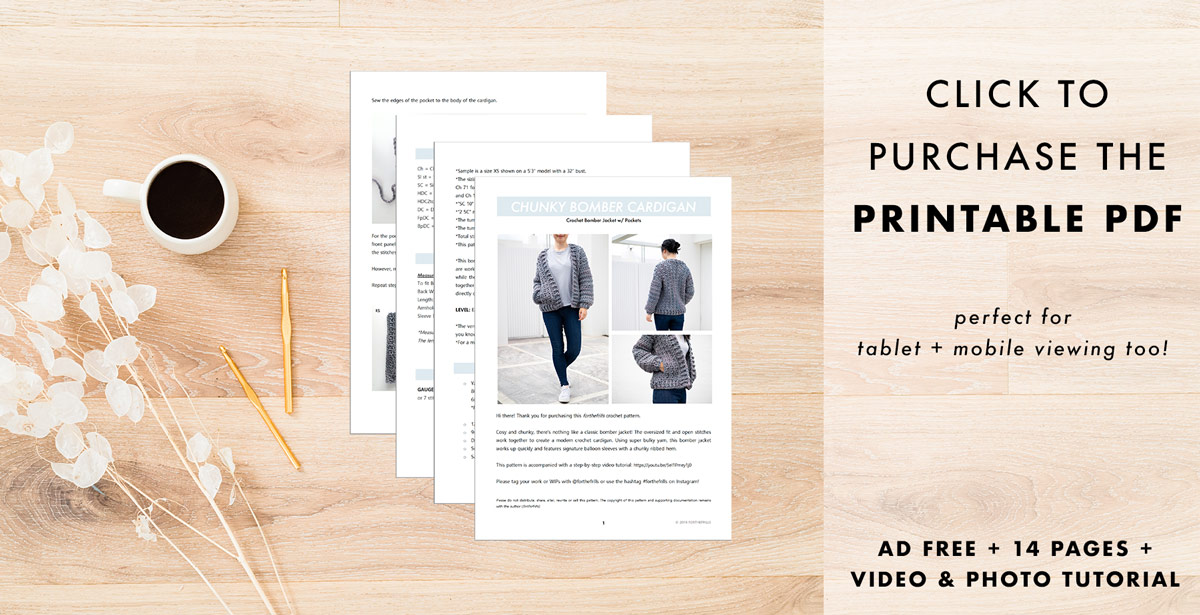
I know heaps of you like to crochet offline with a paper pattern. There is always an affordable printable PDF version of the free pattern. This easy-to-read pdf is ad free and can be viewed on your phone, tablet or laptop. If you like to make notes or track your progress while crocheting, you’ll find the pdf a really valuable bonus!
The PDF pattern also has the detailed step-by-step photo tutorial and a link to the video tutorial. You can purchase the ad-free printable pdf on Etsy here.
Construction
For this Chunky Bomber Cardigan, the front and back panels are crocheted in rows lengthways. This means the foundation chain runs the length of the of the jacket, not the width. This flat construction also makes it possible to add vertical hidden pockets along the side of the body so the cardigan really looks like a bomber jacket!
The sleeves are crocheted in the round from the top down. We’ll start by crocheting half double crochets for the bulk of the sleeve, then decreasing before creating the cuff ribbing. The best thing about these sleeves are the slight balloon shape – they are so much easier to crochet than tapered sleeves. They only require one round of shaping so there’s minimal counting required.
Once you’ve crocheted the body panels and sleeves we’ll sew everything together and crochet the ribbing directly onto the body. The hem is finished off with simple front and back post ribbing to match the cuffs. Then your chunky cardigan is ready to wear!
How to crochet invisible pockets
The best part about this pattern are the hidden pockets! While I love the chunky oversized look, traditional patch pockets (also known as ‘after thought pockets’ because they are sewn on after you finish the garment) can sometimes add too much bulk to a garment.
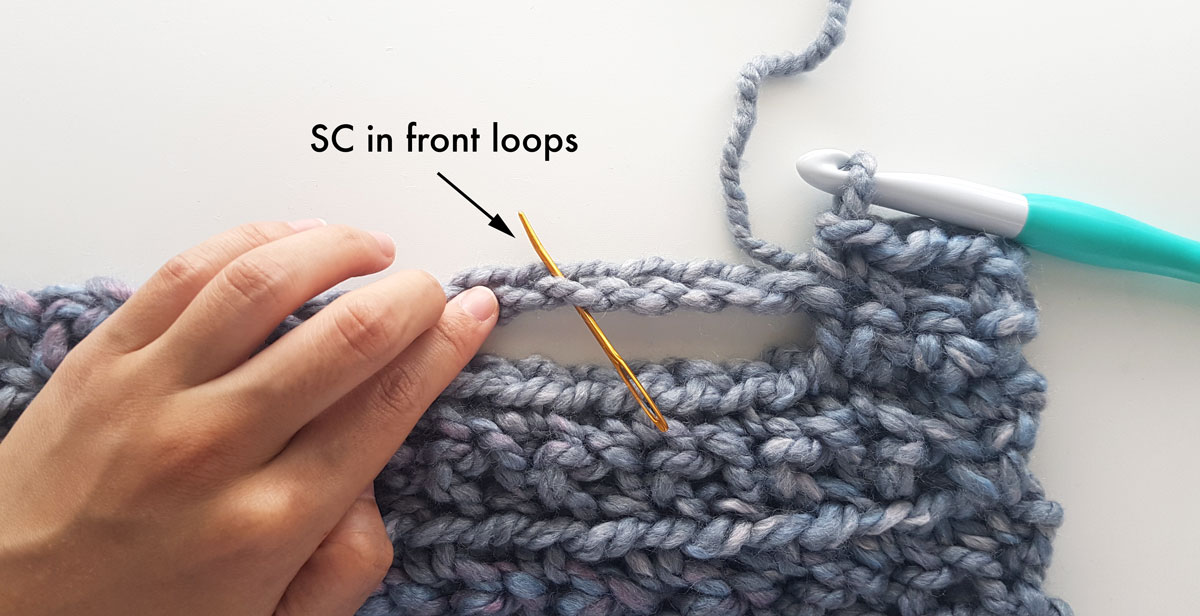
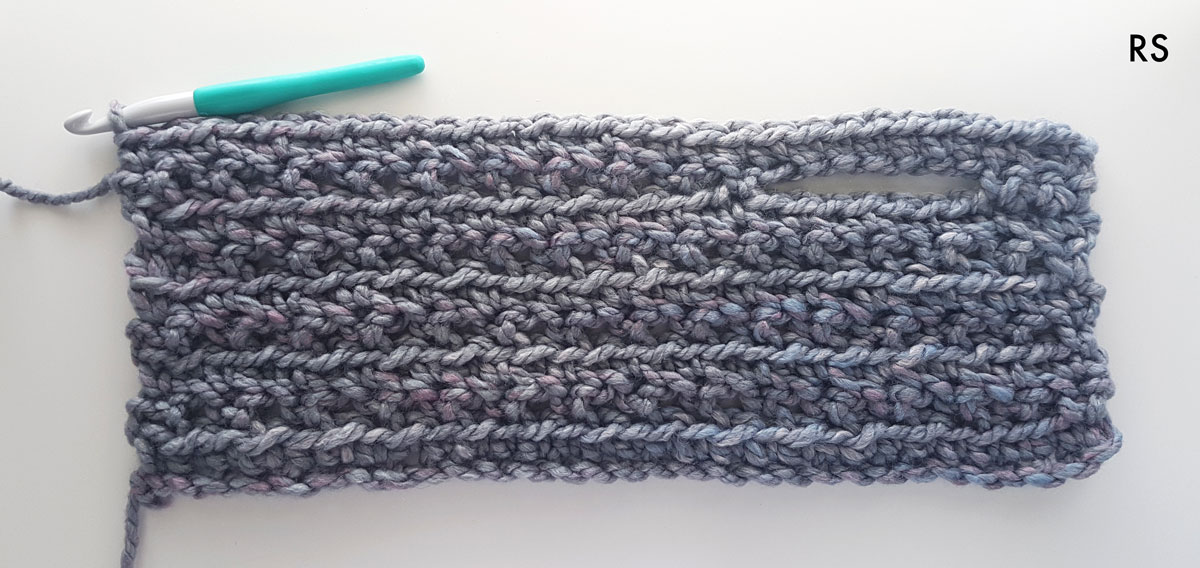
The invisible pockets might seem a bit daunting, but once you’ve gotten the hang of spotting the front and back loops, they are a breeze to crochet. We’ll create the opening by chaining 7 and then skipping 7 stitches. In the next row when you reach the chain, only crochet into the front loops. Leaving the back loop empty, will allow us to crochet the pocket directly onto the front panels.
Flip the front panel over so that the wrong side is facing you. You’ll spot the opening and see that those back loops you left empty are not the front loops facing you. Crochet into the front loops, followed by a few rows of half double crochet. We’re using a solid stitch, so that things don’t fall out of your pocket.
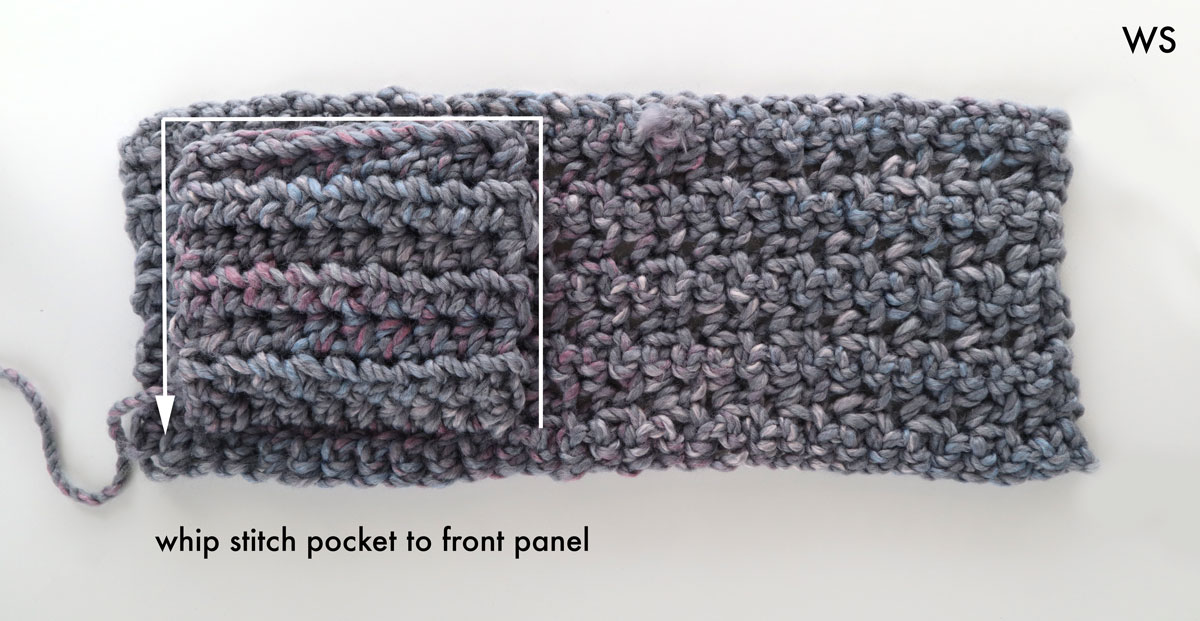
Once you’ve finished crocheting the pocket we’ll sew the edges to the back of the front panels. This is how you achieve a seamless look. It takes a bit more care than an afterthought pocket but I think the final result is worth it!
Design Inspiration
Last year, when I shared the Briar Pocket Cardigan one of you lovely readers mentioned a bomber jacket version. Immediately, I fell in love with the idea of a crochet bomber (so thank you if you suggested it!) but I felt like the Briar Cardigan was a bit too slouchy and soft to really look like a jacket.
Ever since then I’ve been toying with the idea of bomber cardigan and it finally came to life with this super chunky version 🙂
Ever since then I’ve been toying with the idea of bomber cardigan and it finally came to life with super bulky yarn J I wanted to make sure the design had all the classic features of a typical bomber jacket so I made sure to have cuffed balloon sleeves and hidden pockets. To add a crochet twist, I designed the body to have a texture mesh stitch so the jacket wouldn’t be too warm and thick.
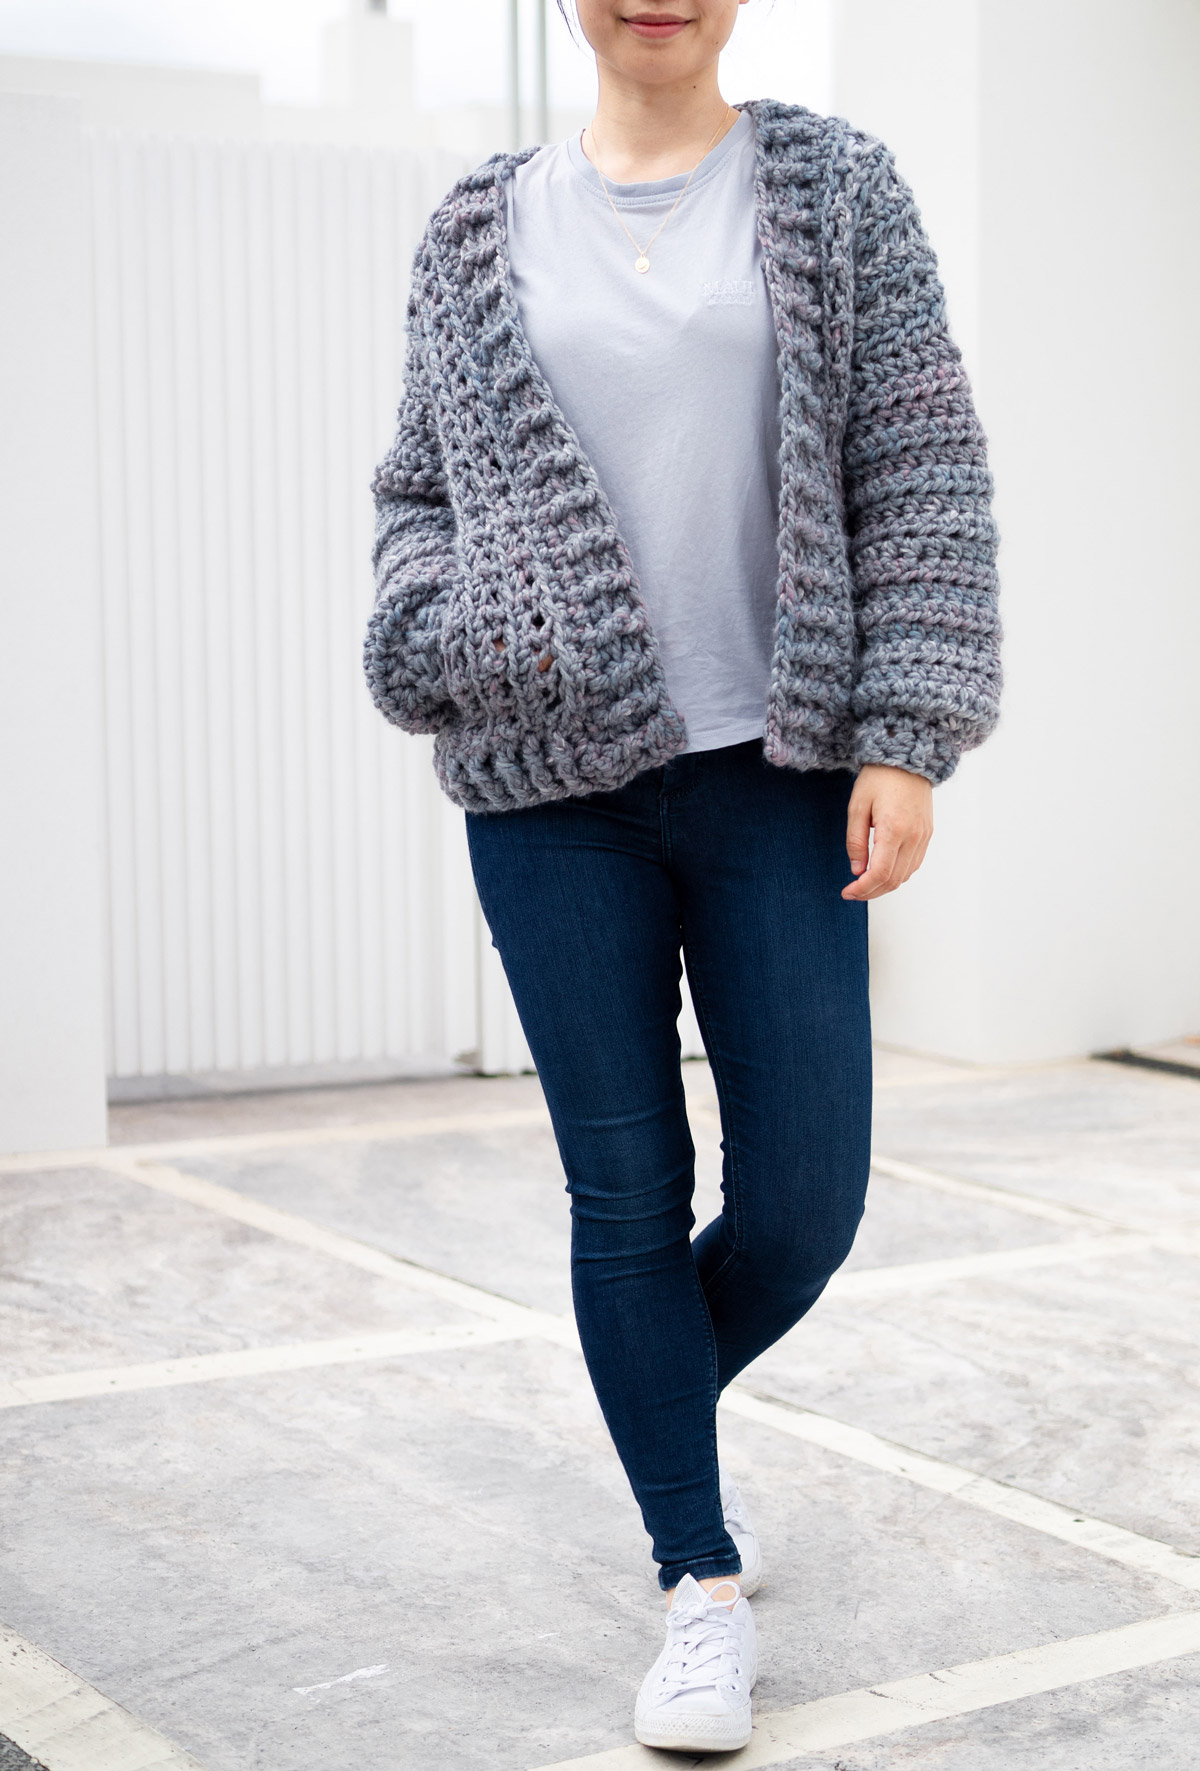
This crochet bomber makes such a great staple piece! Throw it on over a t-shirt and jeans, a dress or pair it with ankle boots for ultimate fall vibes. The thick stitches make you feel like you’re wrapped up in a cosy blanket or a hug. With only one row of shaping in the whole pattern, you’ll have a new crochet cardigan in no time 🙂
Check out more free crochet patterns!
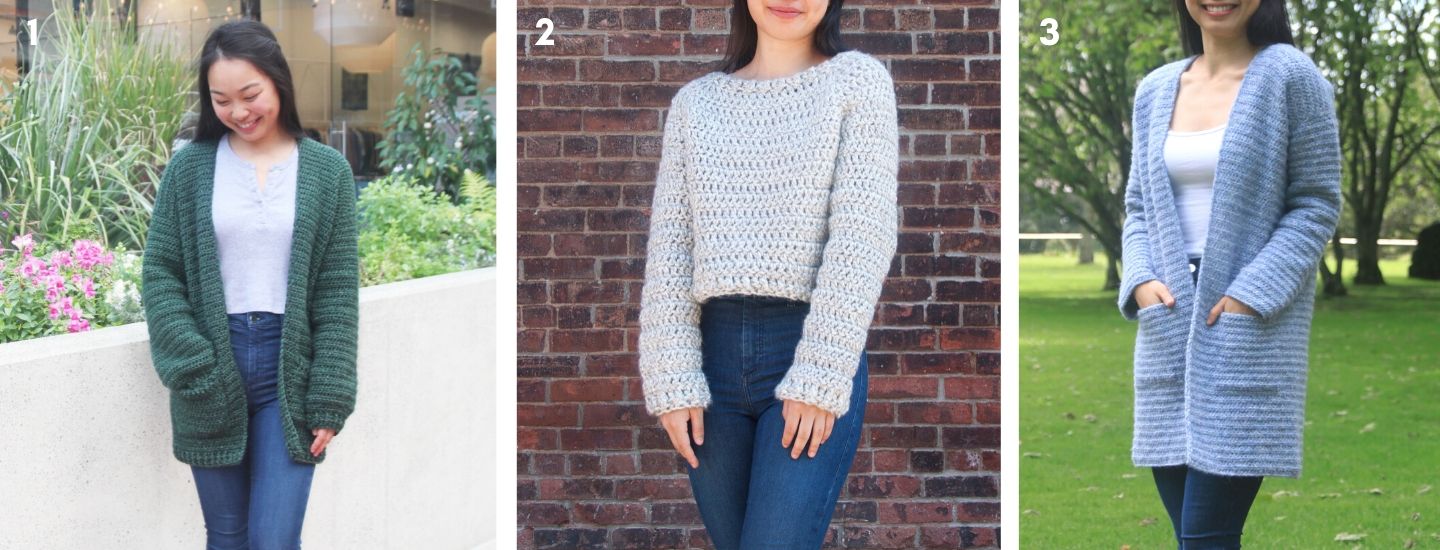
1. Briar Pocket Cardigan / 2. Brooklyn Chunky Sweater / 3. Stonewash Coatigan
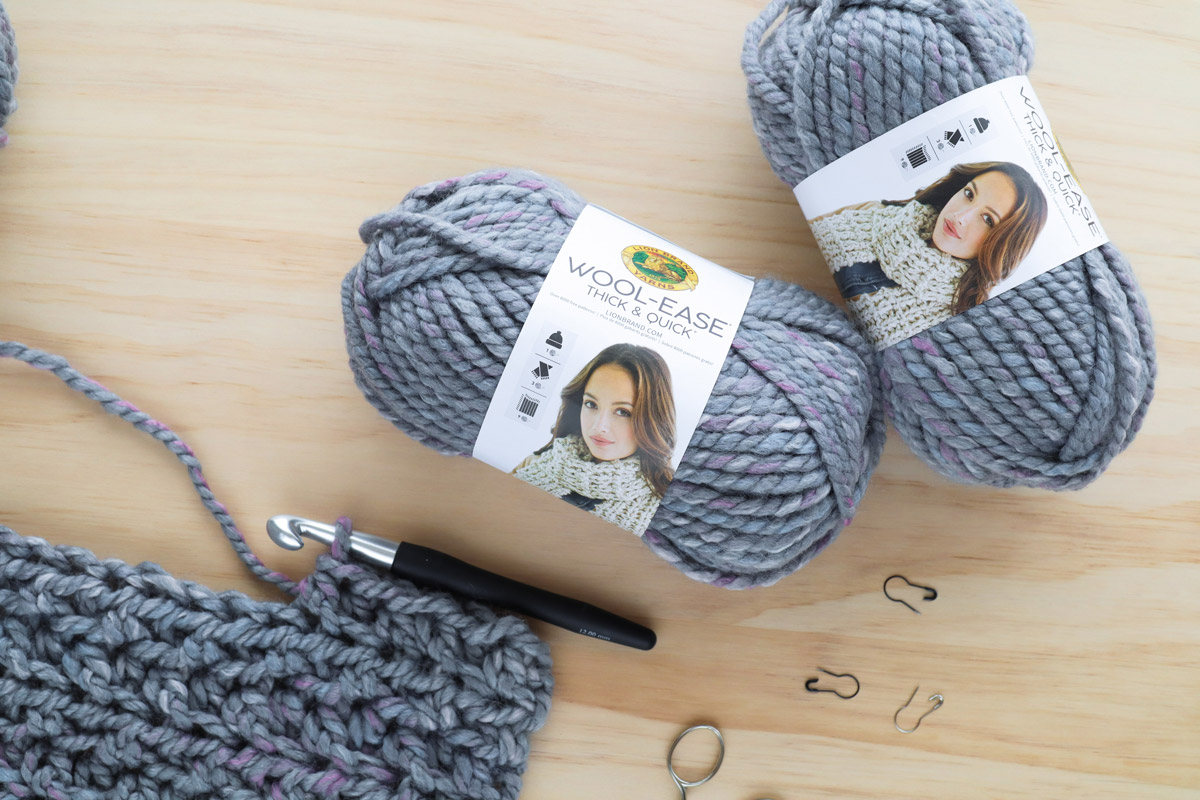
What yarn do I need?
Wool-Ease Thick & Quick is such a versatile yarn! (This yarn is also used with the 1 hr Arctic Ice Beanie or 30 minute Cowl patterns.) Super bulky yarns are so satisfying to use because you can finish a project so quickly. For the Bomber Cardigan I used the shade ‘Storm Front’ which has a base of a medium grey with hints of purple and rose. The subtly variegated yarn is such a nice way to have small pops of colour but the overall look is still a wearable, neutral grey.
You can find Lion Brand’s Wool-Ease Thick & Quick in a huge variety of colours with a great mix of variegated yarn and solid colours. I have my eye on Succulent (Lion Brand’s colour of the year yarn), a gorgeous muted teal green, while Marble also has a lovely variegated mix of neutrals – white, grey and black.
If you’re looking for more fall and winter projects you can find all of my free super chunky yarn patterns here!
Pin me for later!
I love to see your finished projects! Use #forthefrills and tag me on Instagram @forthefrills for a chance to be featured 🙂
Video Tutorial
If you’re new to crocheting in the front and back loops or looking for some extra help with the invisible pockets, the video tutorial is super helpful for visual leaners!
Add the Chunky Bomber Cardigan Pattern to your Ravelry queue!
Purchase the ad-free, printable pdf version of the Chunky Bomber Cardigan!
Find the step-by-step video tutorial here!
MINI EXPLANATION: Looking for a fall crochet project? This casual and comfy bomber cardigan will fly off your hook in an evening or two! With balloon sleeves, hidden pockets and simple stitches – this crochet sweater pattern can be beginner friendly and fun for more experienced crocheters.
NOTES:
*Sample is a size XS shown on a 5’3” model with a 32” bust.
*The sizing guide follows size XS(S, M, L, XL, 2XL, 3XL). E.g. “Ch 71(79, 87, 95, 103, 111, 119) means Ch 71 for XS, Ch 79 for Small, Ch 87 for Medium, Ch 95 for Large, Ch 103 for XL, Ch 111 for 2XL and Ch 119 for 3XL.” If there is only one number, it applies to all sizes.
*"SC 10" means SC into the next 10 stitches.
*"2 SC" means place 2 SC into the same stitch.
*The turning chain ch 1 does NOT count as a stitch, otherwise ch 1 counts as a stitch.
*The turning chain ch 2 does NOT count as a stitch.
*Total stitches are indicated between < >.
*This pattern uses US crochet terms.
*This bomber cardigan comprises of a back panel, 2 front panels and two sleeves. The body panels are worked lengthways (the foundation chain runs the length of the panel not the width) in rows while the sleeves are crocheted in rounds and finished with ribbing. The body panels are sewn together and then the sleeves are sewn to the body. The ribbed hemline and neckline are crocheted directly on the sweater.
LEVEL: Easy+/Intermediate
*The version of this bomber cardigan with invisible pockets is a bit more advanced but as long as you know how to spot the front loops of a stitch, the pockets are quite easy to crochet 🙂
*For a more beginner friendly version, I suggest creating this pattern without the pockets.
Materials
Yarn – Lion Brand Wool Ease Thick & Quick – Super Chunky/ Super Bulky (6), 80m/140g, 80% Acrylic + 20% Wool, Storm Front (544)
6(7, 8, 9, 10, 10, 11) skeins
approx. 840(915, 1035, 1150, 1305, 1360, 1540)g
*For size XS, I used exactly 6 skeins so you might want to order 7 skeins just in case!
*Measurements are taken from the sweater lying flat on a table. The length and body width will stretch out slightly when the sweater has been worn a few times)
Measurements cm:
To fit Bust: 76(86, 96, 106, 117, 127, 137)
Back Width: 46(51, 56, 61, 66, 71, 76)
Length: 50(50, 52, 52, 55, 55, 58)
Armhole: 18(18, 19, 21, 23, 24, 26)
Sleeve length: 40(40, 42, 42, 44, 44, 47)
Measurements inches:
To fit Bust: 30(34, 38, 42, 46, 50, 54)
Back Width: 18(20, 22, 24, 26, 28, 30)
Length: 19.5(19.5, 20.5, 20.5, 21.5, 21.5, 22.5)
Armhole: 7(7, 7.5, 8.25, 9, 9.5, 10.25)
Sleeve length: 15.5(15.5, 16.5, 16.5, 17.5, 17.5, 18.5)
Stitches & Abbreviations
Ch = Chain
Sl st = Slip Stitch
SC = Single Crochet
HDC = Half Double Crochet
HDC2tog = Half Double Crochet 2 Stitches Together
DC = Double Crochet
FpDC = Front Post Double Crochet
BpDC = Back Post Double Crochet
FLO = Front Loop
BLO = Back Loop
RS = Right Side
WS = Wrong Side
st(s) = Stitch(es)
rep = Repeat
sk = Skip
GAUGE: 10cm/4” square = 5.75 stitches wide x 5 rows tall in Half Double Crochet / 7 stitches wide x 5 rows tall in Body Panel stitch pattern
Chunky Bomber Cardigan Crochet Pattern
Throughout this pattern use the 12mm crochet hook unless otherwise noted.
Back Panel
The Body Panels are worked lengthways meaning each panel is crocheted from side to side.
FOUNDATION CHAIN: Ch 30(30, 32, 32, 34, 34, 36).
ROW 1 (RS): SC into 2nd ch from hook, SC in each st until end, turn.
<29(29, 31, 31, 33, 33, 35)>
ROW 2: Ch 1 (doesn’t count as a st), *FLO SC, ch 1, sk 1 st; rep from * until last st, SC in last st, turn.
<29(29, 31, 31, 33, 33, 35)>
ROW 3: Ch 1 (doesn’t count as a st), *FLO SC, BLO SC (into the ch); rep from * until last st, SC in last st, turn.
<29(29, 31, 31, 33, 33, 35)>
Repeat Rows 2-3 until the back panel measures approximately 46(51, 56, 61, 66, 71, 76)cm / 18(20, 22, 24, 26, 28, 30)” wide.
Fasten off.
Front Panels
The Front Panels are worked lengthways meaning each panel is crocheted from side to side. You can choose to have no pockets (easier project) or add invisible pockets (more advanced).
No Pockets
*Crochet 2 identical front panels.
FOUNDATION CHAIN: Ch 30(30, 32, 32, 34, 34, 36).
ROW 1 (RS): SC into 2nd ch from hook, SC in each st until end, turn.
<29(29, 31, 31, 33, 33, 35)>
ROW 2: Ch 1, *FLO SC, ch 1, sk 1 st; rep from * until last st, SC in last st, turn.
<29(29, 31, 31, 33, 33, 35)>
ROW 3: Ch 1, *FLO SC, BLO SC; rep from * until last st, SC in last st, turn.
<29(29, 31, 31, 33, 33, 35)>
If you don’t want pockets simply repeat Rows 2-3 until the back panel measures approximately 18(20, 23, 25, 28, 30, 33)cm / 7(8, 9, 10, 11, 12, 13)” wide.
Fasten off.
Once you’ve crocheted 2 front panels proceed to ‘SLEEVE’ instructions.
Front Panels With Invisible Crochet Pockets
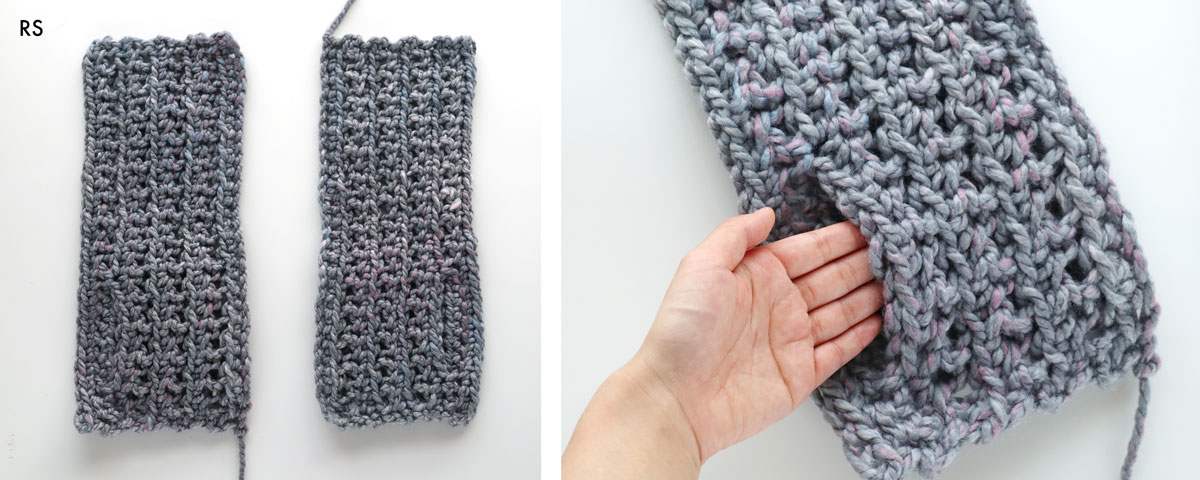
*The two front panels are not identical. Make one of each side.
First Front Panel
FOUNDATION CHAIN: Ch 30(30, 32, 32, 34, 34, 36).
ROW 1 (RS): SC into 2nd ch from hook, SC in each st until end, turn.
<29(29, 31, 31, 33, 33, 35)>
ROW 2: Ch 1, *FLO SC, ch 1, sk 1 st; rep from * until last st, SC in last st, turn.
<29(29, 31, 31, 33, 33, 35)>
ROW 3: Ch 1, *FLO SC, BLO SC; rep from * until last st, SC in last st, turn.
<29(29, 31, 31, 33, 33, 35)>
Repeat Rows 2-3 until the back panel measures approximately 15(18, 20, 18, 20, 23, 25)cm / 6(7, 8, 7, 8, 9, 10)” wide.
Do not fasten off.
*Make sure that your last row (before the ‘POCKET’ rows) is a repeat of Row 3.
POCKET ROW 1 (RS): Ch 1, FLO SC, *ch 1, sk 1 st, FLO SC; rep from * until you have 12 sts left in the row.
Ch 1, sk 1 st, SC in next st, ch 7, sk 7 sts (this creates the invisible pocket hole), SC 3, turn.
<29(29, 31, 31, 33, 33, 35)>

POCKET ROW 2: Ch 1, FLO SC, BLO SC, FLO SC, working into the ch 7: FLO SC 7 (1 FLO SC in each ch), *FLO SC, BLO SC; rep from * until last st, SC in last st.
<29(29, 31, 31, 33, 33, 35)>
SIZES XS, S, M
Fasten off.
SIZES L, XL, 2XL, 3XL
Repeat Rows 2-3 one more time. Fasten off.
Second Front Panel
FOUNDATION CHAIN: Ch 30(30, 32, 32, 34, 34, 36).
ROW 1 (RS): SC into 2nd ch from hook, SC in each st until end, turn.
<29(29, 31, 31, 33, 33, 35)>
ROW 2: Ch 1, *FLO SC, ch 1, sk 1 st; rep from * until last st, SC in last st, turn.
<29(29, 31, 31, 33, 33, 35)>
ROW 3: Ch 1, *FLO SC, BLO SC; rep from * until last st, SC in last st, turn.
<29(29, 31, 31, 33, 33, 35)>
If you’d like to add invisible pockets, repeat Rows 2-3 until the front panel measures approximately 15(18, 20, 18, 20, 23, 25)cm / 6(7, 8, 7, 8, 9, 10)” wide.
Do not fasten off.
*Make sure you have the same number of rows as the FIRST FRONT PANEL before the ‘POCKET’ rows.
POCKET ROW 1 (RS): Ch 1, SC 3, ch 7, sk 7 sts (this creates the invisible pocket hole), SC in next st, ch 1, sk 1 st, *FLO SC, ch 1, sk 1 st; rep from * until last st, SC in last st, turn.
<29(29, 31, 31, 33, 33, 35)>
POCKET ROW 2: Ch 1, FLO SC, *BLO SC, FLO SC; rep from * until you reach the ch 7 gap. (You should have 10 stitches left in the row).
Working into the ch 7: FLO SC 7 (1 FLO SC in each ch), FLO SC in next st, BLO SC, SC in last st.
<29(29, 31, 31, 33, 33, 35)>
SIZES XS, S, M
Make sure that both pocket front panels have the same width.
Fasten off.
SIZES L, XL, 2XL, 3XL
Repeat Rows 2-3 one more time.
Make sure that both pocket front panels have the same width. Fasten off.
Pockets
With the WS facing you, insert your crochet hook into the front loop by the opening of Pocket Row 2
- If you’re a right handed crocheter insert your hook one stitch to the right of the ch 7 pocket hole
- If you’re a left handed crocheter insert your hook one stitch to the left of the ch 7 pocket hole
Secure your yarn and pull up a loop.
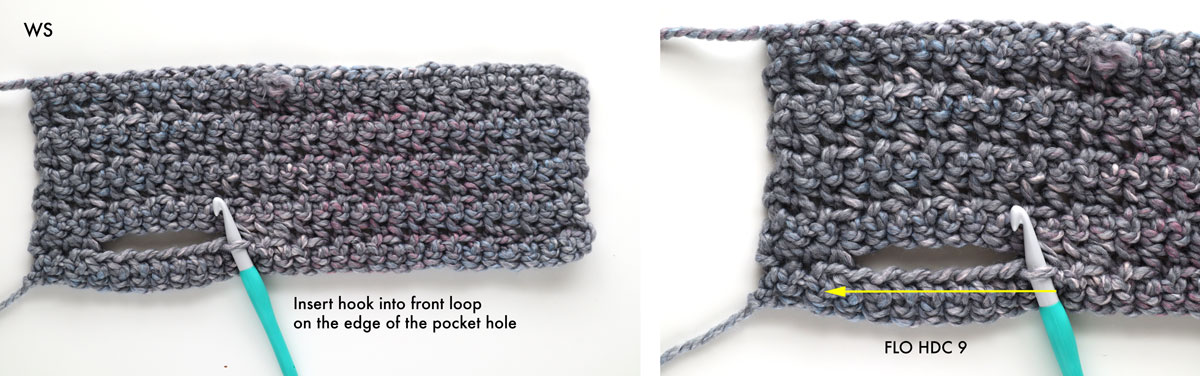
ROW 1: Ch 1, FLO HDC 9, turn.
ROW 2: Ch 1, HDC 9, turn.
Repeat Row 2 until Row 7(8, 9, 9, 9, 9, 9) or until you reach your desired pocket depth. Just make sure that the pocket isn’t taller than the width of the front panel.
Fasten off.
Sew the edges of the pocket to the body of the cardigan. For the pocket to stay ‘invisible’ make sure that you only pick up the stitches along the WS of the front panel (i.e. you don’t want to insert you needle through to the front/RS of the body panel or the stitches will be visible) however make sure to insert your needle through the front and back of pocket for a secure seam.
Repeat steps for the second pocket.
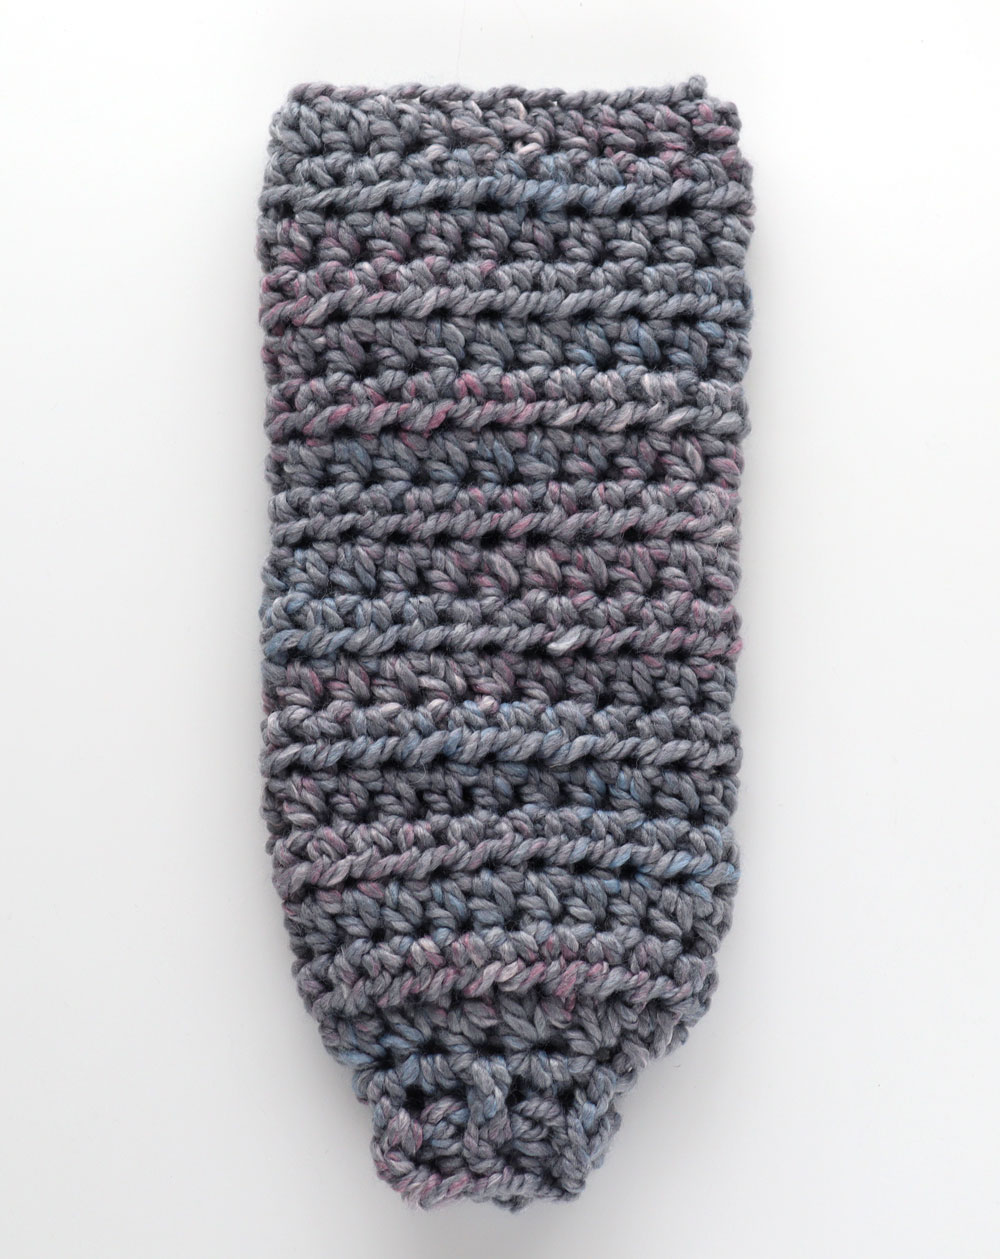
Sleeves
(Make 2)
The sleeves are worked in the round from the widest part of the armhole towards the cuff. There is only one line of shaping in the sleeves in the decrease round to create the balloon shape.
FOUNDATION CHAIN: Ch 20(20, 22, 24, 26, 28, 30), sl st into 1st ch to form a ring. Make sure that the chains aren’t twisted!
ROUND 1: Ch 1, HDC in each ch around, sl st to join, turn.
<20(20, 22, 24, 26, 28, 30)>
ROUND 2: Ch 1, HDC in each st around, sl st to join, turn.
<20(20, 22, 24, 26, 28, 30)>
Repeat Round 2 until sleeve measures 33(33, 35, 35, 38, 38, 40)cm / 13(13, 14, 14, 15, 15, 16)”
*You can add/remove rounds as desired to make your sleeve longer/shorter. Keep in mind that the decrease + ribbing adds 6cm/2.5” to the length of the sleeve.
DECREASE ROUND: Ch 1, HDC2tog, HDC, *HDC2tog; rep from * until end of round, (if you have one st left over, HDC in last st), sl st to join.
<11(11, 12, 13, 14, 15, 16)>
*If you find the cuff too small repeat *HDC2tog, HDC* 2 or 3 times (instead of once) and then HDC2tog until the end of the round. If you have one stitch leftover HDC into the last st.
RIBBING ROUND 1: With the 9mm hook, Ch 2, DC in each st around, sl st to join.
RIBBING ROUND 2: Ch 2, *FpDC, BpDC; rep from * until end (you can end with either a FpDC or BpDC), sl st to join.
Fasten off.
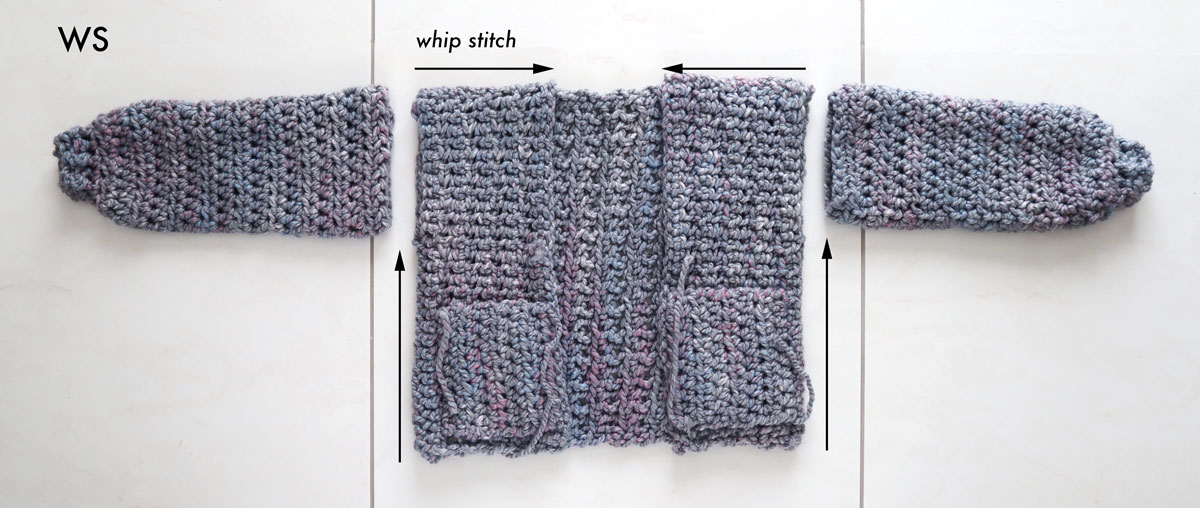
Assembly
With the RS facing up, lay the back panel on a flat surface. With the WS facing up, lay the front panels on top of the back panels. (i.e. the RS of the back and front panels should be touching each other on the inside of the cardigan)
*If you’ve crocheted POCKET front panels make sure that the seamed pockets WS (not the pocket holes) are facing you.
The final row of the front panel of both front panels should be sewn to the back panel (with ROW 1 of the front panels creating the edge of the neckline.)
Double check that the pocket holes fall along the sides of the cardigan and are not in the centre of the cardigan.
With a tapestry needle and a length of yarn whip stitch the top of the shoulders together.
Leaving an opening for the sleeves, whip stitch up the sides.
Whip stitch the top of the sleeves to the armhole openings.
Finishing
With RS facing you and using the 9mm hook, insert your crochet hook into the corner of left front panel if you’re a right handed crocheter or the corner of the right front panel if you’re a left handed crocheter.
Secure your yarn and pull up a loop.
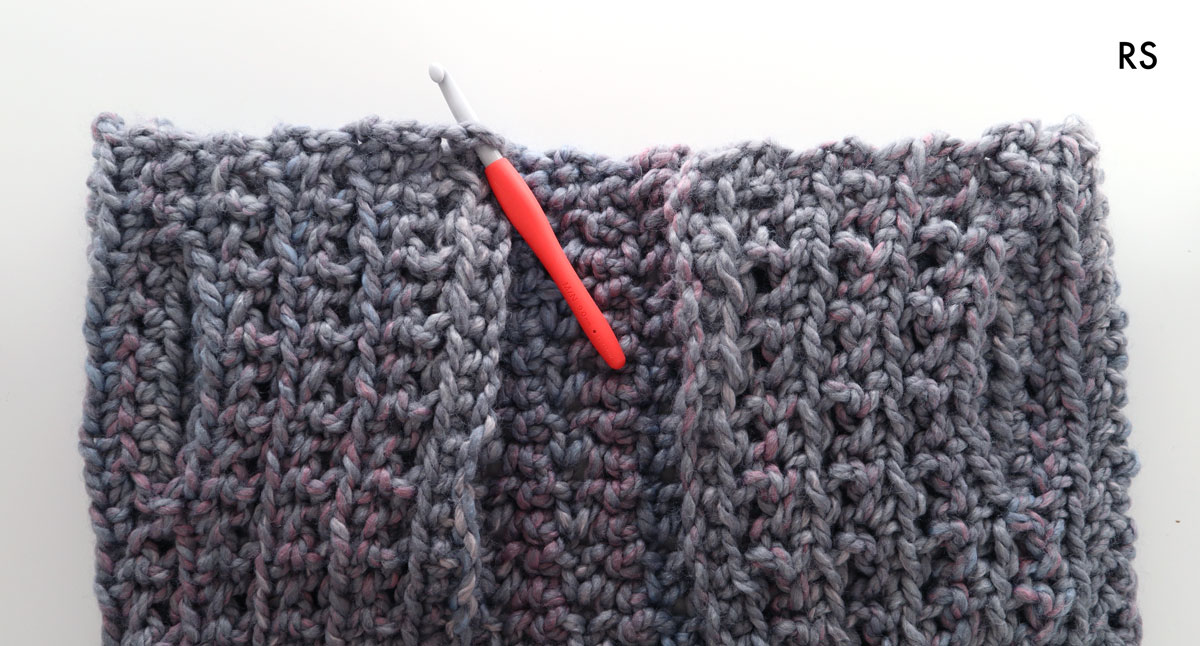
HEMLINE RIBBING ROW 1: Ch 2, DC along the bottom edge of the cardigan.
The exact number of stitches isn’t important, rather you should make sure your stitches are evenly spread out along the hem.
Keep your tension even as too many stitches will cause the hem to ruffle and too few stitches will cause the hem to pucker.
When you reach the other corner, turn.
HEMLINE RIBBING ROW 2: Ch 2, DC into the 1st st, *FpDC, BpDC; rep from * until last st, DC in last st, turn.
HEMLINE RIBBING ROW 3: Ch 2, DC into the 1st st, *FpDC, BpDC; rep from * until last st, DC in last st.
Do not fasten off!
Rotate your cardigan 45 degrees and we’ll now crochet the neckline ribbing.
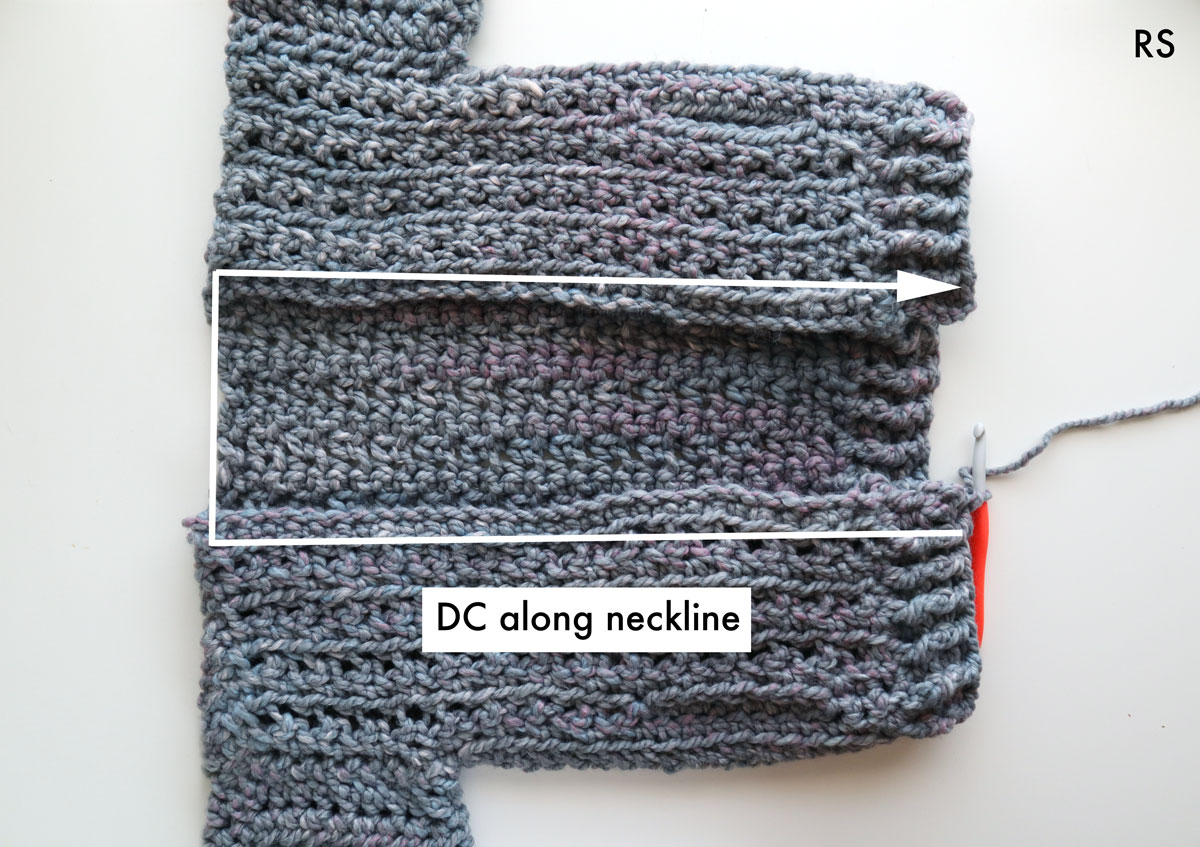
NECKLINE RIBBING ROW 1: Ch 2, DC along the edge of the neckline until the corner of the other front panel.
Keep the tension of your stitches even and neat. If your neckline ruffles you have too many stitches and if your neckline puckers you have too few stitches.
NECKLINE RIBBING ROW 2: Ch 2, DC in first st, *FpDC, BpDC; rep from * until last st, DC in last st, turn.
NECKLINE RIBBING ROW 3: Ch 2, DC in first st, *FpDC, BpDC; rep from * until last st, DC in last st.
Fasten off.
Weave in all of your ends.
Voilà! You’ve finished your Crochet Bomber Cardigan 🙂
Ready for your next crochet project?
You can find more free crochet patterns -
Hi Grace,
I saw your adorable chunky bomber and grabbed some Lion Brand Wool Ease Thick and Quick from my stash. I am working on the back panel and my length measurement is 15.5”, On a second try I loosened up my stitches. . Will the edging/trim bring the length to the 19.5”?
My gauge may be off a bit, but next size hook is 15.0 and that seems too large.
Thank you, Susie
Hi Susie, just wondering what size you're making? For the back panel length the ribbing adds about 2.5" and then you'll get to 18". If you still want the jacket to be longer you can block it to the measurements but once you've worn it a few times it will also stretch out and become slightly longer, so I think you should be ok 🙂 Grace
Hi Grace,,
Thank you for the reply. I am making the x-small. I’m thinking that perhaps I should start again and add a couple of stitches to the initial chain.
Susie
Hi Susie, You can add extra stitches to the chain just be sure to add multiples of 2. Also just wondering if you're making the pocket or pocketless version? If you're making the pocket version be careful with the pocket placement as you want to make sure that both sides are symmetrical.
Making this my next project can not wait to get started.
Hi Grace,
I just finished the back panel. I thought the front panel foundation chain would be half of the back panel foundation chain. I’m confused.
Your help would be appreciated!
Thank you,
Ann
Hi Grace,
Please disregard my question. I read the pattern wrong. I just figured it out.
Thanks,
Ann
Hi Grace,
Please disregard my question. I read the pattern wrong. I just figured it out.
Thanks,
Ann
Hi Grace,
I was wondering how many skeins of wool I would need for a 3xl ? Thank you in advance.
- Sara
Hi Sara, you can find the yarn yardage requirements under 'Materials' in the blog post 🙂
Hey Grace,
Did you buy your yarn in New Zealand or did you have to buy from Lionbrand overseas?
I'm wanting to support local business when we come out of lockdown!
Hi Ashley, If you're in New Zealand you can get Lionbrand from Spotlight! Grace 🙂
Hi Grace,
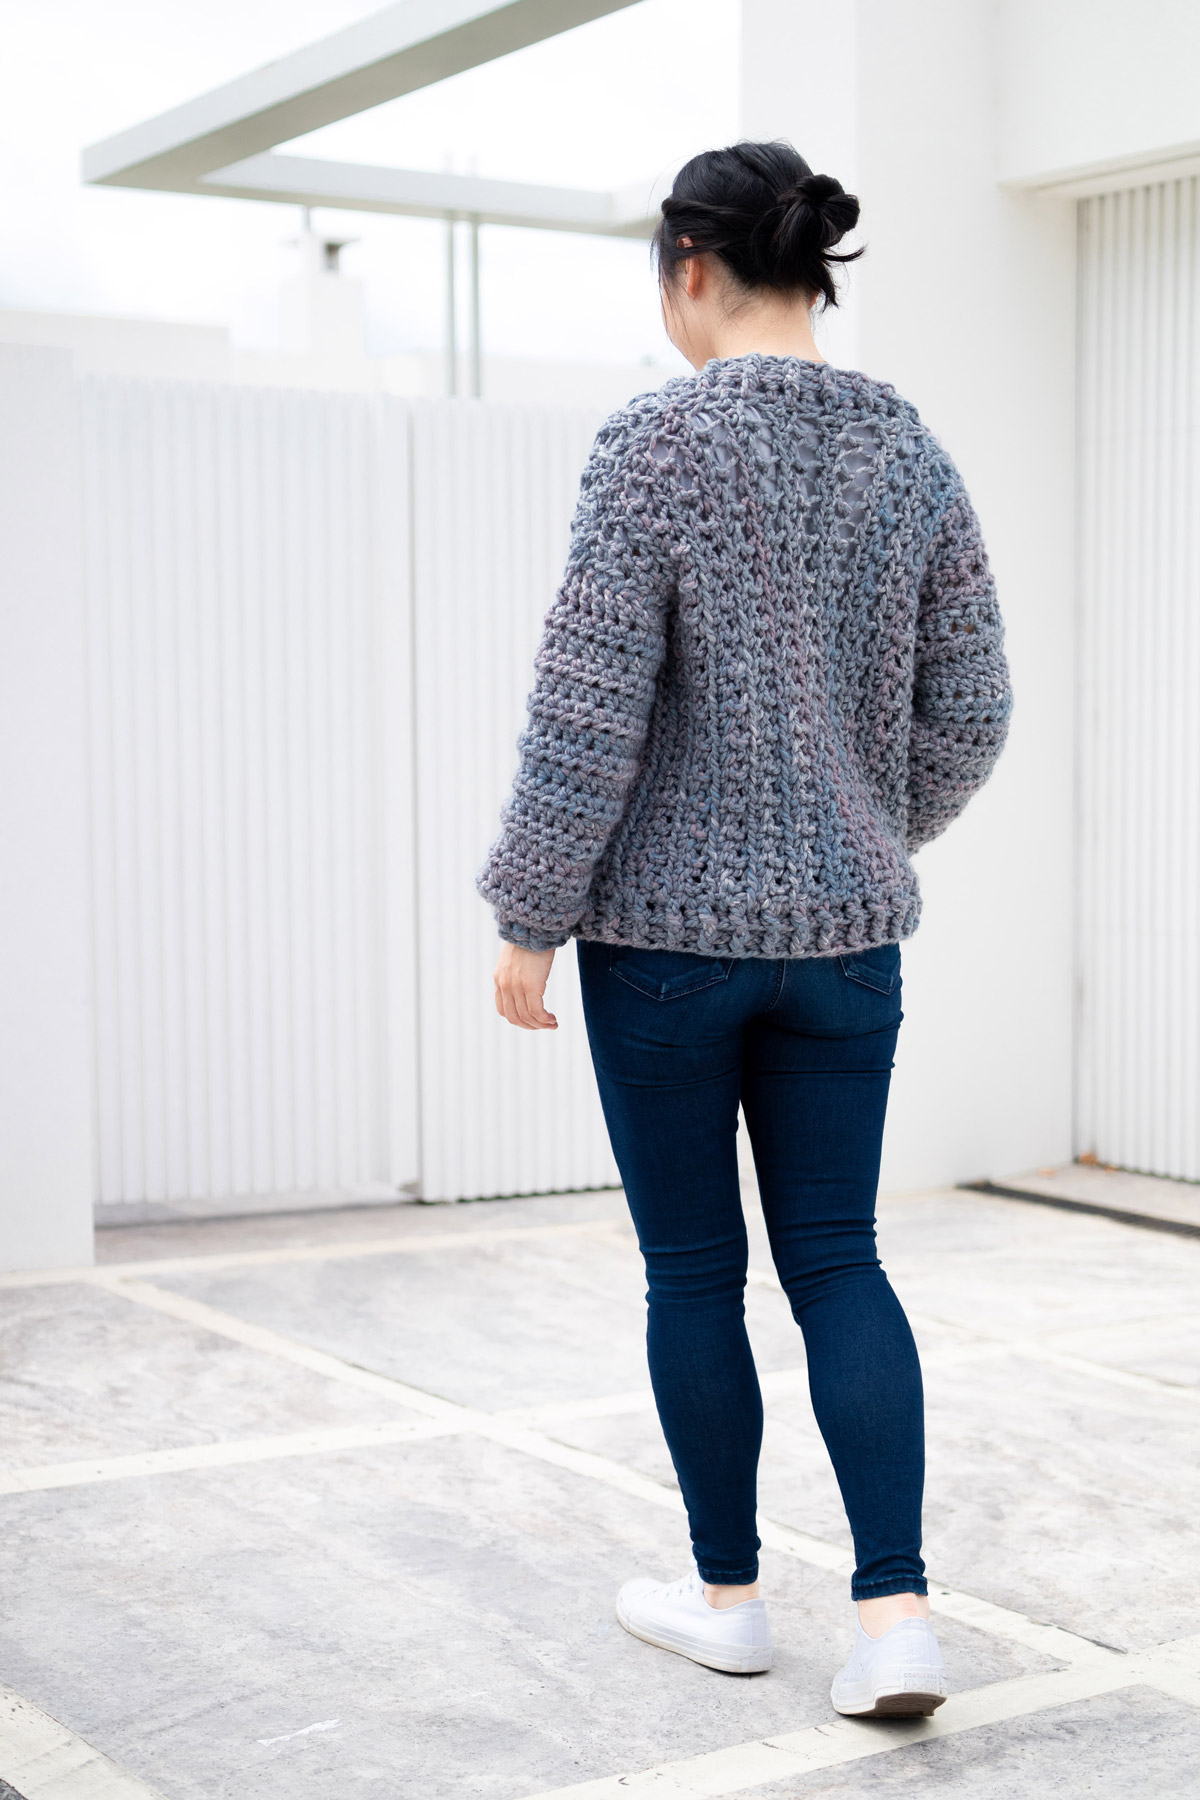
I love this pattern, but from the pictures it appears that the back across the shoulders and over part of the shoulders has very large holes in it as though it has stretched substantially. Is this normal and from the weight of the yarn? I don't want mine to stretch like that if I make it. Thanks.
Hi Janice, yes this bomber uses chains in between the stitches so it always has 'holes'. It's normal for sweaters to stretch out but I think the chains are necessary or the bomber jacket would be very heavy and dense without any drape! The best way to reduce the stretching would be to pick a super chunky yarn that has a lot of yardage per 100g. e.g. a super chunky that has 90m/100g versus a super chunky that has 70m/100g - the 90m/100g will be a lot lighter overall and you'll have less stretching but yarn always stretches out over time. I hope this helps, Grace 🙂
Hi! thank you for sharing this pattern. Do you have an option of yarn that is aminal cruelty free?
Thank you 🙂
Hi Mariana,
Paintbox Yarns Simply Super Chunky is a super chunky 100% acrylic yarn. It is a bit thinner than Lion Brand's Wool Ease Thick & Quick, so please swatch to make sure you meet gauge.
I hope this helps,
Grace 🙂
I was just wondering how many of those balls of yarn you used for the project?
Hi Emma,
Yarn amounts are stated in the 'Meterials' Section 🙂
Grace
I love greys, and that sweater color is simply beautiful. It looks like iridescent with the sunlight.
Thanks for the pattern. I'm gonna try to make it soon 🙂
Hi Grace,
I’m a bit on the shorter side so I’m trying to figure out how to scale it down to my size 🙂 Can I ask how tall you are? Thank you 🙂
Hi Cat, I'm quite short too 🙂 I'm 160cm which is about 5'3"
Grace 🙂
Hello!
Is it possible to make this with baby cotton yarn instead of chunky yarn?
Hi Kay, if you use a different weight yarn your gauge will change and so will the sizing of the bomber cardigan. You can roughly follow the pattern as a guide but I can't guarantee that your cardigan will look like the sample!
Grace
i love your bomber jacket. However I am haing trouble on the beginning row, 1st stitch. Mine doesn't look like yours where u front row crochet in that first stitch after the single crochet row.I dont have that loop at the bottom Please help [email protected]
Hi Gretchen, make sure to look at the top of your stitches to find the 'v' shape. The Front loop will be the loop closest to you.
Grace
Hello Grace, if I wanted to line the jacket with fleece for some warmth, should I do it before assembling the jacket or after? Thank you so much for this project, it's beautiful!
Marilyn
Hi Marilyn, I've never lined a crochet piece before 🙂 But I think if I was just lining the body I would line it after you've assembled the cardigan. If you're doing sleeves and body, I'd probably line it before assembly just so its easier to manage.
I hope this helps,
Grace
Hi Grace!
I very much liked the pattern and the final piece so I bought myself the exact yarn (the Starlight color) and hooks and for the first time in my life I am crocheting a cardigan with big hooks! (I usually work around the number 3 and it's definitely a new world for me.)
I am loving it! So chunky, fluffy, and easy going!
I ran into the "killing" and "blocking" crochet pieces idea just a few days ago and haven't yet learned enough about it.
So I'd love to ask you - does this cardigan need blocking\killing?
Thank you very much in advance, for your answer and of course for the wonderful pattern!
Hi Toni,
I didn't block my bomber cardigan because I liked the way it looked and didn't want it to stretch out any more. In general if I've blocked a piece I'll tell you at the end of the pattern. I tend to block pieces if I want to 1. Make the garment more drapey and relaxed or 2. Use a mesh/decorative stitch and I want the stitch to be more defined and even. If I'm happy with the garment as is I don't block hehe but everyone has their own preferences when it comes to blocking!
Grace
Thank you! I love it as it is and agree that blocking is really not relevant here.
Love your creations !
Thank you so much Daisy!
Grace 🙂
Hi I adore this pattern!
This is going to be my next project but I would love to add a hood to it. I’m pretty new to crocheting so just wondered if you had any advice on how I would achieve this.
Thank you for your beautiful work.
Hi Emma,
So glad you like the pattern! For this particular pattern, you can't really add a hood because the neck opening isn't wide enough sorry! It wouldn't sit correctly and be too tight on the back of your neck. If you'd like a hood I'd suggest searing for hooded patterns on Ravelry and you'll be able to find heaps!
Grace 🙂
Thanks Grace, I did do a search but I couldn’t find one I liked as much as this one. I was goldilocks’ing them 😆
Back to thinking board.
Thank you for replying.
Stay safe ❤️
Hi Grace
I love this pattern but I got chunky wool not super chunky...I am not confident in measuring the gauge (beginner sorry:() if I followed the pattern for a XL size do you think that could work?
It's for a M size cardigan.
Thanks....
Hi Aoife,
I'm really sorry but without gauge there is no guarantee that the sweater will fit! I think you'd have to alter the pattern by adding more stitches to make is longer so simply sizing up won't work in this case. If you're willing to experiment and just see what happens give it a go 🙂
Grace
Hi Grace, I was just wondering is it possible to do this without chunky yarn?
Hi Grace!
Love all your patterns. I have some questions about the sleeves on this pattern..
1) Is the ch 1 & slip stitch part of the stitch total, or do they not count? I somehow get an extra stitch in my count when I HDC in every stitch, and I wonder if I’m wrongfully counting the ch 1 & slip stitch.
2)Will the upper-arm opening/foundation stretch? I’m making an XL, and that opening feels tight on me so I bumped the sleeve size up to XXL (my normal size is an L; I’m making this cardigan as a gift.) .
Grace,
I’m wanting to make your chunky cardigan bomber sweater but I don’t have a 12mm crochet needle. Could you please tell me what part of the sweather I would need this for?
Hi I can't see the instructions for the back panel.
Hi Grace,
This is the second cardigan pattern I am using from your website and so far, they are very easy to follow and my first cardigan turned out so well! I have a question about the second front panel of this pattern. In this first front panel, you mention that when your panel reaches around 20cm (for size M), make sure you end with a row 3. Does this apply to the second panel as well?
Thanks for your time!
Your instructions are easy to follow.Easy to adjust. I made it without the sleeves and I added more rows to the length.A beautiful vest! I made it using bulky variegated yarn(off white, teal, brown) thank you so much for your pattern