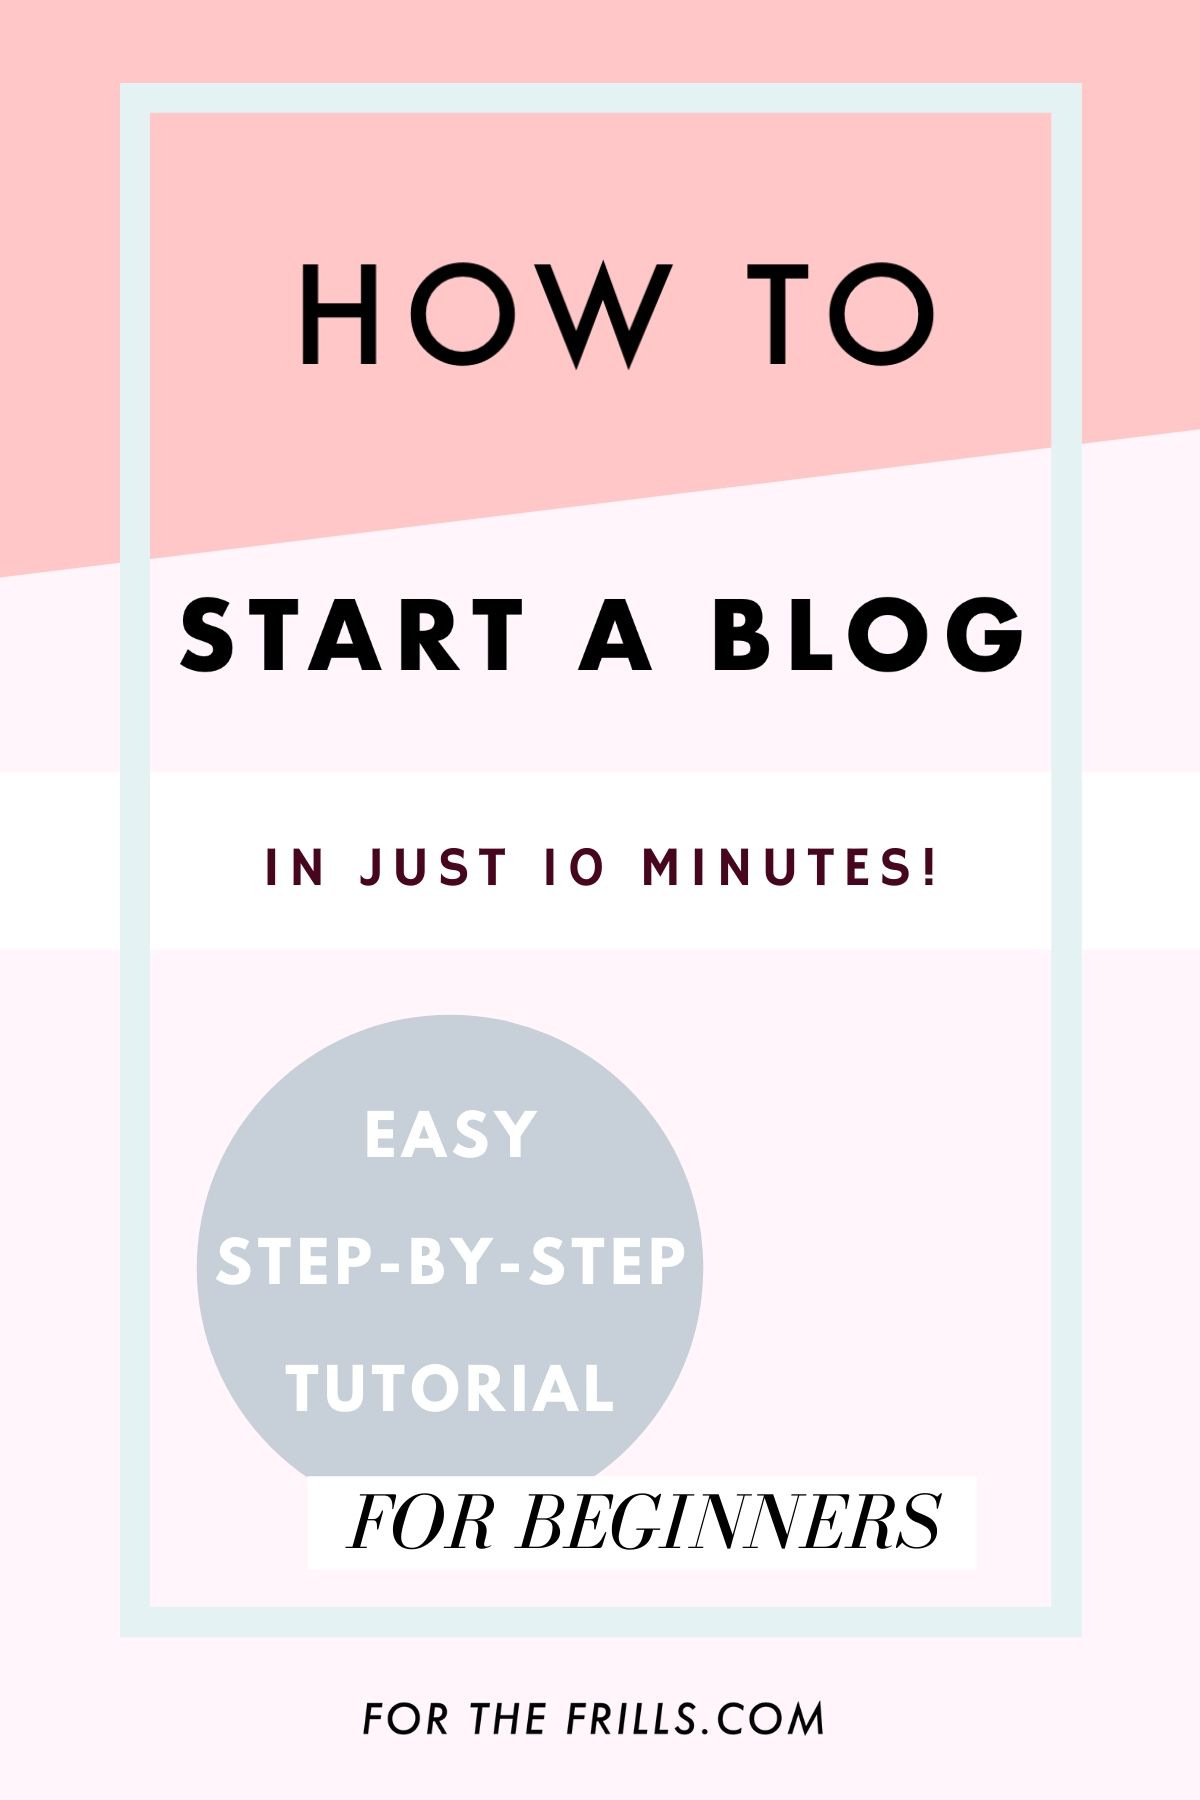
Have you ever thought about starting a blog? Would you love to earn money from your crocheting hobby or passion? Follow this easy step-by-step tutorial to create a blog in just 10 minutes!
This post may contain affiliate links, view our disclosure policy for details.
FOR A LIMITED TIME ONLY, start a Bluehost blog from only $2.95*/month!
So many of you have asked me how For The Frills became my job and it all began with this blog! Blogging is truly a wonderful way to create an income (either as a side hustle or full time) and it gives you the freedom to work anywhere in the world (especially now that we are all staying at home!) and determine your own hours.
Maybe you’ve looked at my blog and thought ‘I could do that!’ Or you’ve always wanted to start a blog but you didn’t know how to begin and now you feel like you’re ‘too late’ to join in!
Honestly, now is the best time to start a blog as more people are online than ever! I started my blog on Bluehost with absolutely no tech experience. Since then, For The Frills has grown to reach hundreds of thousands of readers a month and earn 6 figures this year!
Starting a blog is a great way to cultivate your very own creative space on the internet that you can easily monetise as you grow! Unlike other platforms e.g. Instagram, Facebook, YouTube etc. you have complete control and ownership of your blog and the content on it.
While all of these other platforms are valuable in their own ways, you’re essentially putting your eggs in someone else’s basket rather than your own!
So, today I’ll show you how to set you your blog following 3 easy steps and in just 10 minutes!
3 Steps to start a blog in 10 minutes!
1. Choose a Blog Topic
2. Set Up Your Blog and Domain
3. Customise Your Site
Pin me for later!
1. Choose a Blog Topic
Firstly you need to choose a topic for your blog and find your niche. Some popular (and profitable) topics are -
- DIY and crafts
- Education
- Fashion
- Finance
- Fitness
- Food
- Lifestyle
- Parenting
- Tech
- Travel
And so many more! As long as there is interest in a subject, you can create a blog about it!
With these general broad topics, I suggest picking something that you are genuinely interested in. It will make growing your blog fun and motivate you to keep on blogging, but don’t worry about it being the only passion in your life.
As time passes and you grow to blog, you’ll figure out what you enjoy blogging about and what your readers respond to. From within these larger categories, you can niche down to create a stronger connection to your audience.
For example, my Bluehost blog is a DIY and Craft blog that specialises in crochet and specifically modern crochet wearables.
DIY & Crafts > Crochet > Modern Clothing
Another example would be: Food > Keto > For busy millennials
Do you see how it works?
If there is a specific niche that interests you right away, go for it! However, don’t get hung up on choosing the ‘perfect’ blog niche straight out of the gate.
If you’ve been around from the beginning you might remember that I used to make embroidery patterns as well – but you’ll notice that there isn’t any embroidery on my homepage anymore. In fact I haven’t embroidered anything in over a year! haha 🙂
Even if you don’t know your specific niche yet, it will come to you naturally over time as your audience will let you know what they enjoy. Just sign up and start blogging!
Starting today will get you one day closer to goals that if you start tomorrow 🙂
2. Set up your Bluehost Blog
To set up your blog you need two things –
- A blog platform
- A blog host
Your blog platform is where you’ll write and edit your blog posts. You might have seen lots of different options but I highly recommend using WordPress.org from the beginning. The overwhelming majority of successful bloggers are on WordPress.org because its super customisable, powerful and easy to monetise.
You also need a blog host which is like buying your ‘space’ in the internet. I use Bluehost as they are partnered with WordPress.org and they install WordPress for you! Bluehost is also a great host for blogging beginners as it has 24/7 customer service and the initial cost of only $2.95/month is super affordable!
Click here to create your blog today!
Now you might be wondering, what about free blogs?
If you want to be able to monetise your blog and turn it into a business, free sites are not a good option. They are difficult run ads on and in some cases, you can’t monetise a free blog at all!
Free blogs also look unprofessional and it will take hours to learn all of the html coding the make your free site look pretty and presentable.
Additionally, with free blogs you don’t own your domain name and there is less bandwidth. This means as your audience starts to grow you will need to upgrade to a paid platform anyway and it’s a huge headache (not to mention time waster!) transferring all of your content over.
Invest in yourself as Bluehost plans only start from $2.95/month (paid annually) and the longer you sign for (1 year, 2 years, 3 years) the lower the monthly cost. Your domain name (e.g. yourwebstiename.com) is free for the first year too!
There is also a 30 day money back guarantee, so if you decide blogging isn’t for you, you can get a refund!
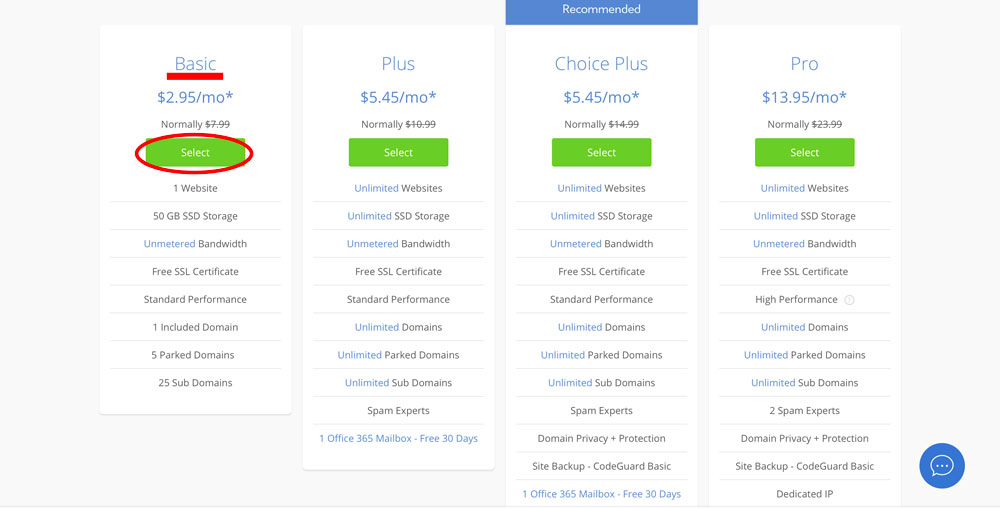
For blogging beginners, I suggest the basic plan as it's all you’ll need to get started. As your blog grows, you can look into more advanced plans to help manage your traffic 🙂
Now, your Bluehost hosting plan is the number one most important blogging investment you can make! This ensures that you own your space and domain in the internet that you can monetise and earn money from!
Investing in your blog (and yourself!) allows you to create your very own online space that can return investment so many times over. I’ve turned my initial investment of a couple hundred dollars into thousands and it continues to grow!
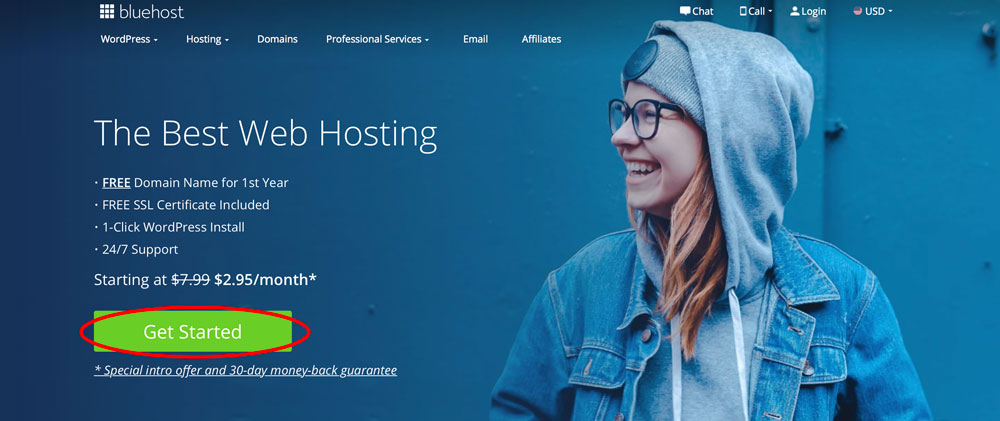
Click here to go to Bluehost and then follow the step-by-step tutorial below!
When you arrive on the Bluehost Homepage click on ‘Get Started’
From there you can choose your plan. Since you’re just starting out the basic plan is all you need 🙂
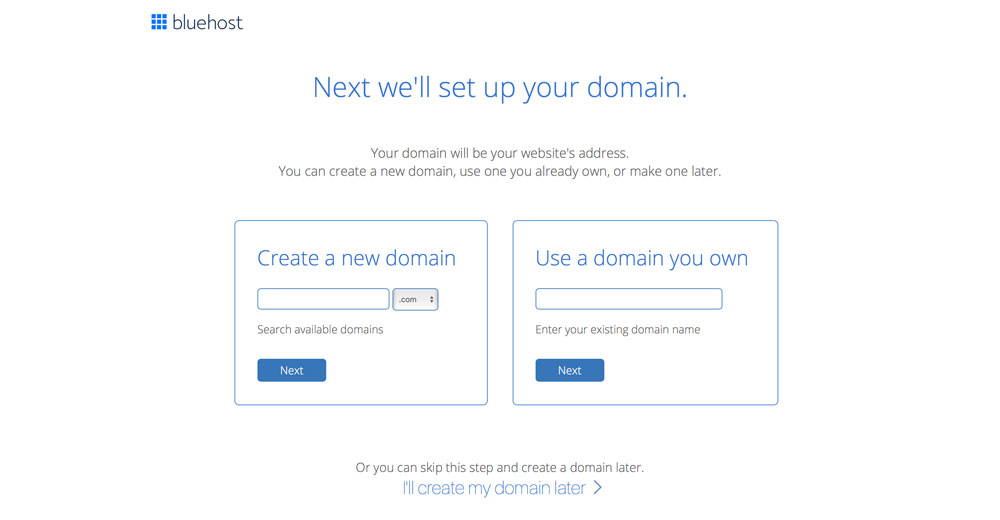
Now’s time to choose your domain name. With Bluehost they offer the first year of your domain name for free!
When picking your Bluehost blog name, I’d recommend picking a name/phrase that isn’t very popular.
For example, if you picked 'comfycrochet.com' your blog niche is very clear. However, it’s more difficult to have complete ownership over ‘Comfy Crochet’ because they’re a really common combination of words. Whereas with my site, ForTheFrills.com when you google For The Frills, it’s always the first search result which makes it easy for people to find me 🙂
I suggest thinking of words that are associated with your niche and go from there. For example, my blog is called For The Frills. Frills has connotations of clothing/fashion and that links to my niche of modern crochet garments!
If you can think of a name that clearly indicates your niche and one that you can develop into your own brand, then that’s great!
However, most importantly don’t let not having the ‘perfect’ name hold you back from creating your blog! If you don’t have a name your 100% in love with, think over ideas for few days and then just pick whichever name you like best.
Lots of successful bloggers have completely random blog names. Remember it’s better to create your blog today with any name than to not start a blog at all!
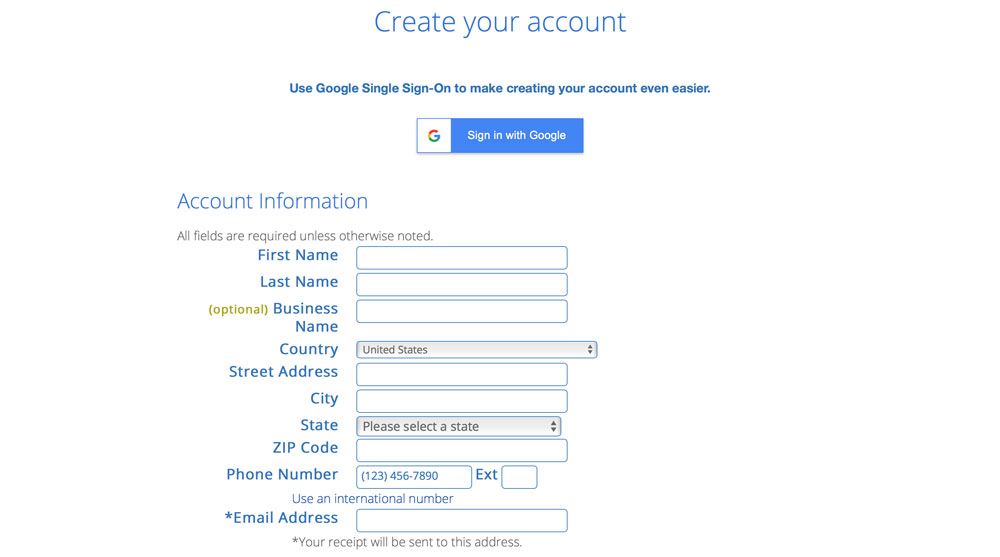
Once you’ve chosen your domain and checked that its available, you’ll be directed to the ‘Create an Account’ page. Fill out the form and scroll down to the section on ‘Package Information’.
Here you’ll select the Account plan – which is the length (12, 24 or 36 months) of your plan.

With the 36 month plan you get the best value for your money (with the current promotion it has the lowest monthly cost of only $2.95/month!).
Also, don’t forget that you have a 30 day money back guarantee so you can cancel at any time during the first 30 days and get a full refund. The 36 month plan is also a good way to motivate yourself to create a long term commitment (remember our goal is make grow our blog to become a long time source of income!) to your blog.
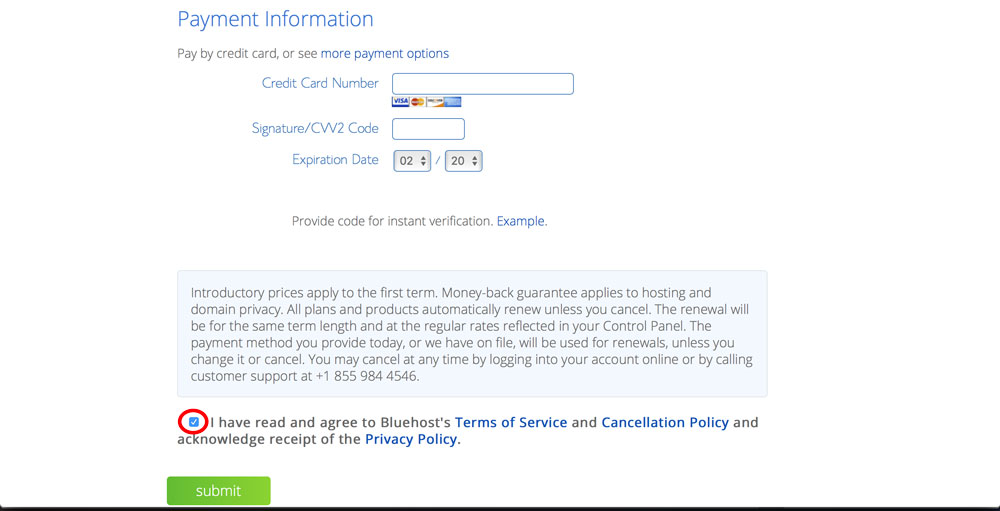
Now scroll down to ‘Package extras’ and uncheck all the boxes except for Domain Privacy Protection.
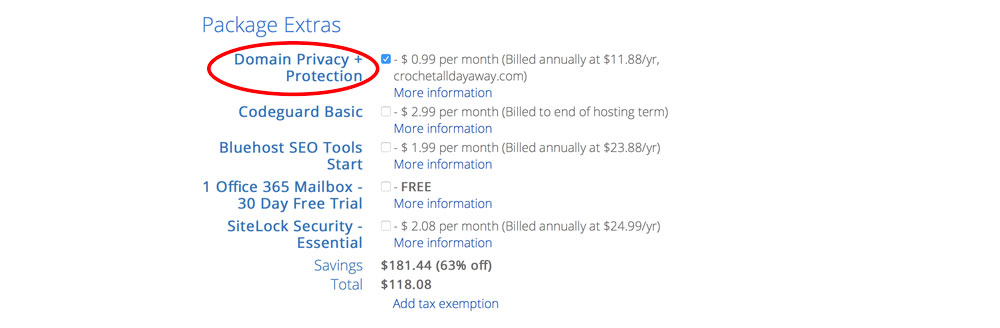
I'd recommend Domain Privacy Protection as it hides all of your details so your personal information (address, name, phone number etc.) remains confidential. Essentially, your personal details are hidden from all the spammers and scammers on the internet. The other tools are nice to have but not essential.
Finally, add your payment information, check the Terms of service and privacy policy and then click ‘submit’!
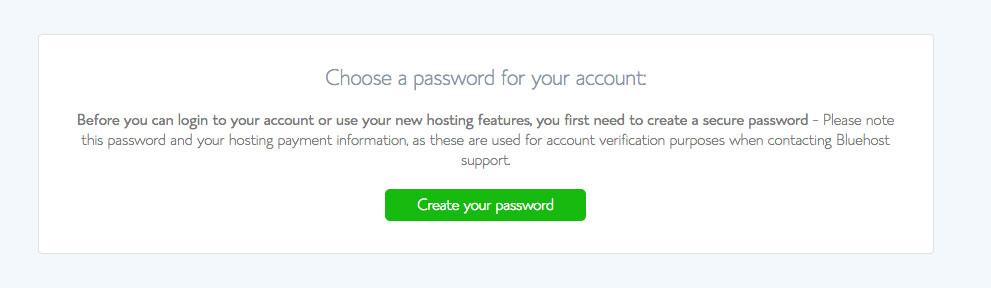
Congratulations! You’ve created your blog!
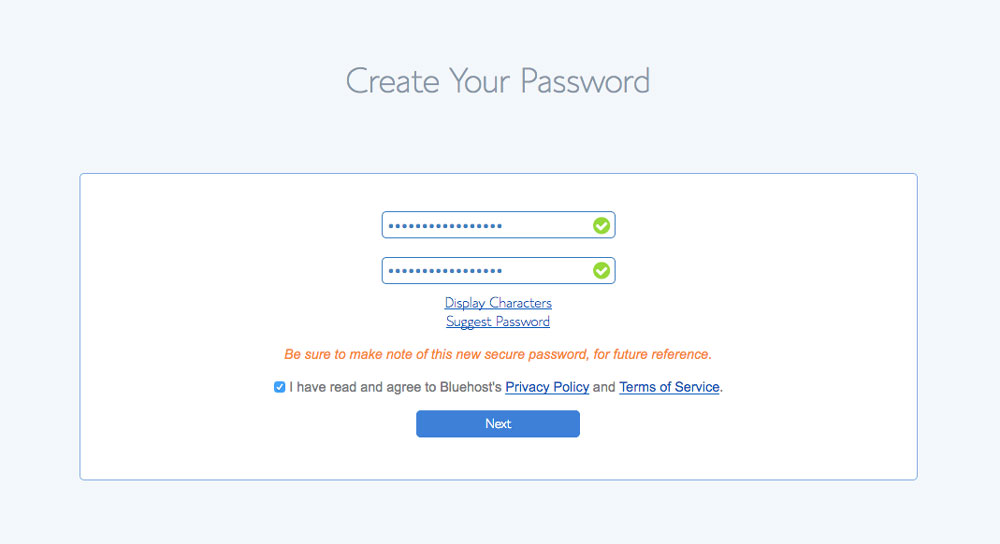
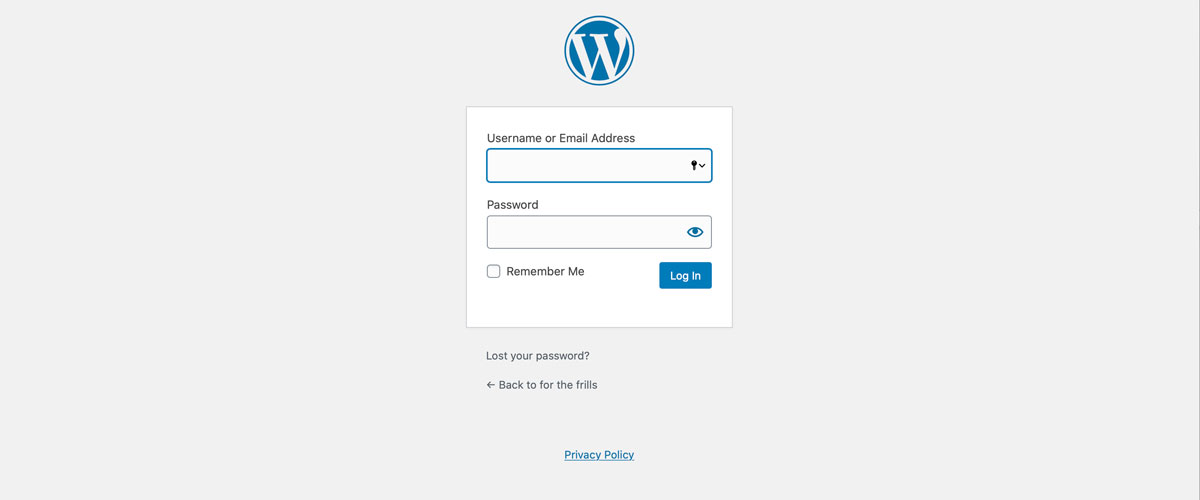
You’ll then be asked to create a password and be redirected to the Login Page.
Now WordPress is the blogging software you’ll use to create all of your blog posts and to edit your site. Bluehost automatically installs WordPress for you! (See no tech experience needed 🙂 )
Once you’ve logged in, WordPress will ask you to pick a theme. All of the ones pictured are free but you can change or apply a customise theme later (more details on that below)!
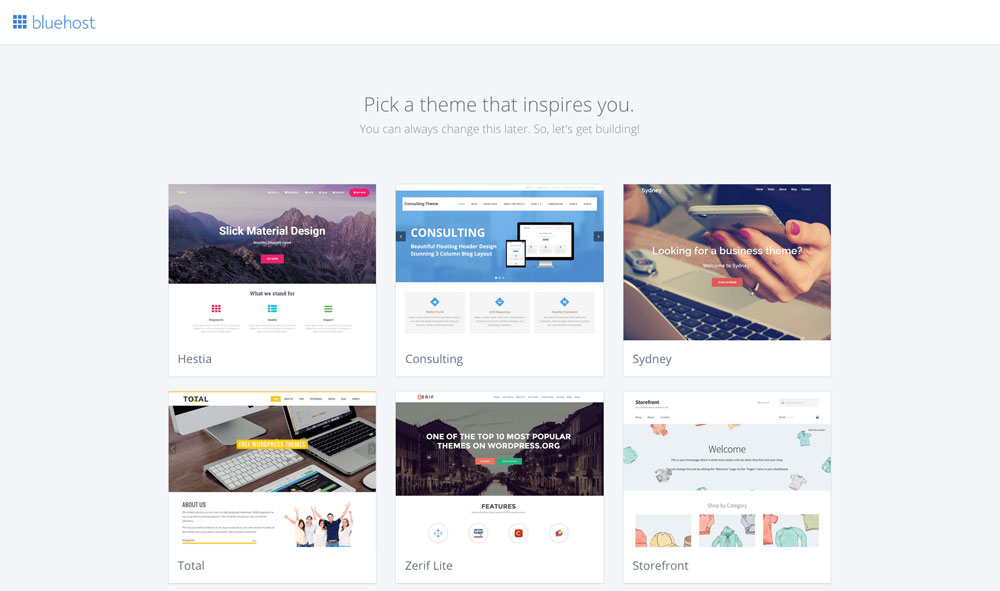
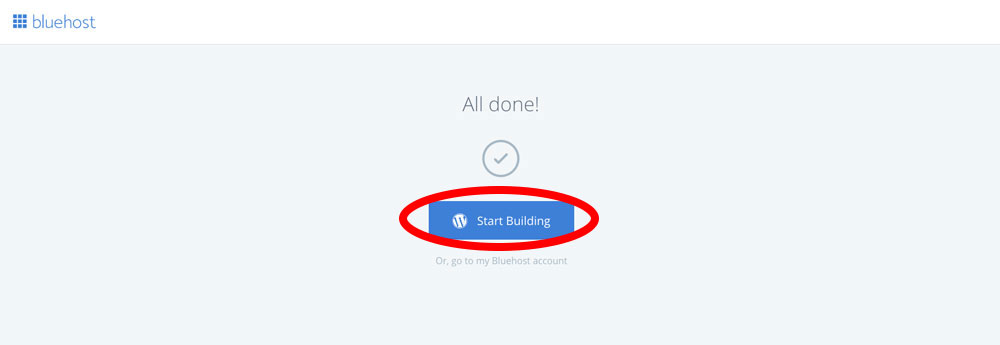
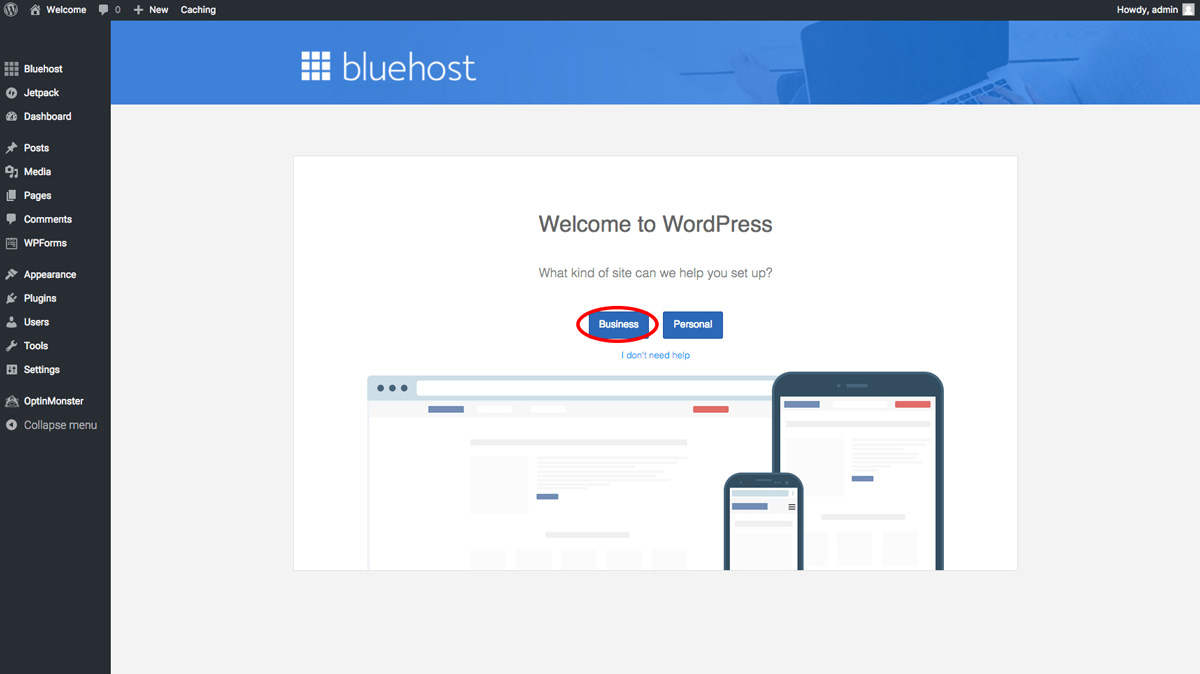
Once you’ve picked your theme, it will take a couple of minutes to set up your WP dashboard. When it’s finished click ‘Start Building’ to go to the WP Dashboard and then click ‘Business’.
From there explore all the tools on the left sidebar that will help you create your blog! (Bluehost has a lot of setup tools and tutorials too!)

To access your WordPress dashboard you have 2 options –
1. You can go to Bluehost.com, login in to Bluehost (using the email and password you already created). Then click ‘Login to WordPress’.

2. You’ll need to set up a new admin within your WordPress account.
- Login to your WP dashboard using step 1.
- On the left sidebar find ‘Users’, then click ‘Add new’.
- Create a new user account, username and password. (Save all the information as you’ll use these details for future logins)
- Go back to ‘All Users’ and delete the old admin user.
Once you set up the new user, you can login directly to your account by typing in the browser - yourdomainnamehere.com/wp-admin/ . You’ll be directed to the login page below and you can fill out the username and password you just created.
Now every time you want to access your Wordpress Dashboard you can just type yourdomainnamehere.com/wp-admin/ and use the username and password to log in directly!
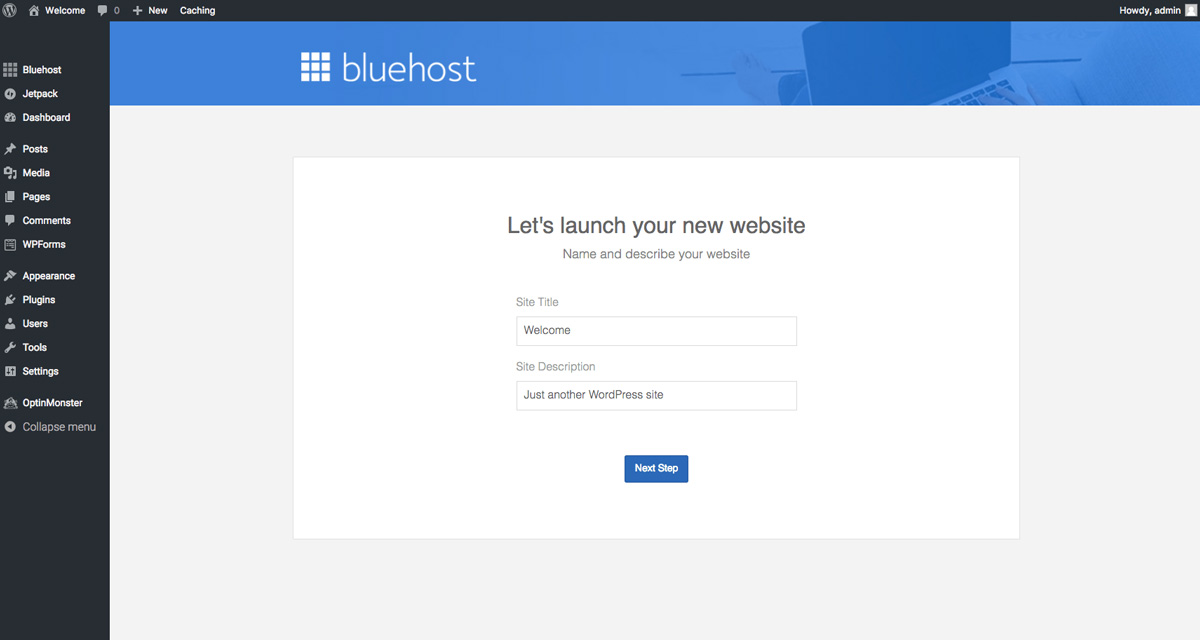
Once you’ve finished designing and customising your site, fill in your site name and description then launch your site!
3. Customise your blog with a WordPress theme
This is one of the best parts of creating a blog as your theme is all of the pretty design parts of your blog! To customise and design your blog, you need a blog theme. Your blog theme holds all the software and coding to make your site beautiful and run smoothly.
When you’re choosing a blog theme, you can use either a free theme or a paid theme.
The quick rundown - if you can afford to buy a theme, get the one you like when you set up your site to save yourself time and hassle. (Seriously, when I changed themes it took me 3 days to DIY it and set everything up correctly 🥲)
However if you're on a budget, just start with a free theme! It's always best to just get started today.
Free vs. Paid Blog Themes
Free WordPress Themes
Free themes are an option if you're just starting out on a budget, but they lack a lot of tools/benefits a paid themes give you.
From a visual stand point you won’t be able to change the font, any colours on your website or the layout of your homepage. Your customisation options will be seriously limited (which can be super frustrating!).
The second disadvantage is that free themes often don’t have customer support, so if you have a question or need help there is not a lot of information available.
Lastly, free themes can make your site very slow (because there is no incentive for the creator to update theme or make it user friendly) especially as you gain more traffic!
But the great thing about free themes, is that they give you a chance start blogging with a smaller investment. If you're trying blogging out and you just want to get started, there ton of free themes already installed on WordPress or you can find other free themes online!
Paid WordPress Themes
So you might be thinking why would I want to spend money a paid theme?
In general, paid themes are more customisable and faster than free themes. Speed is especially important as you don’t want people clicking away from your site because it takes too long to load!
Since there are heaps of design and customisation options, your site will look more professional and unique. You’ll also have access to support and tutorials to help solve your questions. The vast majority of professional bloggers (over 95%!) are on a paid theme.
I use the Brunch Pro theme on the Genesis Framework from Studiopress. The Genesis Framework is key as it’s widely regarded as the fastest and most powerful theme framework on WordPress.
If WordPress is the engine of the car, the Genesis Framework is all of the parts and the ‘child theme’ – the design and feel of your blog – is the paint job. (Update - I've since DIY customised my site with the Feast Plugin but i'm still using Brunch Pro and love it).
There are heaps of different themes on the Genesis Framework and they recommend a wide range of themes on their website, Studio Press.
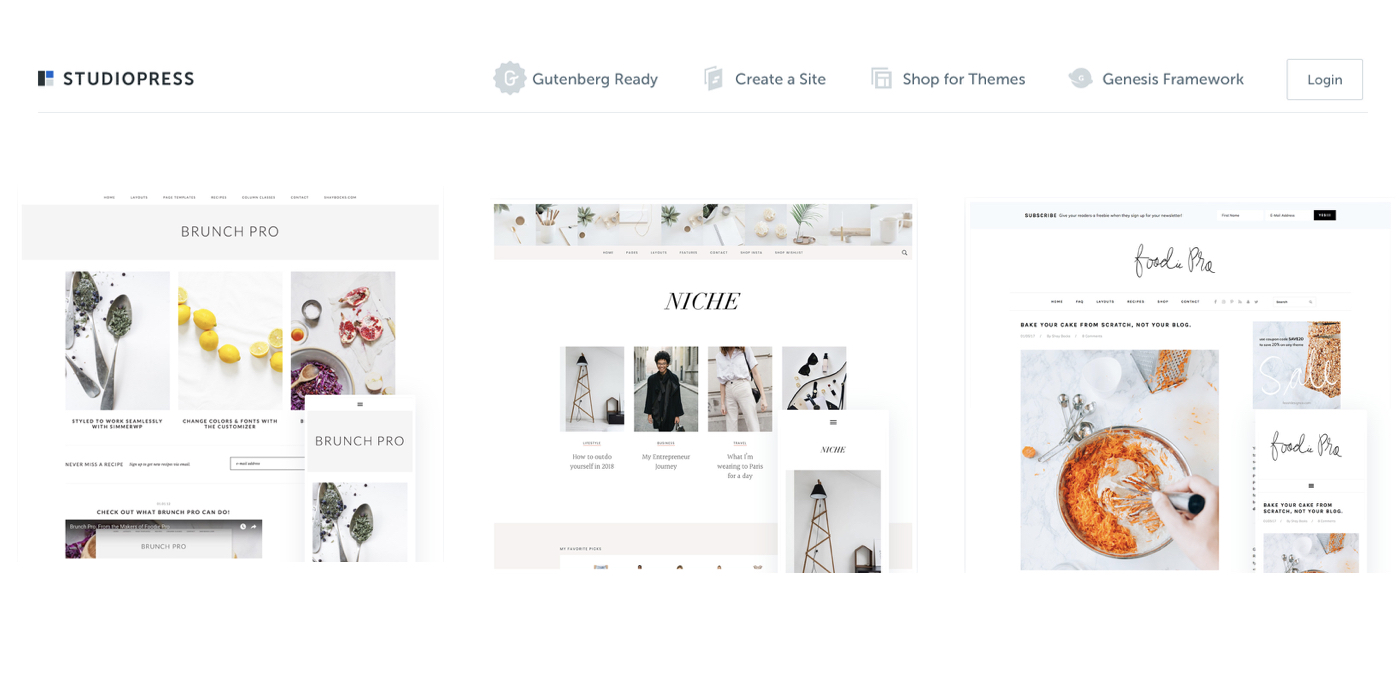
I absolutely love the clean minimalism of my theme Brunch Pro, but you’ll need to do some customising to get it to look exactly how you want. There are heaps of tutorials when you download the theme. If you’d like a theme that’s beautiful, feminine and more ready ‘out of the box’, Restored316 Themes (also on the Genesis Framework) are absolutely gorgeous too!
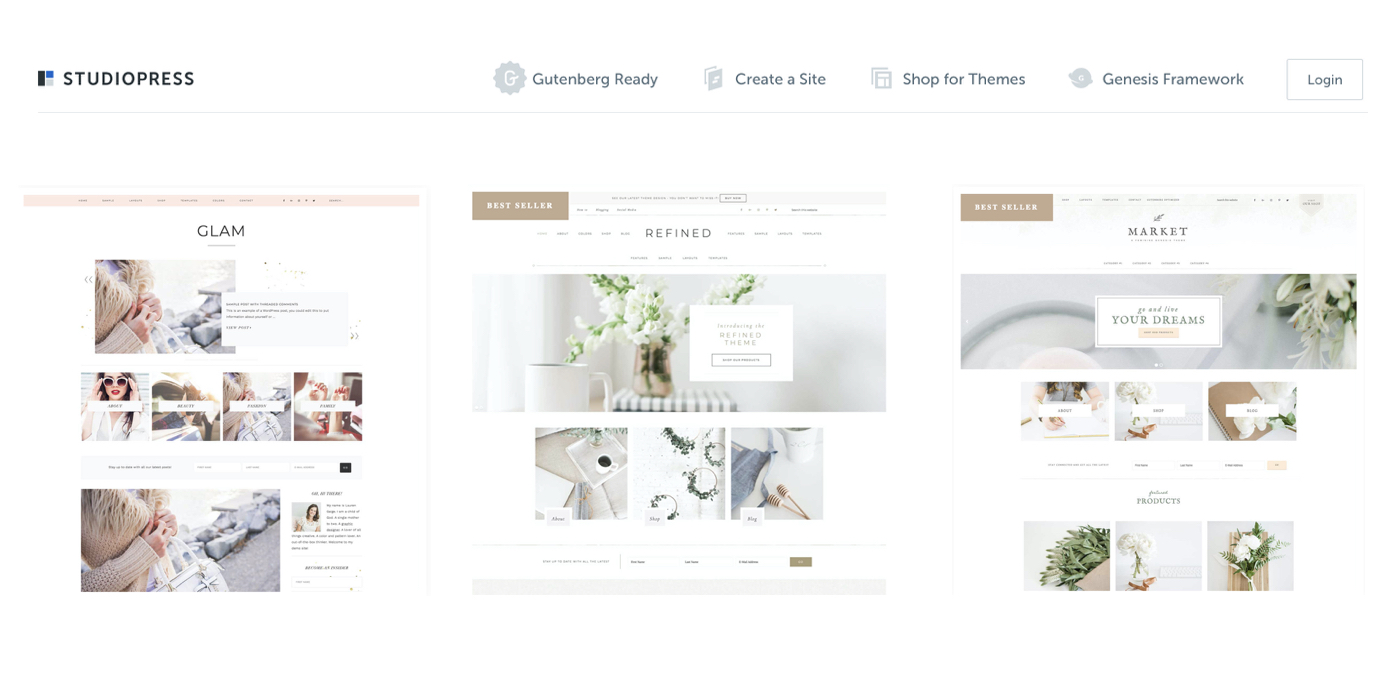
Studio Press Theme Bundles (Genesis Framework + Child Theme) range from $99 - $130 and they are worth every penny. You only need to purchase the Genesis Framework and the ‘child theme’ once and you never have to pay again. (Unlike many other ‘build-a-theme’ options that require a monthly subscription!)
Picking a customisable StudioPress theme will also save you money as hiring a web designer and web developer to create a theme for you starts costs thousands (I’ve asked around and a bespoke web design will be in the 5 figures range! )
When diving into designing your blog, remember that you should treat your blog as a business. Changing in between themes takes hours (remember your time = money) and you can run into all sorts of technical problems that can cause your blog to crash!
So to summarise, pick a free theme if you’re on a tight budget so you can start to grow your blog and audience.
If you can afford it, go with a paid theme because you can customise design (colours, fonts, layout etc.) and have technical support.
Once you upload your theme to WordPress and you’re ready to go!
So here's how you can start your Bluehost blog today! You can set up your blog in the amount of time it took to read this blog post 🙂
The 10 minutes it took to set up my blog last year have completely changed my life. Blogging has given me the ability to exponentially increase my income while working from home and connect with so many of you through our shared love for crocheting!
This tutorial can apply to any niche or type of blog so if you’ve had other any ideas, just give them a go!
Happy blogging,
Grace 🙂
PIN ME FOR LATER!
Thank you for this post! I have a blog on a free platform but it isn't really giving me the exposure I would like. I'm going to give BlueShot a try and see how it goes! Will you be posting more about this topic?
Hi Connie, I'm so glad you found it helpful! Yes I'll definitely be posting more about blogging, I've learnt so much in the past year and have so much to share! I think I'm actually going to create a 2nd blog that's all about blogging so that everyone that comes to For The Frills sees all of the crochet stuff and then the 2nd blog can be for those wanting to start their own blog!
Grace 🙂