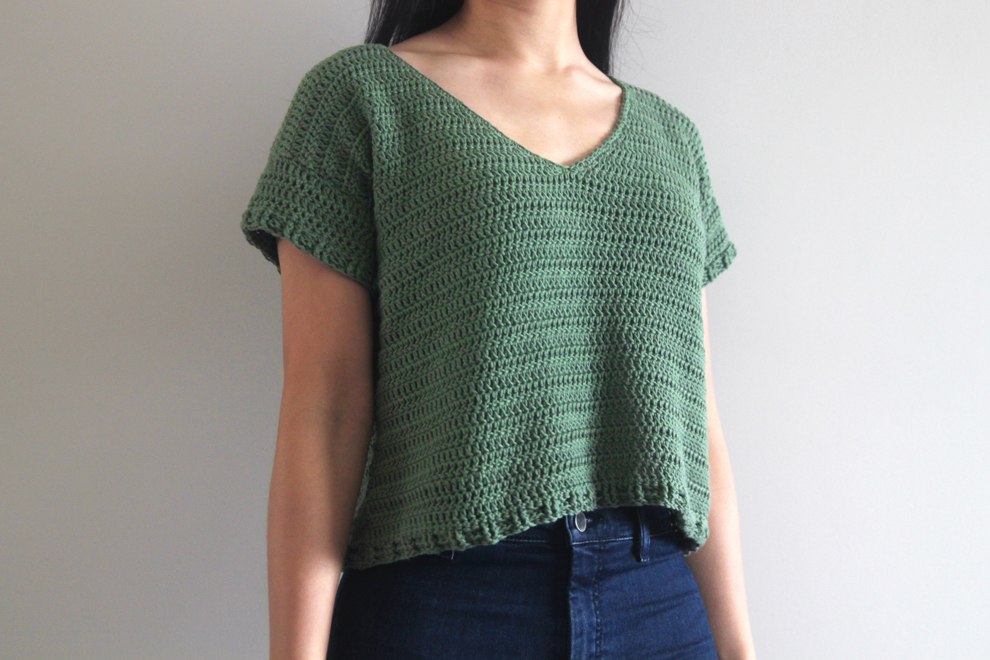
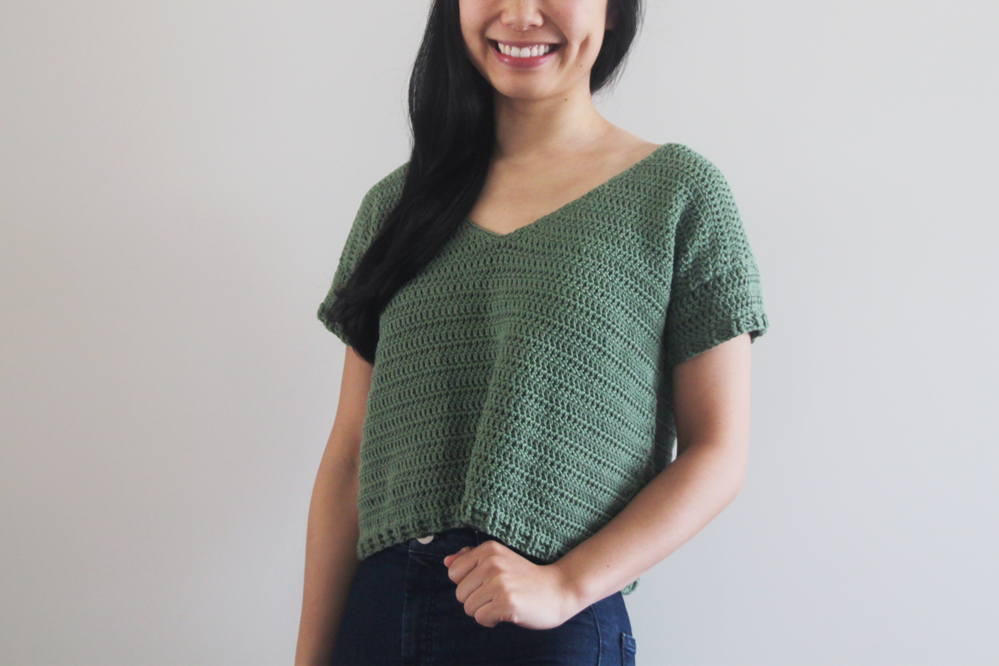
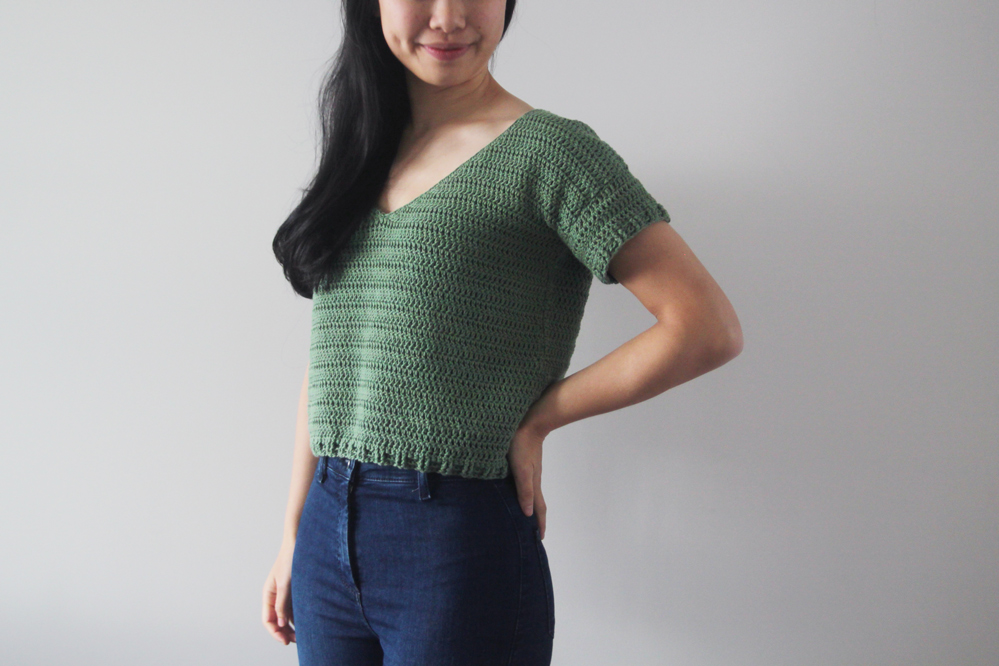
The Forest Breeze V-neck Tee is the crochet top you need in your wardrobe this summer!
This free crochet top pattern is accompanied by a video tutorial.
This post may contain affiliate links, view our disclosure policy for details.
The Forest Breeze V-neck Tee is the sister to the Sea Breeze Tank! It’s been so wonderful seeing all of your love for the Sea Breeze Tank and I thought a v-neck t-shirt style top would be such a versatile piece.
This tee has relaxed, loose fit (its slightly wider than the Sea Breeze) with an elegant v-neck and short t-shirt sleeves.
This design is made up of four panels (front, back and two sleeves) that are seamed together. Since the top is worked from the neck down, the length is completely customisable so you can have a quick, cropped top for summer or a longer full-length style for spring or autumn.
Design Inspiration
My inspiration for this piece was definitely the Sea Breeze Tank! I have been in a t-shirt/top mood lately because it’s been getting quite cold in New Zealand.
I wanted to create a piece that could be worn year-round (I think it’d look great with a turtleneck underneath or a cardigan over during winter) but still feel nice and summery! I’ve been on a bit of a light blue phase as its one of my favourite colours but I thought I needed to change it up a bit with this gorgeous army green!
Please let me know if there are any colours/yarns you’d like me to use. I’m always happy to discover new yarns!

Yarn
For the Forest Breeze V-neck Tee, I wanted to use a cotton yarn so that the top would be nice and cool for summer. However, sometimes 100% cotton yarns can get quite heavy and since this project has sleeves I didn’t want the weight of the sleeves to pull on the body and make the V-neck look flat.
So, I found Lana Grossa Wakame and it’s a 75% cotton, 25% viscose (sea cell) blend and its so lovely! The viscose makes the yarn softer and lighter so you get better yardage for each 50 grams. I find that it’s also wound tighter than the average cotton yarn so it glides so easily over the hook!
If you can’t find Lana Grossa Wakame where you live, a great alternative would be Lion Brand's Coboo. The bamboo gives this yarn a very similar feel to the Wakame.
Check out more free crochet patterns!
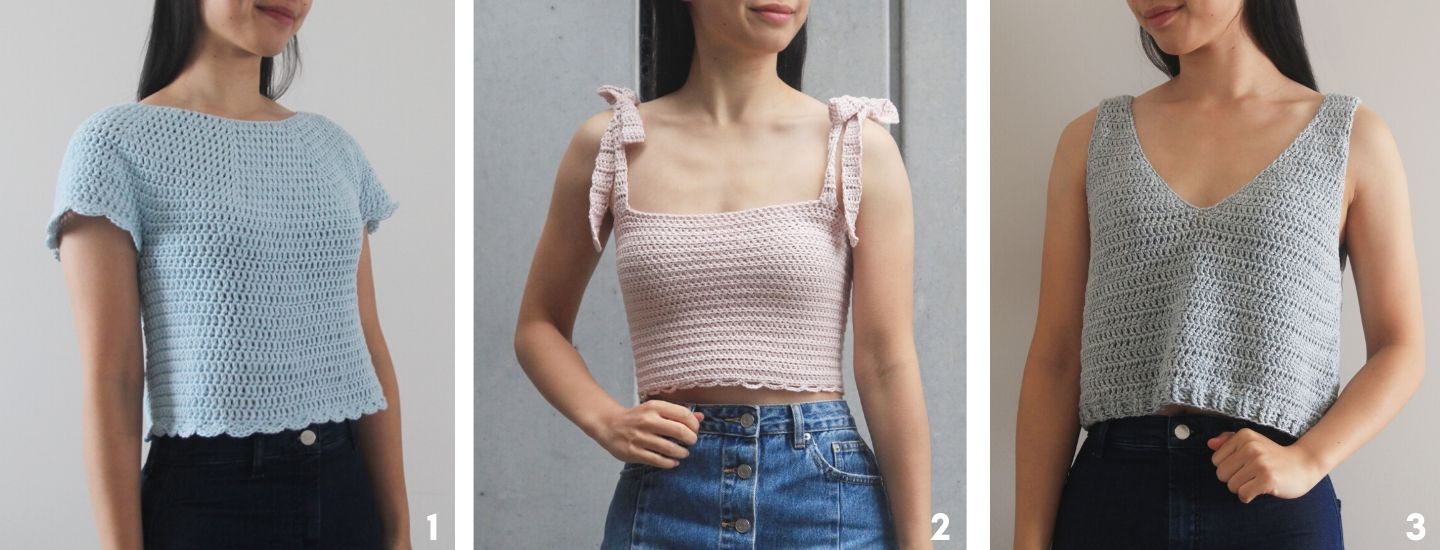
1. Forget-Me-Not Tee / 2. Leila Tie Strap Crop Top / 3. Sea Breeze Tank Top
Summer V-Neck Crochet Top Video Tutorial
Add the Forest Breeze Tee to your Ravelry queue!
Forest Breeze Tee - Ad-free, printable pdf version!
Notes:
*The sizing guide follows size XS(S, M, L, XL, 2XL, 3XL). E.g. “Ch 72(80, 88, 96, 104, 112, 120) means Ch 72 for XS, Ch 80 for Small, Ch 88 for Medium, Ch 96 for Large, Ch 104 for XL, Ch 112 for 2XL and Ch 120 for 3XL.
*Total number of stitches is listed between < >.
*"DC 10" means DC into the next 10 stitches.
*"2DC" means place 2 DC into the same stitch.
*Ch 2 and Ch 1 does NOT count as a stitch.
*This pattern uses US crochet terms.
Materials
Yarn – Lana Grossa Wakame – DK (10 ply), 125m/50g, 75% Cotton + 25% Viscose in Reseda Green (043)
Skeins – 5(6, 6, 7, 8, 9, 9)
LEVEL: Easy
Stitches & Abbreviations
St = stitch
Ch = Chain
SC = Single Crochet
DC = Double Crochet
FpDC = Front Post Double Crochet
BpDC = Back Post Double Crochet
GAUGE: 10cm/4” square = 16 stitches wide x 10 rows tall in double crochet
Measurements cm:
Width (body): 42(47, 52, 57, 62, 67, 72)
Length: 41(43, 43, 47, 47, 49, 49)
Armhole: 15(17, 18, 20, 22, 23, 24)
Sleeve Length: 6(6, 6, 8, 8, 8, 8)
Measurements inches:
Width (body): 16.5(18.5, 20.5, 22.5, 24.5, 26.5, 28.5)
Length: 16(17, 17, 18.5, 18.5, 19.5, 19.5)
Armhole: 6(6.5, 7, 8, 8.5, 9, 9.5)
Sleeve Length: 2.5(2.5, 2.5, 3, 3, 3, 3)
V-Neck Tee Pattern
FRONT BODY PANEL (V-NECK)
Left Side V
FOUNDATION CHAIN: Ch 20(24, 28, 30, 34, 38, 42).
ROW 1: DC into the 3rd chain from the hook, DC in each ch until end.
<18(22, 26, 28, 32, 36, 40)>
ROWS 2-4: Ch 2, turn, DC in each st until end.
<18(22, 26, 28, 32, 36, 40)>
ROW 5: Ch 2, turn, 2DC, DC in each st until end.
<19(23, 27, 29, 33, 37, 41)>
ROW 6: Ch 2, turn, DC 18(22, 26, 28, 32, 36, 40), 2DC.
<20(24, 28, 30, 34, 38, 42)>
ROW 7: Ch 2, turn, 2DC, DC in each st until end.
<21(25, 29, 31, 35, 39, 43)>
ROW 8: Ch 2, turn, DC 20(24, 28, 30, 34, 38, 42), 2DC.
<22(26, 30, 32, 36, 40, 44)>
ROW 9: Ch 2, turn, 2DC, DC in each st until end.
<23(27, 31, 33, 37, 41, 45)>
ROW 10: Ch 2, turn, DC 22(26, 30, 32, 36, 40, 44), 2DC.
<24(28, 32, 34, 38, 42, 46)>
ROW 11: Ch 2, turn, 2DC, DC in each st until end.
<25(29, 33, 35, 39, 43, 47)>
ROW 12: Ch 2, turn, DC 23(27, 31, 33, 37, 41, 45)>, 2DC, 2DC.
<27(31, 35, 37, 41, 45, 49)>
ROW 13: Ch 2, turn, 2DC, 2DC, DC in each st until end.
<29(33, 37, 39, 43, 47, 51)>
ROW 14: Ch 2, turn, DC 28(32, 36, 38, 41, 46, 50), 2DC.
<30(34, 38, 40, 44, 48, 52)>
ROW 15: Ch 2, turn, 2DC, 2DC, DC in each st until end.
<32(36, 40, 42, 46, 50, 54)>
ROW 16: Ch 2, turn, DC 31(35, 39, 41, 45, 49, 53), 2DC.
<33(37, 41, 43, 47, 51, 55)>
*Sizes XS(S, M) – Fasten off. Proceed to Right Side V instructions.
Sizes (L, XL, 2XL, 3XL)
ROW 17: Ch 2, turn, 2DC, DC in each st until end. <(44, 48, 52, 56)>
ROW 18: Ch 2, turn, DC 43(47, 51, 55), 2DC. <(45, 49, 53, 57)>
*Sizes (L, XL, 2XL, 3XL) – Fasten off. Proceed to Right Side V instructions.
Right Side V
FOUNDATION CHAIN: Ch 20(24, 28, 30, 34, 38, 42).
ROW 1: DC into the 3rd chain from the hook, DC in each ch until end.
<18(22, 26, 28, 32, 36, 40)>
ROWS 2-4: Ch 2, turn, DC in each st until end.
<18(22, 26, 28, 32, 36, 40)>
ROW 5: Ch 2, turn, DC 17(21, 25, 27, 31, 35, 39), 2DC.
<19(23, 27, 29, 33, 37, 41)>
ROW 6: Ch 2, turn, 2DC, DC in each st until end.
<20(24, 28, 30, 34, 38, 42)>
ROW 7: Ch 2, turn, DC 19(23, 27, 29, 33, 37, 41), 2DC.
<21(25, 29, 31, 35, 39, 43)>
ROW 8: Ch 2, turn, 2DC, DC in each st until end.
<22(26, 30, 32, 36, 40, 44)>
ROW 9: Ch 2, turn, DC 21(25, 29, 31, 35, 39, 43), 2DC.
<23(27, 31, 33, 37, 41, 45)>
ROW 10: Ch 2, turn, 2DC, DC in each st until end.
<24(28, 32, 34, 38, 42, 46)>
ROW 11: Ch 2, turn, DC 23(27, 31, 33, 37, 41, 45), 2DC.
<25(29, 33, 35, 39, 43, 47)>
ROW 12: Ch 2, turn, 2DC, 2DC, DC in each st until end.
<27(31, 35, 37, 41, 45, 49)>
ROW 13: Ch 2, turn, DC 25(29, 33, 35, 39, 43, 47), 2DC, 2DC.
<29(33, 37, 39, 43, 47, 51)>
ROW 14: Ch 2, turn, 2DC, DC in each st until end.
<30(34, 38, 40, 44, 48, 52)>
ROW 15: Ch 2, turn, DC 28(32, 36, 48, 42, 46, 50), 2DC, 2DC.
<32(36, 40, 42, 46, 50, 54)>
ROW 16: Ch 2, turn, 2DC, DC in each st until end.
<33(37, 41, 43, 47, 51, 55)>
*Size XS(S, M) – do not fasten off! Proceed directly to Joining Row instructions.
Sizes (L, XL, 2XL, 3XL)
ROW 17: Ch 2, turn, DC (43, 47, 51, 55), 2DC. <(44, 48, 52, 56)>
ROW 18: Ch 2, turn, 2DC, DC in each st until end. <(45, 49, 53, 57)>
*Sizes (L, XL, 2XL, 3XL) – do not fasten off! Proceed directly to Joining Row instructions.
JOINING ROW
JOINING ROW: Ch 2, turn, DC 31(35, 39, 43, 47, 51, 55), 2DC, 2DC into last st of Right Side V.
<35(39, 43, 47, 51, 55, 59)>
Place the Left Side V (with the right side facing up) to the left of the Right Side V.
2DC into the first st of the Left Side V, 2DC into the next st, DC in each st until end.
<70(78, 86, 94, 102, 110, 118)>
BODY ROW 1: Ch 2, turn, DC in each st until end of the row.
<70(78, 86, 94, 102, 110, 118)>
Repeat BODY ROW 1 until BODY ROW 20(22, 22, 24, 24, 26, 26).
<Total Rows 37(39, 39, 43, 43, 45, 45)>
*You can add or remove rows to reach your desired length – please keep in mind that the ribbing adds 2cm/0.75”.
BODY RIBBING
ROW 1: Ch 1, turn, SC in each st until the end of the row.
<70(78, 86, 94, 102, 110, 118)>
ROWS 2-3: Ch 2, turn, DC into 1st st, *FpDC 2, BpDC 2; rep from * until last st, DC into last st.
<70(78, 86, 94, 102, 110, 118)>
Fasten off.
BACK PANEL
FOUNDATION CHAIN: Ch 72(80, 88, 96, 104, 112, 120).
ROW 1: DC into the 3rd chain from the hook, DC in each ch until end.
<70(78, 86, 94, 102, 110, 118)>
ROW 2: Ch 2, turn, DC in each st until end.
<70(78, 86, 94, 102, 110, 118)>
Repeat ROW 2 until ROW 37(39, 39, 43, 43, 45, 45).
*If you made the top shorter/longer make sure you have the same number of rows as your front panel.
Do not fasten off! Proceed directly to Body Ribbing instructions.
SLEEVES
FOUNDATION CHAIN: Ch 52(56, 60, 68, 72, 76, 80).
ROW 1: DC into the 3rd chain from the hook, DC in each ch until end.
<50(54, 58, 66, 70, 74, 78)>
ROW 2: Ch 2, turn, DC in each st until end.
<50(54, 58, 66, 70, 74, 78)>
Repeat ROW 2 until ROW 4(4, 4, 6, 6, 6, 6).
Do not fasten off! Proceed directly to Sleeve Ribbing instructions.
SLEEVE RIBBING
ROW 1: Ch 1, turn, SC in each st until the end of the row.
<50(54, 58, 66, 70, 74, 78)>
ROWS 2-3: Ch 2, turn, DC into 1st st, *FpDC 2, BpDC 2; rep from * until last st, DC into last st.
<50(54, 58, 66, 70, 74, 78)>
Fasten off.
ASSEMBLY
Line up the neckline edges of the front and back panels along the neckline together. Sew the front and back panel together.
Fold sleeves in half and line up the middle of the sleeve with the seam of the front and back panels. Sew the sleeves to the body.
Fold the top in half and sew along the sides of top and underneath the sleeves.
FINISHING
At the top of the neckline, insert hook, secure yarn and pull up a loop.
Ch 1, SC evenly along the edge of the neckline, making sure that your stitches are not too tight.
Sl st into first SC to join. Fasten off.
Weave in all of your ends.
You’ve finished your Forest Breeze Tee!
Thank you for sharing! I'm always on the hunt for summery crocheted tops that aren't hot. I lived in Texas in the US, and it gets really hot here. Most tops, even though they are called "summer" are too heavy for our summers. This top will be perfect! I also checked out the sleeveless on, but I think the V's will be too deep for me. I'm rather high chested and my bra and strap would show. This pattern is perfect! When I get it made (and please don't hold your breath, I tend to make things for everyone else and very little for myself), I will share a photo with you!
Thanks again and hugs!
Thank you for your kind words Julie! I'm so glad you like the pattern! For the sleeveless version, I've included alteration instructions in case you want to make the 'v' shorter and sit higher on your body 🙂
Hi! I was wondering how much yarn you would need total to make a small size?
Thank you SO MUCH for your beautiful patterns. You’re one of my favorite artists!
Hiya,
Thanks so much for your patterns - I’ve been looking for cotton projects for ages!
Would the pattern be able to be modified to long sleeves too?
Thanks 🙂
Hi Lucy, I'm so glad you're enjoying the patterns! I've just released a sweater version of this top - the Ocean Breeze Pullover 🙂 Grace
I’m planning on making this but how many yards of yarn do I need?
All the yarn amounts are listed in the 'Materials' section 🙂 Grace
It doesn’t give yardage, it gives the number of skeins of the suggested yarn. So you can look up the now discontinued yarn and do the math, or the yardage could just be listed which would be easier.
Since this yarn is no longer available, I did a gauge swatch with a different yarn and it came out perfect. I had the size large. thank you for giving the gauge.
Hi, love all your designs except for me and my sisters we love our blouses longer (age related.. haha). Thank you very much for sharing! You video instructions are also very clear and easy to follow 🙏🙏🙏
I just finished this sweater. I used an acrylic yarn that is super soft and had to do a guesstimate on the # of stitches for my size and I also made it longer. I waited until it was sewn together and added a scalloped edge to the bottom instead of the ribbing.
What was the number of stitches that you used. I'm trying to make mine and I was wondering how much I should do
I've started making the size small version of this tee using Lion Brand Comfy cotton. I got the gauge to match up (16 stitches = 4 inches) however the shirt is coming out much wider than the cited 18.5 inches despite being 78 double stitches wide. Mine measures 20 inches and I'm afraid I'm going to have to frog it after all the progress I made on it already because it's way too big.
When I do the math, a gauge of 16 stitches/4 inches should convert to 19.5 inches for 78 double stitches, which is very close to what I have. Is there an error in the way I'm interpreting the gauge?
Hi, I found that once you sew the front and back panels together the edges/turning chains 'interlock / match up' with each other. So when you measure the finished garment lying flat (as opposed to a gauge swatch) the width of finished top is slightly smaller. According to the gauge the rectangle should measure exactly 19.19" (so closer to 19" and then once you sew your top together it should be slightly smaller by about 1/2"). If your rectangle is a bit wide, your gauge might not be even throughout the entire rectangle? Since this top is designed to be loose and drapey, and if you don't mind a slightly looser fit, you should be ok with a 20" panel.
I hope this helps,
Grace
Hi ! Thank you so much for sharing beautiful patterns, I just made my very first (and not last) crochet piece, love it!
Sadly, I followed the instructions for a medium and ended up with something the size of a 3XL. I don't know what I did wrong, used the same hook and yarn as you?
Hi Chelsea, it seems like your gauge might be too loose? Since everyone crochets differently (even if you have the same yarn and hook) I always recommend crocheting a gauge swatch and changing your hook accordingly to match the gauge in the pattern.
Grace 🙂
Hi there,
Thanks for sharing this pattern! I'm so excited to make my first shirt, but I'm having a bit of trouble determining which size to make for these measurements: 37 in chest/bust, 31 in waist, 12 in body length, 6 inch armhole. There is a very good chance that I am misunderstanding the measurements, but compared to the pattern, the length would be about a XS but the width/ body is bigger than even the 3XL.
Any help would be greatly appreciated! 🙏
Hi Pamela,
The measurements listed in the pattern don't match the measurements you've stated in your question? For size XS the width =16.5", length = 16" and armhole = 6". The length is customisable so you adjust it to any length that you'd like.
Grace 🙂
hello! i never understand this in patterns, but do you do a DC in the Ch2 from the previous row?
Hi Logan,
It normally depends on the pattern itself! In my notes if it says 'chain 2 doesn't count as a stitch' (as it does in this particular pattern) that means you don't place a stitch in it (because this would cause your stitch count to increase). There isn't a hard a fast rule because different stitch combinations and stitches might require the chain 2 to count as a stitch in order to create the correct pattern, while others don't need it.
I hope this helps,
Grace
Hi Grace
Thank you so much for sharing the pattern. I can’t wait to finish it. Love all your tops. God bless.
HI Grace
This pattern looks like so much fun thanks for sharing. However, The video does not match the pattern. The video is for a headband.