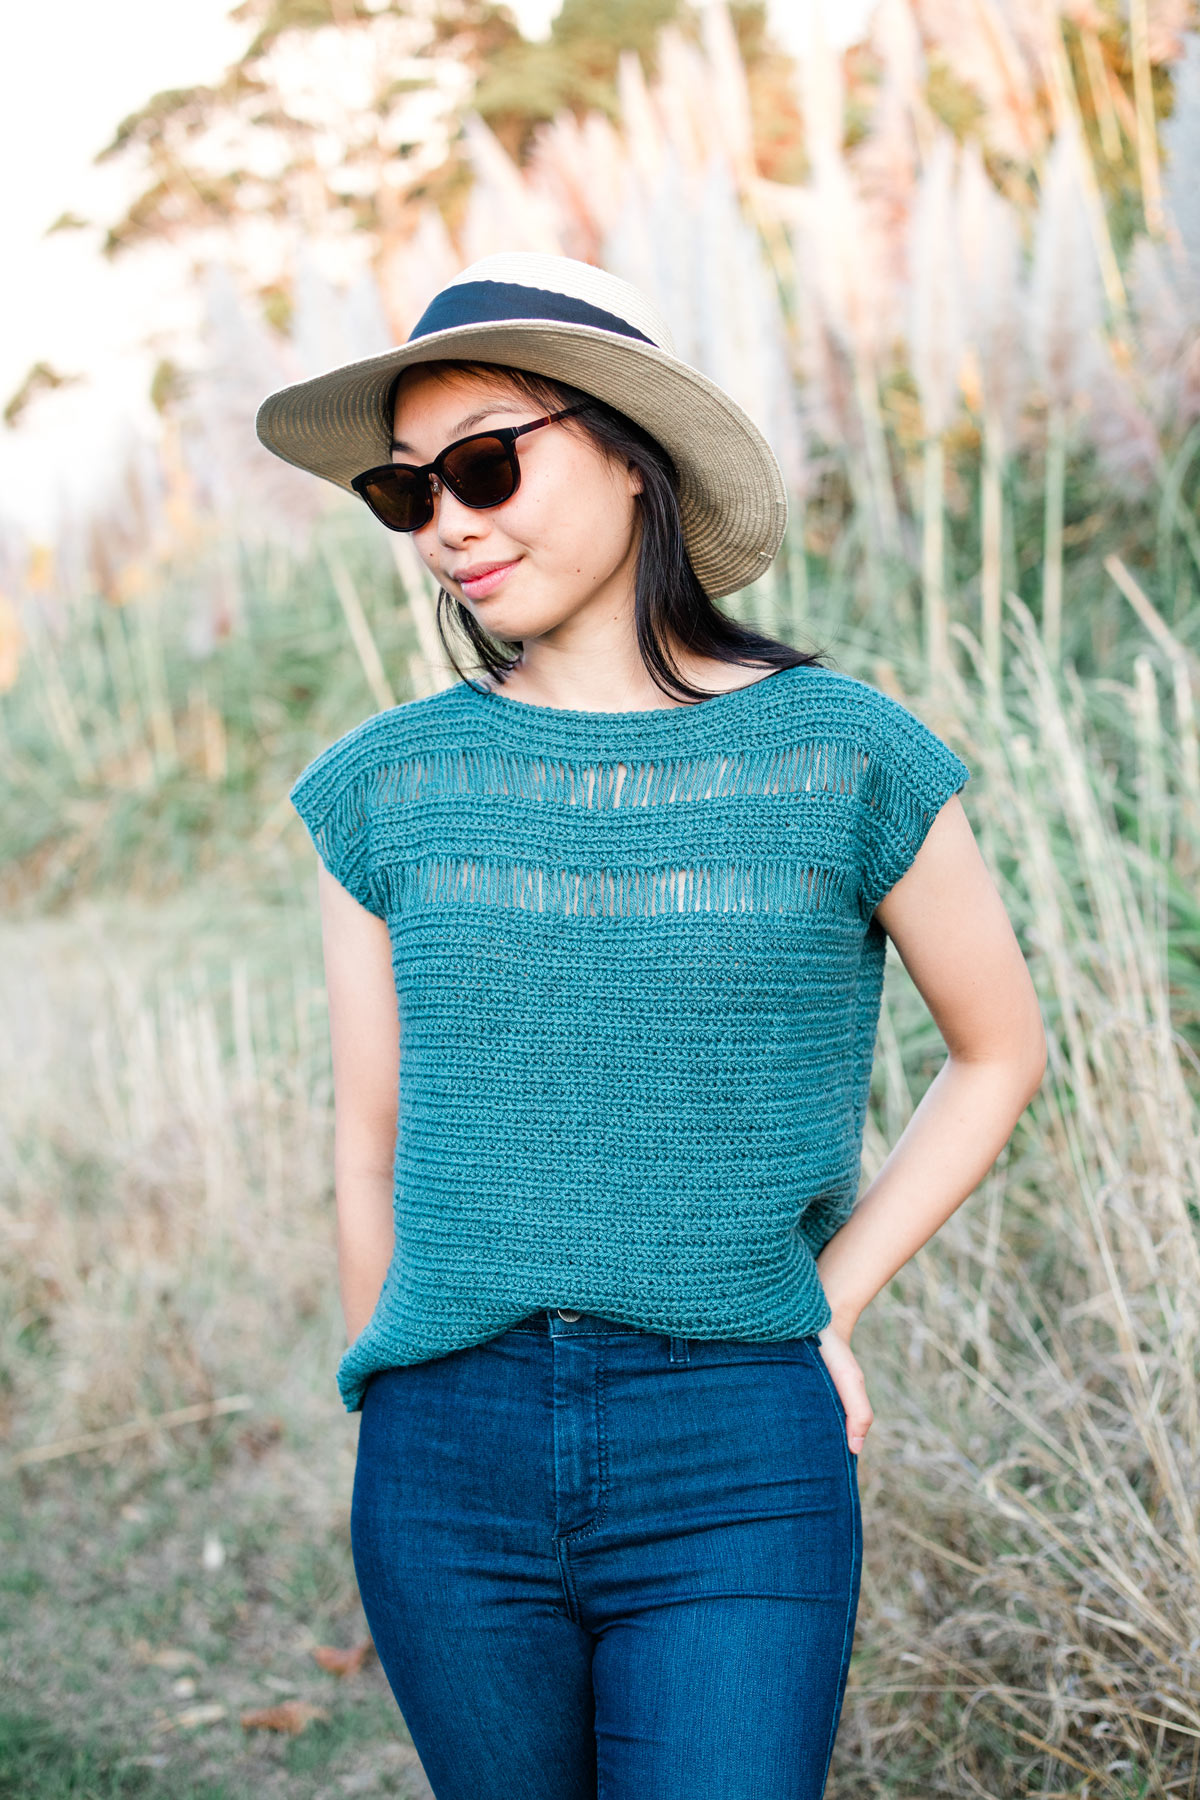
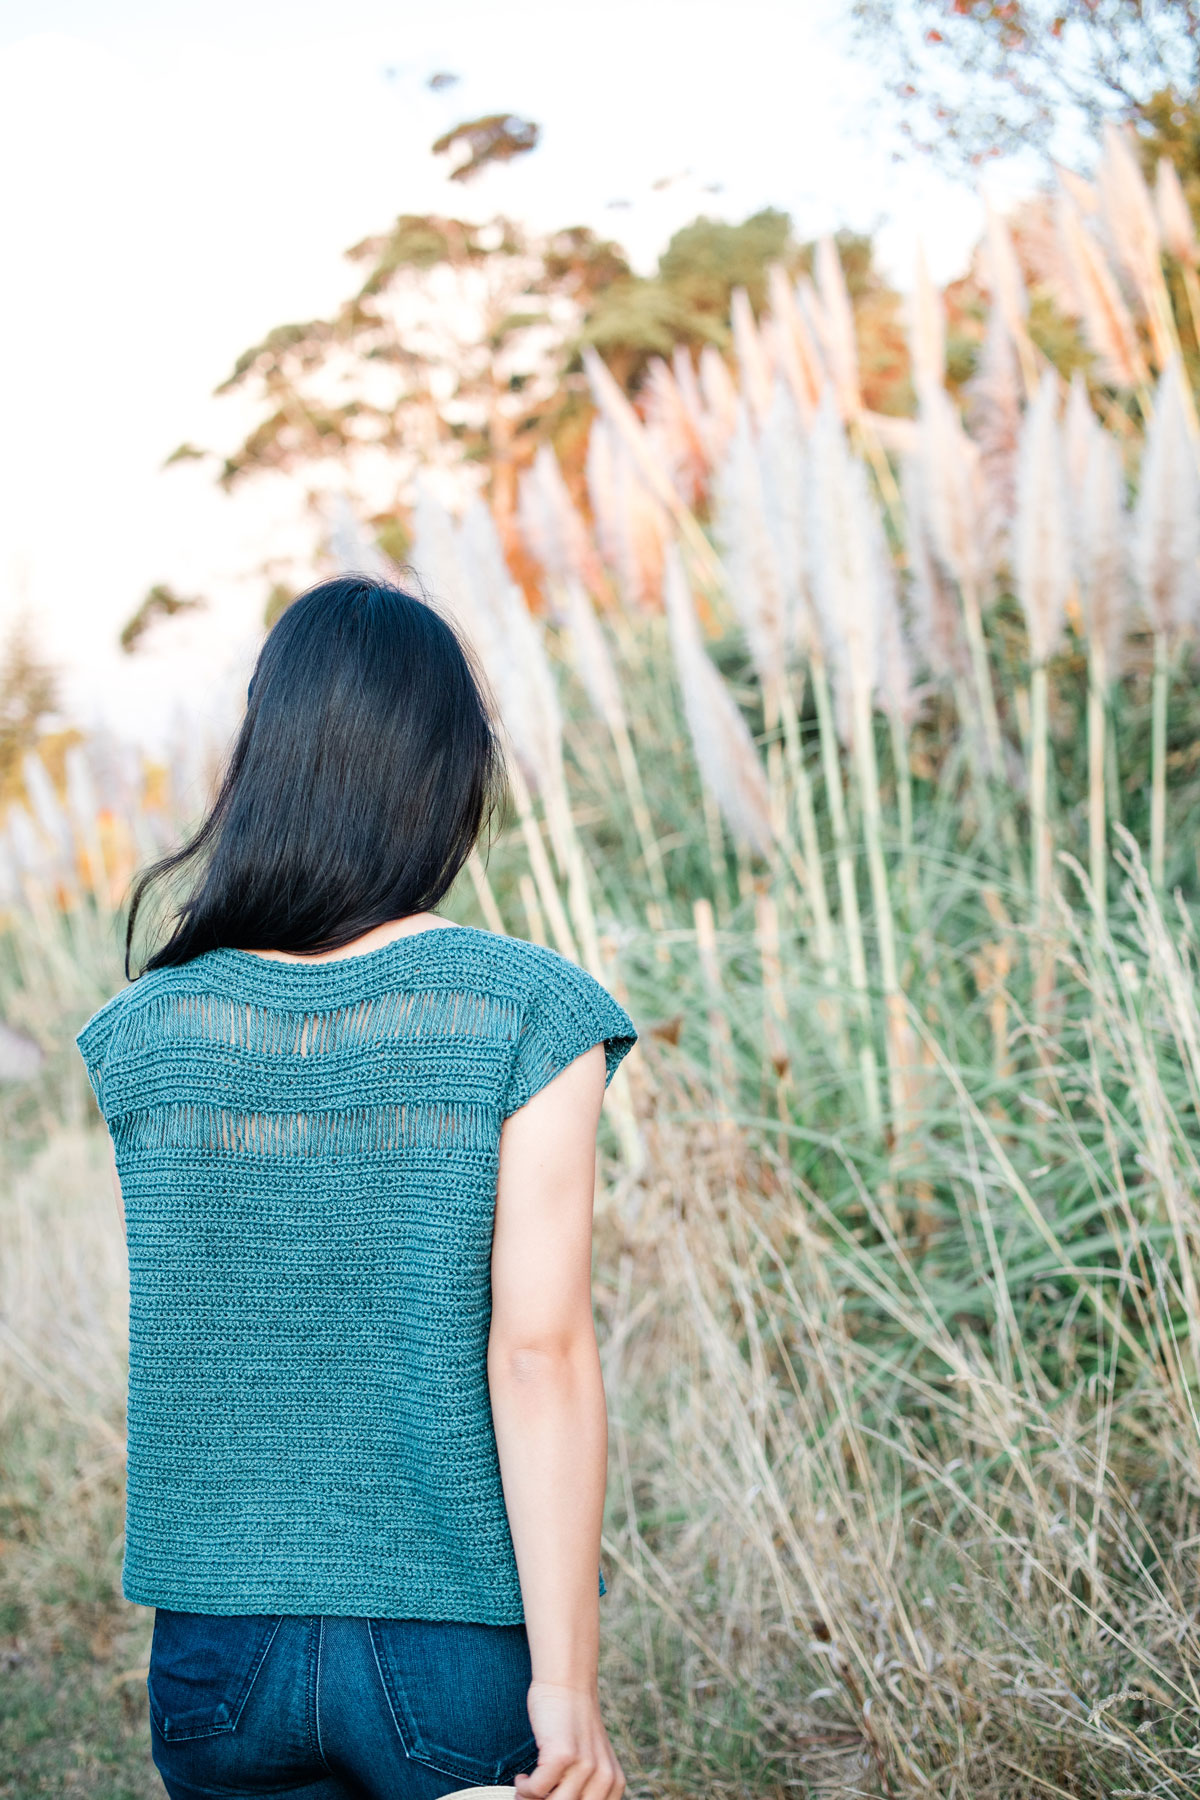
Elevate your summer wardrobe and learn how to crochet a top using broomstick loop stitches with the Summer Stream Tee! The dropped loop stitches add interest and breathability to the top, while short rows are used to create a simple and flattering boat neckline.
This post may contain affiliate links, view our disclosure policy for details.
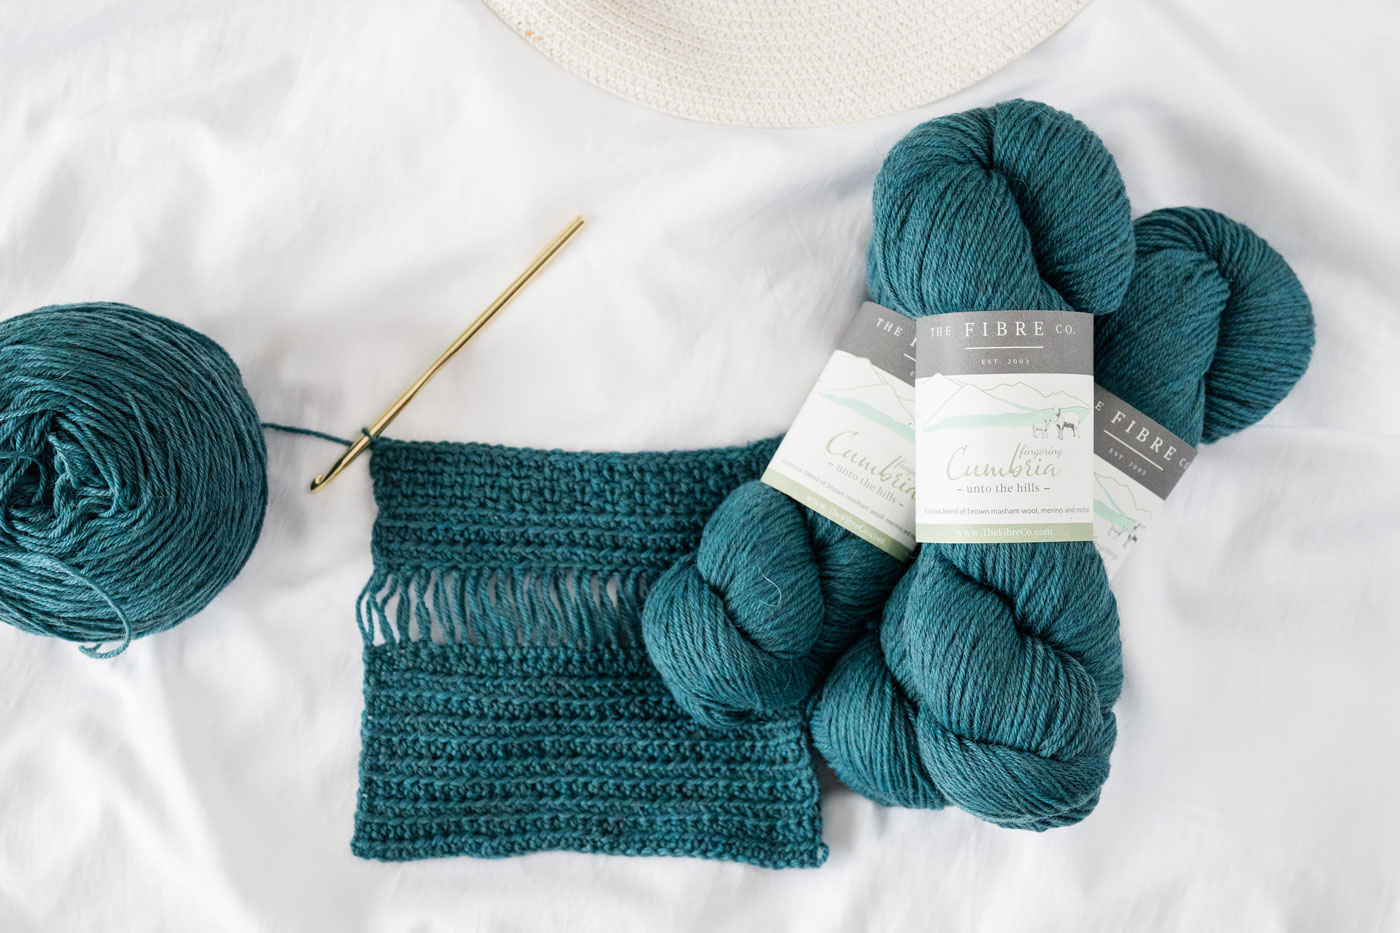
Thank you to The Fibre Co. for providing yarn support for this free crochet top pattern!
As always, all thoughts and opinions are my own 🙂
The Summer Stream Tee is versatile, modern and a lot easier to crochet than it seems! (Pretty much my favourite kind of crochet project haha). This simple summer top consists of two identical body panels (the front and back are the same) that are worked up in front loop half double crochets.

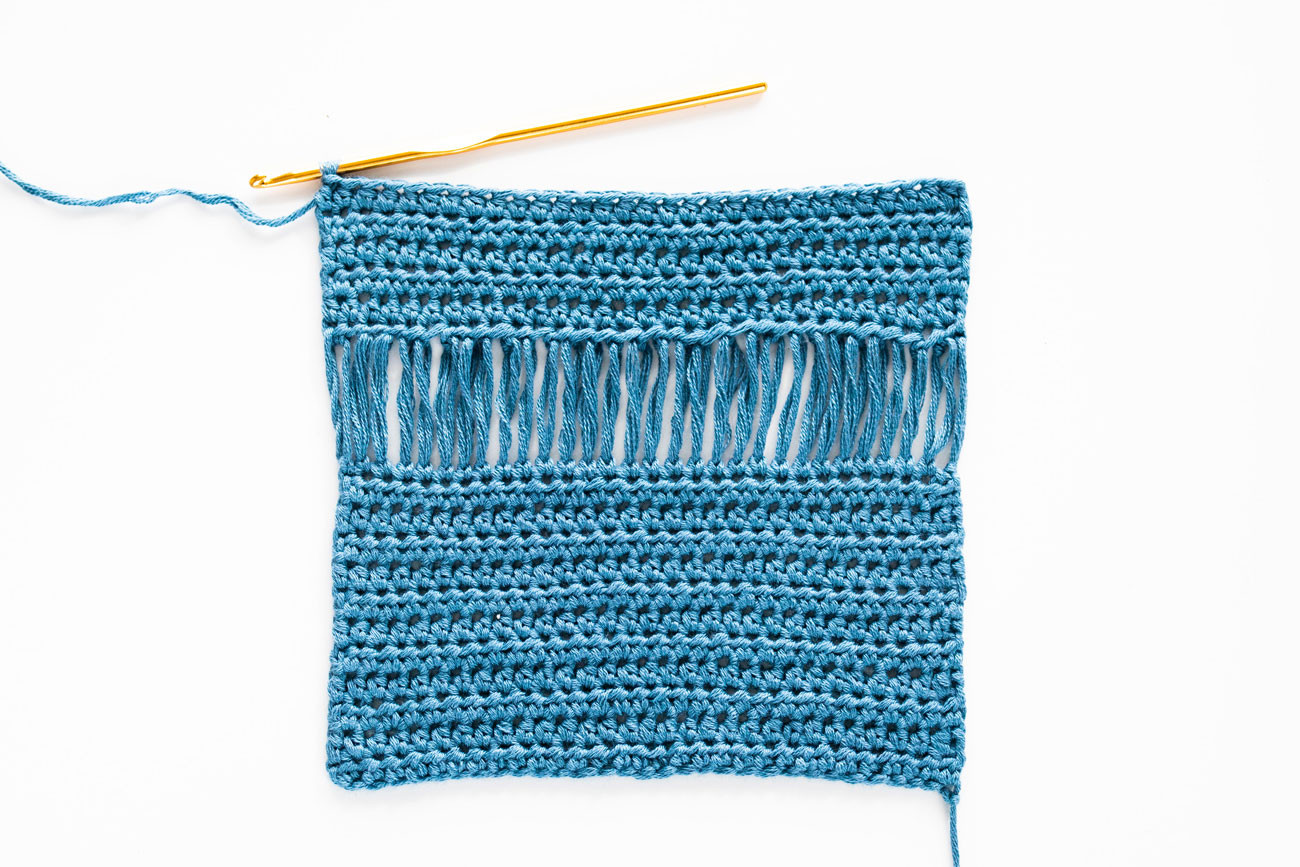
Dropped loop stitches add a delicate lacy-mesh details but the striking vertical lines elevate this top for a modern and sophisticated vibe. The neckline is shaped using slip stitches so you never have to fasten off, which means you have less ends to weave in 🙂 I always find weaving in the ends the toughest part of the project – you’re so close to the finish line but you still have work to do!
Design Inspiration
Whenever the weather starts to get warmer and all of my crochet tops come out of storage, I know that winter is truly over and spring has begun! I think crochet tops are my most worn ‘me-made’ items.
Since New Zealand is so far south, the light in the country changes drastically from season to season. During the summer months, the sun is so strong that it you can see beams of sunlight rippling over the water any time of day. The glowy, striking light is one of my favourite things about New Zealand summers and it’s reflected in the loop stitch detail in the neckline.
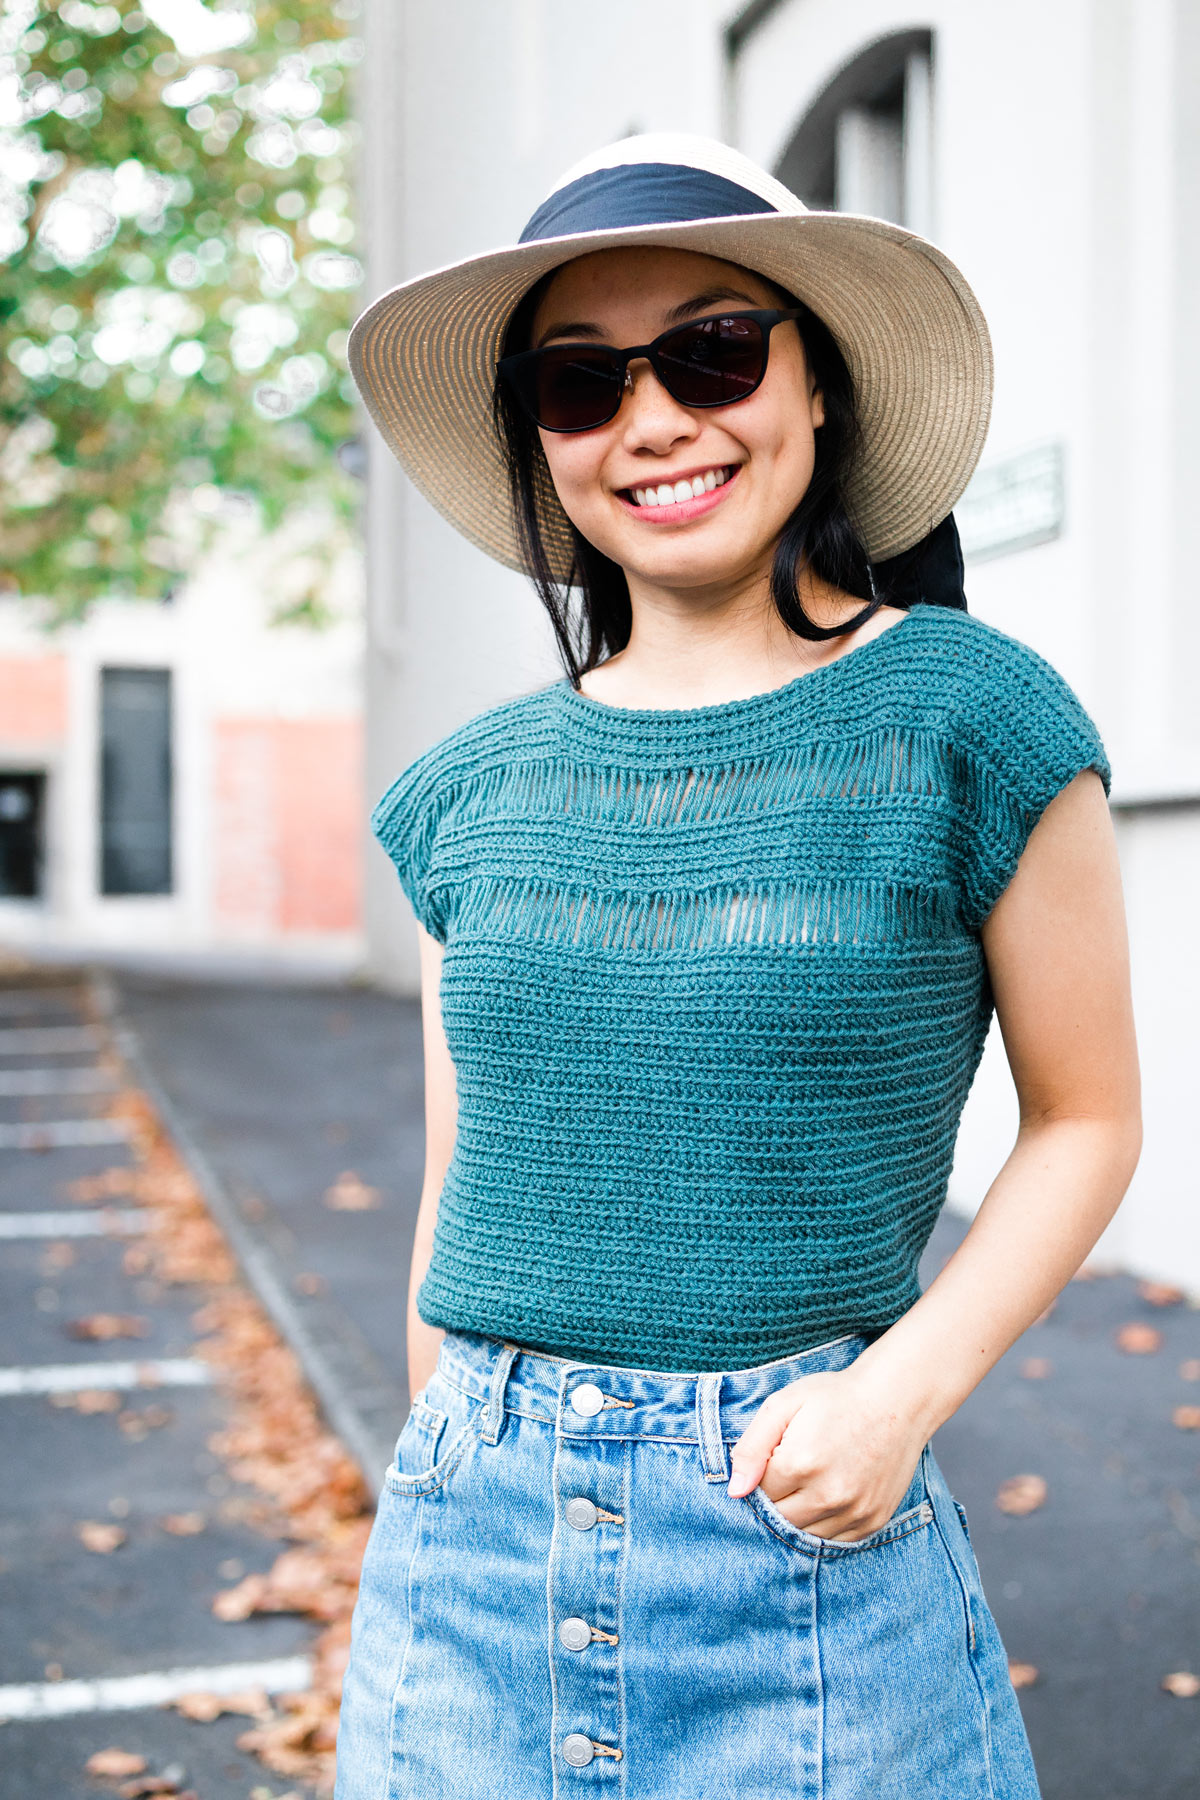
I also love how the mix of front loop half double crochets and dropped loop stitches work together to create a relaxed, easy drape so this top doesn’t really look like crochet. The Summer Stream Top has a fun boho summer vibe while still looking very modern!
This project is classified as Easy+/Intermediate. The drop loop stitch/broomstick technique might be new to you, but it’s very simple to create! If you need extra help I have an entire tutorial teaching you how to crochet the drop loop stitch here!
Construction
This simple summer top is crocheted in rows from the bottom up and then we’ll add the drop stitches and neckline shaping. The length of this top is customisable (follow the instructions provided in the pattern) and you can alter this pattern to have just 1 row of drop stitches. Just keep in mind that you’ll need more yarn if you decide to crochet half double crochets instead of the drop loop stitches!
For the Summer Stream crochet pattern, both the front and back panels are exactly the same. Once you’ve crocheted the two panels simply place them on top of each other, whip stitch the shoulders together and down the sides leaving a gap for the armholes. Also, just as a note, I always whip stitch crochet pieces together with the wrong side facing outwards because I find it gives a neater result.
Yarn
This project uses one The Fibre Co. Cumbria Fingering in the colour Windermere. The shade is a lovely rich turquoise that’s right in between blue and green. In real life the colour is a bit more muted but when the sun shines on it (like in the pictures :)) it’s a gorgeous rich jewel tone. It’s a luxurious wool and mohair blend, maybe not the best choice for summer but the natural fibres and yarn weight means that the top is breathable and light weight.
Even though this yarn is called a ‘fingering’ I think it’s actually a sport/5ply weight yarn that’s closer to a DK. If you’re looking for substitutes WeCrochet's Shine Sport and Simply Organic Cotton are both cotton yarns and have a very similar thickness. Lion Brand’s Beautiful You also is a similar weight although it’s tightly spun so you’ll have more stitch definition.
Looking for summer crochet inspiration?
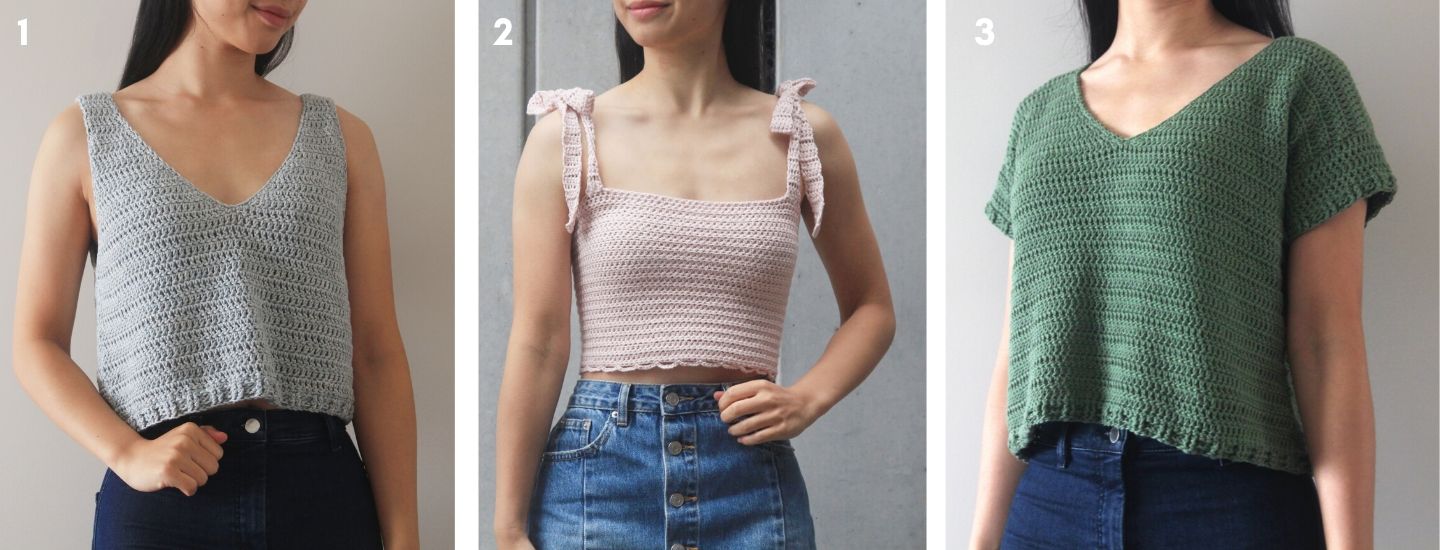
1. Sea Breeze Tank Top / 2. Leila Tie Strap Crop Top / 3. Forest Breeze Tee
Pin me for later!
Check out the Drop Loop Stitch Video Tutorial!
Add the Summer Stream Tee to your Ravelry queue!
Purchase the ad-free, pdf printable version of the Summer Stream Tee!
*Sample is a size small shown on a 5’3” model with a 32” bust.
*The sizing guide follows size XS(S, M, L, XL, 2XL, 3XL). E.g. “Ch 82(87, 96, 105, 114, 123, 132) means Ch 82 for XS, Ch 87 for Small, Ch 96 for Medium, Ch 105 for Large, Ch 114 for XL, Ch 123 for 2XL and Ch 132 for 3XL.” If there is only one number, it applies to all sizes.
*"HDC 10" means HDC into the next 10 stitches.
*The turning chain, ch 1 does NOT count as a stitch, unless otherwise noted.
*Total stitches are indicated between < >.
*This pattern uses US crochet terms.
*The sample tee uses The Fibre Co. Cumbria Fingering and it’s closer to a thick sport/5ply/fine (2).
*You can replace 1 row of Drop Stitches with 4 rows of FLO HDC, just take into account that you’ll require more yarn.
LEVEL: Easy+/Intermediate
Materials
Yarn – The Fibre Co. Cumbria Fingering – Sock/Fingering/Super Fine (1), 300m/328yds/100g, 90% Wool + 10% Mohair, Windermere
2(3, 3, 3, 4, 4, 5) skeins
approx. 200(215, 260, 290, 335, 360, 415)g
2.5cm/1” diameter knitting needle/tube/wooden dowel
Stitches & Abbreviations
Ch = Chain
Sl st = Slip Stitch
HDC = Half Double Crochet
FLO = Front Loop
DLO = Dropped Loop Stitch
St(s) = Stitch(es)
Rep = Repeat
Sk = Skip
Special Stitches
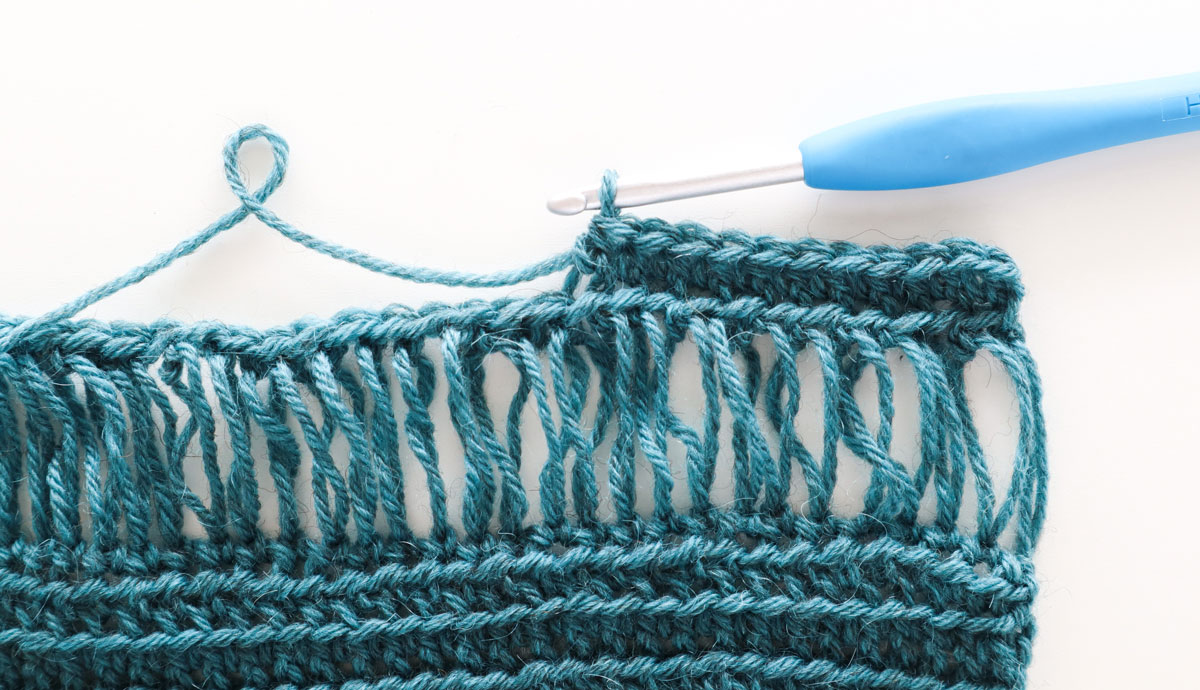
Drop Loop Stitch = Insert hook into next st, yarn over, pull up a loop, ch 1, pull ch 1 loop over knitting needle, pull loop tight.
The Drop Loop Stitch also has a step-by-step video tutorial + photo tutorial!
Measurements cm:
To fit Bust: 76(81, 91, 101, 111, 122, 132)
Panel Width: 43(46, 51, 56, 61, 66, 71)
Length: 52(52, 55, 55, 58, 58, 62)
Measurements inches:
To fit Bust: 30(32, 36, 40, 44, 48, 52)
Panel Width: 17(18, 20, 22, 24, 26, 28)
Length: 20.5(20.5, 21.5, 21.5, 23, 23, 24.5)
GAUGE
10cm/4” square = 18.5 stitches wide x 12 rows tall in front loop half double crochet
Summer Stream Tee Pattern
Body Panel
(Make 2)
FOUNDATION CHAIN: Ch 82(87, 96, 105, 114, 123, 132).
ROW 1: HDC into 2nd ch from hook, SC in each st until end, turn.
<81(86, 95, 104, 113, 122, 131)>
ROW 2: Ch 1, FLO HDC across, HDC in last st, turn.
<81(86, 95, 104, 113, 122, 131)>
Repeat ROW 2 until ROW 40(40, 42, 42, 44, 44, 46).
*ALTERATION NOTE: You can make your top longer/shorter by adding/removing rows. Please keep in mind that the loop details + neck shaping adds 18(18, 20, 20, 22, 22, 24)cm / 7(7, 8, 8, 8.5, 8.5, 9.5, 9.5)” to the body length.
NECK DETAIL
Learn the Drop Loop Stitch with a step-by-step video tutorial!
DROP LOOP ROW 1: Ch 1, pull ch 1 loop over knitting needle, pull loop tight, DLO in each st until end,
*If your knitting needle gets ‘full’ of loops, push all loops off. Place last loop back onto needle and pull tight.
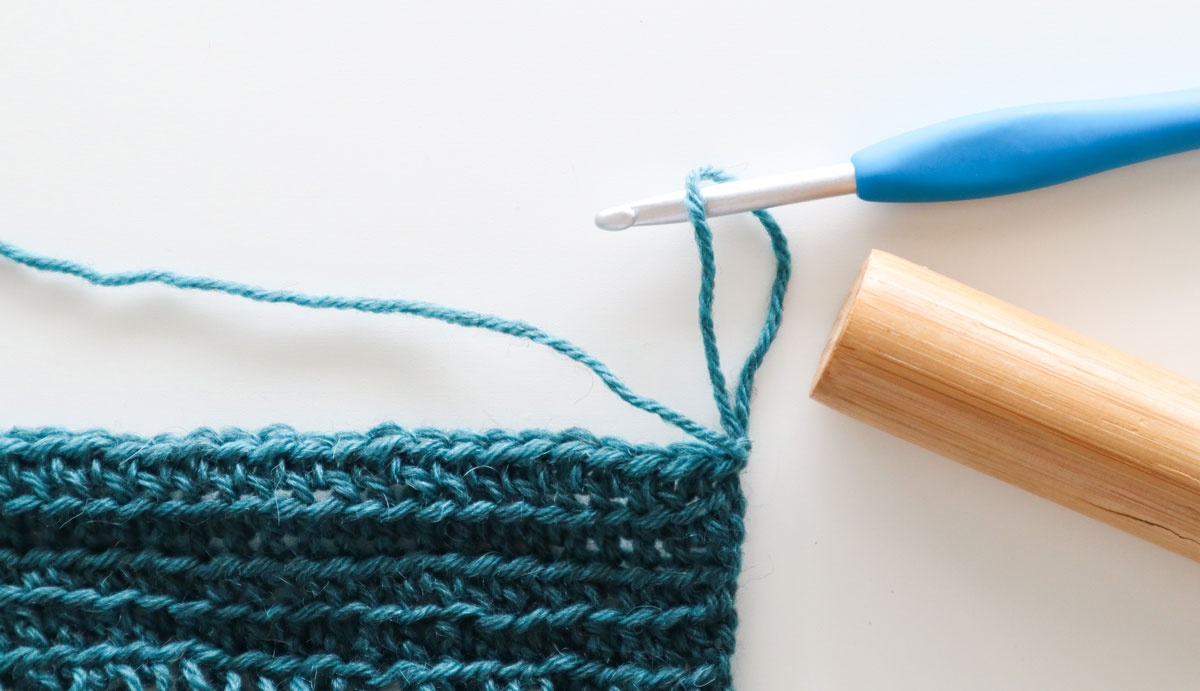
Repeat DLO instructions in each st until end of row.
Pinch the base of the last DLO, remove knitting needle and turn.
<81(86, 95, 104, 113, 122, 131) loops>
DROP LOOP ROW 2: Still holding onto the DLO, insert hook into same DLO, yarn over, pull up a loop, ch 1, HDC into first DLO, HDC in each DLO until end of row, turn.
<81(86, 95, 104, 113, 122, 131)>
ROWS 3-7: Ch 1, FLO HDC across, HDC in last st, turn.
<81(86, 95, 104, 113, 122, 131)>
ROW 8: As DROP LOOP ROW 1.
<81(86, 95, 104, 113, 122, 131) loops>
ROW 9: As DROP LOOP ROW 2.
<81(86, 95, 104, 113, 122, 131)>
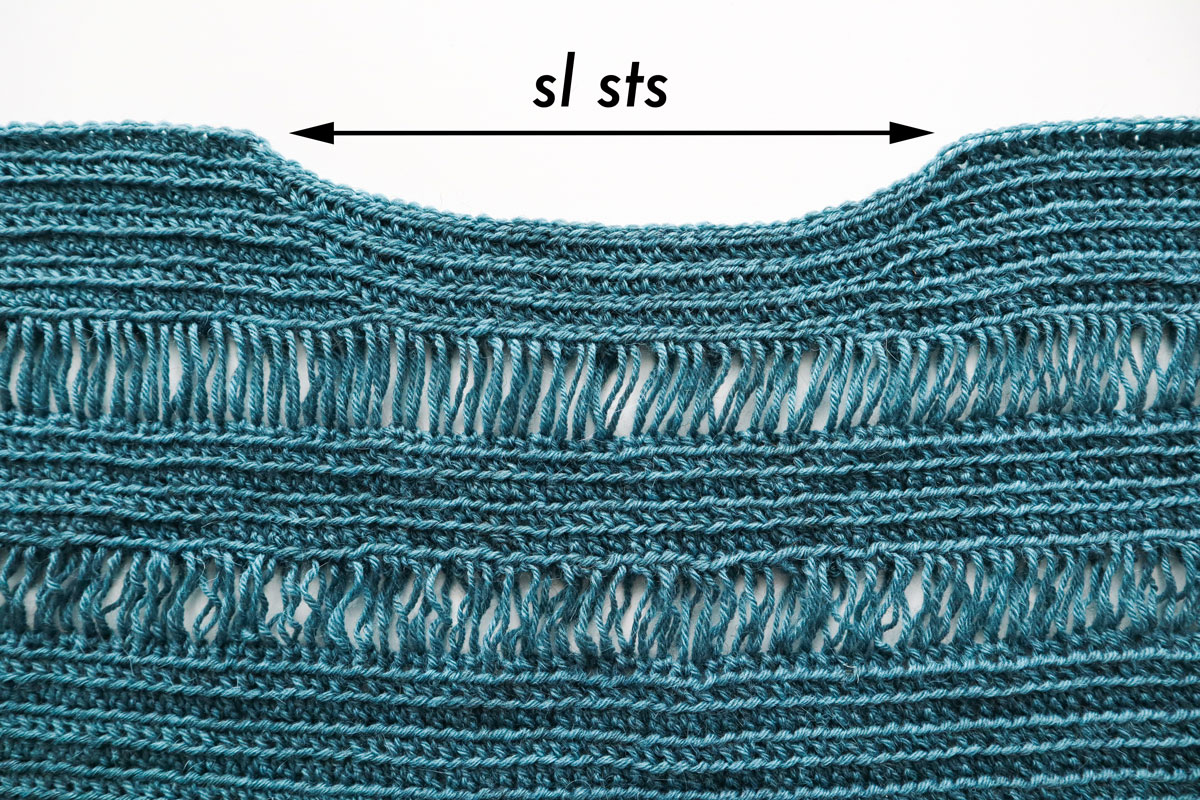
ROW 10: Ch 1, FLO HDC 28(30, 34, 38, 42, 46, 50), sl st 25(26, 27, 28, 29, 30, 31), FLO HDC across, HDC in last st, turn.
*Make sure that your sl sts aren’t too tight or they will cause the centre of the top to pucker. They should be as loose as your HDCs.
<81(86, 95, 104, 113, 122, 131)>
ROW 11: Ch 1, FLO HDC in each st until end, turn.
ROW 12: Ch 1, FLO HDC 26(28, 32, 36, 40, 44, 48), sl st 29(30, 31, 32, 33, 34, 35), FLO HDC across, HDC in last st, turn.
<81(86, 95, 104, 113, 122, 131)>
ROW 13: As Row 11.
ROW 14: Ch 1, FLO HDC 24(26, 30, 34, 38, 42, 46), sl st 33(34, 35, 36, 37, 38, 39), FLO HDC across, HDC in last st, turn.
<81(86, 95, 104, 113, 122, 131)>
ROW 15: As Row 11.
ROW 16: Ch 1, FLO HDC 22(24, 28, 32, 36, 40, 44), sl st 37(38, 39, 40, 41, 42, 43), FLO HDC across, HDC in last st, turn.
<81(86, 95, 104, 113, 122, 131)>
Sizes XS, S – Fasten off.
Sizes M, L, XL, 2XL, 3XL only
ROW 17: As Row 11.
ROW 18: Ch 1, FLO HDC (26, 30, 34, 38, 42), sl st (43, 44, 45, 46, 47), FLO HDC across, HDC in last st, turn.
<(95, 104, 113, 122, 131)>
Sizes M, L – Fasten off.
Sizes XL, 2XL, 3XL only
ROW 19: As Row 11.
ROW 20: Ch 1, FLO HDC (32, 36, 40), sl st 49(50, 51), FLO HDC across, HDC in last st, turn.
<(113, 122, 131)>
Sizes XL, 2XL – Fasten off.
Size 3XL only
ROW 21: As Row 11.
ROW 22: Ch 1, FLO HDC 38, sl st 55, FLO HDC across, HDC in last st, turn.
<(131)>
Fasten off.
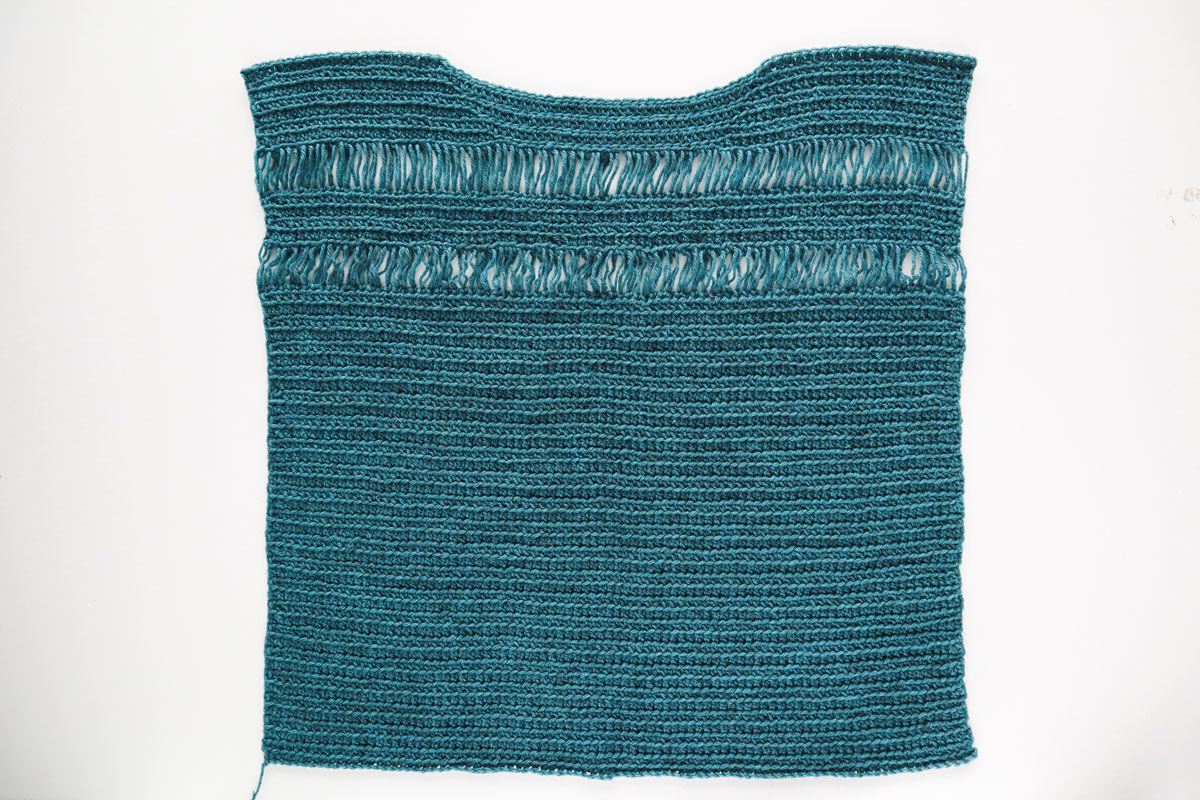
Assembly & Finishing
Lay the 2 body panels on top on each other, with the right sides touching on the inside.
Whip stitch across the top of the shoulders.
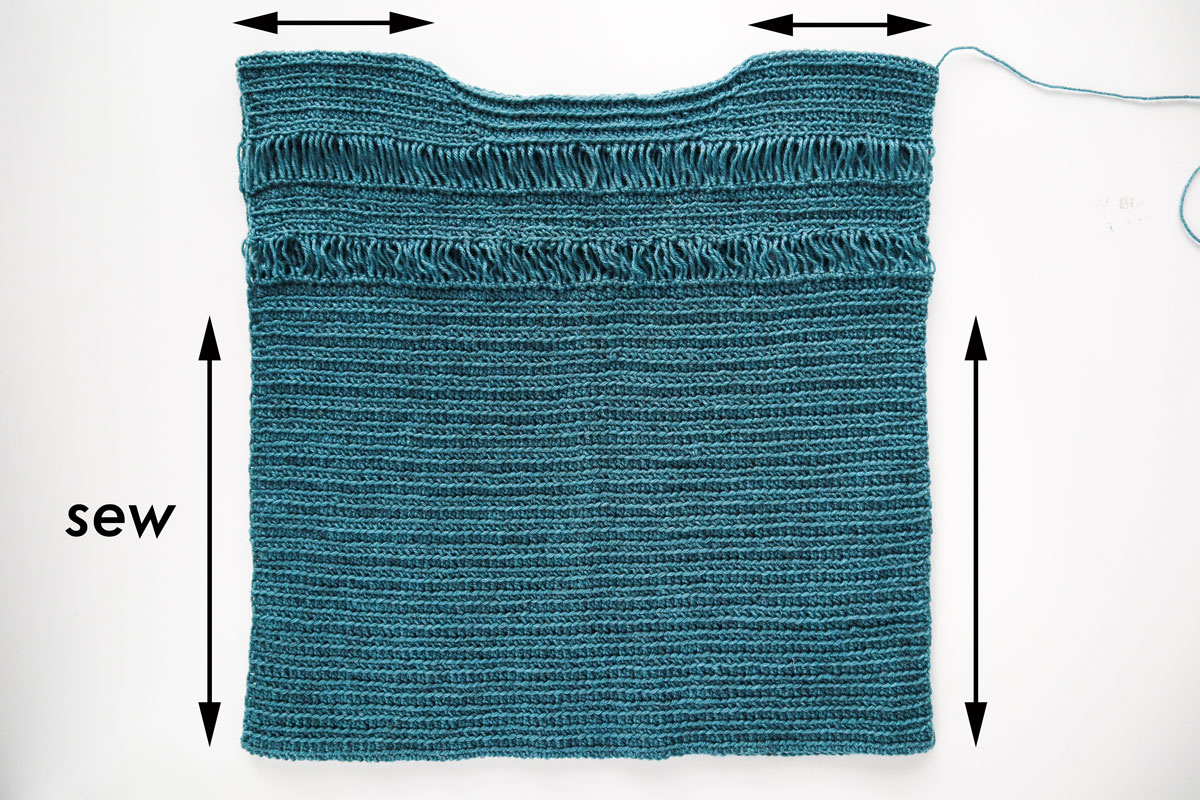
Whip stitch down the sides of the body leaving a gap for the armholes.
For a point of reference leave a gap approx. 18(18, 19, 20, 22, 23, 24)cm / 7(7, 7.5, 8, 8.5, 9, 9.5)”
However, you can make the armholes as small or as large as you want – whatever feels comfortable for you 🙂
Weave in all of your ends.
Steam and block your top.
Voilà! You’ve finished your Summer Stream Tee 🙂
Oh this is so pretty. Thank you for the clear directions!
Is it possible to not only add length but width around the stomach area? The bust size will work but the other width size doesn’t fit so how can I make that part bigger ? It’s such a beautiful shirt that I wanted to make one for myself n know that the width was a Problem. So can I get any help from u and how many more skeins of yarn will I need.
Thanks for an hel
Merry
Hi Merry, you can start with a longer foundation chain and then slowly decrease up the sides until you reach your bust measurement. Otherwise I'd suggest just sizing up altogether and the top will fit loosely around your bust. How much extra yarn you'll need depends on your stomach measurement compared to your bust measurement and what size you start with but as a general estimate I'd add at least 25g of yarn for every extra 10cm/4" of width.
I hope this helps,
Grace
I just made this and love it! Got lots of compliments today. I wore it layered over a white button down shirt, making it even more versatile. Thanks for sharing a chic and fun pattern. I am sharing your website with all my crafty friends.
Hi, this top is BEAUTIFUL! I would love to give it a try. Would you be able to suggest a USA brand yarn/fiber that does not contain wool. Thank you for sharing your lovely creations with us!
Hi!
I made this pattern in an XS and it came out quite large and can actually fit me despite me measuring up to be the XL size. I used the right size hook + was pretty tight in my tension so I'm not 100% sure where I went wrong!
Really appreciated how clear this pattern was though! It was so easy to follow and came out looking really nice in the end.