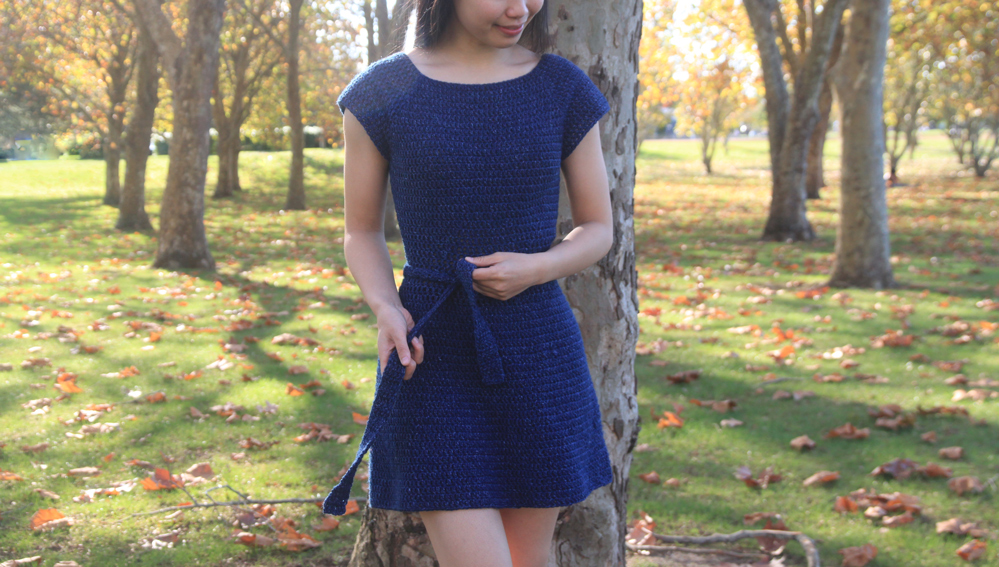
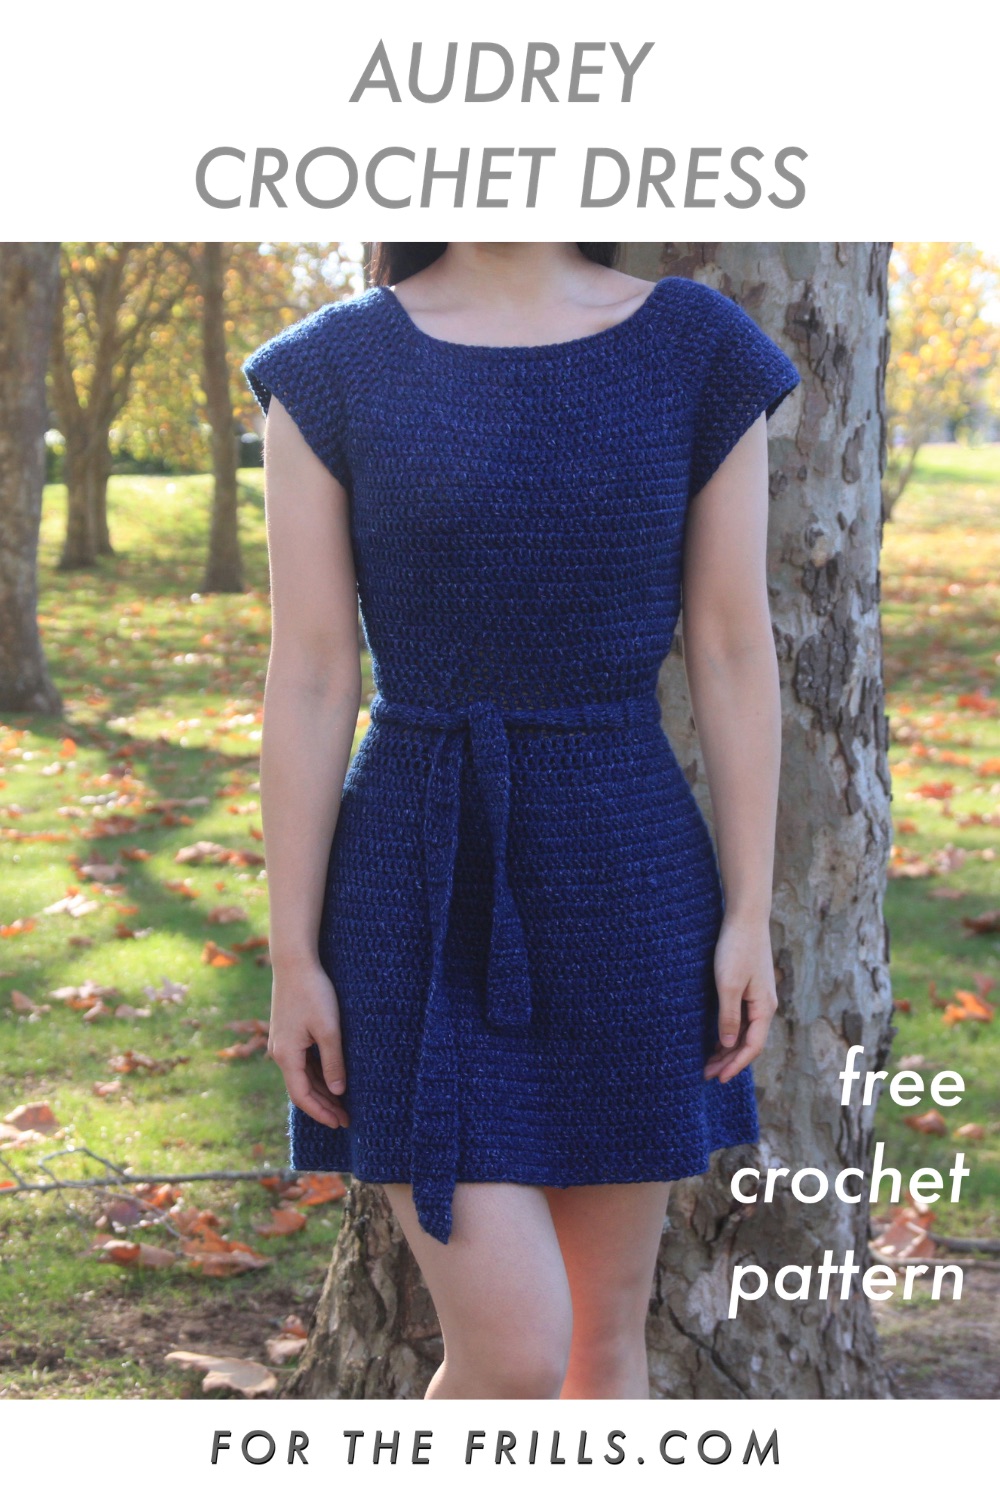
It’s finally here! I’m so excited to share my newest free crochet pattern with you! The Audrey Crochet Dress is the staple crochet dress everyone needs in their summer wardrobe!
This post may contain affiliate links, view our disclosure policy for details.
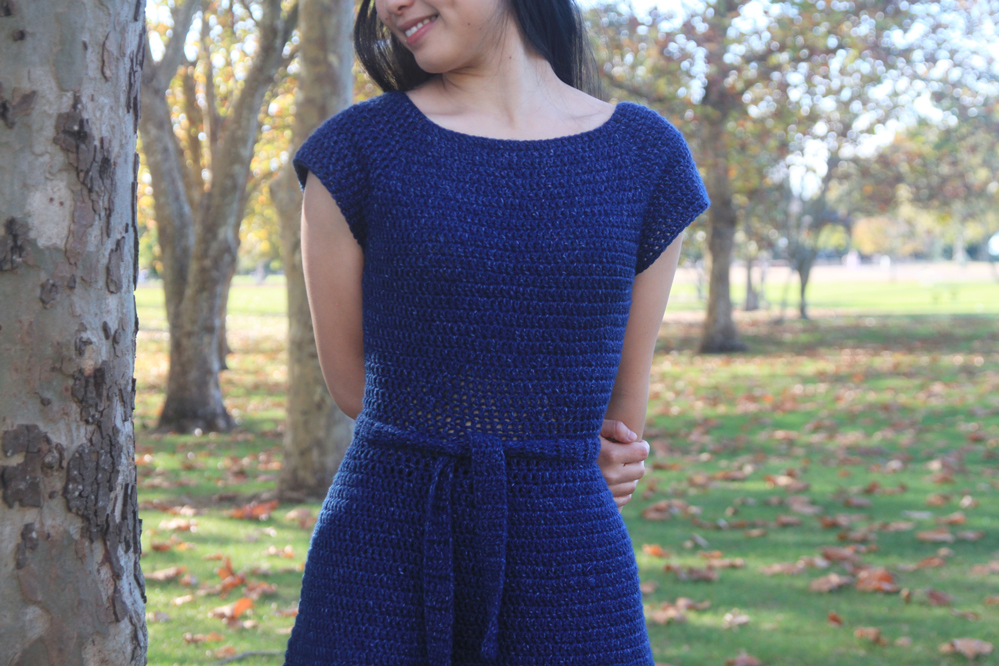
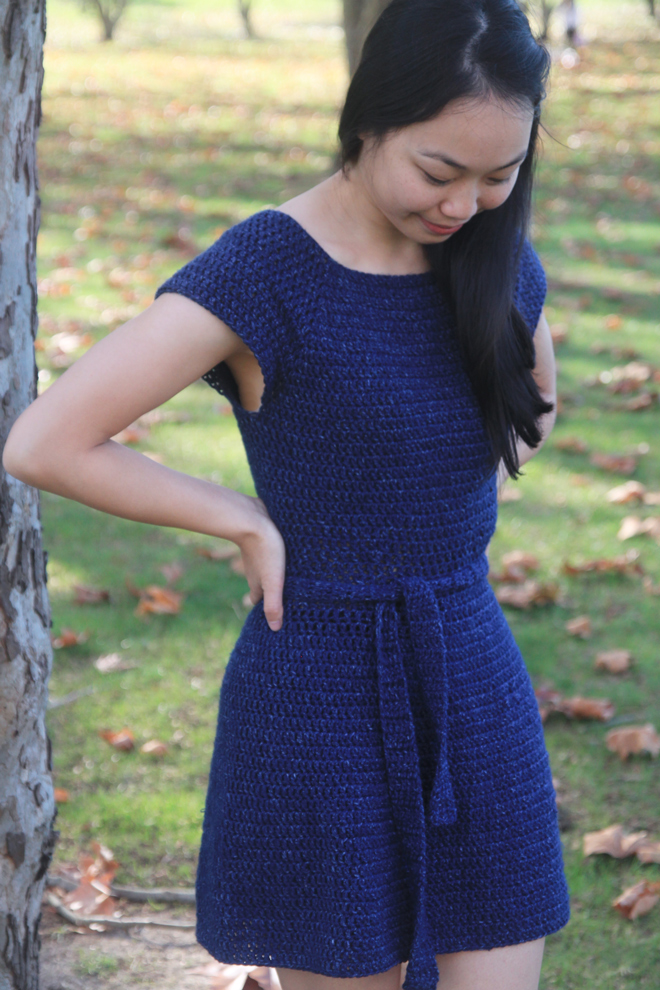
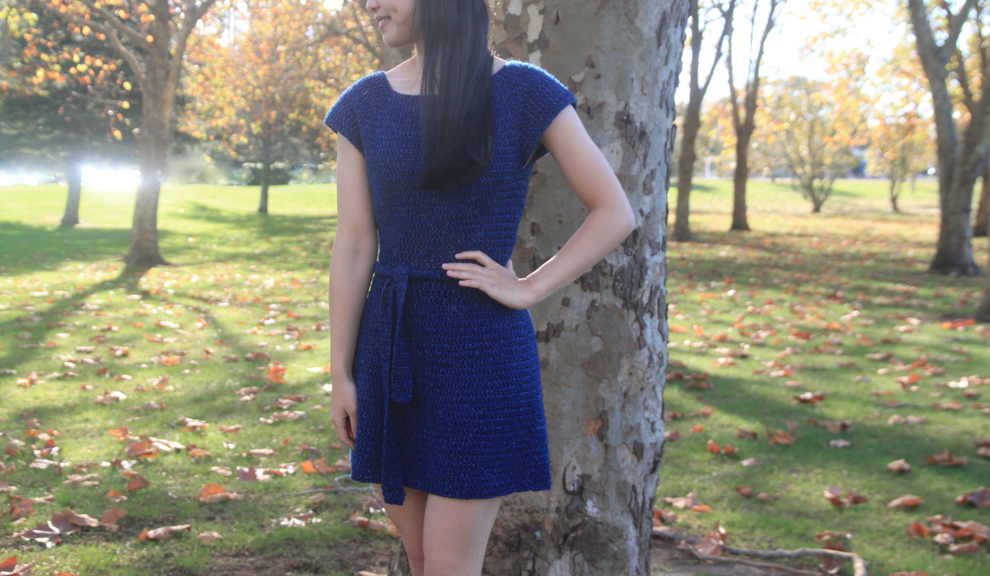
The Audrey Crochet Dress is fit and flare crochet dress with elegant cap sleeves for extra coverage. The sleek and stylish silhouette creates an extremely versatile piece, while the short sleeves and loose skirt make it perfect for summer! The entire dress is only one piece as its crocheted in the round from the neck down and there isn’t any extra seaming to join the dress together (yay!). Since this is a neck down/raglan crochet pattern, it’s very easy to alter so that this dress can fit your body. I’ve also written instructions for a waist tie belt – I always love a bit of waist definition, but it’s completely optional.
Design Inspiration
In daily life, I’m a dress wearer 90% of the time! I love being able to just slip on one piece of clothing and not think about matching a top to a bottom. I wanted to create a casual dress that was comfy and easy to wear while still creating figure flattering shape 🙂 I also wanted a summer dress that could also easily transition from spring or to autumn because who doesn’t love options?
The silhouette is a modern take on 50’s fit and flare dresses. This dress is named Audrey as it was inspired by Audrey Hepburn’s ‘wedding dress’ in the movie Funny Face. I like to think that is a modern, every day, crochet version of the gorgeous couture Givenchy gown!
Yarn
For the Audrey Dress I used Lion Brand Jeans yarn in the colour ‘Classic’. It’s a 100% acrylic yarn and I absolutely love how this yarn is so soft and stretchy, which gives it wonderful drape. I love the colour palette – which mainly consists of blues and a grey, but there is another version of this yarn called ‘Jeans Colors’ which has a wider colour range.
One thing to note is that since this yarn has wonderful drape, the length of your dress can ‘drop’ i.e. become longer, once you’ve worn it a few times. This also applies to most types of yarns regardless of fibre (acrylic, merino, wool, cotton) so please keep this in mind when determining how long you’d like the skirt to be.
Check out more free crochet patterns!
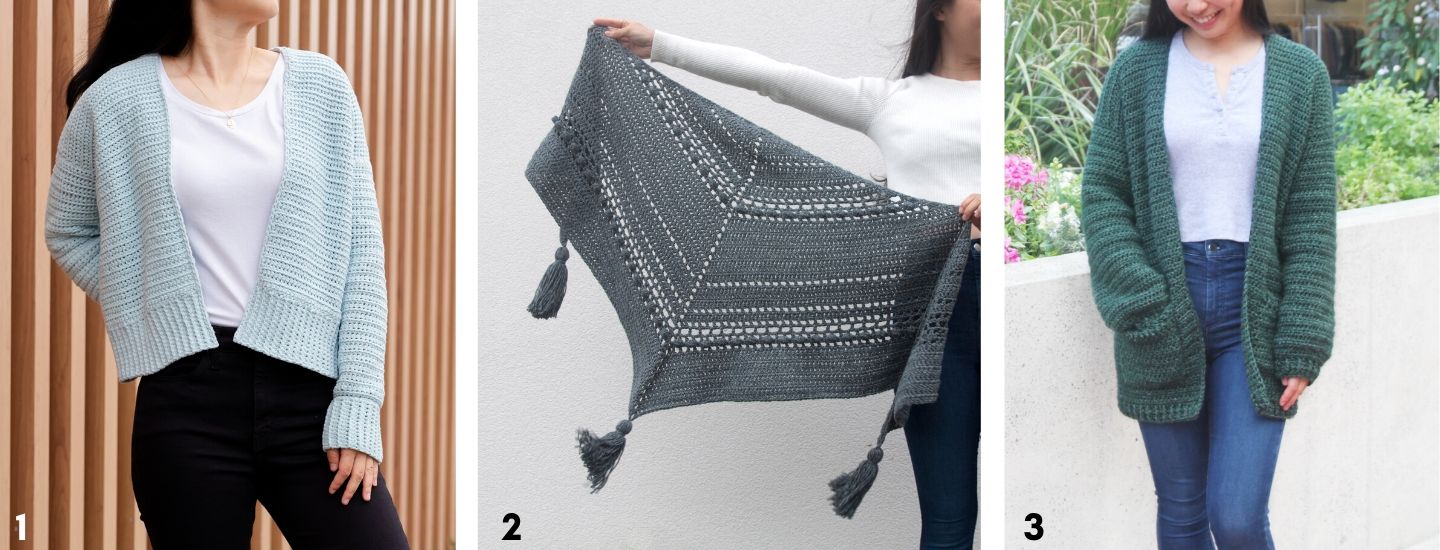
1. Cuddly Cardigan / 2. Stormborn Wrap / 3. Briar Pocket Cardigan
Pin me for later!
UPDATE: I've added lots of alteration instructions to help you achieve a great fit for you! Even within the same size everyone has very different body shapes so I recommend trying this project on as you go.
Add the Audrey Dress pattern to your Ravelry queue!
Audrey Dress - ad-free, printable version pdf!
Notes:
*Sample is size XS on a 5'3" model with a 32" bust.
*The sizing guide follows size XS(S, M, L, XL, 2XL, 3XL).
*'DC 10' means DC into the next 10 stitches.
*'3DC' means place 3 DC into the same stitch.
*This dress is created from the top down so the body and skirt length are customisable. I suggest trying on the dress at the end of the ‘YOKE’, ‘BODY’ and ‘SKIRT’ instructions. You can add or remove rounds after each stage to customise fit.
*The yoke of this dress is perfectly symmetrical, but it should not be noticeable once the dress is worn.
*Lion Brand Jeans yarn does have lovely drape to it but keep in mind that the dress will drop/become longer once you’ve worn it.
*Ch 3 always counts as a stitch.
*Ch 3 can be replaced with a no turning chain stitch to minimise the visible seam.
*This pattern uses US crochet terms.
LEVEL: Easy+
Materials
Lion Brand Jeans Yarn – Aran/Worsted (10 ply), 225m/100g, 100% Acrylic in Classic
XS = 4 skeins, S = 5, M = 6, L = 6, XL = 7, 2XL = 7, 3XL = 8
Stitches & Abbreviations
Ch = Chain
Sl st = Slip Stitch
DC = Double Crochet
DC2tog = Double Crochet 2 stitches together
GAUGE: 10cm/4” square = 13 stitches wide x 8 rows tall in double crochet.
Measurements cm:
Bust: 76(86, 94, 100, 111, 122, 132)
Armhole depth: (16, 18, 20, 23, 25, 28, 30)
Waist: 60(66, 74, 84, 94, 104, 114)
Length: 76(78, 81, 84, 87, 90, 93)
Measurements inches:
Bust: 30(34, 37, 40, 44, 48, 52)
Armhole depth: 6.5(7, 8, 9, 10, 11, 12)
Waist: 23.5(26, 29, 33, 37, 41, 45)
Length: 30(31, 32, 33, 34, 35.5, 36.5)
*Measurements are taken from the garment lying flat, before the yarn has stretched out/dropped.
Audrey Dress Pattern
YOKE
FOUNDATION CHAIN: Ch 84(92, 100, 108, 116, 124, 132). Sl st into the first chain. Make sure your ring of chains is not twisted!
ROUND 1: Ch 3, DC 24(26, 28, 30, 32, 34, 36), 3DC into the same stitch – insert a stitch marker on top of the 2nd stitch in the 3 DC cluster.
DC 15(17, 19, 21, 23, 25, 27), 3DC – insert a stitch marker on top of the 2nd stitch in the 3DC cluster.
DC 25(27, 29, 31, 33, 35, 37), 3DC – insert a stitch marker on top of the 2nd stitch in the 3DC cluster.
DC 15(17, 19, 21, 23, 25, 27), 3DC – insert a stitch marker on top of the 2nd stitch in the 3DC cluster.
Sl st into the 3rd chain at the beginning of the round.
<92(100, 108, 116, 124, 132, 140)>
*After every 3DC cluster move the stitch marker on top of the 2nd stitch.
ROUND 2: Ch 3, DC 25(27, 29, 31, 33, 35, 37), 3DC, DC 17(19, 21, 23, 25, 27, 29), 3DC, DC 27(29, 31, 33, 35, 37, 39), 3DC, DC 17(19, 21, 23, 25, 27, 29), 3DC, DC 1.
Sl st into the 3rd chain at the beginning of the round.
<100(108, 116, 124, 132, 140, 148)>
ROUND 3: Ch 3, DC 26(28, 30, 32, 34, 36, 38), 3DC, DC 19(21, 23, 25, 27, 29, 31), 3DC, DC 29(31, 33, 35, 37, 39, 41), 3DC, DC 19(21, 23, 25, 27, 29, 31), 3DC, DC 2.
Sl st into the 3rd chain at the beginning of the round.
<108(116, 124, 132, 140, 148, 156)>
ROUND 4: Ch 3, DC in every stitch until the stitch marker, 3 DC into the stitch with a stitch marker. DC in every stitch until the stitch marker, 3 DC into the stitch with a stitch marker. DC in every stitch until the stitch marker, 3 DC into the stitch with a stitch marker. DC in every stitch until the stitch marker, 3 DC into the stitch with a stitch marker, DC in every stitch until the end of the round.
Sl st into the 3rd chain at the beginning of the round.
<116(124, 132, 140, 148, 156, 164)>
Repeat ROUND 4 until ROUND 13(14, 15, 16, 18, 20, 22).
<188(204, 220, 236, 260, 284, 308)>
*Note - I suggest trying on the yoke. The corners/stitch markers should meet underneath your arms on both sides (e.g. the front left stitch marker should be able to reach the back left stitch marker and the same for the right side). The top should fit over your bust.
If the top or armholes are too tight enough ADD more rounds.
If the top or armholes are too large REMOVE rounds.
*Note - If you’ve altered the yoke, this will change total stitch count. Follow the stitch patterns for the size with the closet number to the total number of stitches in your yoke to achieve the fit and flare shape.
<188(204, 220, 236, 260, 284, 308)>
BODY
ROUND 1: Ch 3, DC in every stitch until the 1st stitch marker, DC into the stitch with a stitch marker, DC into the next stitch with a stitch marker. DC in every stitch until the 3rd stitch marker, DC into the last stitch with a stitch marker. DC in each stitch until the end of the round. Sl st into the 3rd chain at the beginning of the round.
<106(114, 122, 130, 142, 154, 166)>
ROUNDS 2 - 4: Ch 3, DC in each stitch of the round. Sl st into the 3rd chain at the beginning of the round.
ROUND 5: Ch 3, *DC 8(9, 10, 10, 11, 12, 14), DC2tog*; rep * - * around, DC in all remaining sts to end. Sl st into the 3rd chain at the beginning of the round.
<96(104, 112, 120, 132, 144, 156)>
ROUND 6: Ch 3, DC in each stitch of the round. Sl st into the 3rd chain at the beginning of the round.
ROUND 7: Ch 3, *DC 7(8, 9, 9, 11, 12, 13), DC2tog*; rep *-* around, DC in any remaining sts to end. Sl st into the 3rd chain at the beginning of the round.
<86(94, 102, 110, 122, 134, 146)>
ROUND 8: Ch 3, *DC 15(16, 18, 19, 22, 24, 27), DC2tog*; rep *-* around, DC in any remaining sts to end. Sl st into the 3rd chain at the beginning of the round.
<81(89, 97, 105, 117, 129, 141)>
ROUND 9: Ch 3, *DC 14(15, 17, 18, 21, 23, 25), DC2tog*; rep *-* around, DC in any remaining sts to end. Sl st into the 3rd chain at the beginning of the round.
<76(84, 92, 100, 112, 124, 136)>
ROUND 10: Ch 3, *DC 13(14, 16, 17, 20, 22, 24), DC2tog*; rep *-* around, DC in any remaining sts to end. Sl st into the 3rd chain at the beginning of the round.
<71(79, 87, 95, 107, 119, 131)>
ROUND 11: Ch 3, *DC 12(13, 15, 16, 19, 21, 23), DC2tog*; rep *-* around, DC in any remaining sts to end. Sl st into the 3rd chain at the beginning of the round.
<66(74, 82, 90, 102, 114, 126)>
ROUND 12: Ch 3, *DC 11(12, 14, 15, 18, 20, 22), DC2tog*; rep *-* around, DC in any remaining sts to end. Sl st into the 3rd chain at the beginning of the round.
<61(69, 77, 85, 97, 109, 121)>
ROUND 13: Ch 3, DC in each stitch of the round. Sl st into the 3rd chain at the beginning of the round.
*Note – You can remove Round 13 or add more rounds of Round 13 to make the body shorter or longer.
*If the waist is too tight, you can replace decrease rounds (e.g. ROUND 12 and 11) with Round 13.
SKIRT
ROUND 1: Ch 3, *DC 3, 2DC*; rep *-* until the end of the round. Sl st into the 3rd chain at the beginning of the round.
<76(86, 96, 106, 121, 136, 151)>
ROUND 2: Ch 3, DC in each stitch of the round. Sl st into the 3rd chain at the beginning of the round.
ROUND 3: Ch 3, *DC 3, 2DC*; rep *-* around, DC in any remaining sts to end. Sl st into the 3rd chain at the beginning of the round.
<94(107, 119, 132, 151, 169, 188)>
ROUND 4: Ch 3, *DC 3, 2 DC*; rep *-* around, DC in any remaining sts to end. Sl st into the 3rd chain at the beginning of the round.
<117(133, 148, 164, 188, 211, 234)>
ROUNDS 5 - 9: Ch 3, DC in each stitch of the round. Sl st into the 3rd chain at the beginning of the round.
ROUND 10: Ch 3, *DC 7, 2 DC*; rep *-* around, DC in any remaining sts to end. Sl st into the 3rd chain at the beginning of the round.<131(149, 166, 184, 211, 237, 263)>
ROUNDS 11 - 15: Ch 3, DC in each stitch of the round. Sl st into the 3rd chain at the beginning of the round.
ROUND 16: Ch 3, *DC 7, 2 DC*; rep *-* around, DC in any remaining sts to end. Sl st into the 3rd chain at the beginning of the round.
<147(167, 186, 206, 237, 266, 295)>
ROUND 17: Ch 3, DC in each stitch of the round. Sl st into the 3rd chain at the beginning of the round.
Repeat ROUND 17 until ROUND 30.
*You can add or remove rounds to have a longer/shorter dress. Once you’re satisfied with the length, fasten off.
Weave in all of your ends.
*If you find the armholes slightly large, you can sew the edges together - from the base of the armholes to 2-5cm/1-2” up the edge.
Belt (optional)
ROW 1: Ch 7, DC into the 3rd chain from the hook, DC 4.
ROW 2: Ch 2 (does not count as a stitch), turn. DC 5.
Repeat ROW 2 until ROW 84(90, 96, 104, 110, 116, 122).
*You can add or remove rounds to have a longer/shorter belt.
Once you’re satisfied with the length, fasten off and weave in ends.
Thank you for the lovely free pattern. I need your precious advice on sizing, what if my size is between size XS & S.
My bust ard 33''
My waist ard 26''
Which size to choose to made?
Hi Jocelyn, Thanks for visiting my blog! From your measurements, I think I'd go with size S since it matches your waist size. If you want a very fitted dress (with no ease), you could choose a stretchy yarn and make a size XS. If you chose to make an XS I'd recommend trying on the dress while crocheting the yoke and waist decrease, if it starts to feel too small you can replace the last rounds of waist decrease with rounds of just 1 DC in each stitch. I hope this helps! 🙂
hey I really want to make this dress but cannot understand the written directions... can you please please please make a video on how to do it. 🙏🙏🙏
Oh wow a video would be AMAZING....im in the same boat, I really love this dress and been struggling for weeks but I just don't get written patterns...is there anyway a tutorial would be possible, please
Love the dress looks easy can you tell me how many balls of yarn required for a XL longer maxi dress? Thanks
Hi Anne, thank you! It really depends on your height but I'd get at least another 5-6 balls for size XL:)
I've been looking for the perfect, not see through, dress pattern. Thank you for sharing this! I can't wait to make it.
I have been using redheart super saver and so far I've used 4 but finishing it I will use the 5
Could you please make a video tutorial for this dress? Love the design:)
This is the very first dress I crochet and I love it thank you very much for sharing this pattern
When I make the yoke and join the stitch markers together to form the sleeves, the top of the yoke is uneven. The sides of the sleeve don’t match so when I join them together the neckline is slanted and different on either side. This has happened twice now. I have double-checked all the stitches and the number of stitches and everything is correct to the pattern. What’s going wrong?
Hi Susie,
The yoke isn't perfectly symmetrical but once you try on the yoke it shouldn't be noticeable!
Grace
Hi! Thank you for this amazing pattern! I was wondering where the body portion of the dress should land on my body when trying it on? Should it be slightly above the bellybutton, at the bellybutton, or below? Thank you so much!
Hi Ashley,
You want to end the body portion at around your belly button and then increase for the skirt. Everyone has a different torso length so feel free to add or remove rows to fit your body.
Grace 🙂
hi! what changes do i make if i want to get rid of the yoke and make straps instead?? ( like the ones from your easy crochet crop top that can be ruched or sweetheart) I really want to make this but I don't think the style of the yoke fits for me or my body type. Thanks in advance!
Hi Jamaica,
You'd pretty much need to design a completely different pattern to change the neckline of this dress! You can try to crochet the easy crochet crop top for the top and then follow the instructions for the skirt portion of this dress, but I can't guarantee that it will look the same as the sample, sorry!
I hope this helps,
Grace
Hello, do you have draw scheme as for me hard understand all wrtings I more easy to do when is draw schemes
Would 4 Medium Ribbon yarn work for this pattern?
Hi Emily, I wouldn't recommend ribbon yarn as it doesn't have the right drape for a dress - I'd recommend an acrylic or cotton acrylic blend!
Grace
Is there a video on this by the way love all your patterns
Hi.. i love the simplicity of your design.. I just lost my drive to crochet and then i saw ur vlog.. I have a question though, if my bust size is 34 and my waist is 37 which should measurement should i follow and also can i wear this at office and it wont show my undergarments? im working in a muslim country so i dont want them to be shocked...
Hi,
Since this is a crocheted dress it will stretch out over time and you can see slightly through the stitches so I'd recommend wearing a slip underneath. I'd probably size up to fit your waist just take into account that the bust section might be a bit loose.
Grace
Thank you very much.. will start it now...
Hi!
Thank you so much for sharing this pattern! If this was in the instructions and I missed, I apologize! But do I turn my work at the end of each round or after the slip stitch do I continue working in the round? Thanks!
Hi Shelby,
I just continued to work in the round without turning. This will make the seam curve slightly but since I used no turning chain stitches instead of the ch 3 it wasn't visible.
Grace
Hi Grace
I love this dress pattern. I normally can read the pattern notes but to better get this is there a video to follow alone with the rounds for the body and skirt! Thank you for sharing
Hye. thanks for this lovely tutorial. do you have video tutorial for this dress?? or do you have tutorial for dress have sleeve?
Sorry i mean half sleeve
Hi Grace!
I have a question about this pattern. Could you use this as a shirt pattern and leave the skirt out? If you did that, how many balls would you need? Also, would I have to crochet it a size larger? I really love your patterns and thank you for sharing them!
Hi Charvi,
Sure you can just crochet a top - since this pattern is top down you can just try it on as you go and adjust the fit as needed. You'll probably need about half the amount of yarn listed in the pattern.
Grace 🙂
Hiya! Would a 100% merino wool work for this dress? or perhaps a merino/silk blend? thank you!
Hi June,
A merino yarn sounds lovely! As long as you can meet gauge the pattern should work well 🙂
Grace
Can you please make a video for this dress? I am a beginner and love the look but have not quite yet figured out how to read instructions properly.
Hi I was wondering is there a video to follow for this
Hello there. I started doing this dress pattern, * the pattern for the you yoke says "Repeat ROUND 4 until ROUND 13(14, 15, 16, 18, 20, 22).
" the number of stitches doesn't match what
I had made. I added 4 rounds of Round 4 but my total number of stitches is 268. If you follow the pattern the total number of stitches should be <212(220, 228, 236, 252, 268, 284). So I am not able to continue with the dress because I am doubting that I did something wrong along the pattern. Thank you.
I'm working on the last couple of rows for the yoke but I dint see where in the pattern it instructs to join the sleeve part of yoke. Will the instructions for the body of the dress just automatically bring the two parts together for the sleeves or do I slip stitch them together myself?.
There’s a part in the directions where it says “DC2tog*;rep*-*around”. What does that mean?
You start a DC, but only pull through the first two loops, don't finish the DC and start another DC in the same stitch. Pull through two loops, then pull through the remaining loops, to create two DC that are finished off together. Repeat that the entire round, every stitch.
Hope that helps! 🙂
So glad I found this, I love it so much! I'm only half done but the top (the difficult part for me) is done and I only had to make a few tweaks to fit my body type. I noticed a lot of beginners asking for a video which would be difficult with the time it takes for garments like this, if anyone happens to read this part, there are tons of YouTube videos about how to read written patterns as they can be confusing in the beginning. Thank you for this!
Hello, I love this pattern. I've been looking at something to my preteen daughter for Christmas and this is perfect! Just as a curiosity, how would you adject the xs/s size if you only have a 3 weight yarn to use?
Is it possible to extend the cap sleeves to make actual sleeves? I love the pattern but would love to lengthen the sleeves if possible.